Acrylic sculpting is a very eye-catching, fashionable type of design. It is, in essence, practically the only possible way to design nails in volume. Not all craftsmen can complete truly complex designs, but the demand for this service remains consistently high. What acrylic nail sculpting is, how it’s done, who it’s suitable for and what it looks like will be discussed in this article, and also shown in the photo.
[yandex1] [google1]
Characteristics of sculpting on nails
Volumetric patterns on nails are created using acrylic powder or a special modeling gel. For acrylic modeling you will need special acrylic powder and liquid monomer or, as it is also called, liquid .
Nail sculpting made with acrylic
By mixing these components, the master obtains a plastic mass for modeling. A small piece of material is taken with a damp brush and the desired pattern is created on the foil . When all the smallest details have been created, the decoration must dry completely.
The master glues the finished drawing to the nail plate and secures it with an additional layer of acrylic. This will ensure the safety of the manicure for several weeks.
To create a gel masterpiece, modeling gel . After the master has created the drawing, it must be dried under an ultraviolet lamp . These are the main differences between gel manicure and acrylic sculpting.
Should I decorate all my nails with acrylic sculpting?
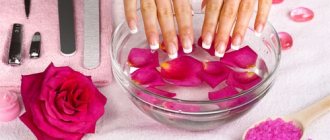
It is believed that nails decorated with voluminous sculpting should be created only on special occasions, for example, when you are invited to an anniversary, celebrating the New Year, going to a corporate party or going to a wedding. However, this opinion can be easily circumvented if you decorate not all nails with acrylic modeling, but only a few of them - the middle and ring nails, for example. Thus, if something happens to your claw and the molding “falls off”, then creating a new drawing will not require much time and effort. You can create a design on one nail and paint the rest of the nails in one of the colors that was used in acrylic sculpting.
Also, for everyday wear of voluminous nails, you can use small voluminous designs in the form of miniature flowers and wear not very long nails.
General principles of nail sculpting
- Work with acrylic very quickly and accurately , because it only takes a couple of minutes to harden.
- Experienced masters create designs directly on the nail plate. However, for beginners it is better to start sculpting on foil or paper. And only after a successful result can you transfer the design to your nails.
- Modeling powder should be elastic and not subject to crystallization. Then the material will not turn yellow on the nails.
- The molding lasts for a very long time. To get rid of it, you just need to cut down the entire volume of the plate.
- Toenails are rarely decorated with sculpting because they are quite small for a three-dimensional design. This work should only be performed by an experienced craftsman.
- Sculpting can be done on both natural and extended nails .
Gel sculpting on nails
General information
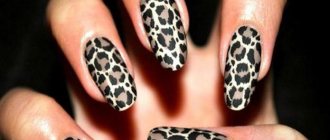
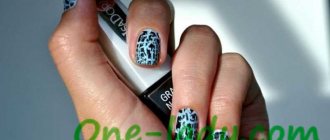
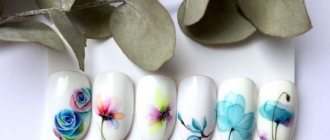
Sculpting with acrylic on nails, as in the photo, is a way to create a three-dimensional figure on the surface of the nail plate. The simplest such sculpting can be a few flower petals, only slightly rising above the surface of the nail. The most complex ones can depict reptiles, animals, entire flower bouquets, butterflies and much more.
Acrylic modeling is made from the same material used for nail extensions. Acrylic powder is mixed with liquid monomer (in the required proportion, individual for each individual design) and the future figure is formed from the resulting plastic mass. Each master chooses how to give the figurine color. Some mix colored acrylic powders, thus immediately forming a colored sculpture, while others “paint” it with powders after completion.
https://youtu.be/XOrMV8dYeqA
The top of the figure is covered with the usual acrylic fixative. Rhinestones can be glued to it, sparkles can be sprinkled on it, etc. This way, the most decorative manicure is achieved. The most complex sculpting is done on a special frame that supports the entire structure. This nail design with frame sculpting, as in some photos, is quite short-lived.
Most often, modeling is used for wedding manicures of brides. This is not the most comfortable type of design, which is quite easy to damage even when fastening a button. Moreover, the more complex the design, the more difficult it is to keep it intact. The wedding lasts only a couple of days and maintaining the original condition of the manicure during this period is not so difficult. Although, some of the simpler designs can be used for everyday use. After all, acrylic modeling, as evidenced by its photos on nails, can be very diverse.
[yandex2] [google2]
Tools and materials for modeling
To create three-dimensional patterns from acrylic powder you need:
- Acrylic powder of the desired color.
- Brushes for sculpting with acrylic. Choose tools No. 1, 2 and 3 made of natural bristles. You can also use dots.
- Monomer and a glass for it.
- Nail file
Materials for sculpting nails
For gel sculpting you need to purchase:
- Colored gels . Sold in sets.
- Brushes No. 1, 2 and 3 with synthetic bristles.
- Ultraviolet lamp .
- A special liquid for working with gel – clinser .
- 3D gel . The denser and more flexible structure of this gel allows you to create three-dimensional 3D designs on your nails.
- 4D gel . In appearance it resembles dense plasticine or clay. When using such a gel, the master sculpts all the details of the design with his hands or a stick.
When choosing a brush, look carefully at the tip. It must be completely assembled and level. Buy a lamp with closed sides so that the drawing hardens faster.
Materials and tools for acrylic extensions
Materials for extensions
The material for extensions is acrylic powder, it can be either regular or camouflage.
You will need the following products: The main material for extensions is acrylic powder
- liquid monomer (liquid);
- glue for tips;
- top;
- bonder (also called a degreaser);
- primer;
- cuticle remover;
- cuticle oil.
Tools for acrylic extensions
Nail extension mold
- cutter;
- tips;
- forms;
- a respirator, as acrylic has a strong odor;
- nail clippers;
- tweezers;
- buff with medium abrasiveness;
- brush to remove dust;
- container for acrylic;
- pusher or orange stick;
- clothespins to clamp the stressed part;
- paper towels.
Choosing acrylic powder
When choosing acrylic powder, pay attention to the following indicators:
- The color can be any. If you are doing extensions professionally, then you should have as many different colors of acrylic powder as possible.
Colored acrylic powder
Polymerization rate. The speed of hardening depends on the speed of polymerization. Powder with a high polymerization rate is suitable for professionals.
Matte powder is ideal for aquarium manicure and French coating. Transparent powder is suitable for edge correction and sculpting.
Camouflage powder is suitable for creating a perfectly smooth surface with a natural shade. Can also be used for broken and deformed nails.
Stained glass powder is suitable for creating a manicure with a “candy” design. And also to create a crystal effect.
Pay attention to the plasticity of the powder. The more plastic it is, the easier and more comfortable it will be to apply.
This indicator is important for both beginners and professionals in the acrylic extension technique.
The process of sculpting nails using gel
- Preparing your nails . We extend them with gel or acrylic. The natural plate must be coated with transparent gel polish and wait until it dries completely.
- Using a pusher, take a small part of the gel . manually form the basis of the future drawing.
- We transfer the material to the nails and continue to work on the shape of the pattern . To do this, we need a brush dipped in clinser.
- Dry the patterned nails in an ultraviolet lamp for about 2 minutes.
- If you need to create several designs on one nail, repeat all the previous steps again. But do not forget to dry each new element on the nail in a lamp.
- Finally, we apply a finishing layer , which will provide additional protection to the sculpt.
The process of sculpting gel on nails
The process of creating an acrylic manicure
- We extend the nail with gel or acrylic. We cover natural nails with transparent gel polish.
- Take a thin brush and wet it in liquid .
- Dip the brush into acrylic powder and make several rotational movements. It is necessary that a small ball of acrylic forms .
- Carefully transfer the lump onto the nail, exactly to the place where you plan to create the design.
- Using a brush we form all the details of the sculpt . If the acrylic begins to dry out, wet the brush again in the liquid.
- It is not necessary to apply a topcoat to acrylic. This can only be done if you want your nails to shine.
Modeling nails with acrylic
Rules for placing patterns on nails
The pattern located closer to the cuticle line looks beautiful
In order for a drawing to please you with its beauty longer, it is important to know the rules for its placement. You need to create a sculpt at the highest point of the nail , because by placing the pattern at its tip, you expose the nail plate to deformation during filing.
You need to start creating a pattern as close to the cuticle as possible . Try not to create 3D images on small nails. Small patterns in the form of dots or thin lines are suitable.
It is best to decorate only one nail in an everyday manicure . It's very gentle and feminine. For a special event, you can decorate all your nails with sculpting.
Wedding manicure with sculpting
For any other holiday, you need to select the type of drawing to match your appearance and theme of the event.
In a New Year's manicure, you can paint voluminous snowflakes with gel or acrylic. If you are a beginner, then just make small dots of white color. Craftsmen can create a 3D image of Santa Claus, deer and other holiday attributes.
Wedding manicure requires beautiful floral and delicate patterns. Large and bright drawings will be superfluous here.
Original manicure: French with modeling 2022
The classic design remains one of the top solutions for nails of any length and shape from year to year. This is because it is universal and suitable not only for weddings or important events, but also just for every day. As for modeling, this decor can look completely different, depending on the number of details and the presence of color accents. For example, voluminous flowers and patterns are an ideal solution for a French manicure for a wedding. Most often, it is additionally decorated with sparkles or rhinestones. They are mainly applied to the nails of the ring fingers.
Those who like a light or colored design of the smile line can safely choose it for a romantic look. In this case, larger flowers and patterns can be made in the form of modeling according to your taste. It is not necessary to use sparkles or rhinestones, but they still add special brightness and shine to the manicure.
Nail design ideas with sculpting
Step-by-step process for sculpting an acrylic rose
The process of creating a rose from acrylic paste
- Take a small ball of red acrylic and transfer it to foil .
- Using a brush we form a rose . To do this, lightly press the ball from the middle and draw out spiral-shaped petals.
- Separately, we form a leaf . To do this, press the small green ball as much as possible and give it an oval shape. Carefully remove the leaf veins with a thin tool.
- Using glue, first apply the leaf to the nail plate. We wait a couple of minutes until it dries and glue the rose to the leaf in the same way. The voluminous flower is ready.
More experienced masters create three-dimensional designs directly on the nails. Watch a master class on creating a rose: