The process of decorating nails is interesting and exciting in its own way. After all, every year new items appear in the world of nail art, or slightly forgotten trends return to fashion. For example, stained glass manicure is familiar to many. However, it has not been as popular lately. In 2022, we suggest looking at it from a different perspective. It's perfect for the summer season, which means it's time to experiment.
Nail art “Stained glass” and its features
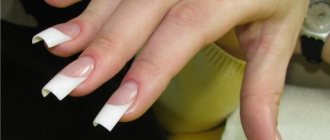
The option under consideration was originally a variation of the long-known French manicure, which is characterized by decorating the free tip of the nail with gel, paint, varnish and other means. But in this version it is not necessary to stick to the usual pink and white tones and it is not necessary to decorate only the tip. The widespread French nail art has long gone beyond its classical framework and now allows you to combine several styles.
The stained glass nail design is distinguished by the transparent tip of the nail plate. It should look like glass
Since the desired effect cannot be achieved on natural nails, it is necessary to use a gel polish base. Stained glass nails look original and, importantly, very feminine. Without a doubt, with this option no one will be left unattended.
Varieties of “Stained Glass Nail Art”
This type of nail art is performed both by professionals and at home. There are several techniques for performing this nail art:
- Mosaic. It is performed using gel polishes of different shades, as well as foil, mica and glitter, which are used to decorate the free tips of the nails.
- Combination. Performed using several techniques. Combining different techniques, the design of marigolds turns out to be original and very creative. This scheme is suitable for both professional and independent use.
- Painting. It is this technique that allows you to realize your imagination and design ideas. Photos will help you choose a pattern, where the process of applying the pattern is presented step by step.
- Contour manicure. Here you will need stained glass nail polishes, which fill the contours drawn on the tip of the nail with contour varnish.
Design options for “glass” nail art
The transparent texture of “glass” gel polish makes it possible to use various decorating materials, for example, a foil backing, or apply stamping or painting. All those techniques that are used with conventional gel polishes on a translucent base will look new and sparkle with new colors.
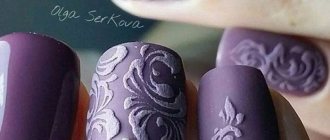
- Stained glass is especially advantageous when combined with stretching, colored or transparent French. When creating it, you can use acrylic paints to draw individual elements.
- The popular “cat’s eye”, which goes well with stained glass varnish, will give your nails greater depth and volume.
- Like any other, glass nail art can be complemented with lace, rhinestones, sparkles, mica, and broths.
Necessary materials
To create nail art “with glass” for yourself, you will need to have a certain set of tools and tools on hand. You will need to acquire:
- stained glass gel. Many craftsmen recommend using a regular gel to which stained glass paint is added. But in this case, the result is unlikely to please. Stained glass nail gel, in addition to its rich color palette, is distinguished by the content of reflective particles, which ensure its transparency and the desired effect;
- base gel;
- finishing;
- you will also need: paints, pigments, foil, glitter, broths and other decorative materials;
- brushes of different widths;
- instructions for working with gel polishes;
- special UV lamp.
Using stained glass gel polish
It is necessary to perform a manicure with stained glass gel in stages:
- A base is applied to the previously prepared nail, after which it is covered with a top coat;
- The next layer is colored gel polish. If the nail design is performed on a transparent background, you can immediately apply stained glass;
- The colored layer is coated with a fixative. Each layer requires drying in a UV lamp.
You can learn more detailed instructions on how to create a gel polish stained glass window in the video below the article.
Little nuances
- It is not recommended to apply the entire stained glass gel polish to your nails. It is better to use it for the design itself, since it is more intended for decoration. It is recommended not to use it as a full coverage.
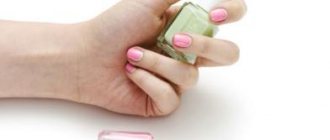
- Before applying the gel polish, it must be thoroughly mixed so that the pigment that has settled to the bottom is evenly distributed, and the “glass” design is made smoothly, without stripes or bald spots.
To feel truly irresistible this spring, you should try the “glass” nail art option. Glass nails are not only unusual and creative, but a great addition to any look.
Stained glass designs: how to decorate your nails most effectively?
If you are a professional manicurist, then you have probably already experimented to your heart’s content with glass gel polishes using all the techniques in your arsenal. A novice nail artist should start getting acquainted with stained glass gel polishes with four main options for decorating nails:
- Contour manicure technique.
It involves making the contours of the design on the free edge of the nail (as an option - French stamping). Painting (drawing) is usually created with acrylic paints or gel. The design can be a geometric figure, the details of which are painted in color. Or an abstract painting is created, filled with color and decorated with sparkles. The finished design is coated with 1-2 thin layers of stained glass gel polish and dried in a lamp.
- Mosaic nail technique.
Such images are made using stones, classic sparkles, rhinestones, beads or foil (transfer, malachite or broken glass). Stained glass gel polish gives this spectacular decor the appearance of a piece of marble or fragments of precious stones framed in crystal.
- Stained glass design with painting.
This original manicure can be created using acrylic paints. The subject is limited only by the imagination of the master or client. A correctly selected coating, if it combines beautifully with the color of the painting, will ultimately create a visual resemblance to antique Venetian glass. Artistic painting on stained glass is the most complex of the techniques mentioned. Masterfully executed images are not inferior in beauty to stained glass paintings in churches of medieval architecture.
- Combined manicure-stained glass.
Can combine several techniques. For example, painting and decor that complements it. At the same time, it is important to observe moderation in decorating the nails and not to distract attention with auxiliary decorations from the main thing - painting.
As for the most common nail looks with glass gel polishes, these are:
- Aquarium design;
- Manicure with liquid stones;
- Design with transfer foil or Broken Glass foil;
- Complement manicure with “Cat Eye” gel polishes.
When decorating clients’ nails with any of these designs, you need to know how to properly apply stained glass coatings for regular looks and on mirror substrates. Let's learn both design options.
Patterns on nails using a brush step by step
For girls who have just begun to master nail art at home, the technique of painting with a brush will help. At first glance, it may seem the most difficult, but in reality it is not so. It's better to start experimenting by making simple geometric patterns.
To create a spectacular nail coating, you must have a base color, at least two more shades for the design and a fixative. Next, you should follow the basic instructions.
Important! Do not forget that each layer of varnish must dry perfectly. Only then can the next color be applied
Otherwise, the drawing will be damaged. Initially, you should choose light and classic patterns.
If you look at the work of professionals with a brush, you will notice that they work wonders with this tool. However, at home, without special training, it is difficult to understand all the intricacies of this matter.
Interesting design ideas
Stained glass design is perhaps one of the most versatile there can be. Its scope of application is so wide that one can endlessly list the ideas and types of designs with which it is compatible. Both young, carefree girls and wealthy adult women, with completely different types and lengths of nails, can afford a stained glass manicure. But, nevertheless, we will tell you the most popular designs for any occasion.
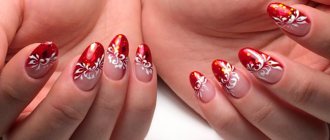
- Stained glass summer manicure. Summer stained glass involves the use of bright and “rich” shades of gel polish. You can easily apply the entire spectrum of the rainbow on one nail and it will look very impressive and original.
- A ceremonial stained glass window using shiny gel polish and even rhinestones.
- Discreet, casual stained glass in bed colors. Suitable for young female students. Fresh, delicate and original manicure.
- Stained glass for successful and stylish business women using dark shades. A great option for an office manicure!
- Some girls even use stained glass techniques in wedding manicures. This idea looks unusual and original, in contrast to the usual wedding designs, executed exclusively in white colors.
Not all beautiful nail art that you may have seen on the nails of your friends, acquaintances or in fashion magazines has a complex creation technique. Stained glass is one of these designs. We hope that after reading our article, stained glass manicure will become one of your favorite decors in your collection!
Painting with gel polish
Gel painting on nails is an art that will not leave any woman unnoticed. In any nail design, there is a touch of charm that attracts the eye. The choice of gels on the cosmetics market is simply huge. Variegated, transparent, thick varnishes ─ each of them has its own mission. Gels of bright colors are rich and perfectly complement each other on nail painting.
Base and top coats are often used to create a background surface, as well as to perform additional paintings:
If you are new to this creativity, then first you need to master the technique of circular color mixing. Having only a few bright colors, such as blue, red and yellow, can create a mass of shades. And if, in addition, you have white and black gels in your arsenal, then the base for creativity is endlessly large.
Using gels, translucency is achieved by applying strong pressure to the brush.
It is important to remember that when working with different varnishes, it is necessary that they all be from the same manufacturer, this will help to avoid shortcomings in creating a beautiful design.
As long as the coating has not been under the lamp, you can apply corrections to the drawing without limit. Thanks to the thickness of the gels, the execution of drawings is greatly simplified; they do not smudge or flow.
Top 5 brands of gel polishes with stained glass effect
Currently, many brands have released these popular creative coatings to create stunning looks. These are brands such as Bluesky, TNL, Kodi, Masura, Diamant. Why are their products interesting for beginners and nail industry professionals?
Stained glass gel polishes from Bluesky
are perhaps one of the most famous materials of this type. Bright and monochromatic, quite well pigmented, they are ideal for creating mirror mosaics using mirror gel varnishes as a substrate for stained glass windows.
"Glass" from Tnl
They have both a wide range of colors and good durability. Among the key features of this brand’s products is the need to apply stained glass effect gel polish in at least three layers to obtain optimal color brightness. It is also worth remembering that stained glass from Tnl looks especially beautiful on a special backing that enhances the expressiveness of the material on the nail.
Mosaic stained glass windows and aqua manicure with Kodi gel polishes
– a design with high quality products and a range of colors for even the most picky fashionistas. They are famous for their crystal-precious finish, dramatic and deep glass effect. By using Kodi's stained glass products even in just one coat, you can easily transform those already boring gel polishes from your collections into sparkling gems.
Glass coatings from Masura have long been in favor with craftsmen.
. They are interesting for their incredibly attractive effect akin to Murano glass. Most of the colors in the palette are perfectly pigmented and can be applied even in one thin layer to make your favorite cat eye gel polish even richer, more expressive and more interesting. They have a viscous and thick texture and do not flow when applied. However, some shades “sin” by sliding off the ends. Experts advise “treating” this problem by removing the stickiness from the base, or by polymerizing the nails one at a time in a lamp.
coatings from the Diamant brand were no less delighted.
. They provide a beautiful background layer, juicy, deep and rich. They look especially stylish on a mirror backing, but without it they give the effect of transparent sugar candies. Thanks to the dense texture, even a single-color design with these gel polishes allows your nails to feel under reliable protection without harming your nails during long-term wear and removal of the manicure.
Attractive and elegant stained glass coatings, along with the specialized substrates that complement them, are, of course, better to purchase from trusted manufacturers in order to avoid annoying mistakes when applying and removing materials. But what if you don’t have ready-made gel polish with a stained glass effect, or it has thickened or run out? Fortunately, the special beauty of these materials is that they are very easy and simple to make yourself (both in the process of creating an image in a nail salon, and at home). Let's look at the two most common methods.
Complex recipes for stained glass paints
PVA-based paints are perfect for children's creativity. To obtain a serious result, close to a professional one, it is better to use paints according to other recipes. They provide a more durable pattern that is not subject to deformation and does not deteriorate from the influence of external factors.
On nitro lacquer
You need to buy nitro varnish and any organic solvent. These products are mixed in the following quantities: 2/3 parts nitro varnish, 1/3 part solvent - acetone, white spirit, solvent. Next, the mass is tinted with any pigment, then the brightness of the paint is adjusted to the desired level by introducing an additional portion of nitro varnish or color. The mixture is not suitable for drawing, but it is suitable for filling stained glass contours.
On BF-2 glue
You need to purchase a light-colored glue, add a little acetone to liquefy it, and then add pigment to the composition. For this purpose, only a dye that dissolves in alcohol is suitable, for example, the ink of a regular ballpoint or gel pen.
On gelatin
It is more difficult to prepare such paints, but they will be harmless and children can use them. For the base, dilute 6 g of gelatin in 200 ml of water. In another jar, dry fabric dye is dissolved in a small amount of water, achieving the desired tone saturation. Next, the base and dye are mixed together. You will have to work with the paint quickly: it soon hardens. To increase its durability, you can add a little nitro varnish to the mass: this way the finished stained glass window will last longer and become brighter and more interesting in appearance.
Application of stained glass paints
Glass is an ideal material for creativity and the realization of any fantasies. If you have minimal drawing skills and artistic taste, you can easily master the technique of glass painting and create an imitation of classic stained glass using special paints. Sometimes this type of creativity is also called stained glass, and it is used even in industrial settings.
With the help of stained glass colors you can transform many things. For example, painting on glass can turn ordinary, modest glassware into a work of art. With the help of such means, vases, figurines, and interior items are painted to give them a certain stylized appearance.
After acquiring skills, you can try painting on more serious areas, for example, painting glass doors. Stained glass techniques are most often used for glass, but the materials fit well on other substrates:
- tile;
- tree;
- veneer;
- mirrors;
- films, oilcloths.
#3 Stained glass pattern on nails: imitation of stained glass using gel polish
In our minds, stained glass windows are echoes of a mysterious and sometimes magical past. Stained glass windows decorated churches, administrative buildings and simply people's homes. It was considered art; with the help of images on stained glass windows one could read historical events, feelings and emotions of people. Today, stained glass windows are present almost everywhere: in the decor of apartments and office premises. This technique has also found its application in nail design.
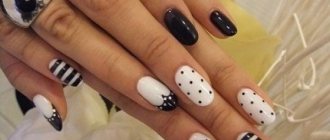
The simplest stained glass design looks like many pieces connected into a single whole. Creating such a pattern is not difficult. Use light pastel shades of gel polish for design, black, white or silver gel polish to draw partitions. Secure the design with clear stained glass gel.
What is stained glass manicure: varnish, paints, brands, manufacturers
Stained glass manicure is done by professionals using a colored gel with a translucent base. It differs from conventional varnishes in its more liquid consistency and fairly dense color texture, but at the same time it remains transparent, which gives it a glassy finish.
Stained glass varnish is applied on top of a hand-drawn stained glass design and creates a glare effect, like on glass.
But this does not mean that a stained glass design cannot be made with ordinary varnish. It’s possible, you just need to get used to it, although you’re unlikely to get an amazing “glass effect”, but you can create a beautiful design in the stained glass style under a transparent top.
Nail technicians prefer special stained glass gels and this is understandable, the effect is simply mesmerizing.
Of these, we note two brands:
- Vogue Nails. Manufacturer - Russia, Irkutsk.
- Kodi Professional. The manufacturer is located in the USA, the partner for improving the quality and promotion of goods is located in Ukraine, Kharkov.
These two companies have long established themselves as reliable manufacturers. Both companies focus on high quality raw materials for the production of gels.
Characteristics of varnishes from Kodi Professional:
- Large selection of colors.
- Long lasting.
- High quality raw materials.
- They are created on a rubber base.
- Gentle on the nail plate.
Qualitative characteristics of gels from Vogue Nails:
- Unique modern composition.
- Multifaceted color palette of varnishes.
- Thick consistency.
- Persistent.
- Self-leveling effect.
But there are also many budget options for brands that create stained glass gel polish:
- Lia Nail.
- Look Nail.
- Lu Nail.
- Nail Passion.
About designs
Design with stained glass gel polish involves creating the following effects:
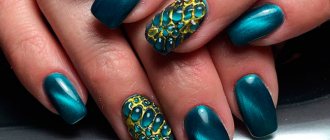
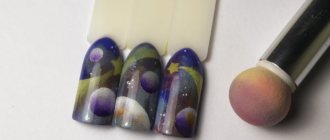
- Aquarium. For it I select deep and rich shades of emerald, sapphire and garnet colors (photo).
- Liquid gems. It is very easy to create the shape of a gem flowing from a nail thanks to the thick consistency of stained glass gel polishes. Stones made from gold, silver and chameleon-colored varnishes look especially impressive.
- Broken glass. A manicure with a broken glass effect is given a stunning look by adding pieces of foil or mirror polyethylene to the varnish, to which the stained glass translucent varnish adds even more shine and shimmer.
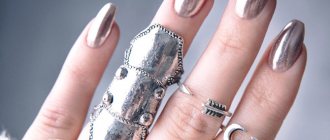
- Cat's eye. Stained glass coating can be applied to any base with a cat's eye effect. For greater color depth, craftsmen advise using a black backing and using branded magnets, for example, magnets from Bluesky or Kodi Professional. The closer the magnet is to the nail, the larger and wider the shiny strip will be; the further away, the thinner the highlight will be.
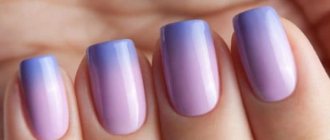
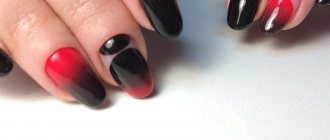
- Gradients. A smooth stretch of two or several colors using the ombre technique looks extremely stylish on nails of any shape and length. Fixing the color with a stained glass base will help give your nails a candy-like shine and transparency.
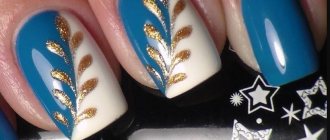
- Foil. Holographic materials for nail art can be supplemented with stained glass gel with a more liquid consistency. The secret and trick of many masters is to add a few drops of darker paint, which gives the manicure the effect of expensive Venetian glass.
- Additional decor. The use of stained glass varnishes with the additional inclusion of sparkles, beads and rhinestones can add shine and bright accents to your manicure.
Bright colors
Options for knitted nail techniques
In addition to acrylic powder, knitted manicure can be done using other techniques:
- Volumetric design with a transparent base or top for gel polish on a bright colored background (glass design). It is better to take a rubber base with a dense texture so that it holds better during the drawing process.
- Volumetric design with colored gel polish on the same or contrasting background. Suitable for every day for the autumn-winter season. More practical compared to powdery texture, as it does not cling to hair and clothes.
- Draw a pattern of braids or strands by hand, if you have artistic talent, or if you have a drawing master. You can experiment with different patterns and pattern compositions, combine flat and three-dimensional designs in one composition. Also try a knitted pattern that continues on several nails.
- Make a drawing using the stamping technique, using a stamp and gel polish of a contrasting or complementary shade. Stamping is a simple and practical way of applying a design, although additional costs will be required for the purchase of stamps and stencils.
- The design, made with glitter varnish, looks elegant and bright. It is suitable for holidays, parties, special occasions. A shiny pattern is drawn on a background without sparkles and dried in a lamp.
- Loose design with flock or melange instead of acrylic powder, as in the instructions above.
- Transfers or stickers with knitted and knitted elements. This option is suitable for beginners in nail art. You just need to carefully decorate the headband and secure the design well with a top.
How to paint with watercolors on nails?
Watercolor design is simple, but looks very impressive.
Any watercolor will work. Choose fresh colors. They should have a uniform consistency without inclusions.
Watercolor is transparent, so it works best on a white background.
Painting with watercolor is not so easy, so we have prepared step-by-step instructions for you:
- Gel polish as a base must be dried.
- To paint on nails with watercolors, treat the surface of the nail with buff until matte. Then the paint will spread less.
- If you apply an image in several layers, then the previous one must dry.
- Cover the finished design with 2 layers of top coat. The top will provide good durability to the manicure for about 2 weeks.
The difference between these approaches is that the pencil will not be visible at the end of the work, but the acrylic outline will be noticeable. The lines of the template drawn with acrylic will act as borders for the watercolor and will not allow it to spread over the entire nail plate.
Features and subtleties of application
Key features include the following characteristics:
- stained glass gel polishes are perfectly self-leveling, as a result of which they do not require the use of special base coatings to level the surface of the nails and hide aesthetic defects (rubber or camouflage bases, or medicinal bases for problem nails);
- the features of the “stained glass” texture suggest the usual basic preparation of nails for extensions or application of gel polishes, since they do not weigh down the nail (and therefore do not require significant strengthening with gels or acrylics even for a solo manicure);
- When creating a crystal (glass) design with them, you should keep in mind that these materials have no restrictions on the length and shape of the nails. That is, they look equally elegant, original, beautiful and stylish both on almond-shaped nails and on a soft square;
- Depending on the degree of pigmentation of a particular stained glass gel polish, “successful” and “unsuccessful” options for a mono manicure are distinguished. If your hands are not in the best condition (age wrinkles, unwanted pigmentation, loss of tone), you should not use stained glass gel polishes as a single-color coating. From an aesthetic point of view, such a manicure will not look as weightless, airy and gentle as a classic aqua manicure or magnetic gel polish - “kitty”;
- Before creating a design, this type of gel polish requires careful and thorough mixing. This is done in order to lift the settled pigment from the bottom and apply the material in a uniform, even layer, without bald spots, bubbles or stripes;
- the use of glass gel varnishes as a material for artistic painting involves the use of separate brushes with fine bristles, which must then be carefully washed using a product for degreasing nails, or a special liquid for washing brushes.
Varieties and basics of stained glass manicure
Manicure with stained glass gel can be performed using the following techniques:
- mosaic manicure is a complex composition of different shades and sparkles;
- contour stained glass - involves clearly drawing the contours of the picture and filling the voids with varnishes of different colors;
Using a brush you can create a wide variety of individual designs.
- design with elements of painting - includes complex designs in the form of geometric abstract shapes or floral patterns, made with a thin brush;
- combined manicure – combines elements of all previous options.
Necessary accessories
Example of a standard manicure set
As with any other manicure, stained glass requires a standard set of manicure tools and some accessories to create the design itself:
- 2 pairs of nail scissors and a hangnail;
- a file of optimal abrasiveness for trimming nails;
- a wooden or metal stick for pushing back the cuticle or correcting the applied varnish;
A wooden (orange) stick gently pushes back the cuticle without scratching the nail plate
- stained glass gel for mixing paints and obtaining a glossy effect;
- stained glass paints for creating designs on the nail plate;
- special brushes of different sizes for modeling using gel and paints;
- UV or LED lamp for coating polymerization.
UV or LED lamp is a necessary device for fixing gel polish
Stained glass manicure technique in 10 steps
Let's now try to decorate our nails with our own hands using an unusual technique of creating patterns with a brush. Prepare all the necessary accessories in advance so that they lie next to you and you don’t have to look for anything or be distracted. The instructions will tell you step by step how to do this:
| Illustration | Procedure |
| Step 1 | We prepare the nail bed - push back and trim the cuticle if necessary, after softening it in a bath or using a special remover. |
| Step 2 | We degrease the nail plate for better adhesion of the coating. |
| Step 3 | Apply the base coat. |
| Step 4 | Dry the top layer thoroughly in a lamp for 1-2 minutes. |
| Step 5 | Let's start decorating using colored gel polishes and brushes. We draw geometric shapes of different sizes and colors. You can also use rhinestones, foil, sparkles, etc. |
| Step 6 | Dry the drawing under the lamp for 2-3 minutes. |
| Step 7 | Apply transparent stained glass gel to create a deep and glassy effect. |
| Step 8 | Dry the manicure in a lamp for several minutes. |
| Step 9 | We cover the nails with top varnish. |
| Step 10 | Dry the top coat in a lamp and, if necessary, remove the sticky layer with a special product. |
Do it yourself: how to create stained glass gel polish?
Properly prepared homemade gel polish dries in a lamp as quickly and efficiently as branded products. The basis for your individual mixture is a classic transparent top coat for conventional three-phase gel polishes. The color component can be as follows:
- densely pigmented gel polish (stained glass or gel paint);
- pigments for gel polishes (pure color, without additional decorative particles).
Option No. 1 (a mixture of top coat and paints/gel polish).
In this case, it is important to choose a top coat with a very thick consistency (you can also use biogel or a transparent base).
When mixing in gel paint or shellac, be careful not to add too much color. The mixture should remain translucent, but the color should be mixed evenly. The test portion can be mixed on a crystal stand or in a special container with a painting brush. Proceed slowly to prevent bubbles from forming in the mixture. And after drying the material, it is better to sign the tip (indicate the proportions of the mixture) and observe how long the color saturation remains. If the drying went perfectly and the pigment did not fade in 14 days, you can safely use the formula on your clients’ nails. Option No. 2 (mixture of pigment and topcoat).
You mix the colored pigment with the above base options, kneading thoroughly. Do not forget to choose a thicker base for the mixture so that the final mixture lies well and evenly on the nail. Apply the finished mixture to the nail with a brush, polymerize in a lamp as a regular (branded) product. Remember that self-made stained glass gel polish must be covered with a top coat. And do not prepare too large a portion in advance, since mixtures of this kind do not last long.
How to apply on nails
- lamp. Irradiates nails with ultraviolet rays and ensures that the material on them hardens and lasts for a long time, more than two weeks. The cheapest lamp will cost about 1,500 rubles, and professional equipment for home care will not be needed;
- tools for preliminary preparation of nails. Scissors to trim, tweezers to trim, pushers to push back cuticles, files to polish the ends, and buffs to polish the surface. The entire hand care set costs about 1,000 rubles, but you can save by buying used or at a discount;
- degreaser. Definitely a professional one for working with gel polish - without it you won’t get a stylish manicure, the polish will come off in a few days;
- primer A special coating that provides better adhesion between the nail and the base;
- base and top. Mandatory for decoration: the base will hold the varnish, the top will protect it from environmental influences;
- shellac. You can only have a stained glass one, or you can also have a simple one, so you can put it in several layers;
- moisturizing oil. After a manicure session, it is necessary to treat the shifted cuticle and hands exposed to the ultraviolet lamp;
- auxiliary means. This includes everything you need to realize a specific idea and turn your nails into a work of art: glitter, sequins, foil, paint for painting, rhinestones, etc.
Step 1 - nail preparation. Keep your hands in warm water with salt until the skin becomes soft and pliable. Then take it out, dry it with a towel and carefully remove the cuticles on all nails with a pusher. Trim your nails, polish them, give them the desired shape - circle, square, oval. Step 2 - preparation for applying the base. When the nails are ready and their shape is perfect, they need to be degreased with a buff until they become matte and lose their shine. And then they need to be treated with a primer - carefully, so that it lays flat, leaving behind a smooth surface. Step 3 - base. The bottle with the base composition must be rolled in your hands until its contents become homogeneous. In this case, you need to act gently and smoothly so that bubbles do not form inside. After a minute of rolling, you can get down to business: carefully apply the base and immediately remove the excess with a brush. When the base is applied to 4 nails, they need to be put in a lamp and dried for a minute. Then cover the nail plate on the big toe with the base and do the same with it. Then repeat with the other hand. Step 4 - applying color. Stained glass gel polish is usually applied in layers, with 1 layer giving a shimmering translucent effect, 2 layers making the nail brighter, and 3 or 4 in appearance not much different from standard gel polish. You need to follow the scheme with the base: paint 4 fingers, dry, paint your thumb, dry. Repeat with the second hand. If the polish spreads, drips from the nails, or forms streaks, you need to dry it one nail at a time in order to catch it before this happens. Step 5 - applying decor. Stickers, glitter, foil are glued, painting is done, rhinestones are inserted
You need to act carefully and follow the same pattern, drying each finished nail so that the elements do not fall off. Usually the decor is attached simply: a toothpick is dipped into transparent varnish, dripped onto the nail, and glitter or rhinestone is placed on top
The foil is attached according to the instructions, and painting is done with a thin brush. Step 6 - conclusion. On top of all the splendor that has turned out on the nails, the top coat is applied in a fairly thick layer. Separately, you need to run the brush along the edge of the nail so that it also does not crack. When the top is dry (this is also done using a lamp), the remaining sticky layer is removed from it using a degreaser.
https://youtube.com/watch?v=BiDATnXnWkI
Extension technology, how to do it yourself
Stained glass gel looks great on translucent extended nails. It is indispensable in creating a bright glass jacket that looks great on both round and square shapes.
To make stained glass gel, use ordinary gel and stained glass paint. Place a drop of paint on the palette and combine with the gel. It should be quite thick.
Now let's move on to application!
Making gel is a fairly simple procedure; you will need much more effort to see the result of your efforts on your nails.
The extension technology is quite complex and you need to carefully monitor the sequence of steps.
You will also have to repeatedly use a lamp with ultraviolet rays (UV lamp), which is indispensable in nail extensions.
- Prepare your nail. Treat the nail with an oxidizing agent, a primer and apply a base polish (UV lamp - 2 minutes);
- Make a backing on the extension form (UV lamp - 10 seconds);
- Press the substrate with tweezers and remove it (UV lamp - 30 seconds);
- Lay out an extension of gel-chewing gum of any length and shape (UV lamp - 4 minutes);
- For a smooth transition, apply Cover Rose gel. (UV lamp – 30 seconds);
- Lay out the apex - that is, the highest point of the extended nail (UV lamp - 2 minutes);
- Align the smile line, adjust the length and lower parallels. Apply gel polish to the smile line. It will be more beautiful if you decorate it with sparkles. Tint the smile area with a darker gel. Perform shading by placing a lighter gel on the tip (UV lamp - 30 seconds);
- Press the first layer with pliers so that the nails take shape (UV lamp - 2 minutes);
- Start laying out the design (UV lamp – 30 seconds);
- Lay out the second layer, which can be one- or two-color (UV lamp - 2 minutes);
- Make sawdust in any shape and cover with a final coating. (UV lamp – 2 minutes).
If you did everything correctly, you will get an incredibly bright and rich stained glass French sample, which you see in the photo: