Those with fragile, soft nail plates cannot fully appreciate all the benefits of gel polish coating, as they often experience chipped and broken nails. Fortunately, this is not a reason to abandon artificial turf.
The nail industry has given the fair sex many options for strengthening their nails. One of them is strengthening with acrylic powder.
What kind of material is this? How to work with it? Is it possible to use it at home? Let's find out in this article.
Acrylic powder: what is it and what is it for?
Acrylic was originally used in dentistry to create fillings and dentures. And then this plastic, but at the same time durable and lightweight material was used in the nail industry. Today, manicurists use it to strengthen and extend nail plates and create various designs.
Acrylic nail powder is a polymer powder, most often based on methacrylic acid ester - ethyl methacrylate. Thanks to its properties, the powder hardens under the rays of a manicure lamp or upon contact with a special hardening liquid - monomer.
Benefits of acrylic powder
- is hypoallergenic, suitable for almost everyone. Allergic reactions occur in only 5% of cases;
- easy to use, does not require much time;
- It is characterized by increased durability, therefore reducing the risk of nail breakage.
Disadvantages of acrylic powder
There is an opinion that acrylic negatively affects human health. Is it so? The material itself is absolutely safe. Its vapors are harmful. But their toxicity persists only until the acrylic dries, that is, literally a few minutes. Another small minus is that the material has an unpleasant, pungent odor. How to get rid of these shortcomings? Wear a mask and work in a well-ventilated area.
In what cases should acrylic powder be used for strengthening?
- Nails are weak and often break because of this;
- Artificial turf lasts less than a period of time; detachments, cracks, and chips constantly occur.
It should be remembered that acrylic powder does not heal the nail plate. Strengthening occurs due to the creation of an additional protective layer.
Contraindications to the use of acrylic powder are:
- fungal diseases;
- individual intolerance to components;
- undergoing chemotherapy;
- taking antibiotics.
Advantages and disadvantages
Like any product, gel powder has its advantages and disadvantages. Before choosing a product, you need to understand the pros and cons of the product.
Advantages:
- The relative speed of the procedure using the product. You can create a custom manicure in just 30 minutes;
- No ultraviolet exposure to nails and skin of the hands - the product composition does not require drying in a UV lamp;
- The coating stays on the nails for about a month without cracking or fading;
- Products intended for coating do not have the chemical smell inherent in many products in the nail industry;
- In addition to the aesthetic function, it has the property of strengthening the nail plate;
- In beauty salons, the speed of the procedure allows the master to increase the number of clients;
- The organic composition eliminates the possibility of allergic reactions that manicurists often encounter;
Flaws:
- To achieve maximum effect, you will have to purchase products from one manufacturer. When working with gel polishes, for example, it is allowed to use top and base from different companies and the result will not suffer from this;
- The products dry out quickly, so to get a high-quality manicure you will have to first master the technique.
Types of acrylic powder. Which to choose?
Today on the shelves of manicure stores you can find several types of acrylic powder. Let's figure out how they differ from each other and what they are intended for.
Transparent acrylic powder is usually very finely ground. It does not stand out at all on the natural nail plate. Universal. This type of powder is used to create a base layer, strengthen, and build up the nail plate. With its help you can eliminate unevenness of the nail and model the tip. It is also suitable for designs.
Acrylic Powder Expert Clear NeoNail 30 g
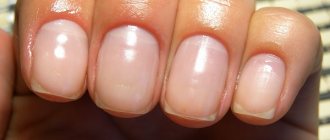
Camouflage powder is opaque, similar to the natural shades of the nail plate. It has a denser texture and is more flexible. Even its thin layer perfectly masks nail imperfections: unevenness, yellowness, white spots, grooves and other defects.
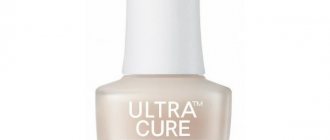
Acrylic camouflage peach powder Cover Peach InGarden 20 g
Matte powder hides imperfections in the nail plate and visually evens it out. Suitable for base coat when strengthening and extending the nail plate.
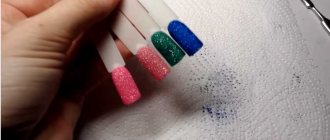
Colored powder is used to create designs. There is a huge palette of colors on the market to suit every taste. Using colored powder, you can create different designs on your nails and achieve the “sugar nails” effect.
Neon powder comes in bright, rich shades and glows when exposed to ultraviolet light.
Glitter powder can come in different textures and grinds. Accordingly, the size of glitter (sparkles) varies. Great for finishing coats or creating bright, sparkling designs.
Summarize:
- to strengthen and correct the shape of the nail tips, choose transparent acrylic powder;
- in order to achieve a smooth surface of the nail plate and hide imperfections, use camouflage powder;
- To create designs, colored, neon powder, and glitter powder are suitable.
INTERESTING!
Acrylic powder is ideal for creating a textured, voluminous manicure. Want to create contrasting textures? Make the design with powder on a glossy base. Want to achieve the effect of “sugar” marigolds? Cover the nail plate completely with powder. You can also make a “knitted” manicure using powder.
How does he work
Acrylic powder and monomer, when mixed, form a plastic and pliable material, ideal for both shaped sculpting (volumetric design) and for the formation of nails that are visually no different from natural ones.
The molecules in the acrylic mass bind together to form chains - as a result, it quickly polymerizes and becomes hard and durable. In this case, all excess is released on the surface in the form of a sticky layer, which can be successfully removed with any alcohol-containing liquid.
The easiest way to understand how this works is to use a mortar as an example. Only instead of cement, the nail artist uses acrylic powder, and instead of water, a monomer. This example is not very correct, but it conveys the essence of the process quite accurately.
When doing nail extensions, the combination “monomer + acrylic” is an excellent alternative to gel, which hardens only under the influence of UV rays. Firstly, acrylic coating is more durable, and secondly, its use allows you to do without a UV or LED lamp.
ATTENTION! Acrylic nail extensions are not for everyone. Allergic reactions may occur. There are a number of other medical contraindications. Therefore, before this procedure, you must consult a doctor. Don't risk your health!
Strengthening nails with acrylic powder: step-by-step instructions, video
Strengthening your nails with acrylic powder at home is quite simple; you don’t need to master any special skills. Below is a detailed algorithm of actions.
Step one: get your nails in order
Necessary tools:
Nail file classic white 180/200 g ParisNail
Cuticle Eliminator Be Natural 59 ml
Pusher PK-154 METZGER
Cuticle scissors, manual sharpening (long handles) 1343-PB-SH-Salon Paris Nail ZINGER
Orange sticks medium 17.8 cm IRISK 90-100 pcs
First you need to do the manicure yourself to get your nails in order.
- Using a nail file, give the free edge the desired shape;
- Apply cuticle remover to the cuticle and side rollers;
- Place your hand in a bath of warm water for 3-4 minutes. We wipe our fingers and start manicure;
- Use a pusher to push back the cuticle;
- Remove the cuticle with scissors (tweezers, nippers);
- With an orange stick dipped in water, we go along the contour of the nail and clean the pterygium.
Step two: preparing the nail plate
Necessary tools:
Buff mini 100/180 White Monami 50 pcs
E.Mi Dust Brush
Napkins in a roll 30*30 spunlace white “Choice” White Line 100 pcs
Degreasing and removing agent Vanilla ParisNail 200 ml
Nail dehydrant “Dry nail” Nayada 25 ml
Acid-free nail primer Nayada 25 ml
Then we move on to preparing the nail plate for coating. This is a very important stage, since it determines how well the adhesion of the natural nail and the artificial coating will occur.
- We treat the surface of the nail plate with a buff to lift the scales of the nail plate and improve adhesion;
- Remove dust with a special brush;
- Apply degreaser to a lint-free cloth and wipe your nails;
- For those with wet, oily nails, to improve adhesion, apply a dehydrator to the entire surface of the nail and air dry it for a minute. You can also apply a disinfectant;
- Then you need to apply primer to the free edge of the nail. Depending on the purpose and condition of the nails, we choose acidic or acid-free. The free edge is one of the most vulnerable places, and thanks to the primer, the adhesion between the nail plate and the artificial material improves, which contributes to longer wear of the coating. We also air dry the primer for one minute.
Step three: strengthen the nail with acrylic powder
Now you can move on to strengthening with acrylic powder.
- Apply a thin layer of base coat to the surface of the nail plate. DO NOT dry;
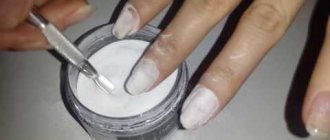
- Scoop up acrylic powder with a spatula and sprinkle it on the nail plate;
- Lightly tap the knuckle of your finger to shake off excess powder;
LIFE HACK!
To use the powder sparingly, sprinkle it on the nail plate directly above the jar of powder. In this case, the excess that does not stick to the nail will fall back into the jar.
- Dry your nails in a lamp;
- Remove excess powder with a special manicure brush;
- Now you can remove the sticky layer, buff your nails and leave them like that;
- Or you can coat it with gel polish or just a transparent top coat to give your nails a glossy shine.
IMPORTANT!
The base should suit your nail type. If you are doing strengthening, you most likely have thin, plastic nails, so choose a flexible base coat. Read more about choosing a base in our article “Base for gel polish. What is it and what is it for?
Correct Application
If used incorrectly, chips, detachments, abrasions and cracking of the material may occur, which is absolutely unacceptable. Therefore, you should first thoroughly understand how to dilute acrylic powder, how to use it and how to dry and wear it correctly.
Tools and materials
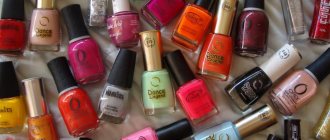
Any job usually requires special tools, and for acrylic they will also be necessary. It is better to purchase materials at official retail outlets, otherwise you can simply lose money on low-quality compounds that will not give the desired effect.
- Acrylic powder of the selected type or a complete set, which is now sold at any specialized retail outlet.
- Liquid with which to mix powder (liquid). This substance is a monomer that does not change the color of the source material, but it contains plasticizers that mix with the base and harden, forming a sticky layer. This solution significantly reduces dust levels during final shaping.
- Special flat long brush.
- Degreaser for nail plates.
- Files and buffs for polishing.
The cost of a jar of acrylic powder is quite high, which often scares off buyers, but everything is not so simple. The fact is that one small jar of powder, if applied and used correctly, will last for quite a long time, especially when it comes to home manicure.
Strengthening
Not all girls understand what is better, strengthening with acrylic powder or gel, and not every master will give an intelligible answer to this question. Gel is much easier to work with, but it causes allergies many times more often than acrylic, and it sticks to the nails somewhat worse. Basically, it’s a matter of taste, who likes what more, the powder gives a more durable and reliable result, but the choice, of course, is up to you.
- Before performing any manipulations with materials, do a standard, hygienic manicure and remove the cuticle at home.
- Degrease the nail plate with a primer, and if necessary, apply a bonder, which is already dried under a UV lamp.
- Apply gel polish base.
- Using a spatula, placing your nail over a jar or sheet of paper, sprinkle the damp, undried base with acrylic powder.
- Dry the surface under an LED or UV lamp.
If necessary, the procedure must be repeated, after which the nail plate can be sanded and the final pigmented coating and top coat can be applied. To strengthen your nails with acrylic powder, you need to follow a sequence of actions; this is quite enough to avoid making annoying mistakes. After this procedure, the gel polish will stick much better, you will be able to avoid peeling and chipping, which is very important.
Building up
When planning to do nail extensions, you first need to decide on the color and texture of the material, what to mix acrylic powder with, how best to do it, and when doing artistic sculpting, also come up with a drawing and design concept.
Remember
The only difficulty with working with acrylic powder is that it dries out quite quickly. If you place the composition unevenly on the nail plate, you will have to shape it for quite a long time using a nail file, or even file it off completely and start over. Therefore, it makes sense to conduct several training experiments on the model.
- Perform a standard hygienic manicure, not forgetting to thoroughly and thoroughly disinfect the instruments.
- Degrease the surface of the nail, and also apply primer to it, dry it and apply bonder, after which drying should be done in a lamp.
- Pour liquid (a special liquid for diluting acrylic) into a small container (glass) for ease of use.
- Secure the extension forms in the desired position.
- Lightly dip the brush into the liquid, and then into the powder so that it sticks in a small lump.
- Apply the acrylic solution to your nails and spread evenly over the entire plate, forming your new, elongated nail. You need to work quickly and clearly, which is possible after a little training on a special finger model.
- After the material has dried, carefully remove the forms and bring the nails to perfection using a regular nail file or a special router.
- Finish polishing with a fine buff.
After completing the extension procedure, you can fix the extended nails in special clips to give them a natural arch shape, which is most preferable with a square shape. The surface can be coated with acetone or gel polish; incredible paintings and artistic modeling can be created on it. True, it’s better not to do such a bulky manicure every day, but to time it for a special occasion. Unlike gel and biogel, removing material from nails can only be done by cutting and nothing else.
Nail art
When figuring out what to do with acrylic powder, do not forget about its decorative use in nail design, as it can come in handy and give your nails a unique look and texture. The surface of the finishing coat, sprinkled with plastic powder, looks like velvet or suede.
- Do a regular hygienic manicure and adjust the shape of your nails.
- Apply primer.
- Alternately apply bonder and a special base for gel polish, drying each layer under a UV lamp.
- Carefully and evenly apply the pigmented gel polish of the desired shade. If necessary, it can be applied in several layers, each drying in ultraviolet light.
- Without removing the dispersion sticky layer, sprinkle the surface with acrylic powder on one or all nails.
The top can be applied at the end of the procedure, or you can discard it, as it will smooth out the rough, velvety surface of the powder. In the same way, you can draw various patterns or monograms, or even entire pictures, for example, by applying them with a transparent top and sprinkling them with polymer powders of different colors.
How to remove acrylic powder
You have done the strengthening, walked away for the allotted time with a wonderful manicure, but the moment has come when it’s time to remove the coating. How to do it?
There are 2 ways to remove acrylic powder:
- using a special acrylic remover (remover);
- using the device.
Let's look at each of them in more detail.
To remove acrylic using a remover you will need:
- a rough file, the abrasiveness of which is approximately 100 grit;
- cotton pads;
- scissors for cutting cotton pads;
- remover;
- aluminum foil (you can use food grade foil instead of professional grade);
- orange stick or metal pusher;
- buff;
- file for natural nails.
What are we doing?
- We lay out all the necessary materials and tools in front of us, spread out a paper towel or napkin. This is necessary so that the debris from the removed acrylic can be immediately rolled up in a napkin and thrown away. It won't get in the way and you won't have to pick it up from your work surface.
- Cut the cotton pads into 4 parts, cut the foil into 10 pieces. Each piece of foil should be of such a size that you can wrap your finger in it.
- Use a nail file to remove the top layer of coating.
- Apply gel polish remover to pieces of cotton pad, place them on each nail and wrap in foil, leave for 10-15 minutes.
- After the specified time has passed, carefully remove the softened coating from the nails using an orange stick or pusher. Do not remove all the foil at once; work with each finger in turn.
- After we have cleaned all the nails, we treat them with a buff. Using a natural nail file, give the free edge of the nail the desired shape.
- At the end, it is advisable to apply cuticle oil and moisturizing or nourishing hand cream.
You can also remove acrylic with a machine. In essence, this is “cutting off” the coating with a special manicure cutter. At speeds of 25,000 rpm, it gently and painlessly removes layers of artificial material.
Note! Removing the coating with a manicure machine requires certain skills. To do everything correctly and not damage your nails, we recommend that you take a hardware manicure course.
Rules for use in salons and nail salons
Design example
Low cost, speed of application and relative safety make gel powder attractive for beauty salons. All the advantages of the master have already been appreciated, but in pursuit of increasing the average daily check, you should not neglect two tips.
- A jar of powder is a potential home for bacteria.
Every day, dozens of people pass through the master, each of whom dips his finger into the container. From a sanitation point of view, this process can hardly be called safe, therefore, in order to avoid unpleasant situations, you should not neglect the simple rule: For each client - a separate container.
- In addition to the sanitary side of the issue, it is necessary to clearly explain to clients that the removal of the coating should only be done by a professional. Independence will lead to thinning of the plate and deformation of the nail shape.
Nail extensions using acrylic powder
Finally, let's pay attention to the important function that acrylic powder performs - nail extension.
For extensions, powder is used in combination with a special colorless liquid, which is called monomer or liquid. When mixed, a plastic, viscous material is obtained, which is used to “sculpt” an extension of the nail plate using a brush.
The peculiarity of the resulting material is that it does not need to be dried in a lamp; it hardens upon contact with air. The master needs to work quite quickly - he only has a few minutes to apply the extensions, since after this the material will harden and the extended nail will have to be corrected with a file.
Acrylic powder is a material that allows you to extend the life of your manicure, create interesting designs, and increase length. And as you can see, there is nothing difficult in working with it. Don't be afraid to experiment and test different materials. They are created to simplify your work and improve your life!
What does the DIP system for nails without a lamp consist of?
In order to cover or strengthen nails using the DIP system, the following materials are used.
What does the DIP system for nails without a lamp consist of:
- DIP base coat
- Transparent mineral or acrylic powder
- Colored mineral powder
- Activator
- Top coating
In addition, additional drugs are used, just like in the gel system. These are dehydrators that dry out the nail plate. The principle of operation is quite simple, but it is not performed in the same way as gel polish coating, but using special equipment.
System by Nicole Diary
How acrylic works: how does it strengthen nails?
Some girls have naturally weak nails that constantly peel and can break at the first opportunity, but this is not a reason to give up a beautiful, fashionable manicure and grow the desired length. Acrylic powder also provides a long-lasting white or colored finish that allows nail plates to be permanently strengthened, unlike regular polish. With its help, you can extend your nails, or you can do additional extensions, or simply strengthen your manicure. The effect is achieved due to the fact that the powder is mixed with liquid; it fills absolutely all micro cracks on the surface, leveling the texture to a smooth, shiny state.
Colored acrylic powder options
As a result, you get a neat and stylish manicure that is resistant to mechanical stress and temperature changes. You can calmly do household chores and allow your hands to come into contact with water for a long time when washing dishes or wet cleaning, your manicure will remain intact and unharmed. Nail service specialists recommend applying a special vitamin coating under the powder to provide additional protection.
Strong marigolds
Removing acrylic coating
Despite the harmlessness of the material, nails need periodic rest from beautiful designs and contact with open air. It is possible to remove acrylic powder yourself, at home. You will need several special tools and materials:
- foil;
- a set of manicure files;
- manicure tweezers and scissors;
- liquid for solution of acrylic mass;
- orange sticks;
- cotton pads.
Removal instructions are simple and do not take much time. The main thing is to follow the rules:
- If possible, elongated shapes are cut off.
- The finish is removed with a file.
- Cotton pads soaked in a special liquid are placed over the nails.
- Each finger in the marigold area is wrapped in foil for 15-20 minutes.
- The pieces of foil are removed one by one, and the coating is immediately removed with orange sticks.
- If there was powder under the gel polish, files are used.
- Nails are polished with a buff.
- Smart enamel is applied.
- Moisturize the skin with oils or cream.
Materials and tools
When performing this type of work, you cannot do without
:
- degreaser, you can use nail polish remover;
- a bonder containing substances necessary for adhesion of artificial materials to the nail plate;
- brushes for applying glue;
- fan brush to remove powder residue;
- files (coarse abrasive) to even out the length of the nail;
- buff (bar-file), which has a rectangular shape and is used for polishing nail plates.
How to choose a monomer for nails
Quality
The most important thing: we need to purchase high-quality and safe material. That's why:
- You should not buy dubious products, the packaging of which contains mysterious information that cannot be translated into articulate words without a translator and a magnifying glass.
- Be sure to check your purchase for a quality certificate.
- The monomer must not contain MMA, i.e. the bottle must have the inscription “ethyl methacrylate”.
- High-quality nail material consists of high-quality, proven components and therefore cannot be too cheap - do not be tempted by suspiciously low prices!
Curing time
Monomers for nails can be divided into groups depending on the curing (hardening) time of the material. Unfortunately, there is no general grading system, so each manufacturer indicates the polymerization time as it pleases (or does not do so at all). So, monomers are:
- Slow-hardening - polymerization occurs in about 10-15 minutes, which is ideal for beginner craftswomen just mastering working with acrylic. In addition, they are very convenient for artistic sculpting on nails. On bottles with this monomer they often write “provides longer sculpting time” or something like that.
- Monomers with a medium curing speed (approximately 2 to 5 minutes) provide more reliable adhesion of acrylic to the nail plate. They are versatile and ideal for creating three-dimensional design elements.
- Less than a minute - these are more often used by professional craftsmen, for whom it costs nothing during this time to lay and smooth the acrylic mass. In addition, they provide very high strength and stable coloring of the coating. On such monomers, the curing time is often indicated more specifically in seconds.
Note: the rate of polymerization of the acrylic mass directly depends on the caustic and pungent-smelling substances contained in the monomer. Simply put, the faster the monomer works, the more unpleasant it smells.
Subtleties of choice
When purchasing a monomer, you also need to consider the following:
- When using compounds with a high hardening rate, the likelihood of chipping is reduced.
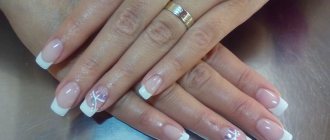
- For a French manicure, it is better to choose a special monomer of a bluish or lilac hue - it neutralizes the yellowness of the nails and emphasizes the white color favorably.
- You should not use acrylic powder and monomer from different manufacturers - the materials may exhibit undeclared characteristics, which will negatively affect the result.
- Nowadays, many manufacturers have mastered the production of monomers that are practically odorless. This factor may be important for people who react negatively to strong odors.