Basic terms
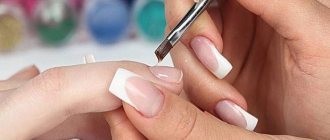
Top forms are a soft plastic product that imitates a natural nail plate and helps create an artificial nail of the desired length and curve.
Unlike conventional blanks, they are installed on the nail, and not under it. Extension on top forms is a procedure for artificially lengthening the nail using top forms and gel material. Extension using this method involves laying out the material inside the form and imprinting it on the natural nail plate.
Polygel is an extension material obtained by combining acrylic and gel formulas.
The product is odorless and has increased density, which makes it an excellent material for modeling artificial nails. Available in tubes or jars with a lid.
Difficulties in placing lower forms for extensions and how to solve them
Difficulties arise due to the fact that the templates have a universal slot for a finger, semicircular and of a certain width. While the smile line, its depth and the position of the growth points can vary from finger to finger. On one finger there will not be enough slot depth for the template to fit into the ingrowth points. On the other, on the contrary, it will cover the growth points, but will lag behind in the center of the nail. In addition, the side bolsters will prevent the template from curling into an arch, which will prevent it from curling under the nail. If this is neglected, then artificial nails will turn out flat and brittle, since without an arch they lose the ability to absorb loads.
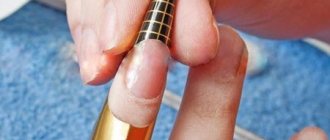
When cutting a template, you can use a pen to mark the width for which you want to make a recess and the places where you are going to make cuts.
So, how to cut out shapes:
- The nail bed and hyponychium are elongated, protrude far forward and the template does not reach the ingrowth points. This most often occurs on the index fingers and in those women who have been wearing gel polish or extensions for many years without a break. In this case, you need to cut the template in depth to the distance that is not enough for the template to contact the growth points, measuring the recess also along the width of the nail.
- The nail bed and hyponychium are straight and the template is oval, so it lags in the center. This is more common on the ring fingers and in those women who have not worn gel polish or extensions for a long time. In this case, you should straighten the template slot, from a round one to make it more square, the width of the nail.
- The side rollers are too convex, stretching the form and preventing it from curling into an arch along the width of the natural nail. Cuts made from the growth points perpendicular to the template slot will help here. They need to be made at least 7mm deep, covering the entire thickness of the roller. They work on the same principle as a slit on a long skirt: the slit reveals the template, the rollers are placed in the slit, and the template is folded under the nail.
Kinds
Depending on the bend, there are 3 types of upper forms:
- Natural . Light bend, close to natural;
- Classic . More convex in the center of the structure;
- Standard . The most convex. The result is a nail with a slightly drooping tip.
The specific type is selected based on the data of the natural nail - the bending of the transverse and longitudinal arch is assessed, as well as the desired shape of the extension.
- A natural curve is used for the final result, a crisp or rounded square;
- For the future nail shape Almond is standard;
- For an oval – classic.
But this relationship is conditional - you can use any bend, but in some cases this may increase the operating time.
A few important points:
- The upper forms have their own size range, which is determined by the numbers embossed on the plastic. The larger the number, the smaller its size. Depending on the manufacturer, the largest figure may vary. Common numbering of sizes is from 1 to 10;
- Depending on the manufacturer, it can be with or without printed lines. The marks on the plastic are intended to determine the length of the future nail and carefully lay out the material. Forms with markings are offered by dozens of manufacturers, for example, PNB, Formula Profi, Monami, Vogue Nails;
- There are small handles at the ends of the plastic blanks - they help separate the plastic without damaging the artificial nail. Find forms with handles from the brands Monami, Vogue Nails;
- On the upper forms, extensions are done with any type of gel. But most often it is polygel that is used, since it has a dense texture and does not “roll off” from the sides. When choosing a product, pay attention to the brands Canni, Vogue Nails or Patrisa Nail.
Nail care at home and in the salon
Healthy nails look great even without an elaborate design. The use of various decorative means for decoration often leads to a deterioration of their condition, so taking care of the nail plates should become a regular habit. Home care is based on several rules:
- High-quality manicure tools are the main condition for healthy nails. For natural nail plates, glass, ceramic, and crystal files are the safest. They need to be filed in one direction.
Care products should include hand cream, cuticle oil, and strengthening product.
- Regular warm oil baths for hands made of olive, almond, castor oils with the addition of lemon juice. Dipping your fingertips into lemon pulp will help whiten your nails.
- Intake of nutrition from food containing vitamins C, D, B, A, E. Food requires a sufficient amount of zinc, iron, iodine, magnesium, calcium, biotin, folic acid.
- Salon nail care procedures: professional manicure, paraffin therapy, sealing, various types of extensions.
The difference between the upper forms and the usual ones
The usual forms mean tips, liquid tips and disposable templates for extensions.
- The upper ones are reusable. After polymerization, the material separates effortlessly and leaves no marks on the workpiece, so it can be used until it loses its bending. Approximate service life – 2 years;
- The upper forms do not polymerize along with the coating, but are removed immediately after the material has hardened;
- The technique of working with forms allows you to save material and create nails that are close in thickness to natural ones;
- The extension procedure is halved and takes from 1 to 1.5 hours including decoration;
- The end result requires almost no modification. After polymerization, you only need to remove the excess and polish the resulting nail.
- Unlike liquid tips, where the material is applied only to 2/3 of the natural nail, top forms involve laying gel over the entire nail plate;
- There is no need to add material after removal.
Description of extension technology on conventional forms:
Nail extension with tips: materials, step-by-step instructions and nuances
Gel-jelly extensions
Gel jelly is one of the latest developments in the field of nail design. The dense jelly-like consistency makes it a very convenient material to work with. Working with jelly gel takes noticeably less time than with conventional gels. It is easy to shape, convenient for correcting mistakes made during extensions, and convenient for repairing nails.
Setting time is only 5 seconds, polymerization takes 2 minutes. Manufacturers offer natural shades of gel-jelly: flesh-colored, beige, pink.
Common problems with hair extensions
- The natural nail plate is completely flat or its edge tends upward. In such cases, the stress zone is difficult to form and most often remains the weakest in the extended nail.
What to do: Before printing the material, drop a little polygel in the center of the stress zone. The ball should be no more than 1.5 mm in height and no more than 1 mm in width. Dry the ball in the lamp and start printing. This technique will help keep your shape at the desired level and prevent it from falling below the required level. - A very arched nail. When looking at the end of the free edge of a natural nail, a strongly rounded arch is visible. In this case, it will not be possible to press the workpiece tightly, since the transverse arch of the workpiece will not be so rounded.
What to do: before imprinting the form, add a little polygel to the natural nail in the cuticle area. This technique will help smooth out a steep arch. - Nails grow downwards. If the nail plate tends downwards, the edge of the workpiece at the cuticle will constantly move away.
What to do: Place a small layer of polygel near the cuticle, as well as drops in the center of the stress zone. Only after the layering has polymerized, start printing. - Large gap between cuticle and mold. There is no need to install the workpiece tightly to the cuticle, but there should not be a large gap. The maximum indentation is 1 mm. What to do: File the plastic blank on the sides so that the edges do not interfere with moving it closer to the cuticle. You only need to cut down a little bit so that there are no gaps in the side sinuses.
- There is no free edge. To work with top forms, it is best that the natural nail has at least minimal regrowth. The distal edge will help avoid material leakage and also increase the strength of the structure. What to do: Before modeling, complete the free edge with polygel. You can do this on disposable paper blanks.
What is required for salon (classic) gel nail modeling
Gel
There is a huge selection of different modeling gels on the market. We have a separate article about how gel differs from gel polish and why they are not interchangeable. In short, the gel should be hard after polymerization, hold its length and shape well, not sag, spring, or bend.
Gels are:
- single-phase or three-phase. In a three-phase system, the base, sculpting (builder) gel and finish are produced separately. In a single-phase system, the gel can be used both as a base and for laying out length and volume, and does not require covering with a finish. Which, in general, is very doubtful. Typically, a single-phase gel is used as the second phase, and gel polish is used as the base and top.
- liquid, medium and thick. Liquid: base and top. Medium and medium-thick, as a rule, produce sculptural or single-phase gels, since they need to be laid out at a certain thickness. Jelly gels and soufflé gels are produced in thick and very thick forms. Such materials are needed for laid-out French and when it is required that the material does not spread.
- transparent, camouflage and colored. Transparent: base and top. Camouflage - constructing and single-phase gels. Colored ones are needed for laid out jackets and various designs.
If you need to buy the most versatile material, then pay attention to single-phase camouflage gels for strengthening and modeling nails. They can be combined with gel polish bases and tops without fear of material conflict.
Lower forms
They are a template that is placed under the nail and on which the material is laid out. In classic extensions, the template is placed according to the growth of the nail, that is, straight. It is allowed to place the template slightly upward - 3-5 degrees, but we strongly do not recommend placing the template with a downward slope. Not on every hand it is possible to place the shape correctly with a pounce, so below in the article there is a paragraph on how to correctly cut them and adjust them to the individual characteristics of the hands.
The lower forms can be:
- paper, laminated or plastic. Paper templates are soft, wrinkle and tear easily. To confidently lay out “squares” on them, you should use metal seals that are glued to the back side and prevent the form from sticking together. Then these seals are bent to the shape of a tube, matched to the width of the nail. Laminated templates are already tougher, and the most dense and expensive are plastic ones.
- universal or for special final shape. There are templates that, when installed, are folded as best as possible for a specific nail shape: on some it is convenient to model a stiletto, and on others a square.
- with and without markings for cutting. Often the markup is not very helpful, but for beginners it can serve as a hint.
Brush
The brush for laying out the gel should be dense and well-filled. You can choose a square or oval synthetic brush from size 4 to 6. The larger the nails and the greater the length, the larger the drop of gel you will have to pick up with a brush. Therefore, select the size of the brush according to the volume of extension. Also, some masters use a thin striper brush to level the gel and more conveniently distribute it in the cuticle area.
Files
Files for modeling sawdust should be selected based on the amount of work. Beginners often need to cut off a lot of excess length and thickness; a coarse abrasive of 100-150 grit is suitable for this. To file the surface in the nail cavity and bring the architecture to perfection, choose a softer abrasive of 180-240 grit. This will reduce the risk of injuring the skin and cutting through excess.
In most cases, a boat or crescent shaped file is suitable. You can also use a regular oval one. If you are not working with very dense, filing-heavy materials, then you most likely will not need a special file for artificial nails. You can use the same file that you used to file the free edge of the natural nail plate.
*Equipment and tools for manicure
In order for artificial nails to last for a long time without detachments on the cuticle side, it is necessary to perform a manicure or at least thoroughly clean the pterygium.
- Manicure should be done dry, without soaking your nails in water. Gel, like acrylic, is afraid of water, and detachments can occur. Because of this, they used to even do manicures and nail extensions on different days. You can choose a hardware, combined, file or European manicure. If you are just starting to learn extensions, then it is better to split the manicure into two stages: first, clean the pterygium and push back the cuticle, then perform nail extensions and surface filing, and then cut off the cuticle and sand the rollers . This will help avoid sawing through the skin around it.
- You can clean the pterygium with a sharp pusher, a corundum block or a 180 grit buff. The more carefully you do this, the less sagging in your work and detachments in your socks.
Modeling using the Ombre technique
Thanks to the unique technology and simplicity, extensions can be done immediately with the design. One of the common varieties is ombre modeling.
To work you will need:
- Polygel: white and camouflage;
- Orange stick and brush;
- File and buff;
- Top.
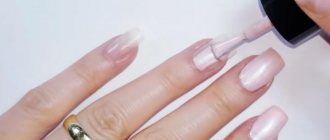
- Prepare for extensions: do a manicure, apply primer;
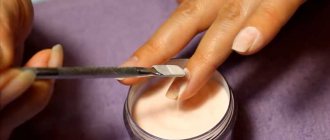
- Place a small amount of camouflage in the center of the workpiece with an orange stick and spread it with a brush in a thin layer. When distributing the polygel, “smooth” it to a thin, almost imperceptible layer;
- Place the form in the lamp for 7 seconds so that the camouflage “sets” slightly;
- Using an orange stick, place white polygel in the place where the white color is planned for ombre;
- Distribute the polygel, carefully blending it onto the camouflage where the color transitions;
- Dry for 7 seconds in a lamp;
- Lay out a little more camouflage - this layer will become the main thickness of the future nail;
- Distribute the gel, forming a thickened stress zone, a free edge with its future shape, a cuticle zone and side ridges;
- Print the form with the material onto the nail, remove the excess, complete the missing pieces with camouflage;
- Place your hand in the lamp for 10 seconds;
- Using a clamp, pinch the distal edge and growing points, remove the workpiece and install a clothespin;
- Dry the material in a lamp;
- File down the free edge, remove any imperfections and polish the surface of the nail with a buff. When polishing, avoid the color transition area so as not to simply file it off;
- Wipe your nails with degreaser and apply top coat.
Gradient manicure: preparation, ideas, materials, 6 methods of execution
Extensions with tips
Tips are plastic false nails that are glued onto natural nails. They can be transparent, white or colored and are selected individually for each nail.
Tips are ideal for short, narrow or irregularly shaped nails. Tip extensions can also be performed in one, two or three phases.
To make your manicure look truly natural and aesthetically pleasing, you need to choose the right tips.
How to choose suitable tips?
Here are some recommendations for wisely choosing tips:
• The plastic from which the tips are made must be elastic and thin. • The size should correspond as much as possible to the size of natural nails. • For convex and flat nails you need to choose special tips. • For uneven, wavy nails, it is recommended to use a gel adhesive that fills in the unevenness.
You can buy tips using our website with delivery throughout Russia.
Materials for extensions onto tips.
For extensions using this technique you will need the following materials:
- cuticle softener;
- orange stick or pusher;
- nail file or buff;
- the tips themselves;
- type cutter;
- glue for tips;
- lint-free wipes;
- UF lamp;
- modeling gel;
- brush for treating nails after filing;
- tassels;
- liquid to remove sticky layer;
- primer;
- degreaser;
- cuticle oil.
Extension with tips. Step-by-step instruction
Stage 1
We prepare the workplace, disinfect hands, tools, materials and surfaces. To make it more convenient to work, you can select tips and immediately arrange them in the order of gluing on each nail. Tips should not exceed 2/3 of the natural nail. The excess must be carefully cut off. You cannot glue tips that are narrower than the nail. It is better to choose the one that is wider and carefully file it to the size of the nail.
Stage 2
We perform a manicure, trim the cuticle and carefully remove the pterygium. If pieces of skin remain, this may cause the gel to peel off. We cut off the free part of the nail to 0.5 millimeters and process it with a file. Use a buff or file to remove the glossy surface from the nail plate. Clean it with a brush.
Stage 3
Apply glue to the tip up to the step line, which is applied to the edge of the nail. To improve adhesion, you can apply glue to the area where it joins the tip. Apply the tip to the middle of the nail at a slight angle and press the rest of the nail. The line of the step should coincide with the edge of the nail. For gluing, hold for 15 seconds. If you find bubbles between the tip and the nail, try to squeeze them out or re-glue the tips.
Stage 4
Using a tip cutter, we remove the excess length, giving the nail the desired shape. Using files with large cells, we file the tips for leveling. Using a buff or the same file, we treat the surface of the tips for better adhesion to the gel. We pay special attention to the junction of the tip and your nail. Using a file, we clean this place as thinly as possible so that the transition is invisible. Remove dust from nails and finger skin with a brush. We treat the nails with a degreasing solution, apply a primer and polymerize.
Stage 5
Let's start working with the gel. Apply the first thin layer. Be sure to retreat about a millimeter from the cuticle and side ridges. Dry in a UF lamp for 2-3 minutes. Apply a thicker layer to the middle of the nail, gradually reducing it towards the sides. Dry at this stage for at least 3 minutes! If you experience discomfort from heating your nail, you can take a break and then continue drying. When interrupting drying, turn the nail down so that the unformed layer of gel does not spread. After drying, remove the sticky layer.
Stage 6
Now we give our nails the final shape. Using a file or buff, we process the surface of the nail, removing any unevenness in the arch. We clean the sides and the area of the nail near the cuticle, reducing the coating to nothing as much as possible. We file the tips of the nails so that they are as thin as natural nails. We process irregularities on the free edge. We wipe off the dust with a brush.
Stage 7
We're almost done! Apply the final coat so that it lays on the nail in a thin, even layer. This time we also cover the places left earlier along the side ridges and cuticle. Dry in a UF lamp. Some manufacturers produce a topcoat that does not have a sticky layer. If there is such a layer, then it must be removed.
Nails are ready! We treat the cuticle with special oil.
Tip extensions are also used to create a beautiful French manicure. A tip is attached to the base of the nail with glue, then gel is applied to the artificial material. The gel nail is dried in a UF lamp. Depending on your wishes, a smile is painted on top of the gel, or between layers. Beauty!
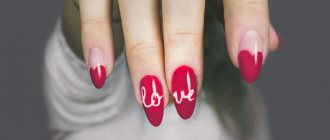
French lay-out
In order not to draw the smile line and not suffer with a clear joint, use the lay-out technique. In this case, everyone can get a French manicure.
- Carry out standard preparation - manicure, polishing, degreasing and primer coating;
- Place camouflage polygel into the mold and form a curved smile line. This part will be pink, so leave an imaginary margin for the white tip;
- Stamp a camouflage shape onto your nail. Look at the structure from above - if the gel shows through, pull the workpiece off and start over. The layer should not be too thick, but it should not be visible either.
- After installing the form with polygel on the nail, send it to the lamp for 10-13 seconds;
- Reach out with your hand, pinch the free edge, remove the workpiece and put on the clothespin;
- Dry the polygel in a lamp;
- Take the mold again and put white polygel there. Stretch it as much as the length of the future nail should increase. Don’t pay attention to the smile line - the joint with the camouflage will be smooth in any case;
- Secure the blank on the nail, moving it from the free edge to the junction with the camouflage;
- Check the antennae. The lines going to the lateral sinuses should be smooth and filled. If you find any gaps, fill them with white polygel;
- Place your hands in the lamp for 15-20 seconds;
- Pinch the nail, but only where the white color is completed. Attach a clothespin and send your nails to dry;
- File the form, check for empty cavities and polish the nail plate to remove excess streaks of white polygel onto the camouflage;
- Cover your nails with top coat.
Design options for a French jacket - a selection of ideas
Nail cleaner
You should also always remember that before sticking tips on your nails and applying gel, you must use a cleaner.
This substance is a special degreaser intended for natural nails. With its help, you can clean your nails and disinfect them before starting modeling. Also, using a cleaner, you can remove the sticky layer from your nails after the gel has dried.
These are the basic, but not all, materials that you will need for nail extensions.
If you decide to get a pedicure, gel polish is a better base.
It lasts much longer than a regular surface, and most importantly, it allows you to create a unique and interesting design. Nowadays, decorating nails with stones is becoming especially fashionable; in combination with monochrome gel polish, stones will look great if you decorate your big toe nail with them. Moon manicure is not inferior in popularity, especially since experts offer girls different types of holes. You can make a regular standard one or choose a curly one, you can leave the natural color of the nail or cover it with contrasting gel polish.
If your nails are not as naturally strong as you would like, you can purchase a pedicure gel.
The gel is saturated with protein and calcium and imparts all its properties to the nails, reducing layering. Moreover, this cover is perfect for vacation. I am not afraid of salt water or the scorching sun. No matter how hot the temperature is, the bio gel will not lose its appearance or become cloudy. In order to apply bio gel, you need a UV lamp, because without it the gel simply will not dry on your nails. Bio gel is otherwise called fruit acid, so you can find it in the store under that name.
Acrylic is a mixture of liquid and powder. We suggest looking at acrylic nail extensions, video lessons for beginners, and step-by-step instructions that will allow even a beginner to figure it out. There are two methods: creating nails using forms and using tips.
On forms, the nail plate is created directly from polymer materials. This technology has a number of advantages, namely: the strength of the material, protection from negative environmental influences, and long-lasting nail wear (up to 4 months).
Aquarium manicure
- Carry out standard preparation of nails for extensions;
- Take the mold and cover the inside with a small layer of clear polygel. The layer should be such that design elements are “sunk” in it;
- Lay out the desired design using an orange stick. Almost anything can be used as decoration - rhinestones, bouillons, kamifubiki, sparkles;
- Dry the form with the future aquarium in a lamp for 10 seconds;
- Lay polygel on top of the decor in the color of the future coating - camouflage or a bright shade, if desired;
- Distribute the material according to standard rules - less at the cuticle and on the sides, more in the stress zone and on the free edge;
- Stamp onto the nail and remove excess material;
- Dry for 15 seconds, pinch, remove the mold and dry completely;
- Cover the design with a top.
Polygel nail modeling on top forms is becoming the most popular technique.
If you haven’t tried this on yourself yet, don’t put it off. Any questions? Ask in the comments. Comment
Polygel extensions at home
Step-by-step instructions for acrylic gel nail extensions will help you carry out the process at home.
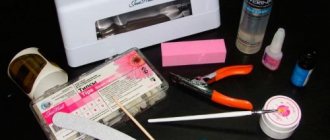
To do this, you need to purchase a set for modeling nails with polygel. Professional equipment includes all necessary materials:
- 4 polygels (clear, white, light pink, camouflage pink);
- construction fluid for leveling acrygel; bonder, dehydrator;
- acid-free primer; classic finish gel;
- sticky layer remover;
- brush, spatula, clamps for squeezing polygel out of the tube.
Preparation consists of a thorough manicure, cleansing and dehydration of the nail plates.
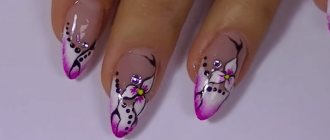
Design of artificial nails is a certain type of art
We can talk about designs for extended nails forever.
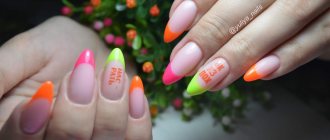
On long almond-shaped nails, a discreet and laconic design using neutral colors will find its place. On square-shaped nails, both a classic French manicure and a French manicure made using more modern techniques will fit perfectly - multi-colored holes, stripes in the center of the nail, colored borders.
Dark colors of gel polishes will help to visually increase the length of an artificial nail. Almost any design will find its place on long and strong nails, so even homemade extensions with gel coating can look “expensive” if you choose the right design for a particular shape of extended nails.
Advantages and disadvantages
Before you decide to have your nails extended with gel polish, you first need to understand all the nuances of this procedure, find out the advantages and disadvantages, and what the consequences may be. Also keep in mind that high-quality nail extensions are done in a salon for at least 3-4 hours, depending on the chosen length of artificial nails.
@idei_dizaina_nogtey
@_mejzi
@avgystiisha.nail_kzn
@tooop_nails
@nail_radio
@raisa_loginovaoffisial
Pros:
- Strengthening natural nails. Weak, short and flaking nails are firmly “sealed” with gel polish, due to which the health and appearance of natural nails significantly improves over time. In addition, even through a thick layer of gel polish, air reaches natural nails.
- Long time wear. Classic manicure, without applying gel, is short-lived. Regular varnish on natural plates becomes deformed and comes off within 2-3 days after a manicure. And gel polish coatings last up to 4 weeks, depending on your care and the growth time of natural nails.
- Hides imperfections. There are cases when the nails have some kind of damage, or the girl has short, chubby fingers, or her nail bed is too wide. All these aspects significantly reduce the aesthetics of manicure. And nail extensions with gel polish help hide all these imperfections.
The fact is that the thick consistency of artificial coatings helps to even out the nail plate and hide all the unevenness and imperfections of natural nails. And by choosing medium or long nail extensions, you will visually lengthen your plump fingers.
@olga_legkova_nails
@yana_gerasyuk
@nogti.best
- Helps get rid of a bad habit. It's no secret that even adults sometimes bite their nails. Yes, it is harmful, bad, beautiful and extremely unaesthetic. But this is a bad habit that you can get rid of with nail extensions.
Firstly, extended nails will be difficult to chew, even out of habit. And secondly, you will probably feel sorry for the time and money spent, and there is also a chance of ruining such beauty on your nails.
- Space for imagination. Due to their beauty, extended nails can be used to create almost any design you like. Everything will depend on your preferences and the skills of the manicurist. Therefore, it is best to contact a professional.
- Quick removal procedure. To model nails, a polymer gel polish is used, which is dried in a special UV lamp. It is impossible to remove them using regular nail polish remover. This product works well only with regular varnish.
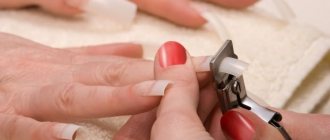
And the manicurist uses gel-softening compounds or performs a hardware manicure, removing the old coating of extended nails using special cutters. If you turn to a professional, the procedure will not last long.
Removing gel polish using a cutter
@tooop_nails
@anastasia_aleksandrovna_nails
- Aesthetic beauty of manicure. Due to the long wearing time, you always have a beautiful, fresh manicure that you are not ashamed to show off. You will always be confident in the impeccability of your image. Especially if you have chosen the desired length and nail design, which can be called universal.
As you can see, nail extensions with gel polish have many advantages. But, as you know, “there is always a fly in the ointment,” so consider the disadvantages of this procedure:
- They may look ugly and sloppy. This is precisely the aspect when girls are not responsible enough when choosing a manicurist. A true professional will create a masterpiece on your nails, but a beginner or an irresponsible nail technician can easily ruin not only the coating, but also your natural nails.
Therefore, before you sign up for a manicure, select several masters who seem to you the most professional, read reviews about them on the Internet, ask your friends and clients about the quality of the procedure. And only after that sign up for nail extensions with gel polish.
@journal_nails
@nnnai.l
@nnnai.l
- Constant correction of extended nails is required. Unfortunately, extended nails can also sometimes break or come off completely. In this case, a local correction is made. And even if your nails are safe and sound, the natural nail plates still grow, which means a full correction must be done at least once a month.
- Price. As a rule, nail extensions with gel polish are not a cheap procedure. In addition, as a rule, it does not include the creation of nail designs and coating. That is, by the end of the entire procedure everything adds up and it turns out to be quite a tidy sum.
- Infection. Don’t be alarmed, the likelihood of infection is reduced to zero if you go to a professional salon or an experienced nail technician. Don't chase low prices and close distances. It’s better to drive further and make it more expensive than to put your health at risk.
- Discomfort. Since gel polish extensions require drying in a UV lamp, some girls may experience an unpleasant, strong burning sensation. This depends both on the chosen composition and on the sensitivity of the client.
- Removal from a master. If you can cover your nails with gel polish for extensions at home, removing it yourself is quite problematic and even harmful to the natural nail plate.
The advantages of gel polish extensions are much greater than the disadvantages. Therefore, if you have carefully read all the pros and cons and decided to have gel coat extensions, find out how it is done, so that later, in the salon, you can understand whether the specialist is doing everything correctly.
@nails_p.sveta
@saule170316
@inails_nail
Nails after extensions: basic care
Press any button with your fingertips, not your nails.
To keep your nails elongated for as long as possible, remember a few important rules:
- Do not untie knots with your nails or pick them. Even the strongest nails can break.
- Be careful when opening the car door.
- Press any button with your fingertips, not your nails.
- Use a knife or razor to open the bags.
- Also use your fingertips when entering text on the keyboard.
- Always wear rubber gloves when washing your hands or washing dishes. This rule is especially true when using detergents. Aggressive ingredients wash away natural oils from the skin, which damage the nail plate.
- If you wear tights, pull them from the middle of your finger, otherwise you will rip your clothes.
- Apply hand cream daily to boost hydration and reduce dry skin and brittle natural nails.