Find out how you can make a mirror manicure yourself using various materials. Also read the article which varnishes are most suitable for this nail design.
Nowadays, there are many methods for creating attractive nail designs. Extraordinary nail art can give your image sophistication, originality, and emphasize individuality. In addition, your nails will cause admiration and will emphasize the elegance of your hands.
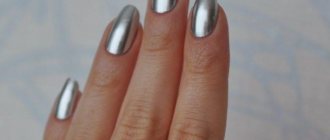
Mirror shine of nails is one of the types of nail art. This manicure is perfect for visiting a restaurant or going to a holiday party. You can create such shine on your nail plates without visiting a beauty salon. If you try, the independent experiment will be a success.
How to achieve a mirror shine on your nails?
For a flawless nail art result in the form of a shiny manicure, you will have to apply maximum patience, a little skill, and most importantly, choose the right way to create it.
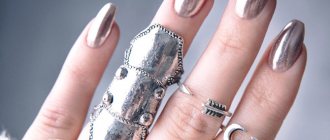
Multi-colored mirror manicure
How can you make glitter on your nails?
- Using a special varnish
- Using mirrored, multi-colored foil
- Applying nail rub
- Using pigments
- Also, a beautiful mirror nail design is obtained by using glitter powder
Glitter for mirror design of nail plates
note
If the work is done with ordinary varnish, then a mirror shine is applied to a damp, undried coating.
How is mirror rubbing with glitter carried out? We process the nail plate, correct overgrown cuticles, and file the edges of the nails. To decorate with a mirror shine, it is necessary to create a smooth surface without sagging or unevenness. Rubbing for the nail plate is a fine sand of various shades, packaged in containers with brushes.
The application procedure is as follows: the nail is covered with a basic base (gel or varnish), make sure that the distribution is even, the layer should not be thick. You need to catch the moment when the base becomes sticky, stops being liquid and has not yet had time to dry. Gradually pour mirror nail polish from the jar onto the nail plate so that the glitter does not crumble, place a paper sheet under your hand.
If there is any excess, you can simply collect it and pour it into a container. You can, on the contrary, pour the powder onto a sheet and apply from it. Nails in places where mirror shine is applied are massaged with quick, gentle movements. It is important not to scratch the manicure and make sure that the coating is even and without bald spots. In order for the surface to stop being rough, it is necessary to cover the top with another layer of varnish with high transparency.
How is the mirror file processed? So that after processing the nail it acquires a mirror shine, we take a polishing file with 4 working surfaces. Each of them is marked with a serial number corresponding to the filing algorithm. The nail plates are processed starting with the little finger and finishing with the thumb. The tool is held at an angle, carefully rounding the nail plates. After 3-4 filings, smooth the upper edge of the nail.
We recommend: Nail dryer: review of manicure lamps and nail dryers when using regular polish
How to make mirror glitter for nails with pigment?
The pigment is a coloring agent. Outwardly, it looks like small particles; the tones of the pigment particles can be different. For mirror design, chrome pigment of different colors is used.
Metallic manicure on gel polish with chrome pigment
Benefits of the pigment:
- Using this substance you can create nail plate designs of varying complexity.
- Its light particles are securely attached to the surface of the nails
- Low cost, low consumption
- If the pigment is applied to gel varnishes, it will be resistant to any external influences (it will not be erased within 2-3 weeks)
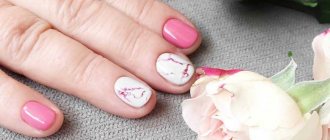
Delicate, pink mirror manicure with pigments
Metallic manicure. Step-by-step instruction
- Make your nails neat. Remove the cuticles, sharpen them with a nail file so that they are the same size
- Degrease the plates with a special compound
- Apply base (gel polish)
- Dry it
- When the gel sticks slightly to your fingers, apply the pigment
- You can rub it in with your finger, or you can apply it with a brush.
- Carefully get rid of excess grains of pigment
- Apply coating on top
Mirror nail design with pigments
IMPORTANT : Try to shake off all remaining pigment dust from your nails. Otherwise, small grains of pigment will remain and spoil the appearance of the manicure.
At home
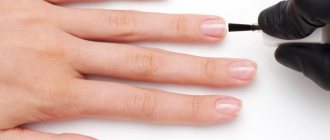
There are many ways to achieve a mirror on your nails. And all of them are available to do a similar manicure yourself. But no matter how this type of coating is applied, it must be completely smooth and even. And to achieve this, you must first prepare your nails and hands.
- Thoroughly rinse off the previous manicure.
- Make a solution based on aloe (extract), sea salt and herbs, which will become a hand bath.
- Carefully treat your nails with a nail file, buff, and cut off all hangnails.
Editor's choice: Hand and nail care: some recommendations and recipes
The condition of the skin of your hands should be ideal. If there is any damage on your fingers in the form of scratches, wounds, or the skin is simply peeling off, you should wait until everything heals with a mirror manicure.
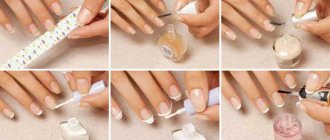
After carrying out the necessary preparatory procedures, we begin the application process itself. The easiest way is to go: use gel polish. You will need:
- file-buff;
- degreasing agent;
- base gel (it should be transparent);
- primer;
- clinser;
- napkins (lint-free);
- manicure brushes;
- finishing coating;
- cotton buds;
- Ultraviolet lamp.
After all the necessary tools are prepared, we begin to apply the varnish:
- the surface of the nail is well polished and degreased;
- a layer of primer is applied, after it dries, the colorless gel comes in, it is applied in a thin layer;
- then the hands are placed under the rays of a UV lamp for the time indicated in the gel instructions;
- The nail is covered with a layer of mirror gel, dried under a UV lamp, applied again and so on up to three layers of gel, after each drying do not forget to wash off the dispersion.
When all layers have been applied and dried, it is the turn of the finishing gel and again drying with a lamp. The “mirror” on your nails is ready.
Editor's choice: Manicure spring 2022: fashion trends and photos
How to make mirror shine for nails with powder?
To get a noble shimmer on your beautiful nails, use magnetic glitter powder (mirror powder). This material for creating nail design fits perfectly on a gel base, acrylic, regular polish, gel polish.
How to properly do a metallic shine manicure with mirror powder?
Metallic nail design with powder
- Prepare the material: base varnish (most often a black coating is used for this), powder, fixing coating
- The next step is to tidy up the nail plates and degrease them.
- Apply polish to your nails, let it dry slightly so that the surface of the plates is slightly sticky, but the paint does not stick to your fingers.
- Then sprinkle your nails generously with glitter powder over a napkin.
- Lightly rub the powder on your nails with your fingers.
- Shake off excess dust
- Finish your manicure
Mirror manicure in bright colors
Films
Mirror coating
Another way to get a mirror coating on your nails is with film varnishes. They are made on the thinnest polymer mica, which stretches very well. They are glued to the entire area of the nail and covered with a protective top coat.
Among the undoubted advantages of this method are the very smooth and truly mirror-like nails that are obtained as a result, as the master class shows. However, a significant disadvantage is the difficulty of gluing such films. Doing this well is even more difficult than with foil. An additional complication is that most films need to be heated with a hairdryer before gluing, just like the plates themselves. And if your hands are cold and/or wet, then it will be almost impossible to stick the films efficiently.
[yandex3] [google3]
Nail polish mirror shine - how to use?
Rubbing for mirror coating of nails is a non-trivial coating of different colors of the rainbow. This manicure looks bright, stylish, unusual. Even a beginner in nail art can do it.
Beautiful manicure - metallic glitter nail art technique
How to do a metallic shine manicure using rubbing?
- First things first, prepare your nail plates for a manicure.
- Then, in order not to be distracted by trifles, immediately prepare your tools and materials. You will need: base varnish, protective coating, rubbing, soft brush, napkins, cotton swabs
- Apply two thin coats of polish to the surface of your nails
- Then rub shiny dust onto the sticky layer with your finger.
- Carefully remove excess “sand” with a soft brush.
- Finally, secure the metallic sheen with a finishing coat.
Mirror manicure - several design options
Method 4. Metal stickers
This is a ready-made coating with a sticky base. A simple sticker that needs to be transferred from a sheet to your nail. You can purchase it online on specialized websites or look at it in the manicure section of cosmetic stores. The easiest way to handle stickers is with tweezers.
How to make a mirror manicure step by step:
- First you need to peel off the sticker. Gently grab the edge with tweezers, which will remain unused, and transfer it to the nail.
- Lightly smooth the surface with the flat side of an orange stick to avoid scratching the sticker.
- All excess part just needs to be cut off with a nail file.
- There is no need to secure it with a topcoat; the stickers stick perfectly on their own.
Of the minuses: when removing stickers, you will need to peel them off the nail. Most likely, they will come off in small pieces. If you feel stickiness along the edge of the nail, you need to prepare for the fact that lint from jeans and sweaters will be there.
Mirror nail polish
This coating must be chosen carefully. To ensure your manicure looks perfect, use the following rules :
- It is advisable not to take varnish of dubious quality from unknown companies.
- Make sure that the composition does not contain harmful components : toluene, formaldehyde, dibutyl phthalate
- The consistency of this product should not be thick.
- Pay attention to the production time , and that there are no deposits in the varnish, much less delamination.
- Also, if the company producing the varnish values its reputation, then not only the varnish , but also the brush of good quality
How to choose a polish to create mirror nail art on your nails?
Advantages of varnish for mirror manicure:
- Ease of use, accessibility
- Variety of colors
- Manicure is done quickly
Mirror shine made with gel polish
Disadvantages of metallic nail polish:
- It cannot be said that the quality of the mirror coating is the same for all manufacturers; for some it is more consistent with a simple varnish with glitter
- No matter how brilliant the manicure made with these varnishes is. If you look closely, brush marks are visible especially in the light
Lacquered, mirror finish
What is mirror manicure
It got its name due to the fact that nails with it are literally transformed into a mirror or chrome surface. This manicure differs from the effect produced by pearlescent or metallic varnishes in its extremely uniform coverage, without brush marks or noticeable reflective particles. Such an ideal result can be achieved thanks to special foil or special powders, which include polyester dust. It is so finely ground that it looks like a homogeneous mirror amalgam on the nails.
The traditional colors of this nail design are silver, gold and graphite, but now it is possible to get almost any shade, as well as the effect of duochrome, prism and a number of others.
Mirror surface looks great on nails, regardless of their length and shape. Another advantage of “chrome” is that it can be applied to natural and artificial bases, so girls can give themselves a stylish manicure at any time without resorting to extensions, removal and other manipulations.
Most often, fashionistas decorate their fingers with a “mirror” for special occasions, but the bravest ones are not limited to holidays. Chrome manicure is quite suitable for everyday wear, which is facilitated by an extensive color palette, from bright, saturated to delicate pearl shades.
Favorite shades are gold and silver, but there are other mirror colors
Nail design with mirror shine, photo
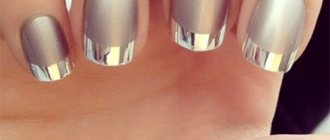
A very beautiful manicure is obtained from mirror foil. Moreover, ordinary baking foil is not suitable for these purposes. This material for nail design is sold in specialized cosmetics stores. It comes in two varieties:
- Regular (transferable), which is glued to nails
- Thermo-foil, you can cover your manicure with it by exposure to warm air
Mirror manicure with foil.
French with foil Below, look at examples of manicure based on a shiny, mirror rub.
Stylish nail design. Nail art obtained by rubbing onto a gel base
A mirror design of nail plates with a special varnish will look beautiful under a little black dress.
Manicure with yellow mirror polish
Design options
A mirror manicure (photos of which can be seen on thematic websites) looks better on medium and long nails than on short ones. The shape of the nail plates can be any, although oval and almond-shaped are popular. The trend also includes a square shape, only with beveled corners.
The list of stylish mirror design ideas includes:
- Classic style. This option goes well with any outfit, as well as jewelry and accessories. The colors include: golden, silver, blue, light blue, pink, red, purple.
- Mirror French. An unusual, but more delicate way is the French style with mirror elements. A mirror moon manicure also looks interesting.
- All kinds of shades. You can choose both bold, bright colors and muted ones that don’t immediately catch your eye.
- Decor . This element will make your manicure varied.
- Marble style.
- Mother of pearl . This design requires fine, pollen-like glitter and a nude base.
- Holographic. When applying, you need to use gray pollen so that it sparkles like diamond dust. The traditional silvery glow will be achieved on a black and white base.
- Prism. It is so small that its particles are difficult to see. It looks on nails just like gasoline stains on water.
- Northern lights. In another way, this design was nicknamed the Maybug, due to the iridescence that resembles the shell of an insect.
- Accent. If you rub in only 1 finger and paint the rest in any neutral color, then with this manicure you can appear anywhere and at any time without changing your style. Also, the accent can be both painting on 1 finger and sliders, while the rest of the nails are painted with shiny varnishes.
- Kamifubuki. Japanese nail art looks like confetti and is often combined with rubbing. The best option would be to paint 1 nail with confetti, while the others will simply shine.
- French. French manicure + rubbing. The nails are painted with gel polish, and then the sticky layer is removed and a basic smile or hole is painted. Dry and rub in the powder and finish with a top coat.
- Double flicker. Method using rhinestones.
- Drops on the mirror. The design is obtained by combining 2 trends of rubbing and droplets.
- Pearl manicure.
Young girls always strive to be noticed, especially with such a magnificent nail design as a mirror manicure. The metallic shine as shown in the photo will not leave its owner unnoticed among others. The fashionable design looks very attractive and captivates the eye.
It is recommended to wear it on holidays, parties or other special days. For those who want to see such a manicure on their nails every day, you can use loose pigment, focusing on 1 or 2 fingers as decoration. Mirror rubbing is a very exciting and creative process, and it’s worth experimenting with.
Article design: Vladimir the Great
Shiny nails, manicure: pink, red, black, blue
Next, see various options for mirror nail art.
Chic blue mirror manicure
Red metallic glitter on nails
Beautiful examples of mirror manicure
Black nail polish with mirror shine
Technology
- Apply base (gel polish or varnish).
- The layer must be thin and very uniform, otherwise the effect will not be obtained.
- Catch the moment when the layer is sticky, but no longer liquid and does not dry out too much.
- Gently pour mirror glitter directly from the container onto your nails.
- Place a sheet of paper under your nails to avoid spilling the product.
- The spilled glitter can then be transferred back to the jar.
- Gently but quickly massage the areas where the gloss is applied.
- Act quickly but carefully so as not to damage the applied varnish.
- The coating must be applied evenly, without voids.
- To get rid of roughness, apply a clear varnish on top.
Application errors
Inexperienced professionals do not always cope with the application, because they do not know exactly how to rub the pigment into the gel polish. It goes on unevenly or washes off quickly. Only a small proportion of failures are due to poor quality pigment. In most cases, this occurs due to non-compliance with the rules for applying powder. Main mistakes:
- Selecting too large a pigment fraction. In this case, it will look like small shimmering glitter, and not a mirror surface. For a mirror effect you need to take the smallest particles.
- Using gel polish with a sticky layer. It will not be possible to drive it evenly; the particles will randomly stick to the previous layer.
- Under-drying or over-drying of layers. In both cases, the powder will not lie flat.
- Rapid erasing of powder will occur if it is insufficiently fixed. For them, you need to choose the densest top coat possible and apply at least two layers.
By eliminating these errors, even an inexperienced technician will be able to apply any type of rubbing without any problems.
Combination with other types of design solutions
This kind of art is very original, catchy, and provocative in a good way. In order not to go too pretentious, you need to choose plain outfits without frills or decorations. The bright metallic effect will already be a wonderful decoration for your appearance.
Mirror design is always a great addition. By listening to our recommendations, you will definitely be able to create an unforgettable chic look. What do you think of our ideas? Would you do this nail art for yourself? Share your opinion in the comments.
Author of the publication
Features of the mirror effect
The mirror design, or matallic effect, is incredibly original. You can use it for any occasion and event. Bright nail art usually creates a sensation among others. In the right color combination or separately, it will always decorate your hands and be a good highlight in your look. This design is best suited for self-confident girls who are not afraid, but want to be the center of attention. If you are brave, determined and love to experiment, then this is just for you.
Advantages and disadvantages: let’s figure out if everything is going smoothly
Like any new product, nail rub has its advantages and disadvantages.
pros
The positive aspects of chrome plating are:
- The first advantage that all masters note, regardless of experience, is the ease of application. Any girl can cope with rubbing shimmering powder into the nail plate, even at home.
- Removing powder is even faster than applying it. No special means are needed to remove such coating.
- With even a little experience, a professional master will be able to create completely different effects using the same pigment, for example, light shimmer or a full-fledged mirror finish. In addition, its application does not require a lot of powder consumption. This leads to the third advantage of rubbing - its cost-effectiveness.
- If the bases for the powder are different, its final shade will also be different. This property allows you to create unusual nail art effects.
Minuses
Before using the rub, it is important to consider several unattractive points:
- Any mirror surface emphasizes imperfection. Therefore, when choosing powder, you need to be sure that the nail plate is perfectly even, or even it out. This is the only way the powder will lie smoothly and look advantageous.
- The rub is much finer than glitter or other sparkles. If you apply it carelessly, it will scatter everywhere, and it will not be easy to wash the smallest powdery grains of sand from your fingers or work area. It quickly gets into the smallest cracks and remains in them for a long time.
- Fragility is also one of the disadvantages of this technique. When using it with both regular polish and gel polish, it is necessary to carefully fix the powder with several layers of topcoat.