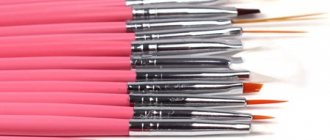
What does a brush consist of?
A brush is a manicure tool designed for painting, sculpting and decorating nails using varnishes, paints, and decorative elements.
Any brush consists of three parts:
- Pen . Usually made of high-quality, durable and pleasant-to-touch polymer material or wood.
- Crimp ring , clip or cartridge - a metal holder that attaches the hair bundle to the handle and securely fixes it.
- A bun is a collection of hairs into one solid dome.
Brussels manicurius
The look is simple, the class is creative. Consists of three parts: bristles, clip and handle.
- Bristle. Hair can be natural or synthetic. Choose the one that your wallet allows you to take. Artificial bristles are in no way inferior in quality to natural bristles if the brush is made to last. New generation synthetics sometimes cope better with the tasks and are characterized by good durability and strength. The bristles should be soft and elastic; hard and rough bristles will not allow you to apply the polish evenly on the nail and create patterns.
- Clip. A funny name for the metal clamp that connects the bristles to the handle. It should be strong and tightly compressed, which will protect the hairs from falling out during work and will not allow the brush to fluff up.
- Pen. Doesn't affect anything except price. Wood or plastic. Status or economy.
Classification, types
There are several criteria by which manicure brushes are classified.
The first criterion is the material from which the tools are made.
- Natural . Natural villus has a porous structure, with a cuticular layer. Such a brush holds the material on itself longer and releases it more slowly into the drawing, so with such brushes it is more convenient to paint watercolors, shade, apply shadows, and just draw calmly and slowly. They are the most expensive, but quickly deteriorate due to acetone-based products.
- Synthetic or nylon. Synthetics have smooth pile, i.e. Each individual fiber is smooth. When we paint with a synthetic brush, the material from it quickly flows onto the nail plate and leaves a mark, so for gel paint we use synthetics, which can quickly draw lines and pattern elements.
- Mixed . The dome of the brush contains natural and synthetic bristles.
The next important criterion is the thickness of the pile in the dome.
- To create a three-dimensional design and large elements, you need a thick brush.
- For delicate lines and patterns, the thinnest brush is needed.
They are numbered depending on the thickness of the fibers. The higher the number indicated, the thicker the brush. The thinnest ones are designated 0, 00, 000 - hair or ultra-thin, and the thickest or widest instruments have the number 8 in the designation.
Each brush must have a designation indicating the thickness of the bristles and the material.
Brushes can also be divided according to their purpose:
- For varnish . With their help, applying nail polish is much more convenient than with a brush, which is sold with the bottle. You can choose the thickness and length of the beam yourself.
- For acrylic . A tool with hard, rounded bristles and a pointed end. It is with its help that acrylic powder is laid out.
- For the gel . Brushes with a square or rectangular dome shape, flat, with hard bristles. The combination of these factors allows you to conveniently work with biogel when covering nail plates and easily model nails from a viscous gel during the extension process.
- For nail design - nail art, painting. Designed for drawing patterns, sculpting three-dimensional decor, and artistic painting.
The next factor influencing the choice is the shape of the dome. There are several main types of brushes, each of which performs specific functions.
- Liner , striper or hair.
A brush with a thin, no more than 2 mm, tuft of bristles, usually 2-3 cm long. The tool is intended for drawing details of a lace pattern, geometry, filigree curls, long lines that can be drawn continuously due to the total length of the bristles. To work with such a brush you need skill, and it is customary to use it for working with acrylic paints and gel polishes. Gel spider and spider manicure
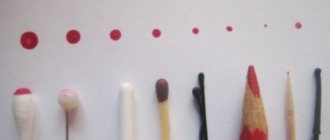
- Spot . A device for performing the smallest details of nail art. The smallest brush, size from 000 to 2, the dome shape is similar to a spade, which makes it convenient for working with small elements of the design. Only the tip of the brush is dipped into the paint and when working you need to hold it strictly vertically to the nail surface.
- Fan-shaped or fan-shaped. It got its name because of its appearance - the villi spread out in a semicircle. An indispensable device for creating original decor. Using this brush, you can evenly scatter glitter on your nails, apply glitter, shade the design, and create a “blurry” background. Very often, a fan-shaped tool is used to create ombre and gradient manicure on nails.
- Petal . The flat dome is narrowed towards the end, reminiscent of a petal. With certain working skills, this one manicure tool can replace two other brushes, a dotted one and an angled one, because with this brush you can draw complex patterns, openwork waves, and even apply sparkles. But most often it is used to create Chinese paintings with floral patterns.
- Flat or wide.
If you are a beginner, then it is better to start practicing your technique and skills using this particular brush. It is much easier to work with than a round bone. The wide active working surface of the beam allows you to evenly apply the polish on your nails, as well as pick up several colors at the same time, thereby creating an interesting and complex pattern. Also used to create gradient, ombre or other interesting nail designs. Gradient manicure: preparation, ideas, materials, 6 methods of execution
- Dagger-shaped or beveled. This instrument has a flat dome cut at an angle of 45 degrees. This form allows you to draw the same elements of decorative manicure, create both three-dimensional drawings and subtle patterns, as well as diagonal lines of the nail plate. It’s convenient to use this brush to do a French manicure, as well as pick up several shades and apply complex decor.
- Dots are a tool made of plastic or wood, on both ends of which there are balls that differ in diameter. To some extent, dots are related to brushes, because with its help you can draw both simple dot patterns and create Gzhel painting on your nails. If you select the required diameters of the balls, then they can replace the liner and dotting brush.
- Rounded . It resembles a wide brush, but the edges of the bristles are rounded. Instruments with this dome shape vary in pile length.
- Short pile . Convenient for drawing floral and plant patterns, because one print already produces an ideally shaped petal.
- With medium pile . Very convenient for applying varnish to the entire nail surface, modeling and making patterns of varying complexity, and filling the background.
- French brush .
You can find on the shelves an invention of manufacturers of manicure accessories - a brush, the dome of which has an arched shape. With its help, it’s easy to draw the perfect “smile line” in a French manicure. Design options for a French jacket - a selection of ideas
- Curly . These brushes are designed for nail design - creating a manicure with flowers, gradient or ombre. The edge of the curly tassels can be anything - torn, divided into 2-3 parts with rounding or narrowing. These brushes are optional - all their functions can replace the varieties listed above, but if you often paint on your nails, they will help make the process easier and faster.
- Silicone brushes or shapers. Instead of a pile dome, such instruments have silicone tips, the shape of which can be very diverse. Shapers have an important advantage - varnishes do not spread on them, which makes work easier when creating patterns. They are also more durable than brushes with bristles.
For painting
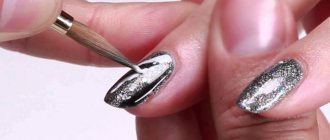
Start assembling your kit with three basic tools: a point brush, a flat brush, and a round brush. With their help, you can do all the basic processes for creating decorative nail art.
Of course, for drawing it is better to use brushes with natural hairs, but first use synthetic ones. Paints and varnishes do not flow on it and are not absorbed. Practice the technique, then switch to professional tools made from natural bristles, which are more durable in use.
Details about painting on nails, what else you will need from tools and materials, as well as step-by-step instructions and examples of work.
For working with gel polish
The dome of the brush can be made of either synthetic or natural hairs. The main thing is that the bundle is rigid and elastic, which will allow you to simulate the shape of the nail from a viscous and viscous gel and avoid unevenness when creating the shape.
Of course, it is much more convenient to use synthetics due to the smoothness of the fibers, on which the material does not linger. But everything is individual and depends on experience and skills.
How to choose the right gel polish: we analyze all its types and top brands
Tips for choosing
- There is no need to purchase all types of brushes at once. Buy new tools as you master the ones you already have.
- It’s better to start working with synthetic brushes, because such brushes are cheaper than natural ones, and it’s not such a shame to ruin them during practice.
- Don't buy a brush based on the photo alone. The instrument must be held in your hands.
- The shorter the handle on the brush, the more comfortable it is to use.
- The cartridge must be securely fastened to the handle of the hand, otherwise you will not be able to confidently and efficiently work with such a tool.
- After purchasing a brush, be sure to check that all the bristles are even and do not stick out from the dome. When purchasing, of course, no one will allow you to do this. But the possible problem is easy to deal with. To do this, twist the brush, resting the base of the dome on some surface. If there are defects, you will notice them immediately. Carefully cut off the “wrong” fibers at the base with scissors.
- Knead the lint with your fingers and wipe it thoroughly with a lint-free damp cloth. This is done in order to remove the special coating from the surface. Absolutely all new brushes have it. Then rinse the brush in warm water and dry.
Washed, washed the chimney sweep clean, clean
A properly selected “brush detergent” is 50% of the success of the cleaning operation. Here is a list of products that can reliably rinse brushes after working with gel polishes and not harm the structure of the pile:
Brush cleaner
Special cleaner for brushes. You can buy it in stores that sell nail art products. Wide range of applications at an excellent price. The cleaner will carefully remove remnants of acrylic, modeling gel, gel polish and will easily help clean nail polish off your brushes. Liquids for washing brushes are offered by Severina, Patrisa Nail, Irisk, Opi, In'Garden, Kinetics, EzFlow, IBD, RuNail and others at prices starting from 100 rubles. for 100 ml. As the volume of the bottle increases, the price decreases. For example, Severina 500 ml will cost only 250 rubles.
2 in 1 products
For example, Brush Cleaner 2 in 1 liquid from Domix 500 ml will remove varnish and acrylic from natural surfaces and brushes for 400 rubles.
Cleanser
A product for degreasing and removing the sticky layer, simply a degreaser, is quite capable of washing off gel paint from a brush. Costs from 50 rubles. for 100 ml.
Alcohol
Many craftsmen use alcohol as a degreaser, which is also suitable for cleaning bristles. The question is what is easier for you to get, alcohol or clinser.
Four optimal options for brush painting. In case of war and the absence of such, the remnants of gel polish can be removed by washing with soap or treating with another detergent. As a one-time event, it’s not terrible, but not on a regular basis.
If you periodically use regular nail polish, then to work with it it is better to buy a set of inexpensive brushes and use regular acetone. The affordable price will allow you to regularly change them without any special expenses.
What you absolutely cannot clean brushes with after gel polish, if they are dear to you as a tool, is acetone. A few applications of acetone and your natural bristles will go in the trash. Never use boiling water for rinsing. After scalding, artificial hairs will “stand on end” and you will have to come up with a new use for them.
Proper care
A few simple recommendations will help you keep your manicure tools with bristles working longer.
- The brush dome should be washed in cool or warm water along the direction of the bristles, carefully moving them with your fingers.
- When working with acrylic, it is recommended to wash the dome after each stroke. Acrylic paint can dry quickly on the fibers and prevent you from making a neat pattern. Further disposal of dried acrylic using acetone-containing liquids leads to damage to the pile.
- It is forbidden to keep the tool in water for a long time. This, of course, helps remove paint residues, but leads to damage to the device. Rinse the pile thoroughly and put it away to dry.
- If the brush is a little fluffy, the dome has lost its original shape, hold the tuft of bristles in hot water for two minutes and then dry.
- The tool can be used after it has completely dried, otherwise problems will arise during the manicure process.
- After completing all decorative work, the pile of the tool must be washed in a special product that removes all excess working materials. The dome can also be cleaned of varnish and paint residues using a base applied to a palette, kneading thoroughly in it.
- No special disinfection of brushes is carried out, because after interaction with the working material, as well as means for its removal, no allergens or other particles remain in the bristles.
- After drying, it is better to lubricate the fibers with nail or cuticle oil. This is recommended for devices with natural bristles.
- If you use a palette to mix pigments, make sure that its surface is smooth, without roughness. This will prevent damage to the villi.
No no and one more time no!
If the tool is expensive and you want to extend its service life as long as possible, then never:
- Take your time when cleaning.
- Don't press too hard on the brush.
- Don't curl your hair.
- Do not immerse the brush in a bottle of cleaner; use a separate container.
- Do not leave it floating freely in the glass, the bristles may become deformed. If you need to soak, be sure to fix the vertical position, in which the bristles do not reach the bottom.
- Do not soak the instrument for more than 15 minutes. Soaking too long and too often will make your hair brittle.
- Do not rub the lint on the napkin, just blot it.
- Do not put the cap on wet bristles, there is a high risk of damage.
- Do not use “blind” caps without air access.
- Do not cut the pile at the root, otherwise the brush will begin to crumble. If you want to trim a few fibers, then leave a couple of millimeters at the base.
- Do not use a rough surface as a palette, this will cause the lint to wear out.
- Do not leave brushes in the sun or bright light.
Watch also the video about brush care:
Perhaps that's all. To create a beautiful manicure, it is important not only the master’s ability to hold the tool in his hands, but also the condition of the tool itself. Now you know how to properly clean your gel polish brush to maximize its service life. A high-quality, soft, elastic brush will work properly for many years. Handle the instrument with care and precision, like a man in love with the lady of his heart. Take care of your brushes! Gorgeous patterns to everyone!
Storage rules
- Brushes should be stored strictly in an upright position, with the bristles facing up. In this case, the pile should dry. It is not recommended to place wet instruments vertically, otherwise they will fluff up.
- It is advisable to store brushes in a special case or case, which will protect them from fading and significantly extend their service life.
In the next article, we looked in detail at the technique of working with the 11 most common types of brushes, how to hold them correctly and apply the material to the nails, how to use them to make interesting designs and ornaments, and what you can use instead of brushes.
Comment
The mouse ran and waved its tail...
The brush with gel polish rolled and fell directly under the rays of the curing lamp. It hardened and upset the owner. Don't be upset, all is not lost yet. The patient can be resuscitated:
- Soak the brush in the cleaner for 15 minutes, keeping it in a vertical position.
- Place the bristles on a flat surface and apply a little pressure to form a fan shape.
- Armed with an orange stick, gradually remove the softened particles of gel polish.
- Then do the same - rinse with water, blot, shape, dry and hide.
Have an educational conversation with the mouse on the topic of running in the wrong place.