Broken nail: what to do
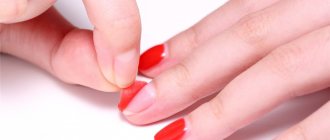
What to do next with a broken nail depends on how it broke: slightly cracked or completely torn off. An uneven edge or crack will cause trouble - scratching and clinging to clothes.
Possible actions in case of a broken nail are as follows:
Nail broken at the edge
- Trim or file the nail.
- Glue the crack yourself.
- Seek help from a specialist.
If you want to solve the problem yourself and save a broken nail yourself at home, then you need to choose the right gluing technology. It depends on where the crack is: in the overhanging part of the nail or in the middle of it. The size of the crack is also important.
- If the damage is minor , then you can seal the problem area with a special patch made of natural fabric or paper plaster. This repair is used for any cracks on the side of the nail, along the “smile” line or along it.
- When the nail is completely broken off, an acrylic artificial material is applied tips .
- Tips are also applied when a crack appears along the axis of the finger, in the middle.
It makes sense to repair a broken nail if it is cracked no more than 1/3 of its length. Otherwise, the repair will be short-lived.
Sometimes the crack goes so deep that it injures the finger under the nail. In this case, it is better to carry out treatment and recovery in the salon.
What not to do :
Do not apply superglue to an uncoated natural nail.
- Glue a living natural nail with superglue . The synthetic composition corrodes living cells of the nail plate. Only extended acrylic plates can be repaired with synthetics.
- Do not treat the nail with acetone or other nail polish remover when breaking it off to the “meat”. Aggressive chemical solutions should not get into the wound.
- Don't delay repairing your nail if you have a crack. The nail may crack further and break off completely. The sooner you start fixing the problem area of the nail, the smaller the crack that needs to be repaired.
Restoration at home
A special quick-drying adhesive used for nail restoration will connect the 2 broken parts of the plate for a period of 2 to 4 days.
Progress of the procedure:
- Rinse your hands well under running water and dry.
- A hand with a damaged nail should be placed in a warm bath to prevent premature keratinization of broken off particles.
- If the plate is not completely broken, this procedure can be skipped.
- Apply glue to the broken area, placing the broken fragment on top.
- The particles of the nail plate are pressed tightly against each other for greater tenacity.
- The glued fracture site is treated with an adhesive composition 2 more times.
- The restored nail is sanded with a buff and coated with clear varnish.
You cannot use regular superglue (such as “Moment”) for the procedure due to the risk of injuring the living parts of the nail plate and skin.
You can only remove minor damage yourself. A thorough repair of the plate, including sealing with wax, restoring with biogel or supplying a long-term patch, should be entrusted to a manicurist.
Such a restoration will last about 7 days, but will require constant wearing of gloves when carrying out any household work due to the danger of the cosmetic being corroded by acetone or household chemicals. Frequent fractures of the nail plate indicate a lack of vitamins and minerals in the body.
Helps prevent brittleness:
- Proper nail care, with constant application of nourishing and moisturizing creams to your hands.
- Compliance with the drinking regime, which consists of drinking at least 1.5-2 liters of water daily.
- Carry out any cleaning only with rubber gloves.
- Protecting the nail plate from any mechanical stress.
- Avoid using nail polish remover solutions containing acetone. It is mandatory to take breaks between gel nail art. Careful removal of hangnails.
- Filing nails with a file located strictly at a right angle.
- Eating plenty of vegetables and fruits.
- Taking vitamin-mineral complexes containing calcium.
At home, you can help strengthen your nails:
- baths with sea salt;
- lubricating nails with iodine solution;
- use of medicinal wax;
- hand baths with the addition of essential oils of fir, orange, lemon, tangerine.
Such a common nuisance for women as a broken nail can cause a lot of cosmetic and practical inconvenience. During the repair, the repair will allow, by masking the crack, to return the manicure to its original appearance and prevent further destruction of the nail plate.
Tools and materials for nail repair
Often, materials for gluing damaged nails are sold as a set, like a professional kit for repairing nail plates. It includes:
The main materials for nail repair are silk and special glue.
- Silk for nail repair on an adhesive basis.
- Glue for natural and artificial nails.
- File and buffer for natural and artificial nails.
- Any disinfectant : hydrogen peroxide, medical alcohol, or even better - a professional manicure product.
- Orange sticks for manicure.
All these tools and materials can be selected separately, depending on availability in the store and personal preferences. It is worth noting that although the special nail repair silk is self-adhesive, its adhesive base is not enough to glue the crack, nail glue is required.
In the absence of silk for nails, it can be replaced with a piece of natural or synthetic silk, a paper napkin, a tea bag, filter paper or a paper plaster - whatever you have at hand at home.
Broke at the root
It is easy to restore a broken nail yourself using a special kit sold in haberdashery stores or with improvised material.
A prerequisite for repairs is the purchase of:
- quick-drying, special nail glue;
- degreasing and disinfecting solutions;
- nail files;
- buffs.
Among the most popular restoration options:
Using a tea bag
A dry, unused tea bag can serve as a patch, allowing you to maintain the appearance of your manicure.
The photo shows step by step what to do if a nail breaks.
For repair:
- A small strip is cut from the bag, 3-4 mm larger than the break size, and fixed on a prepared, buff-polished nail plate using special glue.
- The patch is pressed, and after hardening it is treated with 2 additional layers of adhesive.
- The restored nail is polished with a buff until smooth and covered with transparent varnish.
Scotch tape
Transparent stationery narrow tape will perform camouflage actions, allowing you to restore your manicure before a visit to a specialist.
- A small piece of clear adhesive tape is applied to the broken area on both sides of the nail.
- The tape is pressed to give greater adhesion.
- The restored nail is treated with a buff and varnished.
- Further work is carried out only by a manicurist.
For such a restoration, only one-sided, transparent adhesive tape is suitable. Do not repair broken nails with duct tape.
Natural nail repair
Most often, the nail plate breaks at the point where it attaches to the finger. This line is called a "smile". The repaired nail loses its strength, but retains its appearance. The repair technology is as follows:
Nail repair process
- Remove the polish and treat the nail with an antiseptic .
- Apply a buff to any uneven areas on the broken nail.
- Prepare a piece of fabric - cut it so that it covers the crack by 2-3 mm on each side.
- Apply glue and place a piece of fabric over the nail , pressing it carefully. To level the patch, use a toothpick or an orange stick with a pointed end.
- After the glue has dried, smooth the edges of the fabric with a buffer .
- Similarly, glue another 1-2 layers of fabric on top of the first, depending on the size of the breakage, carefully filing each layer
- Cover the nail with varnish to completely disguise the crack.
You can learn more about how to repair a broken nail by watching this video:
When gluing tips, the technology is similar. Instead of three layers of fabric patches, an acrylic tip is glued over the damage. After the glue has dried, the tips are cut to the required size.
[adsense_content_2]
Causes
There are many factors that contribute to gel polish cracking on your nails.
Such reasons include:
- improper coating application;
- poor quality manicure materials;
- applying the gel in a layer that is too thin or thick;
- influence of external factors;
- unhealthy condition of the nail plate;
- incorrectly selected drying lamp;
- the presence of a sticky and greasy layer on the surface.
Gel polish can crack on both natural and extended nails. The integrity of the gel surface depends on the reason that provoked the development of this phenomenon. For example, if the manicure technique is violated, small cracks appear on the second day.
Results of incorrect application
The gel coating on the nail plate begins to crack if the technology was violated during the procedure.
Poor quality manicure results from the following reasons:
- improper cuticle removal;
- oily layer on nails;
- nails are not completely dry;
- the gel was applied to the plate after applying the cream;
- when gel polish is applied in a very thin or thick layer;
- if the base product and gel are from different manufacturers;
- with improper polishing of the nail surface.
If the master does not follow the application technology, the gel polish begins to crack on the nails within the first week after the manicure.
External factors
If the varnish is cracked, this may be due to external factors. The substances contained in household chemicals are considered the most aggressive to gel manicure.
The nail coating is damaged by:
- washing powder;
- some creams and ointments;
- detergents (especially those that clean the surface of bathtubs and sinks and contain abrasive particles);
- soap
The integrity of the gel is compromised when working with soil without protective gloves. Temperatures that are too low or high also reduce the wear time of gel polish.
Nail condition
Most often, cracks form due to a pathological condition of the nails. If the stratum corneum is very thin or soft, then the gel polish begins to quickly become damaged.
Under frequent exposure to water, powder, and detergents, the coating bursts because it does not attach well to the nail surface.
Thick layer of gel polish
Cracks begin after the material is applied too thickly.
The layer at the top of the manicure dries and decreases in size. The gel coating below, on the contrary, stretches. As a result of this process, cracking occurs.
Drying lamp
When this indicator is lower, the product does not dry completely. The sides remain wet.
To check the quality of drying, press on the coating with a pusher. If a dent appears, the gel has not dried. With incomplete drying, strength decreases.
Exposure to water
Frequent contact with water negatively affects manicure. Washing your hands frequently can cause your manicure to crack.
Remaining sticky layer
If the sticky layer is applied incorrectly or is not completely removed, then the gel polish does not adhere well to the nail plate. Cracks due to its residue appear within a few days.
Poor quality materials
One of the common reasons for cracking gel on nails is the use of low quality materials.
Usually the price for these accessories is low. Such materials are not branded.
Other reasons
Gel polish also cracks due to the following reasons:
- use of antibiotics;
- stomach diseases;
- pathologies of the heart and blood vessels;
- diseases of the endocrine system.
Such a manicure can be damaged due to hormonal changes in women, including during menstruation and pregnancy.
In rare cases, individual intolerance to the components included in the manicure product is possible.
Crack under gel coating
In order to glue the nail under the gel polish, you need to remove the polish. You don’t have to remove all your fingers, limit yourself to just the broken nail, and leave the rest alone. For removal, use special means for removing Shellac or biogel, depending on the coating of the nail. If you can’t remove the gel polish, you can glue a patch over the old coating.
A “patch” is applied to the place where the nail is broken.
The technique of applying a patch to gel polish is the same as for a natural nail, and it is covered with a new varnish, which is dried under a UV lamp. For home repairs using gel technology, you need a UV lamp and gel polish.
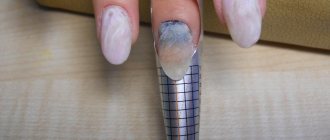
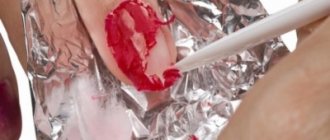
If the crack is located along the edge of the nail, then it can be cut off and rebuilt with biogel . To do this, use a special form or foil, which is placed under the nail and used as a support for applying the biogel. After the biogel hardens under a UV lamp, the foil is carefully removed.
How to build up a broken nail with biogel or a rubber-based base coat, see the video instructions:
Is it necessary to remove gel polish if the original nail underneath is cracked?
The formation of cracks and breakage under gel polish can be dangerous for a girl, as this implies the formation of an air gap between the decorative coating and the natural nail, into which water can enter. High humidity in a confined space quickly leads to the formation of a favorable environment for the development of bacteria, which is why fungus appears.
And the presence of fungus negatively affects the condition of the entire plate, including the health of the matrix (base), so future manicure corrections will not be possible until the nail is restored.
In addition, damage to the plate leads to its severe weakening, due to which a large load on it in the form of gel polish leads to a decrease in the strength of the plate, and detachments and breakages begin to form.
However, if the surface is slightly damaged in the free edge area, you do not need to remove the coating yourself. Typically, the formation of cracks in the regrown part does not lead to pain and does not bring the risk of infection in the body.
Nail extension repair
Extensions are done with acrylic tips . They do not have a living structure, so if they break off, they can be glued with synthetic glue for plastic (superglue, “Moment”). The fastening materials are the same - filter paper, silk strips, paper plaster.
The technology for gluing the extended plate is as follows:
If repairing the extended nail is impossible, you can replace it with a new one.
- Apply glue to the nail and place paper strip on top of it .
Place another drop of glue . the third layer of glue on top of the dried second. - Treat the repair area with a nail file .
- Apply varnish on top .
Another repair option is to replace the broken tip with a new one.
First aid
The course of action for a broken nail will differ depending on the nature of the breakage. If it is bleeding, cracked to the meat, at the root, halfway, then the first thing you should do is disinfect the wound and stop the bleeding. It is important to do it right:
- Stop the bleeding. Press a bandage or clean cloth onto the bleeding area and hold for 10 minutes. In this case, it is recommended to lie on your back and raise your arm up. If the bleeding has not stopped after 15 minutes, you should seek medical help.
- Clean the wound if it is dirty. Place your hand under running cold water. If necessary, use a soft washcloth and soap. Do not rub the damaged area, otherwise the bleeding will resume.
- Treat the wound with an antiseptic. You can use chlorhexidine (does not sting), hydrogen peroxide or another.
- In case of serious damage, it is correct to cut off the broken part of the plate and file the edges. Then you should apply an antibiotic ointment to the wound (Neosporin, Levomekol, Polysporin).
- Gently bandage your finger. Wrap the bandage several times to create a cap, then criss-cross the bandage and tie. Make sure that the bandage is not too tight, but does not fall off.
- Apply ice poured into a plastic bag to the sore spot 3-4 times a day. Keep it on for 15–20 minutes. This will help relieve pain and swelling.
- Change the bandage daily and treat the injury site with an antiseptic or antibacterial ointment.