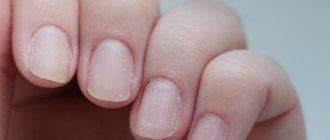
How to dilute thickened nail polish?
Nail polish thickens because the liquid evaporates from it. Knowing this, you can use a lot of ways to bring it back to life.
- Special product for thinning varnish. Manufacturers know that varnishes often dry out, and therefore they came up with thinners. They are sold in the same department where varnishes are sold. Instructions for use are written on them. In appearance, the thinner is a transparent liquid resembling varnish
- Add varnish without color. This method will not help save your favorite polish. But on the other hand, the colorless product will take on some of the color and can be applied to the nails
- The easiest and most affordable way is to add nail polish remover. You don't need much of it to make the varnish come to life. Unfortunately, the effect is temporary
- Heating the varnish is another easy way. To do this, heat the water until hot and place the varnish in it for 10-15 minutes. After this, the varnish can be used again
- Paint thinner. It would be useful to remind you that paint thinner is a strong chemical and is not very beneficial for nails and skin. However, if there is no other way out, the varnish can be diluted with it.
Ways to thin nail polish
Acrigel from TNL
It has 11 shades from classic white to the popular pink parfait, and 18 ml jars are available in several colors. The manufacturer produces acrylic gel in turquoise-colored jars; sometimes the color of the inscriptions on them may change and this does not affect the quality of the product.
Acrigel from TNL is also distinguished by its thick consistency and viscosity of the material. Unlike Vogue Nails polygel, it has a more porous structure. Acrygel can be used to strengthen nails, extend or extend them using forms or top forms. Acrigel from TNL wears well for more than 3 weeks if the artificial material is handled correctly and nail extension technology is followed.
What to do with dried nail polish, what to add to it?
There are many ways to restore hardened varnish. But as the saying goes: “A problem is easier to prevent than to solve.” Therefore, use these tips to keep your polish fresh longer:
- Varnish does not like cold or heat. Therefore, do not store it in the refrigerator. The common myth that polish should be kept refrigerated has ruined many of your favorite nail products.
- Also, do not leave the varnish in direct sunlight or near heating elements.
- The varnish should be stored in an upright position, in a dark and cool place.
- Shake it a little before using the product. But do not overdo it so that bubbles do not form in the varnish.
- To make the polish open easily, wipe the tip of the jar with nail polish remover after use. This will remove any remaining product and prevent the lid from sticking to the jar.
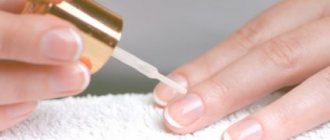
Here's how to properly use varnish thinner if it's dry:
- Add a few drops of the product to a jar of varnish and actively shake it. You can open the varnish and stir it with a brush. The procedure is carried out until the varnish is diluted
- There is no need to add a lot of solvent at once; it is better to do this in several stages. Then the consistency of the varnish will be ideal
- The solvent has a long shelf life and is suitable for varnishes of any manufacturer. It should be stored in a cool, dark place, away from hot objects and children
Varnish thinner
Pros and cons of gel nail extensions
The advantages of gel extension technology include:
- The procedure is performed quickly and takes no more than 2 hours.
- The plasticity of the gel makes the extended nails durable.
- The elastic structure of the gel allows you to extend the life of your nails.
- The cost of gel extensions is lower than with other materials.
- The correction is performed quickly and takes about 30 minutes.
- Natural nails are strengthened, which allows you to grow them without the risk of splitting and brittleness.
- The surface of the nail is leveled by filling the cracks and relief with the preparation.
- The gel gives nails a glossy shine.
- Helium nails are easy to remove.
- The ability of the material to allow air to pass through allows the nail plate to receive oxygen, which prevents it from becoming dry.
- The gel protects the natural nail from ultraviolet radiation, household chemicals and mechanical damage.
- The material does not cause allergies.
- The gel contains pine resin, the bactericidal properties of which have a preventive effect against fungus.
- Designs of any complexity are possible on helium nails.
The disadvantages of the procedure are:
- When the material dries in a UV lamp, a burning sensation may occur.
- Repairing a broken nail is impossible, so new extensions are necessary.
- It is difficult to remove helium nails on your own without damaging your natural ones.
- To remove extended nails, you will need to file them down, but this will damage the top layer of your natural nails.
- The material is susceptible to damage due to sudden temperature changes.
How to dilute thick gel polish?
To prevent the gel polish from thickening, it should be stored in a dark and cool place, avoid contact of the product with sunlight
There are several ways to dilute gel polish:
- Using alcohol. Regular medical alcohol is what you need to save gel polish. To begin, add a few drops of alcohol and mix it thoroughly with the varnish. If the product is not liquid enough, repeat the process.
- You can also add gel polish remover. It will naturally prevent the polymerization process. However, this method will make the gel polish less durable; it will chip off the surface of the nail.
- You can dilute the gel polish with the same color gel polish. Another way is to dilute the product with a top coat for manicure.
Thick gel polish
Hydroxyethylcellulose. We make gels.
Hi all! And again, an overview of a harmless chemical that can be useful in the household. In the preview, the result of the reaction is actually a white or slightly yellowish powder, odorless. The material for producing hydroxyethylcellulose is raw materials of natural origin - cotton and wood. The polymer functions in water-based solutions of any temperature and is resistant to magnesium, calcium, and organic solvents. It is often used as a thickener in the manufacture of water-based creams, gels, and intimate lubricants.
Additional Information
The substance is successfully used in cosmetics to regulate water balance, stabilize, and create a wide range of viscosity in the production of detergents, decorative cosmetics, and lotions.
It is considered safe, so one of the areas of use is medicinal. Due to its fibrous and water-soluble structure, it acts as a laxative. The main areas of application of hydroxyethylcellulose in cosmetic technologies: Gentle skin care– products with UV protection, baby lotions;
Regular hair care
- shampoos, strengthening and nourishing masks and gels, conditioners;
Toothpastes and mouth rinses
;
Decorative cosmetics
– powder, eyeliner, mascara;
Deodorants (roll-on)
; Hydroxyethylcellulose is also successfully used in oil production as a fluid loss and viscosity regulator in drilling fluids.
Rushim now sells bags of 500g and 1kg, but my bag is more modest. The powder is rather beige in color, granules are visible, although they are quite small
For initial testing, I used 200 grams of water and divided 2% powder into three portions
Added 1g (0.5%) of powder and stirred thoroughly. The granules begin to swell and lose their white color. Pay attention to the litmus test, the water in the tap is a bit hard (pH about 8), so there was no need to add alkali.
Over time, the solution becomes transparent, only air bubbles are visible
This is the viscosity of a 0.5% solution. Still a bit runny, but glides on well and dries slowly
Add another 0.5%, bringing the concentration to 1%. The reaction proceeds faster and thickens before our eyes
For clarity, I took a little into a syringe and released it under pressure in order to saturate it with air bubbles. Only in half an hour the bottom layer became transparent
After a few hours, the solution became clear and noticeably thicker, feeling like shower gel. The viscosity of hydroxyethylcellulose at 1% in water should be in the region of 3400-5000 Hz, pH 6-7
I added another 2g (1%) of powder and it dissolved quite quickly. It turns out that the more saturated the solution, the faster the subsequent reactions proceed. So I had to leave it to stand for a long time
It turned out thick, very thick for home use, because... the thick gel quickly turns into a “marshmallow”
Making hand sanitizer
Another advantage of hydroxyethylcellulose is that it reacts with solutions with a high alcohol content, which means it can be used to create antiseptic gels, which is quite relevant at the moment, and probably will be for a long time.
This recipe is popular online:
69% (69 g) ethyl alcohol 96% 10% (10 g) aloe vera gel 10:1 1.5% (1.5 g) hydroxyethylcellulose 11.7% (11.7 g) water 5% (5 g ) glycerin 0.5% (0.5 g) flavor “Orange” (any will do) 1.8% (1.8 g) 10% NaOH solution 0.5% (0.5 g) 80% lactic acid
I took 100 ml of medical alcohol and poured 1 g of powder into it, in the glass on the left 10 ml of colored water
Hydroxyethylcellulose somehow doesn’t want to dissolve in alcohol, so I added water and stirred everything
After an hour, the solution thickened, but not as thick as 1% aqueous, two times weaker, litmus was neutral
To speed up the reaction, the mixture is alkalized with sodium hydroxide and then neutralized with lactic acid, but I didn’t have any of this on hand, so I sprinkled a pinch of soda, literally on the tip of a knife. While stirring, the composition began to thicken before our eyes and after a few minutes reached the desired consistency. I neutralized it with a pinch of citric acid, although it probably could have been left as is. Transparency has not been lost.
In a good way, you still need to add glycerin so that your hands don’t dry out, and all sorts of fragrances to your taste. The viscosity is similar to that of a shower gel or detergent, so it does not dry instantly like regular alcohol and manages to properly disinfect the skin. At first I wanted to test the difference in the rate of evaporation from paper, but this takes a very long time, so we’ll pass the fire test. I squeezed out the same amount of gel and pure alcohol onto the surface and set it on fire, the gel, of course, did not burn as intensely in the end, but the flame lasted three and a half times longer
After combustion, traces of hydroxyethylcellulose, tinted with uranine, remained
An attempt to create a gel to get rid of rust
Added 20% Trilon to the previous water gel
After mixing, no cloudiness is visible, only air bubbles
I also tinted it with uranium to make it easier to monitor the remaining composition on the surface. I just hit the lid of the container on the sheet and added what crumbled
Well, the composition has acquired a greenish tint and glows brightly in the UV
Here's a closer look at the intermediate result before settling
As we remember from the last review, Trilon completely dissolves in water at a concentration of 20% only when heated to 80 degrees, so I put the glass in a baby bottle warmer for an hour and just left it on the window overnight. The next day the gel became more transparent, but small bubbles remained in the upper layers
GIF for clarity
After mixing, large bubbles were added
This gel will serve to dissolve rust on parts that cannot be lowered into a container with a solution. The first thing that caught my eye was this vice.
Quite a large surface area, there is a slope, they are located in the open air, blown by the wind. The conditions are not very good, but if there is a positive result, then it will be even better in the garage. Apply 5ml
After 5 minutes the gel began to spread over the surface and I smeared it a little
After another hour, the layer was noticeably depleted, began to dry out at the edges, and in the middle it resembled marshmallow. I doused the vice with water and wiped it with a dry cloth without fanaticism.
This is not to say that there is no result at all, given the neglect of the case. I thought that if I left it overnight, the treated surface would begin to shine, but physics takes its toll and the drying time is not enough for serious changes. I applied the gel again, but this time I covered the surface with polyethylene.
By morning, the composition had spread over the entire surface, and the excess flowed out through the folds of the bag.
Judging by the traces of rust, Trilon was not enough to neutralize the entire volume
The result is a little better than it was without wrapping, because in this case there was more time for exposure, there was simply not enough reagent. Apparently during the reaction the acidity of the solution increases and it becomes liquid like water
For clarity, I put together a gif: was
/
first treatment
/
second treatment
Results
The substance is useful, everyone can handle it and additional reagents are needed at a minimum, while it is relatively harmless to the body in reasonable quantities; rats felt unwell when taken orally >5000 mg/kg.
It has a pronounced laxative effect, etc. vegetable origin, some may have allergies. For the manufacture of gels and creams, I would not raise the concentration above 1%; for an antiseptic, 0.5% is quite enough. Above 2%, the composition is already more like jellied meat and is poorly absorbed into the surface, drying over time to the consistency of marshmallow. If the water content is high, you don’t have to alkalize, although at a pH close to neutral, the process will be quite long. Well, I repeat once again, sodium hydroxide (alkali) allows you to quickly obtain uniform dissolution and the most transparent solution. Raising the pH level to 7-8 is quite enough. After thickening, the mixture is usually neutralized with lactic acid.
As always, constructive criticism is welcome in the comments. All the best =)
How to dilute matte nail polish?
- Matte nail polish is essentially no different from glossy polishes. Therefore, any means for diluting regular varnish are suitable for it.
- Since the matte finish is very capricious, you should not experiment. The best solution is to use a special varnish thinner
- Matte varnish quickly loses its dullness and chips. It is better to apply it in 2-3 layers and dry naturally for at least an hour
How to dilute matte nail polish?
What brands of acrylic gels are present in imkosmetik?
- Elsa Professional, Grattol, Lunail
- Masura, Monami, Nail Passion
- RIO Profi, TNL Professional, Vogue Nails
Polygel from this brand is available in tubes of 10 and 20 ml. The color of the polygel chosen for the photo is transparent pink and has a medium-thick consistency. Squeeze a small drop from the tube and use a spatula to apply the material to the nail plate. To form a short nail, a drop of about 5 mm is enough.
– The material has no odor, it is elastic, plastic and easy to model. The color is close to the natural nail. Based on experience in use, it turned out that it is better to apply the polygel over the base coat, since when applied to the primer, detachments are possible. This is an excellent material for nail repair, extensions, extensions and is well suited for beginners and those who are just trying their hand at nail modeling, advises Ekaterina Volosnikova, nail service master and imkosmetik live broadcast host.
How to clean brushes from dried varnish?
- The easiest way, which is always at hand, is nail polish remover. You need to pour it into a small plastic container and place the brushes there for a couple of minutes. After this, wipe the brushes with a cloth and rinse with water.
- Another way is to clean with paint thinner. If you have it in the house, then use it according to the instructions. After this, the brushes should be thoroughly rinsed under running water, because the solvent is toxic.
- Brushes can be cleaned from gel polish with a special product to remove the sticky layer. Also - gel polish remover
- Manicure brushes need to be cleaned promptly so that the product does not harden on them. This will make the cleaning process easier
Acrigel - how to work with it?
- do a manicure in the usual way
- degrease the nail surface
- apply primer
- apply base coat
- stick on the form and use a scraper or pusher to place a drop of acrylic gel
- using a brush dipped in degreaser to form the architecture of the nail plate
- periodically wet the brush in degreaser
- polymerize in a UV lamp for 2 minutes, LED lamp for 30 or 60 seconds (depending on the power of the device).
- we produce sawdust. When filing acrylic gel, much less dust remains than when using other materials.
Modeling nails with extensions
Gel nail extensions, step-by-step instructions with photos for which makes the work easier, are impossible without proper modeling. The wear life, beauty and strength of helium nails depend on this. During the modeling process, the drug is applied to the nails in a certain shape and to the required length, and the result lasts for 1 month.
Modeling occurs using templates-forms or types. For nails with a beautiful shape, the first method is used. Another method is recommended for short nails that are prone to brittleness and difficult to correct.
Technique for nail extensions on forms
Using this method, you can give your nails the desired look. As a result, they can be oval, square or pointed. The advantage of using this technology is the natural result. The transition between the product and the nail looks smooth and unnoticeable. This technique made it possible to avoid excessive thickening of nails during extensions.
The disadvantage of this service is that it is labor intensive. Creating a smooth transition requires special skills. It is extremely difficult to repeat it on your own. This technology is suitable for women with a strong and healthy nail plate who want to give it a different length or shape.
The modeling method can be different:
- The top one is done by applying helium material to the template markings and then attaching the mold. After the drug hardens, it is removed.
- The lower one consists of fixing a template with markings under the regrown edge of the nail, and the drug is distributed from above.
Varieties of forms
There are several types of form templates:
- Disposable items are made from flexible and soft materials. This simplifies modeling, but after the procedure the template becomes unusable.
- Reusable types have a plastic or metal base, so they last a long time. They are convenient to use, but are much more expensive.
- Round templates are suitable for working on short nails.
- Oval and almond shapes have smooth lines and are suitable for nails of any length.
- Square shapes are the most versatile and practical, also suitable for long and short nails.
- Pipe, stiletto and edge are distinguished by their pointed tip and unusual shape. They are suitable exclusively for long nails.
- The bottom and top views differ in how they are used in modeling.
How to choose gel for nail extensions?
Gel nail extensions (step-by-step instructions with photos visually display the importance of this component) are impossible without high-quality material. Both the visual effect and the wear time of the extended nails depend on this.
When choosing a gel, you must follow the recommendations:
- It is better to choose single-phase gels. They serve as both base and top coat at the same time. The high cost of such materials is compensated by significant savings in time spent on the procedure.
- Two-phase sets contain a gel for adhesion to the top layer of the nail and a gel for the finishing coat. Their separate application makes the procedure longer and more complex.
- When using three-phase gels for adhesion, fixation and decoration, you will need to apply 3 different compositions, which is long and inconvenient.
- The consistency of the gel should be elastic, not thick or liquid.
- The composition should not contain aggressive components that give off a strong chemical odor.
Technique for nail extension using tips
Gel nail extensions (step-by-step instructions with photos do not reflect all the nuances of the work) can be done using tips. A special feature of the technology is that the tips are attached and not removed at the end of the procedure. Tips have 2 zones: contact and free edge. The contact area is glued to the nail, and the free edge shapes its appearance.
The advantage of this technology is its versatility. Tips can be used even on soft, damaged nails. The disadvantages include the difficulty of working with tips. They must perfectly match the nail, otherwise the result will look unnatural.
Don't miss the most popular article in the section: How to extend nails with gel polish. Nail extension instructions for beginners. Photo.
Nail extensions at home
When performing the procedure at home, you must follow simple rules:
- The top layer of the nail can be filed only until the nail becomes dull.
- You should regularly examine the nail from different angles to see subtle transitions and steps.
- After filing the keratin layer, you should remove nail dust with a brush, otherwise the work will be sloppy.
- Do not apply preparations with a gel texture like regular varnish. The drop is stretched with the tip of the brush from the center to the surrounding area, and then to the area under the cuticle.
- The curing time for different drugs in the lamp is different, so it is important to study the instructions for them.
Lamps for gel nail extensions
Under the influence of the lamp, the gel hardens on the nails. Without this device, the extension procedure is impossible, so you should not skimp on it.
| Name | Advantages | Flaws | Gel polymerization time | Price |
| UV Planet Nails lamp | Polymerization of the gel occurs under the influence of ultraviolet rays. The device operates from the mains and is also equipped with a timer. | When it hardens, the gel heats up, which is accompanied by a burning sensation. The service life of UV lamps is shorter than that of LED devices. | 3 min. | 3000 rub. |
| LED Runail lamp | The lamp life is 50,000 hours. Polymerization occurs under the influence of LEDs, so the nails do not heat up. The device is equipped with a timer and automatic switching on. | Some types of gels are not suitable for working with this lamp. | 5 sec. | 5000 rub. |
When choosing a lamp, you should also pay attention to the following aspects:
- The device should be light in weight.
- The material from which the lamp is made must be resistant to damage and falling.
- The lamp power must be at least 36 watts.
- The lamp must be accompanied by a “PCT” quality certificate, which confirms the safety of working with the device.
Don't miss the most popular article in the section: How to draw monograms on nails step by step for beginners. Instructions with photos.