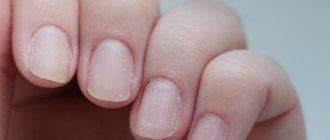
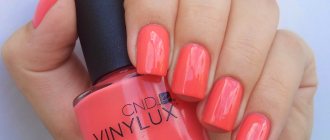
Gel coating is a practical solution for a thin nail plate. The advantages of the gel are that the nails do not break off and have a well-groomed appearance. In addition, it is possible to create any design.
The coating may come off at the wrong time, or may peel off immediately after a fresh manicure. If your nails peel off from the gel, we’ll look at how to avoid this in the article.
What to do if your nail breaks until it bleeds?
Firstly, if the gel polish on the nails is cracked and along with it the nail is injured to the core, then it is better to forget about the perfect manicure until the plate is completely restored.
You have to sacrifice beauty for health! If a nail breaks to the point of bleeding or at the root, you should not start thinking about how to glue it, but first properly treat the wound with chlorhexidine, hydrogen peroxide or any antiseptic. Beauty is beauty, but health is much more important!
Next, wrap it with a plaster or bandage and leave the injured finger alone until the wound is completely healed, after which it is recommended to seek professional help at a salon. During healing, you need to promptly change the dressing material and lubricate the cuticle with products that promote rapid nail growth. If you plan to contact the hand, the nail on which has broken at the root, with water or chemical reagents, you must wear a rubber fingertip or even special protective gloves.
To avoid aggravating the situation, it is strongly not recommended to repair a deep plate rupture yourself.
After the wound has completely healed, you can think about how to fix the situation with your damaged manicure. The ideal option is to contact a professional. In the salon, to the question “Gel polish is cracked, how to save it,” the master will most likely answer with an offer to fix the broken nail with biogel. This is an innovative drug containing many healing substances, including protein. With the help of biogel, damaged layers of the plate and nail bed will be restored in record time. In addition, it perfectly protects wounds from infections and germs.
Biogel restoration technique
This is a universal tool that can be used for both extension and restoration of a broken nail.
This is an easy way to restore your nails and takes less than 30 minutes. There are only three stages:
- Apply biogel.
- Dry.
- Apply base, decorative gel polish and top. Dry in a UV lamp after each application.
Biogel does not tolerate the proximity of household chemicals, so cleaning the house and washing dishes should only be done with rubber gloves.
What should a nail technician do if a nail is cracked under gel polish?
If a nail is cracked under gel polish, the master must do a full repair and strengthening, using for this:
- plastic gel if damaged in the center of the plate;
- more rigid materials - polygel, fiberglass, fiberglass with a defect formed on the side;
- gel for extensions when broken at the root.
You don’t need any special tools for this; those that nail artists usually have are enough.
Watch a video on how to repair a cracked nail:
Tools to fix
You can fix a broken nail so that the crack is not visible using several devices:
- silicone “hoof” or orange stick;
- buff with abrasiveness 240 grit;
- flat brush;
- clinser;
- polygel;
- scissors;
- jelly gel;
- gel for nail repair, sealing;
- silk, fiberglass, fiberglass.
Liquids traditionally used to perform gel polish manicure are also needed.
If it's broken in the middle
If the nail is broken in the middle, it can be repaired in several stages:
- Remove the material down to the natural plate, that is, the base, even in the absence of detachments on it.
- Wipe with degreaser and apply primer.
- The next layer is the base, which needs to be spread in a thin layer, polymerized, and the stickiness removed.
- Using a silicone applicator or an orange stick, take a portion of the polygel and place it on the crack.
- A flat brush is dipped in a cleanser and wiped on a napkin so that the bristles are not too wet.
- The tool is used to distribute the material so that the crack is closed and the surface of the nail becomes smooth and anatomically correct.
- It must be dried in a lamp.
- The next step is to remove the sticky layer with a damp cloth.
- The end of the nail must be filed to remove unevenness.
- Then it can be covered with a leveling layer of base, flower bed and top, successively drying each product and removing stickiness.
Broken on the side
If the nail is broken on the side, you need a more rigid material than polygel, and the repair procedure looks like this:
- A base is applied to an uncoated nail treated with a degreaser.
- This layer is dried in a lamp, and the surface is wiped with a cleaner.
- A rectangle is cut out of fiberglass approximately ¼ of the nail plate.
- The material is removed from the substrate and placed on the damaged area.
- A base is applied to the fiberglass, soaking it until transparent.
- You need to dry the coating in the lamp again.
- To model the nail, use liquid gel, first applying it with a flat brush in a thin layer.
- Then a portion of the same material is taken with a silicone applicator, placed on a plate and also distributed with a brush.
- After drying in the lamp, you need to file the nail from the end, sides and top, and wipe with a clinser.
- The thickness is also reduced from the inside using a machine and a carbide nozzle.
Side breaks can also be repaired with fiberglass:
- The material is smoothed on a flat surface so that the elastic threads lie in one layer.
- A base is applied to the area with the crack and is not polymerized.
- The fiberglass is applied to the area to be repaired.
- Use the applicator to distribute it over the nail.
- Apply another thin layer of base product on top.
- The finger is placed in the lamp to dry.
- Excess fibers are cut off with scissors.
- And you can use liquid modeling gel, as in the previous case.
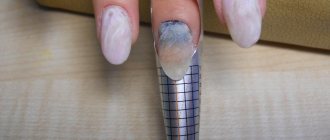
How to glue if under the root
Gluing a nail if it is broken at the root is the most difficult thing, but it is also possible with the help of modeling:
- The remaining free edge is cut down to return the plate to its natural shape.
- Apply a thin layer of base gel.
- This layer must be polymerized.
- Prepare the top form for extensions and apply it to the nail for fitting.
- You need to cut it with scissors in accordance with the outlines of the end part.
- The form is placed on the nail for modeling.
- Coat its surface with an even thin layer of gel.
- The same material is placed onto the mold in drops using a rigid applicator.
- Using a brush, distribute the modeling gel over it, forming a free edge of the desired length.
- Place your finger in the lamp without removing the mold yet.
- After drying, the sticky layer of gel is removed, and the paper auxiliary part is also removed.
- The resulting substrate of material is sawed off from the sides and end.
- Modeling is continued with the same gel, taking a drop with a brush and spreading it over the plate in a thin layer.
- Then take a larger drop of material using an applicator and place it in the middle of the nail.
- Using a flat brush, apply it more evenly, maintaining proportions.
- The finger must be turned over so that the gel is properly leveled, and then sent into the lamp.
- After removing the sticky layer, the excess material is filed away.
- Coating can be done in the usual way.
These manipulations should be carried out if the nail breaks without bleeding. Otherwise, you must first allow the damaged tissue to heal and prevent infection. The finger is washed with chlorhexidine or peroxide, antibacterial ointment is applied, and a bandage is applied. The latter needs to be changed daily and the wound treated.
Watch a video on how to fix a cracked nail:
Why do nails break?
Both a natural nail and one coated with gel polish or shellac can break.
In the first case, the reasons may be:
- excessive mechanical stress on the nail plates;
- excessive grinding of peeling nails;
- increased fragility due to a lack of certain vitamins,
- health problems (disturbances in the gastrointestinal tract, endocrine system and others),
- frequent contact with household chemicals and water, which causes the nail plates to become thinner and often break.
The main reason why an artificial nail can break is mechanical impact.
If you hit something hard on a nail plate coated with gel polish or shellac, a crack may appear or a piece may even break off.
If there is constant mechanical stress on the nails (typing on a keyboard and other factors), the coating often begins to peel off.
Due to a strong impact, such as a blow, a crack may even appear at the base or in the middle of the nail plate. But sometimes it happens that the appearance of cracks and chips on artificial turf is due to the unprofessionalism of the master: due to improper construction of the nail architecture or excessive removal of the top layer.
Particular attention should be paid to manicure care on the first day after extensions or gel polish coating: you should not experience sudden temperature changes on it, and also do not get too carried away with water procedures
Why does gel polish peel off?
First of all, it depends on the manicure procedure itself. The following questions are especially important.
- Has the cuticle area been treated thoroughly? (Is the shine removed with a buff?)
- Has the first layer of gel polish been applied to the dried nail plate?
- Have you used a primer?
- Is the free edge of the nail sealed? (Sometimes the free edge of the nail is missing or the fingertips overlap the nail - this happens when the client bites his nails or cuts the free edge to zero).
Other reasons may be:
- constant contact with water - washing dishes without gloves, frequent hand washing, working in aggressive environments leads to the absorption of moisture by the nail plates, which causes detachment of gel polish or biogel;
- peculiarity of the nail plate (rejection of foreign material on the nails - this is when the work of several different masters and different materials does not last for the indicated 2-3 weeks);
- excessive moisture on the skin of the hands (for example, often sweaty palms) - in this case, it is advisable to go over the nail plate with a primer twice and dry it thoroughly before applying gel polish).
Physiological reasons cannot be excluded:
- diseases of the nervous system or a stressful period in life;
- disruption of the immune system;
- diabetes;
- taking antibiotics;
- rehabilitation period after surgery;
- pregnancy, hormonal imbalances and menstrual periods (in the first days you should refrain from extensions and applying gel polish).
Nail extension repair
Extensions are done with acrylic tips. They do not have a living structure, so if they break off, they can be glued with synthetic glue for plastic (superglue, “Moment”). The fastening materials are the same - filter paper, silk strips, paper plaster.
The technology for gluing the extended plate is as follows:
If repairing the extended nail is impossible, you can replace it with a new one.
Apply glue to the nail and place a cut-out paper strip on top of it.
Place another drop of glue on top of the strip. Apply the third layer of glue on top of the dried second.
Treat the repair area with a nail file. Apply varnish on top.
Another repair option is to replace the broken tip with a new one.
Tips for preventing the problem
To keep your nails in good condition, you need to adhere to the following recommendations:
- saw in one direction, this way you can prevent the appearance of cracks;
- do not cut it too short to avoid nails growing into the meat;
- massage your hands regularly;
- steam the nail plates before the manicure procedure;
- eat meat and fish dishes, herbs, vegetables and fruits daily;
- thoroughly dry your hands after contact with water;
- use only high-quality tools and materials for nail care.
You can keep your nails in good condition not only by following the necessary rules, but also by using the services of specialists. Salons offer the following procedures:
- wax or paraffin applications;
- spa or aromatherapy;
- Japanese manicure;
- ultraphoresis;
- sealing;
- biogel.
Such procedures should only be performed by trusted specialists.
Healthy and neat nails indicate not only the neatness of a person, but also the condition of his internal organs. Therefore, you need to regularly take care of your body, consume as many vitamins as possible and give up bad habits. It is quite difficult to prevent nail damage, but if it has already happened, you need to approach this situation wisely.
How to fix a broken nail
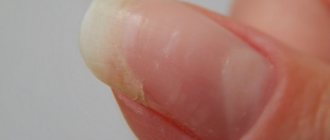
First, it is worth noting that a nail that is more than 1/3 broken is not suitable for repair.
The matter can be corrected only with minor damage. But even after repair, you shouldn’t hope that the effect will last for a long time - such a nail can last only 2-3 days, if you handle it very carefully - a week.
| Caution: if the nail plate is broken in such a way that the soft tissue is damaged, it is better not to try to repair it. |
The fact is that in such cases there is a high risk of infection getting into the wound.
The only correct solution would be to cut all nails to the length of the broken one in order to provide your hands with an aesthetic appearance. The damaged area should be regularly treated and the condition of the phalanx tissue should be monitored. If the option of cutting all of them into one is absolutely not suitable for a broken nail, you can try to save the manicure.
Natural nail repair
To start nail repair, you need to have the following tools and tools: 1. Means for degreasing the nail plate. If you don’t have it, you can replace it with regular medical alcohol.
2. Silk with a self-adhesive base.3. Special glue for nails. It is unacceptable to replace it with Moment or similar products, since such compositions aggressively affect even healthy nail plates. If you don’t have a special one at hand, medical glue will do.4. A nail file or buff with low abrasiveness (to reduce injury to the damaged nail).5. Acrylic powder for fixing the glue layer, giving a natural shade to the nail surface, and also masking the edges of the fabric. All of the above is also sold as a special set, which is convenient to use both at home and while traveling.
Stages of natural nail repair:
1. First you should clean the surface of the nail with a soft buff. They need to move from the base of the nail upward.2. Degrease the nail plate with a special liquid or alcohol.
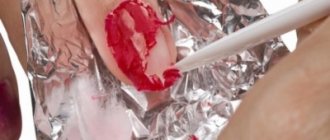
3. Remove the film from a piece of fabric (silk) and stick it so that the crack is completely covered. Then apply a drop of glue to the applied layer and dip the nail plate into the powder. After the glue dries a little, excess powder is removed. If necessary, the steps are repeated. If glue gets on the skin, remove it with an orange stick.
4. After the overlay has completely dried, the surface of the nail is polished with a nail file. This is necessary to remove the adhesive layer so that the nail plate becomes as smooth as possible.
Polishing is done with careful, gentle movements so as not to provoke a new crack. Then oil is applied to the surface of the nail and cuticle and polished with a buff. This is necessary in order to hide the break border as much as possible.
5. After this, apply 2 layers of opaque varnish. These manipulations will completely hide the crack.
If a piece of your nail breaks off, you can try to build it up using gel polish.
Application technology
What to do if there are still problems? Knowing why the gel comes off the tip of a natural nail, you can easily cope with these difficulties. But do not forget about some general rules. Failure to follow this rule will ruin your manicure.
Therefore, oil-containing preparations such as removers, lotions, creams and cuticle oils should not be applied to the surface of the nail immediately before applying gel polish. The nail plate, on the contrary, must be degreased. By the way, many modern degreasing preparations protect nails from the formation of fungus.
Manicure must be dry. Due to insufficient nail dehydration, gel polish often peels off. Before applying gel, masters often use special products that create a special film on the surface of the nails and skin. In fact, this is completely wrong. For the polish to last, your nails must be completely dry.
Don't forget to remove the pterygium. With a wet manicure, you may not notice this. This is another reason why the nail should be dry. Remove it with cuticle removers, special manicure tools and devices.
Carefully examine the general condition of the nail plate. On yellowed nails, the layer lasts worse because its top layer has absorbed too much pigment. If you have previously used reinforcing varnishes, a certain amount of varnish polymer will accumulate between the upper scales. This also does not help the gel adhere to the nail. Polish your nails with a soft polish.
And, of course, under no circumstances should you apply a layer on nails with split tips. They need to be shortened or cleaned. These ends are brittle and brittle. As a last resort, you can try to strengthen them a little.
What else should you think about if your gel polish is peeling off? The reasons may be the following. When applying the base to the nail, make sure that it does not come into contact with the skin. It should be where the color will be. Otherwise it won't stick. The ends of the coating must be covered with four layers. Soft nails need to be strengthened.
There are also cases when the base “moves away” from the cuticle or side ridges. This is due to the polymer's ability to contract. To reduce this effect, it is recommended to apply the foundation in a medium drop and dry your fingers in a powerful lamp one at a time.
Causes
There are many factors that contribute to gel polish cracking on your nails.
Such reasons include:
- improper coating application;
- poor quality manicure materials;
- applying the gel in a layer that is too thin or thick;
- influence of external factors;
- unhealthy condition of the nail plate;
- incorrectly selected drying lamp;
- the presence of a sticky and greasy layer on the surface.
Gel polish can crack on both natural and extended nails. The integrity of the gel surface depends on the reason that provoked the development of this phenomenon. For example, if the manicure technique is violated, small cracks appear on the second day.
Results of incorrect application
The gel coating on the nail plate begins to crack if the technology was violated during the procedure.
Poor quality manicure results from the following reasons:
- improper cuticle removal;
- oily layer on nails;
- nails are not completely dry;
- the gel was applied to the plate after applying the cream;
- when gel polish is applied in a very thin or thick layer;
- if the base product and gel are from different manufacturers;
- with improper polishing of the nail surface.
If the master does not follow the application technology, the gel polish begins to crack on the nails within the first week after the manicure.
External factors
If the varnish is cracked, this may be due to external factors. The substances contained in household chemicals are considered the most aggressive to gel manicure.
The nail coating is damaged by:
- washing powder;
- some creams and ointments;
- detergents (especially those that clean the surface of bathtubs and sinks and contain abrasive particles);
- soap
The integrity of the gel is compromised when working with soil without protective gloves. Temperatures that are too low or high also reduce the wear time of gel polish.
Nail condition
Most often, cracks form due to a pathological condition of the nails. If the stratum corneum is very thin or soft, then the gel polish begins to quickly become damaged.
Under frequent exposure to water, powder, and detergents, the coating bursts because it does not attach well to the nail surface.
Thick layer of gel polish
Cracks begin after the material is applied too thickly.
The layer at the top of the manicure dries and decreases in size. The gel coating below, on the contrary, stretches. As a result of this process, cracking occurs.
Drying lamp
When this indicator is lower, the product does not dry completely. The sides remain wet.
To check the quality of drying, press on the coating with a pusher. If a dent appears, the gel has not dried. With incomplete drying, strength decreases.
Exposure to water
Frequent contact with water negatively affects manicure. Washing your hands frequently can cause your manicure to crack.
Remaining sticky layer
If the sticky layer is applied incorrectly or is not completely removed, then the gel polish does not adhere well to the nail plate. Cracks due to its residue appear within a few days.
Poor quality materials
One of the common reasons for cracking gel on nails is the use of low quality materials.
Usually the price for these accessories is low. Such materials are not branded.
Other reasons
Gel polish also cracks due to the following reasons:
- use of antibiotics;
- stomach diseases;
- pathologies of the heart and blood vessels;
- diseases of the endocrine system.
Such a manicure can be damaged due to hormonal changes in women, including during menstruation and pregnancy.
In rare cases, individual intolerance to the components included in the manicure product is possible.
Prevention of detachment and protection
Any varnish has a negative effect on the nail plate, so after 3-4 manicure sessions with gel polish, you need to take a break for about 1-3 weeks. During this period, you need to use special medications. If the nails are very weakened, then special procedures need to be carried out to strengthen them. It is advisable to take a course of vitamins.
Under the influence of alcohol and detergents, the coating may lose its former shine, scratches or chips may appear. Therefore, when cleaning and washing dishes, you should wear rubber gloves. In addition, you need to lubricate your hands with nourishing cream every day.
Sources
- https://imkosmetik.com/journal/prichiny-otsloeniya-gel-laka-kak-prodl/
- https://infoklan.ru/chto-delat-esli-gel-lak-ne-derzhitsya-na-nogtyah.html
- https://wlooks.ru/lak/dlya-nogtej/pochemu-gel-bystro-otslaivaetsya/
- https://royal-manicure.ru/pochemu-gel-lak-otslaivaetsja-ot-nogtej-20-prichin/
- https://vplate.ru/gel-lak/otslaivaetsya/
- https://1gellak.com/problemy/otslaivaetsya-gel-lak
- https://imkosmetik.com/journal/pochemu-gel-lak-ne-derzhitsya-na-nogtyah/
- https://1gellak.com/problemy/pochemu-ne-derzhitsya-gel
- https://www.syl.ru/article/354553/pochemu-ne-derjitsya-gel-lak-na-nogtyah-obzor-prichin-i-rekomendatsii
[collapse]
Quick restoration of nails after gel polish
Damaged nails must be treated so that the already thinned and injured plate does not become even more deformed. To do this, you will need products that can be purchased at pharmacies or special departments of stores.
So how to restore nails after improper removal of gel polish and damage to the top layer? There are several effective means for restoring the nail plate. It is advisable to do the procedures daily and alternate them with each other.
Baths are very effective in answering the question of how to restore nails after gel polish at home. Only warm water is used. The procedure lasts 20-30 minutes. Baths are needed to prepare the skin of the hands and nails for the use of the nourishing product.
Bath with salt and lemon
Bath composition:
- Sea salt. It is enough to dissolve 2-4 teaspoons in a small bowl. The solution will disinfect and strengthen your nails.
- Chamomile - acts as an antiseptic, softens and expands the pores on the plate.
- Sage – eliminates dryness and flaking.
You can add a few drops of lemon juice into the bath to better soften the skin and plate. Or add a few drops of iodine to sea salt. Such a solution will imitate sea water and have a strengthening effect.
Other useful baths:
- with potato broth - softens and nourishes at the same time;
- 1 teaspoon each of apple cider vinegar and soda - helps restore in a short time after treatment for fungal diseases.
After using the bath, hands are thoroughly wet and a rich nourishing cream is applied. To increase its effectiveness, you can add 1-2 drops of essential oil: jojoba or almond.
Masks are also effective. They can be prepared from the following ingredients:
- Gelatin - 2 teaspoons of gelatin are dissolved in warm water, the nails are lubricated with rich cream and placed in the prepared liquid. Keep for 10-15 minutes. Nails are restored and strengthened, and their growth accelerates.
- A few drops of essential oil are dissolved in olive oil, for example, ylang-ylang, myrrh, apricot, lavender or cedar rose. Apply to the plate and leave until absorbed. The excess gets wet. The mask nourishes with beneficial microelements, fills damaged voids, smooths out scales and makes the surface smooth.
- Clay. It is separated and placed on the plate. Keep for 30 minutes. Afterwards, wash off and rub in the nourishing cream. Clay strengthens the nail and repairs damage.
- Cosmetic paraffin. You need to melt it in a water bath. Fingers are dipped into it for 10 minutes. At the end of the procedure, the residues are smoothly rubbed in and oilcloth gloves are put on your hands. Leave them on for 1-2 hours. Paraffin seals well and smoothes out roughness, nourishes and moisturizes the skin.
Nail restoration polish after gel polish
Therapeutic varnishes help restore the nail plate. This coating protects the nail, fills voids and evens out the surface. It contains vitamins and minerals, especially calcium.
Application of medicinal varnish
Medicinal varnishes include:
- Smart enamel. Available in a wide range. Apply daily. Strengthening of the plate can be seen after two weeks.
- Mavala Scientific. Apply every other day, the result is visible after a month. The product is especially effective for split nails.
- IBX System. A professional product used in salons. Nourishes and restores the plate in the shortest possible time.
- Eveline. It acts in several directions and stimulates nail growth. Apply once every 3 days. The effect occurs after 2-3 weeks.
These and other products can be purchased at the pharmacy chain. The healing coating is usually colorless; colored varnish can be painted over it.
Step by step nail repair
Especially for skeptics, the ambulance chose for clarity the option without complications, but with an asterisk. We bet you were sure that if a nail broke at the root and the tip fell off, then there was nothing left to do but cry over the trash can and trim the rest?
Ha! The professionals grin and roll up their sleeves. Everyone loves before and after photos, right? So, here you go.
Everything can be solved, your hands are not for boredom! Detailed instructions with photos will tell you how to seal a nail.
Preparation
The nail needs to be treated with a buff, remove the gloss and make the surface of the nail slightly rough. The process is similar to preparing for applying gel polish. By the way, if your nail breaks under gel polish, first remove the old coating, fix it and get a new manicure. If the nail is cracked on the side, file down the jagged edge a little. If you need to glue the tip that has fallen off, then, on the contrary, there is no need to file the broken edge. Otherwise, the “gears” will not fit together. Finally, thoroughly degrease and disinfect.
Main action
Apply glue to the nail:
Attach the broken tail and hold for a few seconds, 15-20, so that the glue “seizes”:
This is what the nail looks like both broken and glued:
Now it's the bandage's turn. If the material is adhesive-based, then the fabric can be immediately applied to the plate. If you use a tea bag or non-woven fabric as a bandage, first spread glue on the plate, then place the fabric.
The piece should not be even; all excess is cut off with scissors and filed with a nail file. Do not skimp on fabric; it is better to cover the entire plate for strength. The larger the area, the lower the pressure. The laws of physics also apply in the nail world.
Apply a layer of glue on top of the bandage, smooth it out and dry:
Armed with a buff, carefully polish the nail. Align the edges of the bandage with the plate. If there are any protruding edges and glue clumps, file them down with a coarse file.
You can apply a control layer of glue to the polished nail and lightly buff it again.
Result
Voila! Like new. Now you can paint your nails as usual. Look at the picture:
The nail on the left finger is broken on the side, on the right finger it is broken at the root. Breakdowns are marked with a red line. Nothing is impossible. This technique can be used to repair almost any damage to nails of different shapes and lengths. The proof is in the photo.
The location of the crack does not matter. If the nail is broken in the middle, the repair algorithm will not change. As long as the skin is not damaged. Don't neglect safety precautions.
By the way, when using gel polish, you can use a base coat instead of glue. In this case, you need to put a base layer on the nail and a bandage on top. Soak the bandage thoroughly with the base, you can add an additional drop on top. Only after this polymerize in a lamp.
Thanks to the nail emergency specialists for the master class. Now you can handle repairs of any complexity. If your nail suddenly breaks, you can fix it at home like a real professional. If such breakdowns occur regularly, look for the reason. Perhaps something tasty and healthy is missing from your diet. Eat fruits, vegetables, grains, meat and other good foods more often. Take care of yourself and your health. Strong claws to everyone!
Why do nails under gel polish break on the side most often and generally burst?
Nails under gel polish often break on the side, but they also break in other areas for several reasons:
- The side zone is the most vulnerable. Here, the growth points are often sawn through due to the desire to narrow the wide plates. And when your nails touch hard objects, the side parts are more often hit.
- Another vulnerable spot is the stress zone, which starts from the natural “smile” line and extends to the lower third of the plates. The side parts enter into it, but a break can also form in the middle if material was saved during coating. After all, this area is subject to the most severe mechanical stress.
- Nails are weakened. This happens when their outer layer is cut off excessively when the shine is removed. And also when peeling off the peeling coating. Fragility occurs due to a deficiency of vitamins in the body and certain diseases. They are spoiled by cheap materials, violation of hygienic manicure techniques (moving a file back and forth, using metal tools).
You cannot tolerate it if you feel a burning sensation during polymerization; this also contributes to weakening of the nails.
- Material applied incorrectly. Its thickest layer should be in the stress zone, just to avoid breakages from the sides and at the root. And if more material ends up on the free edge, especially with a considerable length, injuries cannot be avoided.
- The material is not suitable for this type of nail, or the different products do not combine. If the plates are hard, the hard coating will encourage breakage. And a flexible base for soft nails will not make them strong either. In the latter case, it is worth using additional reinforcing materials.
- Some women do not know how to wear a manicure, ignoring the danger of mechanical damage to their nails. They do household chores and play around in the water without gloves. Or they scrape pots with their nails, tear off old wallpaper from the walls during repairs, etc. You need to understand that gel polish strengthens the plates more than regular varnish, but does not make them absolutely invulnerable.
What not to do when gel polish breaks
If the gel polish is broken and the nail is damaged, do not do the following:
- Walk for a long time with a cracked plate without doing anything. The damage will begin to grow further, deeper and may affect the bed, which is very painful.
- To eliminate the defect, use glue that is not intended for use on natural nails. Its composition is such that they will deteriorate, and the crack will also go further.
- If the nail is broken at the root, remove the coating with a remover or other liquid containing acetone until it hurts and bleeds. These remedies will make it even more painful and cause a burn, that is, they will cause additional damage.
How to repair at home?
If the nail plate is damaged, do not rush to trim the broken area and align all other nails to its remaining length. There are many proven ways to correct this situation using the most common means.
To repair nails you will need the following tools:
- disinfectant;
- special fabrics (linen, silk, artificial fiberglass);
- glue for nail restoration;
- buffs;
- nailfile.
How to seal using a tea bag?
The tea bag is made of thin fiber paper. By applying this material to the damaged nail plate, you can hide all the resulting defects. The result is not inferior to salon techniques that use silk coating. To repair a nail you will need:
- tea bag;
- high-quality base coat;
- nail file;
- device for grinding and polishing;
- scissors;
- colored varnish;
- top
Gluing procedure:
- remove nail polish;
- cut out a rectangle from the bag with a shape corresponding to the nail;
- apply a base coat to the plate and let it dry;
- attach the cut piece and smooth it, eliminating bubbles and unevenness;
- put the next layer of base on the nail;
- remove excess cellulose from the edge of the nail using a file;
- apply decorative colored varnish.
The video demonstrates how to repair a nail using a tea bag:
How to save using special glue?
You can restore your nail yourself using special glue as follows:
- wash and dry your hands well;
- put your hands in warm water to soften the plate;
- apply special glue to the nail and spread evenly over the surface using an orange stick (you can also use a toothpick);
- attach the broken part and press gently;
- after the segment is fixed, remove excess adhesive;
- perform polishing using a special file, performing the procedure in only one direction;
- apply protective varnish.
How does gel polish compare favorably with regular polish?
Firstly, it is easier to apply - if a simple varnish, even the freshest one, is prone to gaps and stripes on the nail, then the gel, due to its density, instantly lies on the nail plate in an even layer. Often, gel polish does not require reapplication.
The second well-known advantage is the durability of the coating. This advantage can be a disadvantage for girls whose nails grow quite quickly, but if the length of your nails does not change much over the course of a week, long-lasting polish will be your salvation. Gel coating is also suitable for those with fragile, brittle nails: the gel literally “walls up” all the defects of the plate.
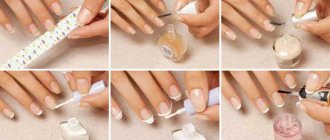
How to do a manicure with gel polish at home?
We will talk about all stages of this process.
Nail preparation
Any manicure should always begin with proper nail preparation. First of all, you should work with the cuticle - it should either be trimmed or carefully pushed back.
How to remove cuticle?
Even those with thin skin prone to injury can remove it, but do not forget to steam your fingers first. Soak your hands in the hot bath and then begin removing the cuticles. First, lift it with a special spatula - the skin should completely move away from the nail. After this, trim the cuticle using a sharp trimmer or well-sharpened thin scissors. If you do injure the skin around your fingers, immediately treat the wounds with peroxide and lubricate your nails with coconut or apricot oil.
If the skin around the nails is quite dense and not prone to injury, you can remove the cuticle “dry” - in this case, the procedure will be exactly the same, with the exception of the first step with warming up the fingers.
If you don’t do a trimmed manicure on principle, it’s still worth steaming the cuticle - so that it’s easier to push it back with a spatula. Even with this method of dealing with cuticles, the skin may be slightly damaged, so keep peroxide and nourishing cream on hand.
After removing or pushing back the cuticle, you should proceed to giving the nails the desired shape. The most popular one is square on short nails, but if the nail plate is set quite low, choose an oval shape - it will visually “stretch” your fingers. Everyone knows how to shape nails - using a file. But opt for a glass instrument. Do not cut your nails with clippers or scissors if they are prone to splitting - carefully file the plate to the required length.
After shaping, polish the surface of the nail with a buff, then remove dust with a brush and apply nourishing oil or cream to your fingers. Before applying gel polish to your nails, make sure that their shape is uniform and that there are no burrs or cuticle particles left around.
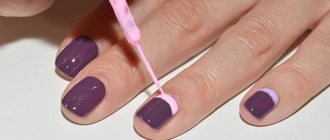
Varnish coating
What do you need to do a gel manicure? The basic necessary tool is an LED or UF lamp. Without it, the coating will not adhere to the nail properly, and the drying process will take much longer.
The gel polish firmly settles on the nail, therefore, to facilitate the removal process in the future, it is necessary to apply a primer to the plate - it will smooth the surface of the nail and will not allow the polish to be firmly “absorbed.” You'll thank yourself for taking this step before you remove the gel polish.
After applying the gel, you need to paint your nails with a topcoat, which will give the varnish shine and durability.
Now let's move on to the procedure.
First, coat your nails with primer, then proceed to applying the gel itself. Make single and confident movements with the brush, do not smear the polish on the surface of the nail. Place your hands into the LED lamp, being careful not to smear the gel, repeat the process if necessary. If the color saturation seems insufficient to you, apply a second coat of varnish.
After the gel, fix the result with a top coat - a protective glossy coating that will provide the varnish with greater durability.
List of sources
- vokrug-nas.ru
- ufologov.net
- salon-nagorkogo.ru
- nails-health.ru
- jawoman.ru
- idealnyi-manikur.ru
- ameno.ru