Another life hack
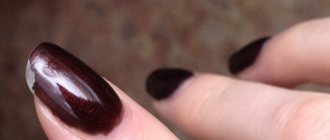
The reasons have been decided. But what should you do if the gel polish just doesn’t want to lie flat? Here I will suggest one life hack:
– try applying the color to a white or black base, depending on which one your problem shade is closer to. Of course, this may change the color a little, but sometimes it’s even beneficial!
That's all, my friends! I hope the article was useful to you and will solve all your problems with varnishes :)
If you found this page useful, please recommend it to your friends:
Source
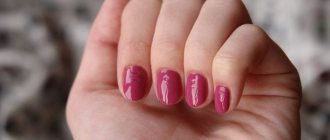
Top 7 common mistakes when applying gel polish at home
In the process of learning to apply gel polish, fashionistas most often make typical mistakes, which are best avoided because if you make them constantly, then such a manicure will no longer look as impressive as our fashionistas would like. Therefore, let's take a closer look so that your home experiments and creativity bring only positive results and impressions!
TOP 7 rookie mistakes
As you know, before applying gel polish, you need to carefully and efficiently prepare your nails for coating. It is necessary to give the nail the desired shape, then apply a degreaser, and only then all the other steps.
Mistake #1
If your gel polish base is sagging. The main reason for this is the incomplete removal of the old coating. You need to carefully file away all layers of the previous design with a nail file or filer so that the layer of the new base for gel polish lays perfectly flat on the nail.
Mistake #2
Microbubbles and mini-voids are visible in the layer of the polymerized base. This situation most often happens when the cuticle is removed; it has not been completely removed. And thus, when baked in the lamp, microgaps formed between the nail layer and the particles of skin remaining on the nail. If this situation occurs to you, then your manicure will not last very long.
Mistake #3
The color coating has peeled off the nail. This situation is due to the fact that our beautiful ladies skipped the stage of removing the top keratin layer with a buff. Damn the nail, it’s important not to damage it. Do not apply significant force when pressing the tool on your nails and follow the correct direction of movement. Correctly buff from the cuticle to the free edge, with light movements.
Mistake #4
The coating cracks and breaks off in small pieces. This situation occurs if it is not enough to clean the nail from dust (sawdust), dirt and sebum.
Mistake #5
The gel polish peels off as a whole plate. This situation occurs most often, and all because particles of the pterygium went unnoticed on the nail, and the delaminations on the free edge were not removed. With subsequent regrowth and peeling of the pterygium from the keratin of the natural nail, the gel coating also comes off. The continued delamination of the natural nail in depth (under the gel polish) leads to detachments of the manicure already from the end.
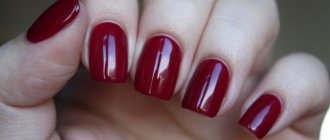
How to apply gel polish evenly: tips for a quality manicure for beginners
Looking at the precise movements of the master in the salon, everything seems simple. We remove the cuticles, file the nails, consistently apply the required coatings and dry it all in a lamp. Gel polish manicure is ready!
The utopian perception leads to the decision to take care of their nails themselves, and women buy everything they need for a shellac manicure.
Disappointment sets in almost immediately: the compositions refuse to go on smoothly, the nails remain bald, and the designs don’t turn out well.
It's too early to get upset! There are many nuances in a gel polish manicure, but knowing about them, you can create the perfect finish. Where does the path to perfection begin?
Types of nail detachments
Nail technicians often have to deal with the following complaints from clients:
- Pieces of the coating break off along the edges of the nail at the ends. Mostly, owners of square-shaped nails face this problem.
- The gel polish begins to gradually come off at the cuticle.
- The coating peels off along the entire perimeter of the nail and is easily removed as a single film.
As a rule, the coating begins to crack at the edges of the nail a few weeks after the manicure. But this is also possible in cases where a woman does not use gloves when washing dishes with a hard sponge.
If the varnish film peels off a few days after application, we can say that the master violated the coating technology.
How to paint your nails evenly with gel polish
The first difficulties arise with the base. This simple manicure layer often causes a lot of frustration for beginners. Why does the gel polish base apply unevenly ? What are the difficulties?
Most often the problem lies in the degreaser. When using a gentle fresher or its alcohol analogues, particles of moisture and fat remain on the nails, and this creates bald spots when applying the base. Changing the composition solves the problem.
Smooth application of the base is possible by following several rules:
Few beginners know that gel polish doesn’t last very well on wet nails after a trim manicure. Do not apply gel polish after nail polish removers or products with oils.
The task of hygienic manicure is not just to give the nails the desired shape, but also;
The biggest danger at this stage is not being able to polish the nail. Here are two tips: when using cutters, position them along the nail and work without pressure, and when choosing a buff, avoid a hardness of more than 240 grit.
Auxiliary products will not only clean the surface of the nail from invisible particles of dust and grease, but will also increase the adhesion of the nail plate to the base. First use a dehydrator, then an acid-free primer.
The main secret is that the base should not get on the skin. But where the color will subsequently be applied, a base is needed. According to the primary classical scheme, the base is applied to the nails in a thin, thin layer.
Also, beginners should remember that the base spreads when drying, and leave a small distance to the skin.
In the new format, masters prefer to apply the base in a thicker layer, but not too thick: to level the nail plate and provide a high-quality base for the subsequent layering of gel polish.
The brush is placed vertically and the cut is covered with a thin layer of base.
Base coated nails are placed under a UV lamp for 60 seconds. If the lamp is LED, then for 10-30 seconds. In order for the base to set in an even layer, you need to dry either one finger at a time, or first 4, and then the thumb separately.
What to do if gel polish does not apply evenly
Gel polish does not apply evenly - a typical problem for beginners.
The reasons may be the following:
The last point can be eliminated either by very good master classes from the pros, or by strictly following the advice below:
If bald spots appear during the process of applying gel polish, there is no need to be alarmed: the second or third layer will solve this problem.
Peeling or chipping of the coating is rare and is either a consequence of using a base/gel polish/top coat from different manufacturers, or ignoring the correct manicure and primer at the preparatory stage of work.
VIDEO INSTRUCTIONS » alt=»»>
How to apply gel polish evenly at the cuticle
There are no particular difficulties here.
If all manipulations are performed correctly, even the first time you will be able to apply gel polish butt to the cuticle .
When all the layers have been applied, the nails are covered with topcoat - the edge is sealed, polymerized in a lamp and the sticky layer is removed. A beautiful home manicure with gel polish is ready!
Source
Matte top on Aliexpress
Matte tops on Aliexpress have become very popular; they are actually bought a lot. It’s worth noting right away that you won’t find corduroy or velor tops on Aliexpress. Mostly they sell coatings with a satin effect or with a slight matte finish. That is, there is no need to achieve rough, rubbery or rubbery nails using this top. However, there are also brands that give a good matte effect. At the same time, their price is quite low.
A catalog of matte tops from Aliexpress can be found here.
List of matte tops on Aliexpress:
- Azur. This matte top is one of the most popular and is sold in small 8 ml bottles. Gives a lasting matte effect, does not rub off, even after two weeks of wear. However, many buyers note that it gets dirty and dirt may appear on the surface. This is especially true if the manicure is light in color.
Azur - Sioux. The matte top has proven itself well; in the jar it is completely transparent and has a fairly decent viscosity. That is, it is thick, but not rubbery. You won't get a rubber surface. With this top you can achieve a satin effect, which muffles the glare and makes your nails slightly matte. Ideal for making lace, as well as for applying over foil or glitter to reduce the shine and sparkle of the decor.
Sioux - Fairyglo. The top has established itself as a product in the cheap segment, its price is quite low. It is worth noting that you should not expect supernatural, good matting from it. Many people note that this top coats bald spots; sometimes for a long-lasting coating it is necessary to apply it in two layers. Some note that if applied in a thick layer, it may not dry completely in the lamp. In this case, certain areas on the nails are erased. This topcoat must be used very carefully, applied in thin layers and preferably in two layers. The effect is average, between matte and satin. You can't call it velor.
Fairglo - Rosalind. This is also a cheap price segment and has average quality. It is worth noting that you will not get rubberized surfaces, you will have a light satin effect. That is, the top may have a slight glare if you point your nails into the lamp. The manufacturer indicates that this is a finishing coating and not a decorative agent.
Rosalind
Manicure stages and possible mistakes
Today there are 3 main types of manicure:
Combined and hardware manicure must be done using a special manicure apparatus, but before using it, it is better to undergo training, since improper operation of the apparatus can lead to damage to the nail plate, for example, cuts. For beginners, it is better to do a classic manicure at home.
Stage 1. Shape filing, cuticle processing
Before applying gel polish, you need to put your nails in order: treat the cuticle, file the shape.
What do we do at this stage?
Stage 2. Preparing the nail plate for coating
What do we do at this stage?
Mistakes at the nail plate preparation stage
Mistake #1:
Typically, people with oily skin or those prone to excessive sweating have a moist and oily nail structure. When preparing such nails for coating, it is necessary to use a dehydrator (nail prep) to deeply dry the nail plate, remove excess moisture from it and improve the adhesion of the natural nail to the artificial coating.
Mistake #2:
The free edge of the nail is one of the most vulnerable places: if you do not pay proper attention to it, chips and detachments may appear. To improve the adhesion between the nail plate and the artificial material, it is necessary to use a primer. Primer is translated as “primer”. There are acid-free and acidic primers.
The acid-free primer acts as double-sided tape and ensures strong adhesion of the natural nail to the artificial nail.
The acid primer lifts the keratin scales of the nail plate for better adhesion to the artificial material. Since the acid primer contains aggressive components, you must be careful not to get it on the skin and cause a burn. It is recommended to use it before extensions for girls with wet or oily nail texture.
Stage 3. Covering the nail plate
What do we do at this stage?
Errors at the stage of covering the nail plate
Mistake #1:
You used the wrong base for your nails.
The condition of the nail plate is different for everyone: for some it is strong, while for others it is thin, soft and plastic. You cannot use the same base for all nails. It is necessary to analyze the condition of the nail plate and pay special attention to the choice of base coat.
Today there are 3 main types of base coatings: hard, elastic and camouflage. What are their fundamental differences? Which one to choose? Let's figure it out.
Hard bases
Elastic bases
Elastic bases are great for beginners: they are easy to work with, as they do not spread, and the alignment is perfect. Using elastic bases you can extend your nails. Elastic bases are great for soft, highly flexible nails. But on long nails they sag over time, that is, after a while a “dip” appears across the nail.
Why is this happening?
Bases are soft gels, and they, in turn, as we said above, can be elastic or not.
Elastic bases perfectly strengthen the nail plate when leveling, because they are flexible, tenacious, and when the free edge moves, they, like an elastic band, move with it. But this is precisely why shrinkage occurs.
There are bases that contain solid plasticizers. Solid materials do not move with the nail and, accordingly, do not shrink. But keep in mind, UNDER HEAVY LOAD, almost any base will give minimal shrinkage.
What to do?
Strengthening with acrylic or hard gel, but this is a completely different procedure. In addition, the harder the material, the worse it soaks and the more difficult it is to cut.
ADVICE! Sometimes it is not very clear from the name of the base whether it is hard or elastic. To determine the type of base, you can do the following: apply a small drop or strip of base to the surface of a transparent plastic bag and put it in a lamp to polymerize. If after polymerization the drop (strip) bends, it means you have an elastic base in your hands. If you can’t bend the drop and it cracks, then the base is solid.
Mistake #2:
You held your hand in the lamp incorrectly and the coating did not dry well.
How to hold your hand in the lamp correctly?
Mistake #3:
You stored and transported the gel polish incorrectly, it has thickened or air bubbles have formed in it, which is why the coating does not adhere well and is difficult to work with.
How should you store and transport gel polish?
NOTE! The application of color coating most often occurs in close proximity to the polymerization lamp. Place the bottle of gel polish so that the light from the lamp does not fall on it, otherwise the gel polish may thicken.
ADVICE! If bubbles still appear in your gel polish, you need to do the following. Open the bottle, but do not remove the brush. Let the material stand in this state in a dark place so that it is not exposed to daylight for a couple of hours. After this, mix the composition with a brush, close the bottle and twirl it between your hands.
Finish with or without tack. What is the difference
“Sticky” - the dispersion layer consists of material components that were not included in the polymer and did not evaporate in the lamp, but remained on its surface.
Tops for gel polish with a sticky layer
Classic gel polish finishes - soak off top coat, finish gel. In conventional topcoats, the dispersion is not sticky, but rather slippery, it has no functional load and must be removed.
Do not wipe off the sticky layer as soon as you remove your hand from the lamp - let the top cool a little. Otherwise, you can leave unsightly marks from the napkin on the hot surface.
The dispersion should be washed off carefully, without smearing it on the skin around it. For each nail, use a clean, lint-free tissue or the unused side of it.
After moistening it in liquid to remove the sticky layer or in alcohol, apply the napkin to the surface of the nail for a couple of seconds and remove it towards you. Due to such careful removal of the dispersion, the risk of allergies is reduced.
In specialized finishes, for example, tops for sliders, the dispersion can be very sticky - it helps to fix the decor and is preserved by covering it with another layer of a regular finish on top.
Gel polish tops without sticky layer
Widely used family of finishing coatings. No wipe top coat, no cleanse top coat, non-cleansing gel top, finish gel without sticky layer, top without l/s - all these are variants of the names of the material, all components of which are part of the final polymer, without the formation of a dispersion layer on the surface.
The no-tack finish has a brighter shine and is quicker to apply as there is no time required to remove the dispersion. Previously, such materials were considered fragile, but thanks to the development of technology, this problem has gone away. The main thing is not to overdry them much longer than the time recommended on the bottle, since with every minute in the lamp they become more compacted and stretched. You can safely choose them as the main fixative and enjoy the acceleration. Also, rubs are rubbed into such tops, broths and voluminous decor are secured with them.
What else can cause problems when applying artificial turf?
Have you tried all kinds of bases, but your nails still appear chipped and peeling? There are several explanations for this, for example:
What to do? Do you want to part with your long-lasting, flawless manicure forever?
Of course not! You can take the webinar “Complicated cases in base coating of nails” from the teacher of the ParisNail school Velmitina Zaitseva.
You will receive a detailed algorithm for applying and fixing the material, learn all the secrets of the teacher and be able to avoid material detachments!
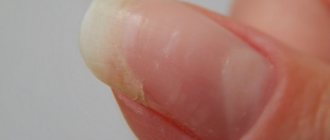
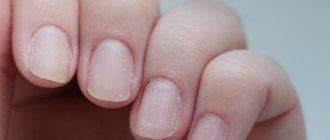
How to remove artificial material correctly and why is it important?
You've probably heard that gel polish spoils your nails, making them thin and brittle. It is a myth! It's not the material that ruins your nails! One of the reasons for damage to the nail plate is improper removal of the artificial coating, so this procedure must be approached with special responsibility!
Is it possible to remove gel polish yourself at home without damaging your nails? What materials and tools are needed for this? Let's figure it out.
How long can you wear gel polish?
First, let's figure out what period of wearing the coating is optimal. Often girls wear gel polish for a month, or even longer. However, they do not understand that they can damage the nail plate.
Technologists advise walking with the coating for no more than 2-3 weeks. Prolonged wear puts stress on the tip of the nail plate, its root suffers from the weight of the coating. All this can lead not only to breakage, but also to deformation of the nail plate.
How can you not remove gel polish?
RULE 1: Under no circumstances should you pick at the gel polish or tear it off the surface of the nail plate, because this can cause serious injury! If you are careless, you can remove the top layer of the nail along with the material, and this can lead to thinning and, at a minimum, painful sensations when in contact with water and various surfaces.
RULE 2: do not file away partially peeled off gel polish. In this case, you also risk cutting off the top layer of the nail and ruining it.
What other consequences might arise?
We hope these reasons are enough to convince you not to peel off the coating from the nail plate and do the gel polish removal according to the rules!
By the way, the peeling process itself is quite painful, it’s hardly worth it!
How to make matte shellac: all the ways
Now let's move on to the most interesting part. Let's talk about how to make a matte manicure easily and without unnecessary problems. These methods are suitable for both nail artists and girls who apply gel polish on their own.
three options in total to achieve a matte finish : a special matte top; sawing off the glossy top coat with a buff or file with soft abrasiveness and using acrylic powder.
The last option is the easiest to implement, and gives not just a matte finish, but the effect of real velvet on the nails. Hence its second name - “velvet manicure”, or “velvet sand”.
The easiest way to get a matte finish is to use a special topcoat. The best manufacturers are KODI and Masura; the top-end coatings from the E.MI and Canni line have also proven themselves positively. The usual budget Bluesky, despite the manufacturer's loud promises, still gives a satin finish, which cannot be called truly matte with complete confidence.
The most popular technique among masters is the technique of performing matte manicure using acrylic powder. Why? You will find out by reading the section below.
Gel polish removal methods
There are two ways to remove artificial turf: using sawdust and by soaking it with a special liquid or napkins.
To remove the coating using sawdust, a special apparatus and removal cutters are required. Therefore, this option is suitable only for those girls who are familiar with hardware manicure.
Perhaps someone will have the thought: “Why not try to remove it with a rough file?” But we’ll immediately answer that this method is quite problematic, takes too much time and can damage the natural nail. It is necessary to try very hard to treat the area near the cuticle, and there is a risk of rubbing the skin. Therefore, at home, the easiest way to remove it is by soaking.
If you want to master sawdust removal, then sign up for basic courses at our licensed school “ParisNail”! After training, you will not only do a flawless manicure for yourself, but will become a real professional in the nail industry and will be able to work as a manicurist!
Maceration
This method involves soaking the gel polish with a special acetone-containing liquid. You will find a list of materials required for this procedure and detailed technology for removing gel polish in the article “How to remove gel polish (shellac) at home?”
NOTE! Not all base coats can be soaked, so ask the seller to select the base that is suitable for this type of removal.