How to learn to paint on nails
Most often, to create original nail designs at home, decorated with beautiful designs and intricate paintings, stickers with ready-made prints, as well as stamping stamps and stencils are used. But bold and bright, delicate and elegant nail art, made with your own hands, has a special, unique charm.
Surely every woman has tried to create her own, unique nail design at least once in her life. Thanks to step-by-step video instructions on how to create easy and effective nail designs for beginners, anyone can master artistic painting today!
Drawing on nails in itself is an incredibly exciting activity. Having started as a simple hobby, creating original drawings for many girls has turned from a simple hobby into a good source of income.
Having mastered simple nail designs at home with the help of accessible step-by-step master classes, you can achieve success only by constantly improving your skills, deciding on bold experiments and mastering new artistic techniques.
What do you use to paint on your nails?
Thanks to the rapid development of the modern nail industry, bringing to life any most unusual and impressive design will not be difficult, because for this there are many special devices and tools, as well as available step-by-step photo lessons and master classes for beginners.
Simple designs on nails can be done using available tools - needles, toothpicks, a thin brush or regular tape.
Very simple patterns on nails are made directly with special varnishes, which manufacturers initially supply with a long brush.
Advice! Even with varnishes intended for artistic painting, novice nail art masters may find the brush not very convenient, so it would be a good idea to first work out the design on paper or plastic tips.
The technology of painting with varnish itself, even for novice craftsmen, is quite simple and does not require any special equipment: the brush should be dipped in the product and you can start applying the pattern. This method is best suited for depicting hearts, flowers and leaves, stripes and flirty polka dots.
When starting to paint on your nails, you should prepare your workspace in advance - cover the table with cloth, paper or cling film so as not to spoil the tabletop with paints and acetone. It is better to print out interesting ideas for fashionable nail art in advance - this way the patterns will be before your eyes, and the technique is guaranteed not to suffer.
Attention! Before you start bringing your imagined drawings to life, it’s worth practicing on paper or plastic blanks how to create a harmonious composition of dots, straight lines, geometric shapes and smooth curls.
Masking tape
A simple manicure pattern can be created using paper-based masking tape - it will be an excellent alternative to ready-made nail stencils. Drawings consisting of several shades look especially advantageous, but restrained minimalism is still in trend. Well, you can’t do without a base and topcoat either. All you need to do is follow the step-by-step recommendations:
- immediately apply a transparent base to the nails;
- the next layer is a colored base;
- strips of adhesive tape are glued onto the completely dry varnish according to the intended image;
- the free space is painted over with contrasting varnish;
- the tape is carefully removed from the nail when the manicure is completely dry; depending on the complexity of the pattern, strips of tape can be glued to the nail plate several times;
- Finally, a top coat is applied to each nail.
Using tape on your nails, it is very convenient to draw light geometric patterns, as well as paint over the edges of the plate in moon and French manicures with a straight line or a smile line drawn at an angle.
Toothpick
When creating fashionable nail designs for beginners in 2022, a toothpick can be no less effective a device than professional tools. Its use also has its own nuances: since the toothpick is made of wood and not metal, more varnish is collected on it, but it rolls off unevenly. It is not suitable for drawing thin lines, but for plant motifs, monograms and abstractions it will be just right. It will be convenient for beginners.
Needle
The simplest nail design for beginners can be created using a thin needle - for this you will need several polishes of different shades. Manicure needles are sold in specialized stores - unlike sewing needles, they do not have an eye, but do have a comfortable handle. The patterns made on the nails with a needle turn out to be very elegant, openwork, it is ideal for working out the small details of the design. You can make a similar tool yourself by sticking a sharp needle into the eraser of a regular pencil.
Comment! To apply patterns and designs on your nails, you should choose the most contrasting colors - this will make the design bright and expressive.
It’s not at all difficult to cover your nails with elegant painting – just follow the step-by-step instructions:
- First, cover the plate with a colorless base, the task of which is to protect the nail from damage with a sharp instrument and the penetration of bright coloring pigments;
- after the base has dried, the color that will become the basis of the entire design is applied to the nail in a continuous layer;
- then dots are placed on the not yet dried varnish in different places and stripes of contrasting color are drawn;
- then the dots and lines are carefully pulled out with a needle, and abstract curls or clearer geometric patterns are formed from them;
- The final touch is applying a transparent top.
Dots
Dots belong to the category of professional tools used by beginners and experienced artists to create fantasy nail art. At first, when drawing easy nail designs for beginners, you can get by with a needle or toothpick. Having mastered simple elements, it will not be difficult to complicate the composition of the drawing - and here dots will come in handy: it is much more convenient for them to achieve stunning effects by drawing abstract patterns, exotic flowers and graceful silhouettes of animals on the nail plate.
Brushes
Of all the tools that help even beginners create beautiful and simple designs on nails, brushes require the most skill, which means you will have to master working with them gradually. Today, cosmetic stores can boast of an excellent assortment of brushes for applying designs to nails: thin, thick, wide, flat, rounded and square - they can easily realize any of your wildest artistic ideas and fantasies. Thus, using a thin liner brush, craftsmen can easily perform exquisite openwork painting; a wide flat brush is convenient for drawing plant elements (leaves, flowers, petals), and to apply glitter, sand and acrylic powder to nails, it is better to take a fan-shaped brush.
Stencils
The easiest way for beginners to create unique nail art is to use ready-made nail stencils. Convenient stickers amaze the imagination with a variety of patterns, designs and textures; moreover, such a design does not require special skills for beginners, and the result is simply stunning.
Manicure technique with tape
Prepare your hands for a manicure using tape in the classic way. Next, follow the following steps step by step:
Manicure process with tape
- Apply a base colorless composition under the varnish. Let it dry completely.
- Next comes the main color varnish. Make sure this layer is thoroughly dry. To speed up the process and ensure reliability, use a hair dryer.
- Use tape to create your design on the plate. Avoid applying tape to the nail edges and cuticles. In these places the strips do not adhere well to the surface.
- Paint the open part of the plate with another varnish. Give the varnish time to dry completely.
Beautiful manicure done with tape
If you perform a manicure with gel polishes, then initially the nails with tape are dried in a lamp for about 10 seconds, then the tape is removed from the nails, and the coating is polymerized in the lamp for the remaining prescribed time. Carefully peel off the self-adhesive strip and secure the design with a fastening base.
A manicure using tape is ideal if more than two hours pass between the first and last stages of applying traditional varnish.
If you want to not only make, but also decorate a manicure using tape, pay attention to the video tutorial:
What can you paint on your nails?
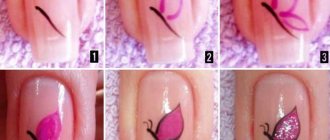
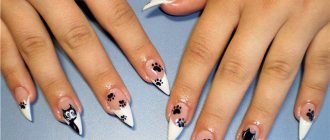
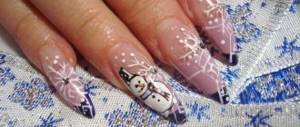
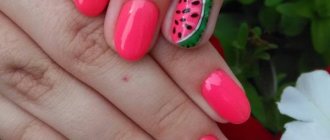
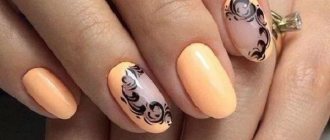
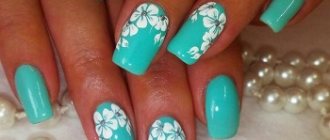
What can you paint on your nails? Whatever you want – the scope for creativity here is truly limitless! Bright flowers and butterflies, lace and abstract patterns, strict geometric shapes and soft gradient tints, as well as stars, snowflakes, bows, birds, funny cartoon characters and unprecedented animals. Hearts, arrows, polka dots, funny faces and even tic-tac-toe look playful and playful. Many beginners love to experiment.
With the help of a step-by-step master class, a novice master can decorate his nails with a chic gradient. To create such a spectacular design you will need:
- patterned stencil;
- foam sponge;
- eye shadows of different colors.
Drawing involves several steps:
- the plate is completely covered with the base color;
- a patterned stencil is glued onto the nail;
- Eye shadows of different shades are applied on top using a foam sponge;
- The sticker is carefully removed, and the finished drawing is covered with transparent varnish.
One caveat - it’s worth rehearsing this design in advance to check whether the shadows in the design will spread due to contact with the top coat. If the experiment was successful, you can start drawing gradient patterns on your nails.
Using a wooden toothpick, you can easily create predatory leopard prints on your nails, which do not require detailed drawing, which means that even a beginner can easily handle them:
- marigolds are covered with a basic tone;
- a toothpick is dipped in varnish of a contrasting color;
- oblong spots are placed throughout the plate;
- Using dark varnish, an arbitrary contour is drawn in each spot - the line should not be solid, on the contrary, free unpainted areas should be left in it.
Another cool piece of art that requires a minimum of effort and additional equipment is a newspaper print. To create it, no special artistic skills are needed, because the drawing is made from pieces of a real newspaper with text printed on them. An easy step-by-step master class on drawing “newspaper” on nails is presented below:
- as a base, the plate is coated with white varnish;
- Ten pieces are cut out of newspaper according to the shape of the nails;
- The printed fragments are dipped in alcohol for a few seconds, after which they are applied to the nail plate - this is how the design is transferred to the varnish coating;
- A transparent top is applied to the finished manicure - an unusual and stylish design is ready!
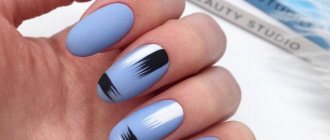
Stationery brushes
They are not comparable to a professional tool, but they can greatly expand your capabilities. For example, drawing stripes is possible with such brushes. As an idea, we can mention a manicure with a predatory pattern reminiscent of a zebra skin. No special skills are needed, but accuracy must be at its best. Agree, every girl can draw several uneven parallel stripes.
By the way, makeup brushes are also suitable for this purpose. After work, do not forget to clean the pile with a solvent.
What patterns can you make on your nails?
A beginner can draw a very delicate and romantic pattern on his nails using lace tulle:
- the nail is covered with a color that will become the basis of the future design;
- a piece of lace is pressed tightly onto the dried covering;
- A contrasting tone varnish is applied on top of the nails;
- After drying, the lace is carefully removed, after which the plate is covered with a transparent top.
Simple and incredibly positive nail art will come out of ordinary spots:
- A bright monochromatic coating is applied to the nails;
- after drying, dots or a needle are used to mark circles, from which very simple or unusual intricate designs and patterns are formed;
- The finished manicure is coated with clear varnish.
On a still wet coating, you can draw beautiful patterns by simply dripping a different color of polish onto your nails and stretching these droplets with a needle, dots or toothpick. This is accessible to beginners.
The real highlight of any fashionable look will be nails with delightful gel engravings:
- light or colored varnish is applied to the plate - you can take one tone as a basis or, conversely, use a gradient of several shades;
- on top of the nails are covered with a thick layer of shellac of contrasting color;
- patterns are drawn with a needle, pin or hairpin with a sharp tip, which must be soaked in nail polish remover;
- the resulting three-dimensional pattern is dried with a UV lamp;
- The design is completed with a layer of gel with a reflective effect.
Another stylish special effect that is perfect for extended nails is imitation of cracks on the surface of the varnish:
- the nail plate is painted over with the main color;
- Drops of colored varnish are applied to the sticky side of the tape;
- the tape is glued to the nail, after which the paint underneath it smoothly spreads;
- the sticker is removed and the resulting pattern is dried under a lamp;
- Then the finishing coat is applied and dried again.
Easy nail designs step by step for beginners
Schemes for beginners will help you create beautiful designs on your nails, where the whole process is demonstrated step by step. So, to apply the popular “Twigs” pattern to your nails, you will need acrylic paints - it is much easier to paint with them than with regular varnish, so this technique is ideal for beginners. The pattern looks good in yellow-green tones, but in other color variations it will look no less impressive. “Twigs” are drawn as follows:
- the plate is covered with the main color - light pastel shades are ideal;
- one or two wavy lines (branches) are drawn from the bottom corner of the nail to the top;
- Use the same color acrylic paint to paint neat leaves along the entire length of the branch;
- the middle of each leaf is drawn in a lighter tone;
- The top of the drawing is coated with colorless varnish.
Important! When creating artistic masterpieces with acrylic paint using step-by-step master classes, you should remember about a transparent topcoat that will protect the designs on your nails, since this material is easily washed off with plain water.
Another simple, but very picturesque print is yellow-orange maple leaves. Drawing them on your nails, following step-by-step recommendations, is not so difficult:
- Conventionally, a maple leaf consists of five axial lines - according to the number of its “petals”, so first you need to mark the protruding edges of all the petals and the places where they connect, so the image will be symmetrical;
- Next they draw the stalk;
- all the points are connected by a smooth thin line, while you need to try to give the image a shape characteristic of maple leaves;
- You can start painting the middle of the leaf.
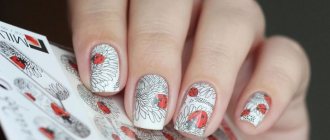
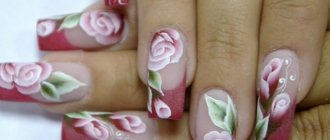
Flowers are one of the most beautiful and sought after nail designs. Available master classes will help you create bright and exotic, delicate and romantic, realistic and fantasy flower designs on nails step by step:
- First, the nails need to be polished with a buff, after which the plate is covered with white varnish;
- use a medium-sized sharp brush to pick up a little paint of the shade that will be used to paint the petals - red, pink, crimson;
- Using the tip of the brush, petals are drawn one by one on the nail - the movements must be precise and neat, but it is not at all necessary to fanatically achieve perfectly straight lines and edges;
- You shouldn’t place each flower strictly in the center of the plate - on the contrary, some randomness and creativity will make the pattern interesting and stylish;
- The empty centers are painted yellow, protruding leaves can be depicted at the edges with green;
- A thin brush will help you achieve clear, pointed ends.
A black outline carefully drawn with a very thin liner will make the design voluminous and graphic. Step-by-step instructions will help you do this:
- you can start from the center of the picture, placing several dots in the middle of the flower;
- Next, draw the outline of each petal; here it is not enough to simply outline the bright spots; on the contrary, you need to slightly go beyond the boundaries, gradually forming a three-dimensional pattern on the nail;
- The thickness of the lines may vary, and solid borders should also be avoided, favoring a light, broken outline and soft curls.
Creating a design using varnishes
This technique of applying an ornament is a little more complicated than using a needle, but it is also easy to learn. To acquire the skill of working with a thin, long brush, first practice on artificial nails: you don’t mind constantly washing them with acetone for a poorly designed pattern. Paper is also suitable for training.
Instructions for applying varnish with a brush:
- Prepare nails for painting: bath, skin treatment, polishing the plate.
- The nail plate is covered with a base (colorless or medicinal varnish).
- The coating dries (in the future: each fresh painted layer must dry completely).
- A background coating is applied: a color is used that will act as a contrast to any other tone used in the painting. First, in one motion, move the brush in the center up to the edge, starting from the cuticle, then paint the left side of the plate and the right - just three strokes of the brush.
- A thin brush is dipped into the varnish, the excess is lightly removed (as in school, painting with gouache) and an element of the pattern is applied (usually from 2 to 6 colors are used). Beginners choose hearts, flowers, lines, only a little later moving on to more complex images.
The completion of the work is considered to be fixation of the ornament with a colorless coating.
When purchasing varnishes, pay attention - their manufacturers supply them with either regular brushes or thin ones intended for painting. If you don’t have this type of material on hand, you can use a thin silicone watercolor brush.
Tips for Newbies
It is not necessary to cover all your fingers with intricate patterns at once - it is enough to highlight one or two nails with a design. A manicure with one design looks very stylish, and you won’t have to duplicate the same print ten times in a row.
You can create an interesting painted decor on your nails using varnish, but it is quite thick and beginners may have difficulty drawing small elements. It is much easier to use acrylic paints, which are used to apply patterns step by step on both regular coating and gel polish. In the second case, shellac will allow the design to stay on the nails longer.
There is no need to rush and immediately buy all the available shades for painting on your nails - at first, 5-6 basic colors are enough. The missing tones can be obtained by mixing existing paints.