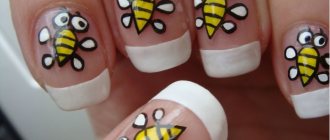
Modern fashionistas prefer to paint real works of art on their nails - they use whatever they can to decorate their nails. Manicures with butterflies are also at the peak of popularity, to create which you don’t have to visit a salon.
Well-groomed women's hands are a sign of self-confidence, femininity and beauty. A good manicure never goes unnoticed . This is one of the most important factors of female charm. Thanks to a large number of techniques and a variety of designs, you can make a real masterpiece out of your marigolds.
This article will focus on butterflies . No, we won't dive into biology lessons. We will learn how to draw these airy creatures on our nails.
How to draw a butterfly on nails step by step with a photo?
Spectacular nail art will require some effort on your part: perseverance, time and precision. But after a few experiments, you will be able to easily cope with the butterfly drawing.
Drawing a butterfly on your nails is easier than it seems
Before this procedure, you need to decide on the materials. First of all, choose a palette of varnishes for yourself . Then prepare the necessary tools :
- A flat brush with a slightly beveled edge
- A thin brush called a “hair”
- Nail polishes
- Dots
An airy and delicate butterfly on your nails will lift your spirits. But before you start painting, get your nails in order . Using a special product , clean the nail plate and treat the cuticle . Now you can start drawing.
Step-by-step creation of butterflies on nails
- You will need several steps. To begin, apply a base polish to your nails . It can be any color you wish. But it’s better if it is a muted and discreet tone, for example, beige or pink
- When the base dries a little, we begin to draw a butterfly . For convenience, you can use an improvised palette (a piece of cardboard). Apply two shades of varnish on it , for example blue and white. Dip one edge of the brush into blue polish, and the other into white. Having mixed the shades in this way, draw the butterfly wings
- Once you have completed this task, you can begin drawing the contour. Frame the drawing with a thin brush and black varnish . To make the butterflies look realistic, you need to paint small veins on the wings with a thin brush.
- Now you need dots. You will need to draw several black dots that will imitate the body of a butterfly. For brightness, you can put white peas in the center of each point . Using a thin brush, add black mustaches
- If you want to make your drawing brighter , you can decorate it with rhinestones or sparkles . Next, coat the nails with a fixing varnish to make the design last longer.
There is an easier way to create butterfly wings using a needle.
Just a few steps and your nails will look mesmerizing!
Butterfly using stamping method
For those who do not feel ready for drawing feats, we can offer excellent options for stamping or ready-made stickers.
A small life hack for applying a butterfly image using reverse stamping using a silicone mat. Typically, a stamping kit includes one stamp, rubber or silicone, with which an impression is made on the nail. If you want to get an image made in several colors, then you will need to resort to the reverse stamping technique. A convenient device for it would be a regular silicone mat for cutting dough, which is sold in any supermarket. It is great for making several blank designs at once, which are then placed and secured on the nail bed.
Step-by-step instruction:
- We apply an aqua base and two layers of varnish of the chosen color or design.
- We wait until it dries completely.
- Apply a base coat to the silicone mat in an even layer of medium thickness.
- Dry it for 2-3 minutes.
- Apply stamping paint to the selected butterfly design on the plate.
- Remove excess with a scraper.
- Transfer the butterfly from the plate to the stamp, and then in a rolling motion onto the dried base layer on the mat.
- We repeat step 7 as many times as we need designs on the nails.
- We color our butterflies with the chosen colors.
- Let it dry for a few minutes (the duration is determined by the properties of the varnish).
- Using a pusher and tweezers, carefully separate the dried sticker from the mat.
- We place it on the nail, level it, cut off the excess, press along the contour with a pusher or toothpick.
- Repeat steps 11-12 as many times as necessary.
- Apply top coat to all nails.
As you can see, drawing is not a very complicated process, although it requires a certain range of skills. However, persistence and accuracy will help you plant a bright and beautiful butterfly directly on your nail.
How to draw a butterfly on nails with gel polish, photo
Gel polish differs from regular polish in that it has a more durable structure and fits perfectly on the nail plate . But it requires drying under an ultraviolet lamp . Therefore, if you decide to paint a butterfly yourself with gel polish, stock up on the necessary tools.
Nail design “Butterflies” with gel polish
- First of all, prepare your nails . Trim the ends, trim the cuticles and lightly sand the nail plate. Wipe your nails with a degreaser and apply base. Then dry it a little under the lamp
- Now you need to apply gel polish for the base . The choice of shade is optional. But it is better to pay attention to pastel colors , then the drawing will look brighter and more voluminous . Dry your nails under the lamp again
- Drop two shades of varnish onto the palette, for example. Dip one edge of the brush into one polish, and the other into another. Having mixed the shades in this way, paint the butterfly wings with gel polish. Dry again. For expressiveness, you can repeat the drawing of the theme again in the same shades . You can sprinkle the butterfly wings with sparkles or decorate them with rhinestones
- With a thin brush we apply contours, draw the body and antennae of the butterfly. To do this, you can choose black or brown varnish. Then we cover the finished drawing with fixing varnish . Dry it and you're done
Watercolor manicure ideas: a few tips when working with watercolor paints
The first thing to remember is that to turn a dark shade into several lighter tones, it is worth diluting it with white watercolor. Thus, all elements of the ornament will have their own smoothness in transitions. But don’t get too carried away, otherwise the drawing will become too whitish and turn into a brightened landscape. When applying the desired tone, you can work with a combination of colors directly on the nail plate. A brush will be an excellent helper for this. It is this that will add vagueness and help you get the desired result. The thickness of the brushes may vary. It depends on the scale of the picture. If the design should fill almost the entire nail, then it is worth paying tribute to thicker brushes. After finishing work on the ornament, you should not emphasize all the contours and elements of the ornament. This will give your work of art translucency and lightness. To achieve a watercolor effect, do not make the outline too thick and outline the entire ornament. It is also worth choosing high-quality and professional brushes designed specifically for working with watercolor paints for manicure. When creating a drawing, not all masters are able to draw straight lines. Therefore, it is necessary to take into account the main advice - the brush must be held perpendicular to the nail plate.
Watercolor painting of women's marigolds is simply mesmerizing in its appearance. After all, real masters are able to convey in a tiny drawing the entire character and mood of the future owner of the manicure. It is this technology of decorating marigolds that occupies a leading position in modern fashion. But, unfortunately, only a true professional is able to create a real landscape on women’s hands.
How to paint a butterfly on your nails step by step with shellac?
Shellac is often confused with gel polish, but they are far from the same thing. Shellac is a very flexible varnish that is resistant to any damage . It has virtually no odor and dries quickly. The color palette is quite rich, which allows you to choose a color to suit your taste. And most importantly, it is practically harmless .
Painting butterflies with shellac is as easy as painting with gel polish
It applies perfectly and has a beautiful gloss . The application technique is no different from gel polish. Shellac requires drying under an ultraviolet lamp . But such a manicure will last for a month without any damage. You can apply various designs to shellac or paint with shellac itself. Try to draw airy and beautiful butterflies on your nails. They look great and add a sense of lightness to the entire look.
Step-by-step drawing of “Butterflies” with shellac
How to draw a butterfly with a needle on extended long nails?
In order for beautiful butterflies to appear on your nails, you don’t have to go to the salon. It is enough to have at your disposal several shades of varnish, a sewing needle and a fixative.
- First of all, provide good lighting. Also, prepare everything you need.
- For large patterns or dots you will need a large needle , and use thin ones for small details. You can paint both short nails and long extended nails
- Apply the base to your nails, and after drying, cover them with your chosen varnish. After the base has dried, you can begin to apply the butterfly design . There are no limits to your imagination here. Experiment, fantasize, use different colors of varnish
- After applying the design, be sure to go over the nails with a fixative. This will make your manicure last much longer.
Butterflies on extended nails On long extended nails, the “Butterfly” design will look very impressive.
Here are a few more secrets so that creating patterns on your nails will only bring pleasure .
- Bright pictures are best placed in the corner of the nail plate
- Follow the color combination . Oversaturation can play a cruel joke. The drawing will look clumsy and funny. It is better to use the application technique on one of the nails on your hand. Modest interesting drawings will arouse more interest
- It is better to always start drawing work with the little finger . Even if something goes wrong, the work will still seem finished than if you started with your thumb
- Use sparkles or rhinestones in your work , so the drawing will look more advantageous
- Choose thick varnish for the main color
Sequins and rhinestones will greatly decorate your nail art in the “Butterfly” style.
Design ideas
The classic option is artistic painting. Using a brush, all the details of the wing are drawn, an outline is added, and the middle is filled. However, with the advent of a variety of materials in the nail industry, butterflies can have a completely unusual appearance if the pattern, for example, is replaced by a laying out of stones.
Foil is sometimes used to fill the wing - an overflow of unrealistic beauty is guaranteed. The insect comes out with a picturesque design. The shimmering effect in tandem with the stones is amazing.
French
French with butterflies is the most popular combination. First the technique is performed, then the pattern is modeled. As a rule, the artistic painting is applied to a pink and white plate, and then the butterfly is filled with different colors.
A wedding manicure with a butterfly in a soft pink design, which is barely visible on the plate, looks great. Nail art masters often use gold or silver to frame the layout of stones and broths. The moth can be silhouetted, with a drawn outline, and an empty middle.
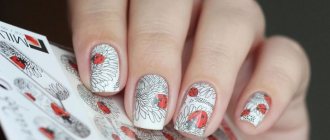
Fragment pattern
In order to diversify the manicure, nail industry specialists use nail designs with butterflies consisting of fragments. The technique is to draw a whole composition, where a flower or leaf located next to a butterfly is accompanied by various elements. The result is a design similar to a photograph. To do this, it is not necessary to place the insect completely on the nails.
With rhinestones
The most spectacular and beautiful design is a manicure with rhinestones. Stones can be located throughout the wing, forming a pattern, eyes, or simply as decoration. An excellent option is a butterfly made entirely of stones, where the wing is laid out using different sizes of shiny material.
The main accent in a manicure with butterflies, as in the photo, is the black base, on which crystals are attached on top. You can make a design with crystal chips, which look no less impressive on the plate in the pattern than rhinestones. When performing this task, craftsmen often use broths and golden cast foil, which adds charm to the painting.
Stamping
It is quite easy to draw a spring insect using stamping. There is nothing easier than imprinting a design on the nail bed. Afterwards, you can use paints and add decor to the drawing.
Butterfly on two nails
Another option to depict insects on your nails is to place two wings on adjacent fingers. The middle and ring fingers are accentuated. A manicure with butterflies looks amazing on them. The moth has no middle part, but has antennae and the lower part of the wing.
Wing art
Winged nail art on all nails looks amazing. Moreover, the execution takes place from such a perspective, as if the plate is completely covered with a wing with beautiful veins and eyes found in real butterflies. This art is best done in bright colors. A wonderful background would be red, pink, orange. To draw the elements we use black and white colors.
How to draw a butterfly on short nails?
If you are the owner of short nails , then you do not have to do only a single-color manicure. A well-chosen ornament will hide imperfections on the hands and emphasize their advantages. Butterflies also look interesting on short nails. However, you should listen to a few tips before applying this design to your nails:
- It is better to place the butterflies closer to the free edge of the nail, this will help visually lengthen your fingers
- To make the nail plate appear narrower , several dark accents should prevail in the design
- When applying a butterfly design to a colored base , leave one millimeter on the sides of the nail unpainted.
- For short square-shaped nails, clean lines are suitable. Smooth and blurry lines will look great on other shapes
Butterfly wings on short nails
Remember that the manicure should not be dissonant with your image . For the rest, use your imagination and act!
Why exactly a butterfly?
Is it possible to create the image of an elegant woman without a stylish manicure? Can an elegant outfit go side by side with unkempt hands? Rhetorical questions and the answer to them is clear.
A variety of hand care products and modern tools allow women to create an almost perfect manicure even at home. Today it is not at all necessary to go to a specialist and spend fabulous money on your nails. All you need to look stylish is imagination and a little patience!
The light and graceful butterfly has long been considered a symbol of immortality and joy of life among many peoples.
And the transformation of butterflies from ugly caterpillars through a boring cocoon into a charming creature made it the embodiment of resurrection and rebirth. The butterfly is always bright, colorful, so reminiscent of a beautiful young girl in a sparkling dance
Naturally, you can limit yourself to applying your favorite shade of nail polish. But will such a solution really satisfy the demanding and even picky fashionista that lives inside every girl? If you want something more sophisticated and complex, you can decorate your nails with different patterns.
Recently, butterfly designs on women's nails have become increasingly popular. Let's take a closer look at this trend.
Why butterflies? The light and graceful butterfly has long been considered by many peoples as a symbol of immortality and the joy of life. And the transformation of butterflies from ugly caterpillars through a boring cocoon into a charming creature made it the embodiment of resurrection and rebirth. The butterfly is always bright and colorful, so reminiscent of a beautiful young girl in a sparkling dance.
The butterfly can appear in the image in different forms
Some artists use this image as a physical manifestation of the muse and inspiration. For others, it becomes a reflection of eternal youth and love.
The butterfly can appear in the image in different “guises”. Some artists (including nail designers) use this image as a physical manifestation of the muse and inspiration, for others it becomes a reflection of eternal youth and love. There are also other interpretations - for example, a butterfly can become a symbol of curiosity, the spirit of an explorer who is endlessly attracted by the new and unknown. Are you familiar with such urges?
Interesting! In Japan, they believe that butterflies are the guardians of youth and beauty. And besides, the Japanese perceive butterflies as a symbol of home and well-being in the family.
What if the images of these beauties have the same properties? Let's test this hypothesis and learn how to draw these ephemeral creatures on our nails. Below we will tell you how to draw a butterfly on your nails in detail, step by step, with photo illustrations.
A butterfly can become a symbol of curiosity, the spirit of an explorer who is endlessly attracted by the new and unknown. In Japan, they believe that butterflies are the guardians of youth and beauty. In addition, the Japanese perceive butterflies as a symbol of home and well-being in the family.
How to draw a butterfly from broken glass on your nails?
The “broken glass” manicure technology looks very original and attractive . Moreover, to achieve this effect you do not need stones or diamond dust. It is enough to buy either a special film or regular foil and show a little patience. Let's try to understand this trendy nail art and create a butterfly on your nails in this style.
- Take foil or special film , cut it into small pieces
- Choose gel polishes of your favorite shades and fixer
- Apply base coat to nails and dry
- Then apply the main gel polish . You can apply it only to those areas where you plan to make the composition
- tweezers, glue small pieces of foil in the shape of butterfly wings onto the base that has not yet dried.
- Outline with a dark outline and add antennae and body
- Dry it a little and then go over your nails with a fixative.
Butterfly made of broken glass
In sunny weather, such a design will literally “burn” with multi-colored shades.
Interesting color solutions
It’s hard to imagine more beautiful combinations than nature itself came up with. Amazing color transitions on the wings create a complete feeling of harmony, even if the two shades in life are not very harmonious with each other.
You need to use red color carefully, since adjacent shades may be invisible next to the bright and rich pigment. But there is one good combination for painting a winged creature. The basal pattern closer to the body is best done in orange-yellow tones, the edge of the front and back of the wing is painted red, and the outline and veins are painted black.
Pink looks perfect in an ensemble with dark blue and purple. The tones can be swapped, using a lighter range for the edges and a darker one for the middle, and vice versa. Pink can also act as an additional color when painting a butterfly or dragonfly.
Blue is almost always used as the main background; the wings are painted over completely, adding an accent in the form of shading. For such a rich pigment, you don’t need additional colors; it’s enough to draw the elements in black and make the outline thicker. For all kinds of patterns or a series of circles, such as a butterfly, use a yellow color.
Powerful black is ideal for detailing elements. However, if you look at the appearance of swallowtail butterflies, which are completely black, it becomes clear that this color acts as the main background. To diversify the insect, use black for the upper part of the wing, and dilute the lower part with variegated colors: red, orange, yellow.
Get inspired by glossy photos of real butterflies, choose the look you like and transfer it to your nail.
The butterfly looks luxurious only with a variegated color, where blue, green, yellow, red or orange are present. If blue or black is chosen, it is better to use a pale overall tone. This way the wings will be very visible. Any colors of varnish can become shades, even if in nature the butterfly does not have such a color combination in color. Flights of fancy should not be limited; feel free to combine the tones you like and use them to create a pattern.
How to draw a white butterfly on your nails?
Classic white color is always in fashion. And designs with white varnish on nails look very gentle and natural. To make the white butterfly look advantageous on your nails, use varnishes in rich shades as a base . For lovers of strict classics, black, raspberry or pink varnish is suitable. Youth style involves the use of blue, green or yellow shades.
Manicure “White Butterfly”
You can apply the design using a needle, brush, toothpick or a special dots device . A white butterfly with a black outline will look beautiful.
A few words about color
A butterfly is a bright and delicate insect. The range of colors in the drawing can combine pastel colors. Pink, blue, white, yellow paints painted in watercolors will give your nails grace and fragility. Brighter colors and beautiful images will highlight the shape of your nails and fingers.
Attention! The combination of tones in the drawing should be harmonious and not dissonant with each other!
In black
In the black version of the design, the image of the insect looks bright and catchy. The decor and colors stand out against the black background. The color scheme of the picture is soft pastel. Rhinestones and sparkles are appropriate.
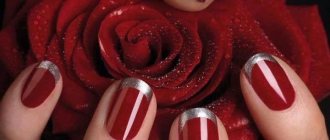
Red
A manicure on a red background stands out and attracts attention. The design can be applied to a red base with black paint in combination with gray or white. Or make a light background (beige, silver, white) on one or two fingers and apply an image on it. Decoration with additional decor is welcome.
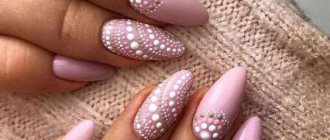
Pink
The pink color scheme is visually beneficial and attractive. Pale pink shades are appropriate for work, everyday life, and special occasions. The rich fuchsia color looks great in the evening. Pink harmonizes with white, delicate purple, and powdery.
White
Butterflies on white look natural. All colors are combined with white, and the image becomes bright and attractive. Delicate pastels or a rich burst of color highlight the butterfly on the surface of the nail.
How to draw a black butterfly on your nails?
Black color always attracts attention. It looks expressive and at the same time restrained. To paint a black butterfly on your nails , you will need black polish. You can use gel polish or shellac , then the drawing will look brighter and more voluminous. And it will last much longer.
Black butterfly on nails
For the background coating, you can take any color from a huge palette of varnishes. It will be enough to apply a base varnish, cover it with the chosen varnish on top - and you can paint. A black butterfly with white or colored splashes will look best . You can add some flowers to this design.
What does the butterfly symbolize?
In many countries and among many peoples, the butterfly symbolizes immortality, the soul, the ability to resurrect and resurrect. She is like an immortal phoenix. He invariably appears, no matter how he experiences his death.
Different peoples interpret the image of a butterfly in different ways:
- In Japan, the delicate winged insect symbolizes an intelligent young woman. If the Japanese see images of several butterflies side by side, for them it means prosperity and family happiness.
- In China, the butterfly is a symbol of abundance, summer and happiness. If an insect is depicted against the background of a chrysanthemum, this is beauty. If a butterfly is drawn next to a plum branch, this is for longevity.
- For Orthodox Christians, the butterfly also symbolizes the resurrection. It may be noted that this sweet winged insect is often depicted in the hand of the little Christ.
Interesting! Plain manicure - trends for 2022
Please note that according to Feng Shui, it is better to depict a butterfly with a full wingspan. Thus, it will bring more joy, prosperity and freshness into your life. If you are alone, then it is better to draw paired insects on your nails. This means that in the near future you will definitely find your destiny.
How to draw a simple butterfly on your nails?
In order for beautiful light butterflies , you don’t have to go to the salon. You can make this beauty . It will take a little patience and diligence, but believe me, the result is worth it!
- You will need regular nail polish and a toothpick. The process includes several stages
- prepare your nails thoroughly . Remove the polish from your nails, clean them well and file them. After this, use a base coat.
- When the coating is dry, you can begin to apply the design. Dip the tip of a toothpick into black polish and place a few dots . This will be the body of the butterfly. draw wings around this point . Add mustache. That's it, the simple butterfly is ready
- Now let the varnish dry well and you can apply a layer of sealing varnish.
How to learn to draw thin lines on your nails
To draw thin lines on your own, first of all, you need to learn how to correctly apply the material to the brush. You can use any flat surface, such as foil, as a palette for work.
- Saturate the working brush completely with varnish.
- Drag the brush across the palette. This will remove excess varnish from the brush and create a thin tip.
- On a piece of paper, practice drawing thin lines in different directions. Try to paint only with the tip of the brush. If you need a thicker line, then press the brush a little onto the surface and then draw it out.
- Practice drawing different shapes and waves.
- After practicing on a sheet, try to consolidate your skills on a tip with a sanded surface by making some simple drawing, and only then start drawing on your nails.
White jacket with butterflies on nails, photo
Discreet and elegant French manicure always remains in fashion. Doing this manicure at home is quite simple. And if you decorate it with butterflies , then a good mood and attention to your person will be ensured.
French in combination with butterflies is a very sophisticated manicure
- To do this you will need a base varnish, a wide brush, varnish of several shades, glitter and a fixer.
- The base is applied to the nails . Next, the tip of the nail must be painted with white or some other varnish and dried. Apply another coat of polish to the tip of the nail
- Now you can start drawing the butterfly . Using several shades of varnish we paint the wings. We outline the contours and attach several rhinestones or sparkles. Apply fixing varnish
As you can see, there is nothing complicated about this technique. Even a beginner can handle this. And an original French manicure with magnificent butterflies will decorate your nails.
Manicure with butterflies: photos of the most beautiful ideas
Unlike other drawings, butterflies can be drawn even on short nails. It looks no less neat and beautiful. The main thing is to choose a pattern that is appropriate in size and shape. Thanks to this approach, the manicure will look truly harmonious and will become a bright part of your image.
For those who love the original design of their nails, we suggest taking a closer look at the design with imitation of butterfly wings. This solution is very unusual, original and for this reason always attracts attention. In addition, it can be realized in absolutely any shade, regardless of the time of year.
In fact, there are many variations of the same design. We have prepared a selection of the most stylish and modern ideas, among which you will definitely find the option that suits you. Get inspired, try something new in design and the result will definitely please you.
As you can see, manicures with butterflies are definitely popular. This is not surprising, because many girls prefer to emphasize their tenderness, fragility and even romance with the help of such simple, unobtrusive details.
Butterfly nail stickers
If you don’t want to bother with drawings of butterflies , there is a great solution - ready-made stickers . It doesn't take much time or effort to apply them to your nails. Just paint your nails with any polish and glue butterflies . Moreover, such stickers will last a long time if you cover the top of the nails with a fixing varnish .
You can also create original butterflies on your nails using stickers.
Such stickers are self-adhesive and water-based. In the first case, there is already glue on the sticker, and you just need to glue it right away. In the second case, the sticker must be dipped in water to activate the adhesive base, glued to the nail and excess water removed with a napkin.
Whatever method you choose, know that airy and beautiful butterflies on nails are not only beautiful, but also original . Allow yourself to be unique!