Relevance
If we hear the word watermelon, images of summer, warm sea water and ice cream appear in our heads. This design is predominantly for the hot season.
If you are going to spend a vacation in warm countries, then the idea of drawing a watermelon will be successful in any season. You can also make an original fruit mix for the New Year by combining orange, kiwi, watermelon and, say, papaya.
Approach this issue creatively, and then it will not matter at all at what time and for what event you did this manicure, everyone will admire its originality and freshness.
Color spectrum
The watermelon design itself is quite bright, rich and juicy. According to the rules of the nail industry, it is not customary to use more than three primary colors at the same time in a manicure. It is believed that this overloads the design and is perceived as bad taste.
In the example of our manicure solution, to depict a watermelon, we recommend using black, red and green colors. It can be supplemented with white detailing. You will need white gel polish for the background of the image itself.
Location on nails
The issue of the location of the design on the nails must be approached carefully. The length and shape of the nail plate should be taken into account.
If you are the owner of long, narrow almond or square shaped nails, then any arrangement of the design will be beautiful: a jacket with a watermelon motif, and juicy pulp for the full length of the nail, and peel for the entire length of the plate - choose any option, you won’t go wrong.
You should be careful with a short length; you should not draw a watermelon slice on the entire plate; it is better to place it on the side, horizontally or diagonally.
Recently, the “ballerina” shape has come into fashion; it is chosen by those with long and at the same time wide nail plates. In this case, it is better to decorate them with many small slices of fruit on one or two nails.
Nail designs with watermelons, types of watermelon manicure
Watermelon manicure offers every fashionista a lot of varied and stylish nail design options. There are so many ways to paint your nails like watermelon that even the pickiest beauty will find exactly her own option.
It is also worth noting that along with the fact that you can change the design, it is also possible to change the color, adding pink, yellow, purple to the manicure and creating any background for the watermelon slices.
Options for a stylish watermelon manicure:
a variant of a simple manicure and pedicure with watermelon for short and long nails; an unusual manicure with a watermelon in pink tones
voluminous manicure with watermelon
manicure with watermelon on one finger
original manicure with painted watermelon slices
beautiful and unusual manicure with watermelon
manicure with watermelon in blue and turquoise tones
original types of manicure with watermelon types of watermelon manicure for long nails
unusual watermelon manicure for long nails
custom manicure with watermelon
Execution technique
Both a beginner and an experienced nail technician can perform a watermelon manicure. Follow the technology and follow the instructions step by step:
- To begin with, we perform a hygienic manicure using a technique that is convenient and accessible to you: hardware, edged, combined or European. Please note: to ensure that the coating does not move away from the cuticle, the pterygium should be carefully removed;
- prepare the nail plate: remove the gloss using a buff or a finely abrasive file. This is necessary to ensure better adhesion of the artificial material to the natural nail. We remove the sawn-off particles, apply a dehydrator (degreaser) and primer. Please note: many people claim that using a primer is not necessary, but this is not true. The primer acts as double-sided tape between the nail and the coating, providing additional adhesion (adhesion), which extends the wearing time of the coating;
- apply the base . If the nail plate has unevenness, we perform alignment in compliance with the correct architecture. This means that the maximum amount of base should be in the stress zone (apex). To determine this area, lightly press on the edge of the nail. You will see a place where it turns white;
- carefully apply the first thin layer of the main color and dry it in a lamp (UF - 2 minutes, LED - 30 seconds). Try to paint as close to the cuticle as possible. If a gel polish brush is inconvenient for this, take any other one that is convenient for you and fill in difficult areas;
- Apply the base color in a second, denser layer and also dry it in a lamp;
- we carry out design;
- cover everything with a final topcoat (glossy or matte);
- remove the residual stickiness and admire the result.
Watermelon French
Versatility is the main thing in this type of design. In this case, the nail can be painted white, black or red, or you can limit yourself to just a camouflage base. There are a lot of options for the watermelon jacket itself, but no matter which one you choose, the sequence of drawing is the same:
- Apply a base coat to the place where the pattern will be located using white gel polish and a thin brush. Dry in a lamp;
- paint the flesh of the berry in red and also dry the nails in a lamp;
- Take white gel polish and carefully draw a thin strip along the red one. Next - a slightly thicker line using green. We shade it a little, trying not to have a clear boundary between white and green, this will give the drawing a natural look. Send to dry;
- Using a thin brush, dots or toothpick, we paint the bones with black gel polish. On some bones you can add highlights with white, making the design more voluminous. Dry in a lamp;
- Using black we make a neat, thin drawing near the peel. If the nail itself is painted black, then paint it with white;
- cover the design with topcoat;
- for greater realism and volume, place transparent voluminous drops according to the pattern with a thick top and dry thoroughly in a lamp;
- After removing the stickiness, the juicy summer design is ready.
Manicure with segments
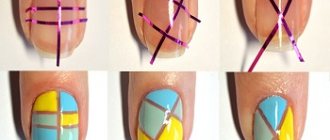
Drawing watermelon slices on your nails is not difficult, but this work is more scrupulous and troublesome. They are drawn according to the same scheme as the French one, only now we use the white color not at the tip of the nail, but in the places where we want to make semicircular or triangular segments.
To simplify the task and realize your fantasy, you can use ready-made sliders, transfers or water stickers. They are usually sold with instructions and are easy to apply.
Manicure with watermelon peels
The watermelon rind design is simpler than it looks. On one or several fingers, as an independent design or paired with slices - it’s up to you, but keep in mind that the main thing here is to choose colors that are harmonious with each other in terms of brightness.
The sequence of actions when performing this manicure is as follows:
- on top of the base we create a thin layer of the main color of the peel (light green), dry it in the lamp for the prescribed time;
- Apply a second, denser layer of the same color. We are not drying it yet;
- With a slightly trembling hand, using a thin brush, draw vertical stripes with a darker (green or dark green) color. If the surface really reminds you of the skin of a watermelon, then in this form we send the nails to dry in a lamp;
- Apply a fixing layer of top, dry and remove the sticky layer.
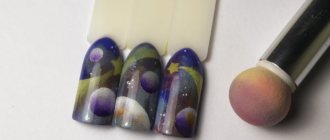
Watermelon manicure with gradient
The design made using gradient technique makes the manicure lighter and airier, because... there are no clear boundaries.
For the gradient, we need the same materials as for coating with gel polish, but we will also need a foam sponge or a special air puffing.
Tip: to create a gradient, it is better to use gel paints rather than gel polishes. The latter are more dense, and the desired effect can be achieved in one or two layers.
Create a gradient step by step:
- Apply two layers of white gel polish on top of the base coat that has been in the lamp (the first is thinner, the second is denser). We dry each layer well, because white color is more pigmented and takes longer to dry;
- dip a sponge or aeropuffing into scarlet gel paint and carefully drive the color into the nail in the place where you plan to depict the pulp of the future berry. Dry it in the lamp for double the time;
- Clean the sponge and dip it green. Gently drive the green color into the nail, imitating the peel. You need to do this, just short of red, you should get a smooth red-white-green color transition, which is called a gradient or ombre. Dry for double the time;
- we draw the bones and also dry them in a lamp, but for a standard time;
- We cover the design with a top coat, and our watermelon is ready.
Tip: if the color does not transfer well from the sponge onto the white backing, then remove the sticky layer from it. It will become easier to work, and the color will be denser and brighter.
Other design ideas
Although there are many commonly used watermelon manicure designs, you can always experiment with other techniques. For example:
- instead of painted black seeds, you can attach small black rhinestones, this will look quite unusual and voluminous;
- You can turn your nails into a fruit and berry meadow by depicting kiwi, orange, banana, raspberry, strawberry, currant, etc. in addition to watermelon;
- create the effect of a sugar watermelon on shellac using velvet sand.
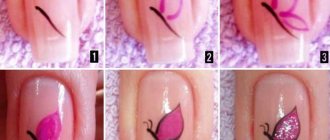
Nail design technique step by step
Before drawing watermelon slices step by step, you need to prepare varnishes, a transparent fixative and suitable thin brushes for applying the image. Green and light green varnish will be needed to imitate the watermelon rind, red or pink - to decorate the pulp, and black or dark varnish - for seeds and stripes. We must not forget about the white color, which is required to create highlights and veins. First, the necessary preparation occurs: shaping the nail, pushing back the cuticle using an orange
You can make a special steaming bath for your hands with lemon juice and essential oils. By holding your fingers in it for about a third of an hour, you can not only steam the skin, but also clean the surfaces. This procedure ends with thorough drying and applying a nourishing cream. Prepared nails are painted with dark green varnish over their entire surface. Then, stepping back slightly from the hole to be able to mark the crust, a white layer is applied.
The arc at the base is complemented with light green splashes using a brush to make the watermelon more realistic. Leaving a thin white line, the remaining nail is covered with red polish. Using a brush immersed in black varnish, roundness is drawn along an arched path, symbolizing seeds. When they dry, using a washed brush and white varnish, you can add volume to them by drawing inclusions. At the final stage, the finished manicure is fixed with colorless varnish.
A variation of the watermelon French begins with a similar preparation of the nail. In this case, applying a base is mandatory. Then, using French stripes, the edges are painted scarlet, and the first layer is dried under an ultraviolet lamp. A thin white line is applied at the junction of the base and the red color, and then a light green line next to it. The layer is also dried with a special lamp. Black dots are drawn on the red pulp, symbolizing seeds, and the finished manicure is secured with colorless varnish.
A calm version of “watermelon rinds” is created using green shades of varnish. First, the plate is covered with two base layers, each of which needs to be given time to dry. Then the nail is painted light green and dries again. Finally, using a brush, slightly blurry and uneven stripes of a dark green tone are formed. The finished image is fixed with colorless varnish. This design is recommended for wide, awkwardly shaped nails, as it visually lengthens the plates.
Sources
- https://VseLady.club/krasota/nogti/dizajn/manikyur-arbuz.html
- https://MakeUp.ru/article/manikjur-s-arbuzom-fotoinstrukcija
- https://wlooks.ru/lak/dlya-nogtej/manikyur-arbuz/
- https://womanadvice.ru/manikyur-arbuz-modnyy-trend-dlya-sovremennyh-devushek-i-zhenshchin
- https://heaclub.ru/kak-narisovat-arbuz-na-nogtyah-dizajn-nogtej-s-arbuzami
- https://chebo.pro/krasota/kak-sdelat-risunok-arbuza-na-nogtyah.html
- https://modnail.ru/publication/manikyur-s-arbuzom/
- https://vplate.ru/manikyur/risunki/arbuza/
Useful tips
In any business you need to improve. To make your manicure with watermelons look perfect, listen to our advice:
- choose gel polishes with good color density, this will avoid “bald spots”, the layer of material will be thinner, which will allow your nails to look more neat;
- After the topcoat has dried, you can carefully file the plates. This will not affect the wear, but a smooth edge looks neater;
- if the varnish flows, then remove the sticky layer from the base and try to paint it again, the problem should go away;
- streaks of gel polish can be easily removed with a thin brush dipped in degreaser;
- Apply varnish one finger at a time - this will not affect the speed, but the quality of work will noticeably improve. The product does not dry without a special lamp, it can flow, blur, and the clarity of the lines is important to us.
Watermelon French
Watermelon French is performed in several stages:
- Apply base to plates.
- Using French strips, cover the free edge of the nail with red gel polish. Dry the layer under a UV or LED lamp.
- On top of the red, at the junction of it with the transparent base, draw a white line, and then a green one. Secure the layer with a lamp.
- Draw black dots - seeds.
- Cover your nails with a sealer.
- Dry all layers.
- Remove the sticky layer using a degrease remover.