Strengthening nails with gel is necessary if they are weakened, thin, peeling or breaking. The procedure is also indicated for long, highly flexible plates. Strengthening is carried out not only with extension products, but also with hard bases, acrylic compounds, the same powders, biogels, including camouflage ones.
One of the selected cosmetic preparations is applied to oil-free nails, coated with a primer, and polymerized. Unevenness should be removed with a file and a buff. And on top the strengthening agent is covered with gel polish or only with a transparent top. After all, many of them also give a beautiful natural shade to your nails, without the need to paint them.
Why is the procedure useful?
Natural nails are prone to brittleness and flaking, so manicurists recommend strengthening them with gel.
This procedure is useful for the following reasons:
- The nail plate does not deteriorate; on the contrary, under the influence of the gel it thickens and becomes even.
- Not only the nails, but also the cuticles receive care, since the trimming manicure procedure is performed less frequently.
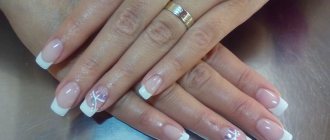
- Nails look natural, strengthening with gel preserves the natural shape of the plate.
This procedure can be done both in the salon and at home, if you have the necessary knowledge and tools (experience will come with time).
Advantages and disadvantages of gel nail coating
The material in question is widely used in beauty salons, as it has the following advantages:
- nails become strong and difficult to break when hitting hard objects;
- the material does not allow them to delaminate and preserves the structure of the plates;
- the plates become smooth, shiny, neat;
- The manicure remains beautiful longer and does not require daily correction.
Among the disadvantages, experts note that the strengthening has its own service life: the procedure will last for 2-3 weeks (it all depends on the individual characteristics of the nails and the speed of their growth), then a correction must be made: the gel grows along with the nails, which makes the manicure not aesthetically pleasing .
Hence the second drawback: correction takes the same amount of time as the primary procedure. For an experienced master – 1–1.5 hours, at home – 2–2.5 hours.
What is better to use gel or biogel to strengthen nails?
Under gel polish, nail plates can be strengthened with both gel and biogel. These materials differ primarily in their composition, and they also have different effects on the treated areas.
Gel is a synthetic (artificial) material - a glass-like polymer that hardens under the influence of a UV lamp. Biogel is a more natural product - a rubber polymer, very elastic and easy to use.
Biogel is used to improve the health of nails, it has a positive effect on them and does not spoil them at all. When using this material, there is no need to cut down the plate; it is applied in a thin layer, retains the natural elasticity of the nail, and does not chip. The biogel lasts no more than 2 weeks and is removed with acetone-containing liquid.
The gel has more possibilities: it can also be used for extensions if there is a desire to change the length of the nails. This material lasts longer, but due to the lack of elasticity it is susceptible to chips and cracks and does not require complete removal before correction. It does not have healing properties, although it helps to thicken the natural plate.
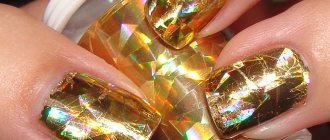
Gel polish coating after strengthening nails: how to strengthen nails with single-phase gel polish?
Gel polish coating is carried out in a standard manner. Please note that after strengthening with acrylic and gel, and after removing particles of sawdust, there is no need to apply a base. Gel polish adheres perfectly to artificial material without applying a base.
Peculiarities:
- If you want to remove small errors that remain after strengthening with acrylic or gel, you can level it using a base. After this, several layers of colored coating are applied and covered with topcoat.
- Many girls who do their nails at home and make their own gel polish often use three-phase gel polish systems in order to reduce the time spent on manicure. That is, one bottle contains color pigment, base, and top. That is, instead of applying several layers, you only need two. However, this option is absolutely not suitable for application to weak, natural nails.
- The fact is that in 70% of cases this varnish chips off on almost all nails within a week. That is, the durability of such a coating is less than a week. That is why it is necessary to apply a base and strengthen it. Single-phase nail polishes are a good alternative for pedicures, but they are very rarely suitable for creating a beautiful coating on fingernails.
- As you can see, strengthening nails is not a mandatory procedure, but it is necessary if your nail plate is very thin and weak, and gel polish practically does not stick to it.
Strengthening products
Contraindications to strengthening nails with gel
Strengthening nails with gel (under gel polish or other coating) requires taking into account the following contraindications:
- the presence of fungal infections of the nail plates and skin;
- the presence of cracks and open wounds in the area where the gel is used;
- the presence of an allergic reaction to the components of the product used;
- increased humidity of the skin of the hands;
- individual rejection by the body of the material in question.
In addition, it is necessary to take into account the general condition of the body, since the following factors may cause the gel coating to adhere poorly, peel off and break:
- diabetes;
- circulatory disorders;
- hormonal imbalances;
- taking antibiotics;
- chemotherapy.
Sudden stressful situations, expecting a baby or feeding him can also cause the gel not to last the required 3 weeks.
Don't miss the most popular article in the section: How to draw monograms on nails step by step for beginners. Instructions with photos.
How to strengthen nails with gel under gel polish?
You can also strengthen the nail plate using hard materials. They are ideal if your nails are very thin. This is the only possible option for girls who do not have any coating on their nails for longer than a week. This is due to excessive weakening, softness and thinness of the natural nail plate.
Accordingly, there is no alternative to strengthening with solid materials. Because it is not possible to strengthen such nails with a base using acrylic powder. This coating simply does not stick to the nails and chips off after just a week. To extend the durability of the design up to three weeks, it is necessary to use reinforcement with solid materials. That is, gel or acrygel.
Instructions:
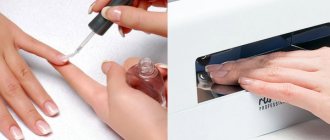
- To carry out manipulation for the purpose of strengthening with gel, it is necessary to file the nail plate, remove the remains of the pterygium using a bullet cutter, and shape the free edge. After this, dust is removed using a cloth with a degreaser, and a primer is applied.
- For better adhesion of the coating, you can apply bonder. And after that, apply a very thin layer of base using rubbing movements, which is dried in a lamp for 30 seconds.
- Thus, using the base, we form a kind of adhesive tape that will help hold the hard material on the nails. After these manipulations, strengthening can be carried out using gel.
- To do this, you need to take a small amount of product on the brush, work the entire nail plate, including the cuticle area, side ridges and free edge. Thus, you apply a kind of substrate.
- After this layer, you need to take a drop on a brush and apply it to the center of the nail. Now, using a thin brush, you need to distribute the gel in different directions, forming the apex zone. After you are satisfied with the quality of the alignment, you have built the architecture of the nail, you need to place your hand in the lamp.
- This option is suitable if you work well with the gel, it does not numb, and you are completely satisfied with the quality of the material. It is very convenient to use for leveling the nail plate and strengthening it with gels of medium consistency.
- Jelly gel is not suitable for these purposes because it is quite thick and does not level well. It is better for them to do extensions rather than leveling. For strengthening purposes, a regular extension gel of medium consistency is suitable.
- If necessary, you can take transparent or camouflage. The thinner the gel, the easier it will be for you to level. This is due to the fact that such material is very quickly leveled on the nail plate, and after that there is no need to file.
Strengthening nails
Materials and tools
In order to carry out the strengthening procedure efficiently, it is recommended to stock up on the necessary tools and materials.
To prepare your nails and perform a manicure you will need the following:
- file, buff (help to give the desired shape, level the surface of the plates);
- orange or metal stick (pushes back the cuticle);
- remover (used for unedged manicure) or nippers (for classic manicure).
To apply the gel coating, you must purchase the following:
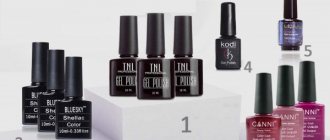
- only gel (if it is single-phase), gel+base+finish (if the product is three-phase) or biogel;
- primer to remove excess oil (acid-free for normal nails, acidic for wet nails);
- dense synthetic brush (used to apply the material);
- UV lamp (to dry each layer).
Design tools are chosen taking into account what is planned: it can be gel polish, rubbing, decorative elements, glitter.
Nail preparation
Before the strengthening procedure, nails must be treated, which, firstly, will allow you to perform a high-quality manicure, and secondly, will provide your hands with a well-groomed, aesthetic appearance. Experts distinguish three main types of manicure: classic (edged), European (unedged), hardware.
A classic manicure involves removing the cuticle with special nippers, where it is first moved back and then removed. Before the hand procedure, it is recommended to take a bath, which will soften rough skin and simplify the entire manicure process.
European manicure involves removing nail polish using a special softening agent - remover. The procedure goes as follows: first the remover is applied, and after a while the softened cuticle is moved with an orange stick.
Hardware manicure is the most gentle; it not only removes the cuticle, but also gives the plates the desired shape. Such a device can be bought in specialized stores; it includes all the necessary attachments and instructions for use.
Next, give the nails the desired shape: square, almond-shaped, rounded or sharp. In this case, it is recommended to move the file in one direction, so the plates are less injured. To ensure that the gel adheres well, the nails are treated with a soft buff; however, you should not overdo it; the plate should not be too thin.
The last step in preparing the nails is degreasing them with a special composition; this procedure will also help the gel to firmly take hold. After removing excess shine, the nail plates should not be touched. If biogel is used for the strengthening procedure, then experts do not recommend sanding the nails with a buff; it is enough to just degrease them.
Strengthening nails with gel. Instructions
Strengthening nails under gel polish using gel can be done with a single-phase or three-phase agent. If the product is single-phase, then only this gel is applied to the prepared nail plates; if it is three-phase, then three different products are used: base, constructor and finish.
Experts also pay attention to other necessary conditions:
- In order for the gel coating to last longer, it is not recommended to use any moisturizer on the skin of the hands before the procedure;
- if a bath was made before processing the plates, then it is better to carry out the strengthening procedure the next day;
- An additional product – a rubber base – will help achieve a perfectly flat surface;
- To avoid chips and cracks, at each stage of strengthening it is necessary to carefully seal the end of the marigold.
The most important thing is that for the result to be pleasing to the eye, and for the manicure to last at least 3 weeks, you should complete the following three mandatory steps.
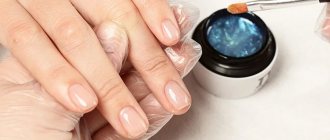
Step 1: base
Base is a transparent material from which the strengthening procedure begins. Apply the product with a thick synthetic brush in a thin layer. Dry the base in a lamp, the exposure time is from 30 s to 1 min (this depends on the quality of the lamps used and the manufacturer of the material).
If a single-phase product is used, then the gel is also applied in a thin layer and dried in a lamp.
Step 2: Base Layer
When the base has dried, they begin to work with the main layer, it is also called construction or sculpture. Since strengthening does not involve the process of changing the shape and length of the nail, the product is applied quite densely, but not in a greasy layer.
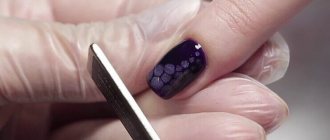
Instructions for strengthening nails with gel under gel polish in photo
In this case, the gel should not be attached to the cuticle and side ridges, which can subsequently lead to peeling and chipping of the material. If the product does get on areas close to the nail, it should be removed with a cotton swab dipped in a degreaser. Drying the sculpture layer in a lamp.
Step 3: Finish
Top Coat is the last, final layer. Before applying it, you need to make sure that the previous layers lay flat; if this is not the case, then you should make a sawdust of the unevenly distributed material with a soft buffer. The finish is applied with the same dense synthetic brush and polymerized in a lamp. The final touch is to remove the sticky layer (if there is one) with a special napkin.
The procedure is completed by applying gel polish or other coating. When choosing gel polish, do not forget about the top coat, which will allow the product to last much longer.
How to do it?
First you need to prepare the nail bed for applying gel polish. To do this, a basic rough treatment of the coating is performed, which will make the nail even and smooth, which will increase the long-term preservation of the manicure.
Processing typically takes up to forty minutes:
- Treat your hands with antiseptic.
- Use a file to adjust the shape of the free edge.
- Apply remover to soften the cuticle (you don’t need to apply it all over your hand at once, it is recommended to do the treatment gradually).
- Use an orange stick or pusher to push back the cuticle and slightly lift it up.
- Use pliers to cut off the keratinized epidermis.
- Polish the plate with buff.
- Remove excess sawdust.
- Apply a degreaser to degrease the coating.
A degreaser should always be applied, as it normalizes the acid balance of the nails, removes the fatty film from their surface, which increases the adhesion of the gel polish. You can replace the dehydrator with acetone, medical alcohol or antiseptic.
Despite the fact that a strengthening gel is used to level the surface, you still need to use a buffer. This will remove excess gloss, increasing the adhesion of the applied materials.
After this, you can begin applying the gel and the main colored varnish:
- Apply primer (optional) and wait for it to dry - up to a minute.
- Using a brush, take a little gel from the container and apply it to the center of the nail. Gradually, with confident movements, distribute it first to the cuticle area, then in the area of the side rollers, and finally bring it to the free edge. Place excess back into container.
- Turn the nail face down so that the mixture flows into the center. After 10 seconds in this position, correct the unevenness of the coating with a brush.
- Return the plate to its original state and make sure that the gel is applied in an even layer.
- Dry the strengthening layer in an ultraviolet or LED lamp for one and a half to two minutes.
- Apply the base and dry it.
- Apply colored varnish in one or two layers, make a design if desired, dry everything in a lamp.
- Fix the work with topcoat, dry it, remove the sticky layer.
Typically, additional strengthening of nails before applying gel polish takes up to half an hour; in the absence of skills and dexterity, it can take up to 40-50 minutes.
Strengthening natural nails with biogel
Biogel can also be used as a base for gel polish, however, this material is safer for nails, in addition, it is odorless, therefore it is approved for use by expectant and nursing mothers and allergy sufferers. Like gel coating, the material in question can be single-phase or three-phase.
Strengthening nails with biogel is carried out according to the same scheme in three steps: a base is applied, then the main layer and finish, each layer is dried in a lamp.
Don't miss the most popular article in the section: How to extend nails with gel polish. Nail extension instructions for beginners. Photo.
Step-by-step instruction
First stage. The plate is strengthened with a base and treated with a thin layer. After the procedure, the fingers are dried under a UV lamp.
Second phase. A thicker base layer is applied and dried under a lamp.
Before strengthening your nails with a base and main layer, be sure to protect the cuticle so that the products do not get on it. If this happens, wipe off the excess with a tissue.
The last stage is to apply another layer and dry. There may be a sticky part left on the plate, which must be carefully removed with a cotton pad.
The strengthening gel is easy to apply, but requires care and pre-treatment.
You can also use acrylic powder - a product that has a similar effect and the same method of application.
How to remove artificial material
The material in question cannot simply be removed with nail polish remover. Experts recommend filing off the gel; a glass or metal file with notches will not work; it is better to use a buffer with an abrasiveness of 100–150 grit, designed specifically for artificial materials.
You need to file off the gel coating carefully so as not to hurt the natural nail. The dust generated during the procedure should be periodically brushed off and the nails moistened with liquid, then the layer of artificial material and natural coating will be clearly visible.
Cleaned nails are sanded and polished, and the surface is treated with a moisturizing component. The final touch is the application of a strengthening base.
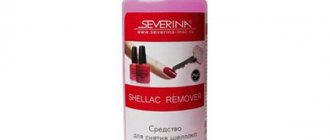
If biogel was used as a base for gel polish to strengthen nails, it is removed with a special product or regular acetone. Cotton pads are soaked in the existing liquid, applied to the nails and wrapped in foil for 15–20 minutes. When the material dissolves, it is carefully removed with tweezers. The plates are then polished and lubricated with a nutrient.
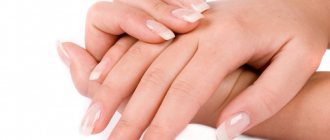
You can strengthen natural nail plates with the help of modern materials - gel or biogel. The procedure can be carried out both in the salon and at home, the main thing is to follow the instructions exactly, then beautiful nails will delight you for at least 3 weeks.
How to strengthen your nails with a gel polish base?
Instructions:
- To carry out the manipulation, it is necessary to prepare the nail plate in a standard way. To do this, filing is carried out using a soft buff in order to remove shine from the natural nail. After this, it is necessary to remove the pterygium so that detachments do not occur in these places.
- Next, treatment is carried out using a primer and a degreaser. After these manipulations, a thin rubbing layer of base is applied. It is not necessary to dry it.
- Now you need to place a large drop of base on the nail and use a thin brush to smooth it out, not forgetting to draw the apex line, gradually reducing the amount of material towards the cuticle, side ridges and ends of the nail. After this, you need to turn the nail down in order to even out the coating and place it in the lamp for a few seconds until the base dries completely.
- If your nails are quite strong, strong, and thick, then such strengthening will contribute to longer wear of the gel polish.
After strengthening