Every woman should look 100% not only her body or face, but also her arms, legs - especially her nails. Nails must be well-groomed and clean - not only from the point of view of hygiene, but also aesthetics. Recently, fashion trends offer women, girls and even little ladies to create an extraordinary manicure using design tape.
Among the many nail design options, it is worth paying attention to nail design tapes. A photo design for step-by-step use of different types will be offered in several options.
What is nail design tape?
Nail art tape is a metallic tape in a reel of different widths, lengths, colors and shapes. An adhesive coating is applied to the back of the tape, with which the tape is attached to the nails.
This tape is used in nail design, in any manicure and with regular nail polish, acrylic coating, and gel polish . The main rule for its use is that the nails must be dry, then the tape will hold firmly and lie flat, photo of the design.
Don't miss the most popular article in the section: How to draw monograms on nails step by step for beginners. Instructions with photos.
Kinds
Decorative tape for creating the perfect nail design is in demand among professional and home artists. Different in shade and thickness, it allows you to diversify your look and add originality to any gel polish coating.
Adhesive tape is sold in small rolls and comes in a thin strip of various metallic shades. The cost of such an accessory is low, and the range is simply huge.
Using adhesive tape you can create a laconic manicure or an intricate design with a geometric pattern. Stripes are used to emphasize the geometry of the nail plate or coating, design the color or shape of the nail.
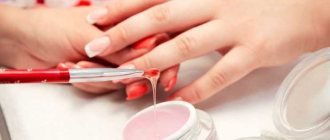
Liquid tape is not an accessory for creating nail designs; such an object acts as protection for the periungual area from contact with gel polish, including base and top coat. The product is sold in a standard bottle with a brush, applied to the area around the nail using the latter using gentle movements, without entering the territory of the nail plate. The use of adhesive tape is useful at the beginning of a manicure: after processing the nail and plate and before applying the base and pigments. The tape allows you to protect the delicate area from contact with persistent gel textures and create a neat, perfect manicure with a durable coating.
It will be difficult to get rid of the coating on the skin, and it’s easy to ruin the appearance of the manicure with such manipulation. The liquid tape absorbs the blows of awkward hand tremors and small errors of the master, which is especially typical when performing a complex design or ombre manicure. It is easy to remove the accessory after all stages of applying the gel coating, including the top coat. Simply pull the tape with tweezers - it can be easily removed without the risk of damaging the coating or skin.
Benefits of using tape
The main advantage of design tape is the huge selection of shapes, colors, widths, and thicknesses.
And:
- The price of the tape is low, you can buy at least a pack of different tapes at once;
- Easy to use, even an inexperienced person can handle its use;
- Creates a beautiful, sophisticated design on the nails;
- It may be stored for a long time - without using it, it takes up little space;
- Retains its appearance for a long time;
Nail design with ribbon for short and long nails. Photos, ideas with rhinestones, tape. Master class: how to do a manicure with gel polish - Helps in creating straight lines if you have difficulty drawing them on your nails.
Working with such a design, there are many more advantages that every woman will highlight for herself.
What is a manicure tape?
The modern beauty industry offers fashionistas many interesting accessories that are designed to make their manicure unique and inimitable. One of them is a special tape, somewhat reminiscent of adhesive tape. This tape is characterized by a beautiful decorative surface - matte or glossy, metallized or holographic - and an adhesive base. It is very easy to use, and the result is spectacular and inimitable.
Shellac with tape
Modern manufacturers offer such tape in various lengths and widths, as well as in a wide variety of colors. For nail design, it is recommended to choose a tape with the smallest thickness - gluing it is much easier and more convenient, and besides, it looks prettier. Thanks to the high-quality adhesive composition applied to its base, it guarantees perfect adhesion to the surface of any nail coating, be it regular manicure polish, acrylic, gel or shellac.
In any case, it is necessary to glue the tape only after the nail coating is completely dry. And at the end, a final transparent coating must be applied. This way, shellac with design tape will hold tighter, more durable and more securely. The best way to figure out how to do such a manicure step by step is to take a master class.
Two options for using tape in manicure
First of all, nail design tape is a decor that is used to create and highlight a design on the nails using a certain color of the tape.
When creating an aquarium design in the form of a 3-D effect, it is carried out in several stages:
- Apply one layer of gel to match the tone of the nail plate, glue several tapes on top, and dry;
- Apply a transparent gel, crumble cut tape or strips on top, but in a different direction, dry the nails under the paw;
- Apply another layer of clear gel.
- A beautiful 3-D manicure with ribbons is ready.
The second option for using ribbon is as an auxiliary design element. It creates various geometric and other shapes on the nails and removes the tapes using tweezers.
Monograms on nails: design features
To learn how to draw beautiful monograms on your nails, first of all you need to stock up on the necessary tools and materials: manicure brushes, gel paint or gel polish, training tips, stencils and training cards.
Brush for monograms on nails
To draw small designs on nails, including monograms, use brushes with thin short bristles. Good reviews on the Internet can be found about the brush InGarden, Global Nail, as well as some brushes from Aliexpress, for example, MAKARTT, BQAN, Monja, KASAKO, etc. But no matter how good the brush is, many masters cut “brushes to suit themselves” ” to make the thinnest hair possible. The brush is cut at the base in a circle, one hair at a time. For long curls, it is better to use brushes with longer hair.
Gel paint
Some masters manage to draw monograms on their nails with regular gel polish of a thick consistency, but it is much more convenient to use products specially designed for this, namely gel paint or gel paste. Among the gel paints, E.mi, NeoNail, InGarden, UNO, Nail Passion, Maranda, Patrisa nail, etc. are praised.
Nail design with ribbon (+photo)
To design nails with tape, you need to prepare your hands and nails for manicure:
- Make a bath for hands and nails;
- Wipe your hands dry;
- Apply hand cream;
- Remove the cuticle with a wooden stick;
- Trim and trim nails to the required length;
- Use nail polish remover to degrease the nail plate;
- Apply varnish, acrylic or gel polish;
- Dry thoroughly;
- The surface of the nail plate should be smooth;
- Glue the tape according to the sketch of the future manicure design, stretching its edges and pressing tightly;
- Apply clear varnish and sealer on top.
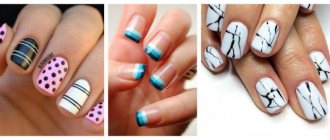
Where to begin? The simplest option for manicure with tape is zebra:
- Choose a thin black or white ribbon;
- Apply nail polish (gel, acrylic). If the tape is black, then the varnish is white and vice versa. You can use other colors, but so that they are contrasting;
- Glue the tape in 2-3 rows - on short nails, and in 3-5 rows on long nails. If desired, the ribbon can be additionally decorated with rhinestones, stickers;
- Cut off the remaining tape;
- Apply clear varnish;
- Dry thoroughly.
Attaching the tape to the gel polish coating
The procedure for applying stripes with a metallic sheen to a gel polish coating is not much different from a varnish coating. The tape coating as an accessory is applied to the nail plates only on ready-made gel polish coatings. Then it is secured with a finishing layer.
Before gluing the tapes, the coating is removed from the sticky layer. The tape, fixed on one side or in the middle (in the case of a lunar design), is tightly stretched to avoid creases. Excess tape protruding beyond the edge of the nails is trimmed and secured with a top coat.
View this post on Instagram
Posted by Unreel (@extremeofficial)
Lunar manicure
Fashion trends are constantly changing, but every woman wants to be in trend from the top of her head to the tips of her nails. One of the fashionable trends in nail art is moon manicure.
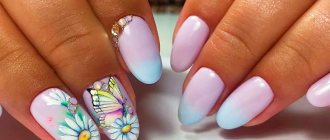
What is a moon manicure? It is quite easy to recognize; the base in the form of a “crescent” stands out on the nails, but some create a square or triangular, double highlight with ribbons, in combination with a jacket. There are many ideas, everyone chooses according to the event: for everyday or special occasions.
For an everyday lunar manicure, a design in white and pink tones with a gold or silver ribbon, as in the first photo, is suitable:
- Prepare hands and nails for manicure;
- Apply the base as a white varnish;
- Dry the white varnish;
- Apply pink polish to the top of the nail and dry;
- Secure with gold ribbon;
- Apply clear varnish on top of the manicure.
It is possible to create such a manicure with one color of varnish (second photo):
- Apply colorless varnish to your nails and dry it;
- Fasten the tape;
- Apply white varnish to the top of the nail and dry;
- Apply a transparent sealer on top.
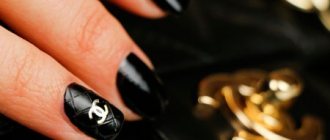
Black and gold
Black color is not only sadness, but also the color of creative individuals, and a manicure in the form of black polish with a gold ribbon or vice versa is a refined and elegant classic. This manicure on your nails will look rich and luxurious.
To create this nail design using tape, you will need several steps (design photo):
- Black varnish (gel, acrylic), gold ribbon, colorless fixative;
- Clean nails and remove cuticles;
- Apply black polish (gel) to dry nails and dry under a lamp;
- Glue a gold ribbon: along, across, diagonally, or create checkered patterns and diamonds from them, perhaps imitating a moon manicure - glue a gold ribbon at the base of the nail onto the black polish. The design depends on the woman's unlimited imagination;
- Apply fixative and dry nails again.
With stripes
In stores you can buy thin ribbons of various colors, rolled into rolls. They look like foil. To create a fashionable striped manicure, you need to prepare:
- manicure set;
- a base for varnish, which will protect the plate from negative influences;
- varnish;
- means for fixing and removing varnish;
- roll of tape;
- cotton buds.
To create a “stripe” design on your nails, first of all prepare the nail plates, namely:
- remove the cuticle;
- use a polishing file to remove the top layer;
- Use a file to trim the edges of the plate.
Then a thick layer of base is applied to the plate. Cut a piece of tape slightly larger than your nail. Next, apply the first layer of varnish, after it has dried, paint the second layer, onto which the tape is distributed according to the intended design. After drying, use nail scissors to carefully trim off its protruding edges. Traces of varnish from the dermis are removed with a special liquid that is moistened with a cotton swab.
Quick Ribbon Design
At home, you can quickly create a manicure design using tape on your nails; there are many options with a photo of the design.
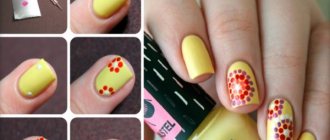
1st option – “Herringbone”:
- Prepare hands and nails for manicure: wash, clean, file;
- Choose a varnish. In our case, white;
- Cover your nails with clear varnish or gel;
- From the base of the nail, use tweezers to glue a tape in the form of a triangle without a base or in the form of a tick, this creates 3 rows;
- Cover the top of the entire nail with white varnish;
- Dry the varnish under the lamp;
- Use tweezers to remove the tape, removing it by the protruding tails along the edges of the nail;
- After removing the tape, apply clear polish and dry your nails.
2nd option – “Sailor”:
For this manicure, we select the colors of the ribbon and varnish in accordance with the marine theme: blue, blue, white, coral, silver.
- We completely cover the nails with white or coral varnish;
- Dry your nails under a lamp;
- We glue a blue or silver tape across the nail in several rows, depending on the length of the nail;
- We cut the edges of the tape with scissors to the very base of the nail;
- Apply the final sealer and dry the nails.
3rd option – “Oblique lines”:
In this manicure, the tape plays a supporting role for an even distinction between colors.
- Apply light pink polish and dry your nails;
- Glue the tape diagonally at the base of the nails;
- Paint the upper part of the nail with varnish 1 tone darker than the previous one, dry it and remove the tape;
- On top of the second layer of varnish, closer to the center of the nail, at the same angle, glue the second tape;
- Paint the edge of the nail above the tape with varnish 1-2 shades darker than the previous one, dry it and remove the tape;
- Apply clear varnish to all nails and dry the nails under a lamp.
Each of the presented options takes from 40 minutes - quickly and beautifully.
How to glue strips onto gel polish: basic techniques
There are several ways to glue strips onto gel polish and for different purposes, but the most popular is the use of shiny strips as a design element:
- First, prepare the nails for coating. It is necessary to file them to give shape, remove excess cuticle, and sand the skin around the plates.
- The surfaces of the nails are treated with a buff to remove the sticky layer. Then they are wiped with a degreaser and a primer is applied, which is air dried for a couple of minutes.
- The first layer of coating is the base. It is polymerized until it dries, and then the stickiness is removed with a cleaner.
- Nails are covered with colored gel polish, preferably in 2 layers. Each one is dried after application. It is also better to remove the sticky layer, otherwise it will not be possible to carefully glue the decorative tape.
- The strip is removed from the base on which it is attached using tweezers. You need to grab the tip of the tool and pull it towards you.
- The first edge of the strip is placed on the plate in the selected location. The second tip is held with tweezers. And press the tape, gradually turning it so that it bends. For a tighter fit, the decor is smoothed with an orange stick, and the excess part is cut off with scissors.
- A top coating is applied, which will secure the tape more reliably. All that's left is to dry it.
The strips can be laid evenly, without bends, and can be used to create patterns and different shapes. For simpler designs, another technique is used:
- A base is applied to prepared nails and polymerized. Then the flower bed is painted in 2 layers, both of them are dried in turn.
- Top coat is applied next. After its polymerization, remove the sticky layer using a cleanser and treat the nails with a buff to remove shine.
- The dust is removed with a degreaser and, using tweezers, separated from the base, and then the tape is applied. It is carefully smoothed and the excess is cut off.
- The edges of the glued strip are coated with base and dried in a lamp. Then the same product is applied to the entire nail and polymerized again.
- The last layer is the finishing coat. After drying it, the design is ready.
Geometric designs with ribbons
The most beautiful manicure using ribbons is creating geometric shapes for nail designs - easy and simple.
1st option – “diamonds”:
- Cover your nails with blue varnish and dry;
- Glue the tapes obliquely to one side of the nail, and then in the opposite direction on top of the first tapes;
- Using a cosmetic sponge, lightly apply blue or white varnish over the ribbons;
- Dry your nails and remove the tapes, first those that were glued with the last layer;
- It turns out on the nails - diamonds. Decorate the nail with rhinestones and beads.
If you want to make a large rhombus, then you will need 4 ribbons. 2 are glued so that a triangle is formed on the edge of the nail and 2 more so that a sharp triangle is formed at the cuticle.
Next, you can cover the entire nail with a different color and remove the tapes or paint over the resulting diamond in the center of the nail. If you leave the diamond in the form of ribbons, then the edges must be trimmed so that they fit tightly around the nail and secured with clear varnish.
2nd manicure option – “spider”:
- Apply golden varnish to the nails and dry;
- Cross the tape with glue so that the intersection point of the cross is in the center of the nail;
- We glue the tape at an angle on 4 sides of the nail, so that the angle faces the center of the nail;
- Apply black varnish on top, dry it and remove the tapes, first the corner ones, then the cross;
- Apply clear varnish on top and dry.
This option is possible in various matching tones; you can use Goethe’s “modern color wheel” to choose matching tones.
3rd option of geometric shapes – “multi-colored triangles”:
- Apply beige or pale pink varnish, preferably to match the skin tone;
- On the dried varnish we glue 3 tapes diagonally from the bottom of the nail to its outer corner, parallel to each other, in the same way, glue 3 more tapes in the opposite direction;
- After applying the tapes, triangles are formed on the nail, which are painted with multi-colored varnishes;
- Dry the nail and remove the tape, apply colorless varnish on top.
4th option:
- Cover your nails with pink polish and dry;
- Apply 2 tapes from the center of the edge of the nail, diagonally to the cuticle;
- Glue two tapes so that it separates the outer edge of the nail;
- We take 2 more tapes, one edge, each of the tapes should be glued inside the first triangle closer to the tape that separates the edge of the nail;
- 2 inner ribbons must intersect - with a cross, so that a rhombus is formed between the 2 corners (external and internal);
- After applying the tapes, paint the nail with a varnish of a different color from the main one, for example: coffee color and dry it;
- Remove the tapes and apply sealant.
Don't miss the most popular article in the section: How to extend nails with gel polish. Nail extension instructions for beginners. Photo.
Stencil tape
Stencil tapes come to the rescue when it is not possible to make a perfectly even strip. To perform this simple design, you need to paint the prepared nails with varnish, and after it dries, stick on tape with a pre-thought-out design. It should be pressed well to the nail plate. Then, without touching the decor, the nail is covered with varnish of a different color. Remove the tape and dry your nails. This type of manicure is suitable for those women who prefer smooth and clear lines.
Striped frappe
Women who love the taste of coffee or coffee drinks can please themselves with one of the most fashionable, stylish, discreet designs in the Striped Frappe style. It perfectly combines shades of beige and brown.
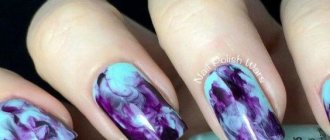
You can combine these colors and their shades using water and liquid tape, then a design in the form of intricate patterns is formed on the nails, similar to coffee foam (design photo).
Smooth, straight lines are made using regular nail design tapes. Dividing the nail along, across, diagonally, in the form of geometric shapes. Adding touches of black varnish, rhinestones, beads, seed beads and additional designs as decoration.
Ways to create stripes
To create a new “stripe” nail design, you can use various tricks. It is necessary to keep in mind that you need to choose shellac or gel polish with stripes if the prints are made very slowly. There are several popular methods, such as painting with a brush or using tape, manicure using water and adhesive strips.
Wedding manicure design with ribbon
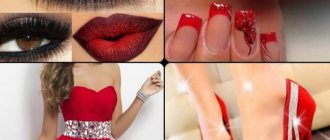
What is the difference between a regular manicure and a wedding manicure? Wedding nail design consists of delicate light tones of varnish, light, airy designs. Use gold, white, silver, beige, soft pink ribbon. Most often you can see a French manicure on the bride’s hands; some frame it with shiny ribbons, others with rhinestones and beads.
The idea of a wedding manicure depends on the wishes of the bride and the capabilities of the master. The fashionable trend is to decorate nails with some kind of decor on one finger, the rest are done in the same style.
Liquid tape for nail design
Liquid tape - dries quickly, forms a dense film, protects the cuticle and skin around the nail from excess varnish. With the help of such tape, beautiful, original drawings are created. The advantage of this tape is that it dries quickly, is easy to remove, does not leave stains on the skin and cuticle, a convenient brush or sponge, and a small bottle.
Apply liquid tape to the skin around the nail with a brush, wait 30-40 seconds for it to dry. Remove it by prying it a little from one edge, it is elastic and can be easily removed. It is well suited for airbrushing, stamping nail decor, water-based, gradient manicure.
For water-based nail design using tape, it is done in several stages:
- Apply base – nail polish;
- Apply liquid tape around the nail;
- Create a pattern in water using several colors with a thin wooden stick;
- Place your finger on the drawing;
- Pull out your finger, let it dry, apply a transparent fixative;
- In this way, designs are created for each fingernail.
At home, liquid tape can be replaced with PVA glue, tape, or cling film.
Materials and tools for execution
Materials and tools for performing manicure and design with ribbons, each woman chooses her own set, which she is used to working with.
Basic tools:
- Bath with aromatic oils;
- Hand cream;
- Penza;
- File;
- Scissors;
- Varnish, Gel polish, Acrylic;
- Nail lamp - for drying gel polish, acrylic;
- Napkins;
- Nail polish remover;
- Liquid tape;
- Design ribbons;
- Tweezers.
This list may be expanded or reduced depending on the type of manicure and design.
Types of tapes for manicure and pedicure
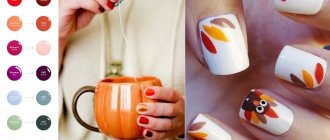
The shiny metallic comes in a variety of shades. Stripes can be narrow and wide, long and short.
The most popular among nail design artists are sets with thin ribbons. Tape material with a metallic sheen is used to decorate varnish and any other artificial coatings.
In addition to shine, transparent tapes are available in different lengths, thicknesses, and colors, with a textured, rough, shiny coating and rainbow tints.
How to make a design with ribbons: step-by-step instructions
The first step in creating a beautiful nail design with ribbons is preparing your hands and nails:
- Make a hand bath;
- Clean and straighten your nails with a nail file;
- Treat nails with nail polish remover or alcohol;
- Apply a transparent base to the nails and dry;
- Apply varnish of the selected color;
- Draw white lines near where the tape will be glued.
- We paste the tape so that there is 1-1.5 mm left to the edge of the nail, then the tape will not come off.
- Apply colorless fixing varnish. We dry our nails and the manicure is ready.
With the advent of a variety of tapes for nail design, every woman can create a unique, neat manicure at home, at the right time for her, and save her money.
Why the tape peels off and how to avoid it
Tape manicures often fade quickly. Such problems are observed when nail design rules are not followed. It is quite simple to glue the tape so that it does not come off.
To do this, you need to adhere to the following recommendations:
- You should first go over the nail plates with a buff. This creates roughness for reliable grip.
- Apply the ribbon with light tension. First, you should fix it on the most convex area, then press the edges with your finger or a manicure stick.
- Cut the tape so that there is a small gap (maximum 0.5 mm). Due to this, it can be securely fixed with the help of a finishing coating and prevent premature peeling.
- It is recommended to cut the product from the coil and along the edges of the nail using tweezers. When using scissors there is a risk of raising the edge.
- Apply top coat. Thanks to this, the manicure will be as durable as possible.
- Apply the tape only to a dry surface.