Recently, the technique of manicure using wet gel polish has become very widespread. It consists of applying various patterns to a coating that has not been dried in a lamp: the lines spread out in different directions, forming intricate patterns, beautiful transitions and penumbra. Today we are interested in rose on wet gel polish. Even a beginner can make this design at home.
Color selection
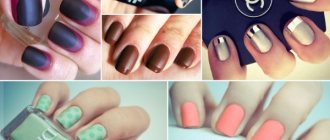
There are a huge number of color variations to create a delicate manicure.
Since the rose on the nails is the main attribute of this design, you should decide on the color of the base, additional decorations and materials that will be used.
The color palette for this manicure can be varied. You can choose beautiful and rich colors based on the trends of this season or choose them to suit your mood.
The most current shades of this season:
- soft pink tones;
- combination of red roses and powdery base;
- dark blue color scheme;
- red colors;
- combination of white and silver tones;
- blue and marsala shades;
- burgundy and caramel colors.
White and pink tones will emphasize the sophistication and tenderness of the image. Lilac and black colors in combination with additional elements will add modernity and relevance to the overall look.
Drawing with gel polish
The most relevant thing is painting nails with varnish. To perform this technique correctly, you must take this process seriously and be patient.
Drawing roses can be done in many different ways. To create an image, it is recommended to start it with a circle shape, and then give it the outline of the petals. You can use monograms that will make up the flower.
To obtain a neat pattern, the edges of the petals should be outlined starting from the middle.
For those who do not have sufficient skills, you can use a ready-made template. An ideal option for beginners would also be to use transfer stickers.
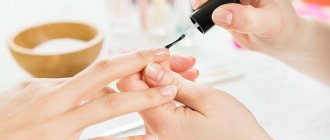
To draw a design with gel polish, you should first prepare your nails for its application. First of all, you should degrease your nails, then cover them with a base and dry them in a lamp. Then apply the main gel polish and dry.
To create a manicure with roses, you should take the thinnest brush. The drawing scheme is as follows:
- on one nail you need to put a dot and smoothly turn it into a comma;
- then arrange such commas in a circle in the shape of a flower;
- To make the rose more voluminous, you need to dry each element of the design one by one.
All stages of work must be done very carefully so as not to spoil the quality of the drawing.
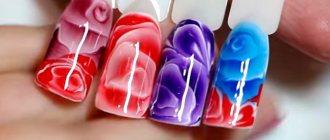
Drawing on wet gel polish
In this case, the image must be applied to an undried layer. This technique is easy to perform. This method is carried out using the following technology: the dried base is coated with varnish, then the design itself is applied to the wet layer.
After fifteen seconds, when the coating begins to spread, you need to dry your nails. After this, you need to apply another layer of coating. You can add stickers or rhinestones to this design.
Chinese painting
To paint several flowers, Chinese painting is often used. Drawing using this technique goes like this:
- the main color is applied to the brush, then the lower tier of petals is painted;
- then the next tier is created from smaller petals;
- the middle of the flower is located closer to the upper tier;
- after this, rounded strokes are made, which give the image splendor. The painting will look trendy when combined with pastel colors.
If desired, you can add leaves. To do this, apply green color to one edge of the brush and yellow to the other. You need to draw with wavy lines, alternately forming each half of the sheet. You can depict it with one stroke and additionally outline the outline.
Stained glass technique
One of the ways to create a beautiful manicure with roses is also the stained glass technique. It helps achieve a sophisticated design. It is best to use dark stained glass, which will emphasize the elegance of the image.
To implement this technique, apply a base, then a base coat. Next you should use a transparent gel to create a stained glass window. You need to draw geometric shapes and small roses among them, and then fill them with the selected colors. You can use various patterns, transfer foil, and rhinestones in this design.
The drawing is varnished and dried. The use of a black base will emphasize the individuality of the design.
Stencil roses on nails, photo
Nuances when working with a stencil:
- A stencil is a template design cut out on a plate. One side of the plate is attached to the nail
- Stencils can be adhesive-based or metal plates. The techniques for working with them are different.
- You need to carefully ensure that the paint gets exactly into the stencil design and does not smear on the surface.
- Stencil roses turn out identical and even. On the one hand, this is just a godsend for beginning craftsmen. On the other hand, roses turn out to be formulaic, not expressive and do not have their own style
Stencil roses
Stencil roses
other methods
For those who do not have artistic abilities or are simply not confident in their abilities, alternative methods of creating a design with roses on their nails are suitable.
Using a stencil
This method is easier to create such a manicure. To make this design step by step, you only need the necessary stencil. Before starting the procedure, you need to prepare your nails, then apply a base, a double layer of gel polish and dry.
After your nails are dry, you need to put a stencil on them and outline it with a thin brush. To make the flower look more natural, you don’t need to paint over the lines too much. This will make the manicure look more delicate and unusual.
Modeling
To create a voluminous rose, you can use the sculpting technique. It is often used in manicures for special events. This method helps to achieve a 3D effect and splendor of the picture. To implement this technique, you should first practice creating the required flower shape.
Acrylic coating will help create raised images. It is best to use white. To make roses, you need to place an acrylic ball on your nail and carefully shape it into a petal. You need to repeat this procedure several times to create a full-fledged flower.
The use of special plasticine will emphasize the originality of the idea.
With a needle
To create a design, use a needle to apply a base, apply the main color and dry. Then cover with a second layer, and after drying you can create a pattern using a needle.
To make the design beautiful, you need to make a couple of drops of varnish and use a needle to create petals in the shape of 8. This technique of making a pattern is suitable for manicure on long nails.
How to draw a rose step by step on nails with acrylic paint: drawing technique?
General recommendations for working with acrylic paint for manicure:
- Acrylic paints are successfully used not only in fine art, but also in nail design. They are easy to mix, have a wide range of colors and a long shelf life.
- Acrylic paints come in different transparency. Usually such information is indicated on the tube. By varying the transparency, you can achieve different effects
- You can work with these paints either diluted or not. When diluted, they have a runny but rich consistency. When undiluted, they resemble oil paint
- Acrylic paints do not tolerate cold well and may crack. Before using them, you need to check their compatibility with gel polish.
- To start working with paints, just buy basic colors. The rest can be obtained by mixing
We paint roses with acrylic paints:
- Think about your nail design in advance. Perform the pattern several times on the training surface
- Apply the intended design to the dried base layer.
- We wait until it dries completely
- Now we cover it with a top coat and dry it in a lamp
Step by step drawing with acrylic paint
Roses with acrylic paint
Design ideas
The most relevant design to complement the floral pattern is the French one. It looks very beautiful on both short and long nails. One popular option is an image with white roses. You can create such a pattern using gel polish or using modeling.
You can draw a voluminous rose or dilute the design with various elements. The golden outline will look very stylish and unusual against the background of dark tones.
Highlighting 2 fingers with roses is considered one of the traditional options. The white background goes perfectly with this image. You can also experiment and use blue tones. Pink colors combined with dark shades will give the image freshness and glamor.
The combination with rhinestones will add sophistication to the look. Against the background of silver and gold tones, the stones will look quite original. To create such an accent, you should not overdo it with details.
Decoration with velvet flowers will add zest to the design. A gentle accent will definitely interest everyone around you. Acrylic powder is used to create this manicure.
A wedding design with roses will look cute and romantic. Red velvet accents will highlight the individuality of the look. Gel manicure for a wedding can be safely combined with additional ornaments and rhinestones.
A large rose in a wedding design will not look very appropriate. It is best to use a fashionable 3D effect or fine painting.
Lunar manicure will be more relevant than ever this season. This design will highlight the beauty and grace of nails in any color. Beautiful colorful accents are the main characteristics of this idea.
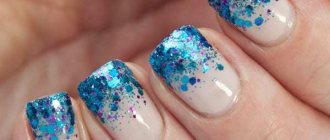
Roses in combination with multi-colored varnishes will look quite unusual. The flower can be painted in pastel colors. The remaining nails can be covered with bright varnish.
Flowers in pastel colors with a white base will emphasize a flirty mood. To create such a manicure, it is enough to have good imagination and patience. This design allows you to create an original and interesting image.