Marble on nails: design features
- The special attractiveness of manicure is based on the imitation of natural stone, which is distinguished by its incredible natural beauty.
- Uniqueness of the design: each marble manicure is unique.
- Possibility to use several colors in a design at once. Creation of drawings can be done based on various shades.
- Unusual: this design can surprise others.
- Effective design. You can create a marble effect on all nails or on several.
- Many options for implementation.
- Easy, interesting technology that even a beginner can do.
And most importantly: there are at least 9 ways to recreate marble on your nails. Each has a different degree of difficulty and the design looks completely different! Choose what you like!
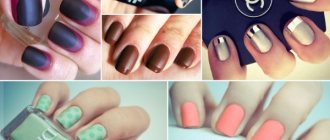
Successful color combinations
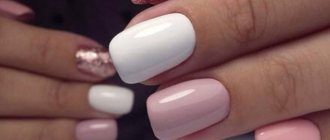
marble manicure with a pattern in soft colors
The selection of varnishes for manicure is a purely individual matter. Each girl chooses certain colors depending on her mood or the nature of the event for which she is designing her nails. Marble manicure looks best when using the following colors:
- Black and white;
- Pink and white;
- Yellow and blue;
- Purple and red.
Triple combinations are also popular:
- Black – white – red;
- Yellow – pink – blue;
- White – purple – black;
- Any three colors that are next to each other in the color scheme, for example: burgundy - red - pink, dark green - green - light green, etc.
bright nail art design
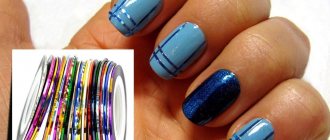
Making a marble nail using film
The technique for performing this manicure is very simple. At home, you can easily make marble nails yourself using cling film. The design can be done using regular polish or gel polish. We will describe the technology using varnish. And for the gel polish method, you need to follow the same steps, only using a lamp to dry the product.
- Cut the film into two strips and crumple well.
- Apply thick cream or Vaseline to the skin of your hands, especially around the nail plate, to absorb excess polish.
- Prepare the nail plate: file, remove the cuticle.
- Cover the nails with base. Allow to dry thoroughly.
- Paint your nail plates with the base color. The varnish should lie evenly and tightly so that there are no translucent, uneven stripes. If the shade is light, you can make the base in two layers. Wait until completely dry.
- Drop varnishes of other colors onto the foil.
- Press the crumpled film against the drops, and then put a light stamp on the foil to remove excess varnish.
- The next stamp is directly on the nail.
- Let the varnish dry.
- Secure the finished design with colorless varnish.
Still have questions about the aliveproxy.com technology? Then watch a short video tutorial from nail art professionals.
Methods
Achieving a marble effect on your nails is quite simple. This nail art method, which is often performed in salons, can be done at home without the help of a professional. But first you need to learn how to do a marble manicure yourself.
There are three main methods for creating a marble effect on your nails.
- Water.
- Using the package.
- Drawing.
You can also do it much simpler and buy a varnish with a marble effect. Using marble effect nail polish is very easy. The result is achieved after applying one layer, without the need to purchase several bottles of different colors. Marble effect varnishes contain several colors that do not mix with each other. After applying the nail art product to your nails, the effect is achieved instantly.
Water method
At home, in most cases, nail designs with a marble effect are performed using the water method. The peculiarity of this manicure is that it is done on water. The procedure must be carried out very carefully; it is recommended to make several trial attempts first.
- The base coat (color) is applied to the nail plates.
- After it dries, varnishes of different colors are dripped into a glass filled with water. In this case, you should drip the product into the same place so that even circles are created on the water.
- Using a toothpick, you create a pattern that will be similar to the marble pattern.
- Then the nail is dipped into a glass (see picture). The position of the plate should be parallel to the plane of the created pattern.
- For each nail you need to create a new design.
- Excess film on the skin is removed with a cotton swab and liquid remover.
- After the varnish film has dried, a fixing layer of transparent varnish is applied.
This method is also suitable for creating a marble jacket. To perform a French manicure, you need to dip the tip of the nail in water and remove the rest of the varnish film with a cotton swab.
The water method takes a long time (about two hours), but the result is a unique design with a marble effect.
Using the package
At home, you can create a marble effect on your nails using a regular plastic bag or cling film. This method has the disadvantage that it is difficult to achieve a marble pattern; this will require imagination and some experience.
The procedure is performed in several stages.
- The nail is covered with varnish of the main color (preferably dark).
- After it dries, the surface of the plate is covered with a layer of a lighter tone product. It is also dried.
- Then a varnish of a different dark color is applied.
- A crumpled bag or film is placed on the last fresh layer.
- Polyethylene is pressed against the nail plate two to three times. The stains should be noticeable.
- After the design has dried, the nail is painted with a finishing agent.
Using the film (package) takes little time. The design is also unique and bright, but the effect is slightly worse than using the water method. This method is not suitable for gel coating.
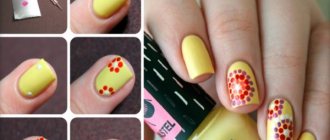
Drawing
This method is the most popular. Many masters use it. Manicure is done quickly and easily. To draw a marble pattern, you need a needle or a thin manicure brush. You should also prepare varnish products of different colors (at least three). All colors must match.
- The first layer should be the base coat.
- The second layer is the base color of the nail. It should dry out.
- Then apply the third layer.
- Immediately after covering with the third layer, the marble design begins.
- Three to four drops of complementary colors are dripped in different places.
- The drops should not be large.
- A brush is brushed over a fresh layer of coating, mixing additional colors with the main one.
- After drying, cover the nail with a finishing agent.
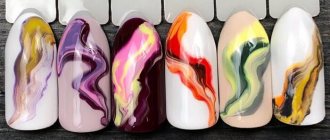
The painting method is most suitable for creating the effect of a marble design because mixing colors with a brush allows you to create a design similar to the natural pattern of the stone. In addition, this method can also be performed using gel products.
Marble manicure with sponge
This method of making marble on nails is similar to the one described above. Only instead of cling film, a piece of sponge is used. Apply a few drops of varnish to the foil, contrasting with the base. Next, blot the product with a piece of sponge, remove the excess onto foil, and apply it to the nails with light movements. Do not press the sponge very hard on the base, otherwise, instead of an exquisite marble design, you will end up with sloppy, huge spots.
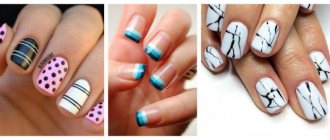
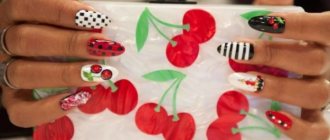
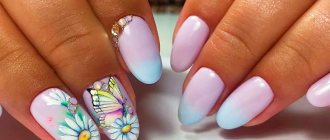
Some marble nail art ideas
You can independently, by trial and error, select interesting compositions, making marble nail design unusual and unique. To inspire you, we bring to your attention a fascinating collection of photos that present several ideas for marble manicure in different colors.
Bright nail art has sunk into your soul, but you can’t always find even 20 minutes of free time? Try a more expensive but practical option: special nail polish. You can get a marble effect in a very short time. Just five minutes and your marbled nails are ready!
It doesn't matter which method of creating nail art you choose. The main thing is that you are pleasantly pleased with the end result. Of course, you can go to a salon and trust the hands of professionals. But you will feel inner satisfaction and delight only by performing the procedure at home. After all, nothing makes you happier than personal success in your favorite business. In addition, manicure for short nails, as a rule, does not require very serious effort, and marble is ideal for short nails.
You have already familiarized yourself with the collection of photos of marble manicure, received your portion of inspiration and learned step by step how to perform fashionable nail art in two different ways. In conclusion, we invite you to watch very interesting and useful video lessons. Visual master classes will help you systematize the knowledge you have acquired and achieve excellent results. Be sure to watch the entire video, because the masters demonstrate completely different techniques and methods for creating marble nail art.
Marble design using oilcloth
For the design you will need varnishes (or gel polishes) of different colors and a piece of thick oilcloth.
- Apply the base color to the nails and dry the layer.
- Apply several drops of varnishes of different shades in random order onto the finished color base.
3. Immediately apply a thick film to the plate and press it to the nail. Under the oilcloth, the varnish spreads into spots with jagged edges.
5. Remove the oilcloth. We get a surface with beautiful spots of different shades. We clean the periungual surface of the skin from varnish, then dry the layer.
6. Cover the “marble” with a transparent top.
Fashion trends
Marble design is considered very beautiful, so new nail art next year should definitely include the effect of natural stone. To make the design unusual, experts recommend choosing no more than four shades for its design. In addition, you can also experiment with texture by using holographic, matte and pearlescent gel polish. Nowadays, crumbs and animalistic images are relevant; the combination of marble with the color of tiger skin and bee stripes looks interesting.
In the coming season, marble design will be dominated by a natural color palette, as it is ideal for creating a daily and evening look. Therefore, stylists advise fashionistas to choose ashy, light brown and pastel shades. At the same time, natural colors can be complemented with sequins, sparkles and glitter.
The following options will also be the right choice.
White classic marble. This is a calm design in which black and gray stains are applied to a white background. This design is suitable for both everyday life and special occasions, because it looks stylish and sophisticated.
Visual French. In this case, the stone effect is created at the tip of the plate and is highlighted with a clear “smile” line. The color palette may vary, but the most common are light shades.
Gray dusty marble. In this design, the manicure looks attractive. Light colors are good for everyday wear, but for going out and celebrating, you can choose darker colors.
Blue sapphire marble. It is a chic design in which a combination of purple and blue stains creates a beautiful texture of natural sapphire. In addition, patterns can also be made in blue and turquoise tones.
Black marble. Despite the fact that a black background is considered gloomy, decorating it with snow-white streaks will result in an unusual and sophisticated manicure.
An interesting solution is to add foil to marble patterns. Imitations of precious stones will also help decorate the texture. To make the decor unusual, it is recommended to decorate your nails in different shades. A hit this season is a nude marble manicure, which uses beige and pink shades. For brave girls, nail art in bright and contrasting colors may be suitable. For this, burgundy, red and blue colors are recommended.
Water marble: the nails of your dreams
The technology for performing marble manicure using water is somewhat more complicated. You need to spend at least two hours on this procedure, but the result is worth it. The color applies easily and beautifully to the nail and dries quickly.
- Prepare a bowl of water at room temperature.
- Prepare the nail plate: sharpen it, remove the cuticle.
- Cover your nails with base coat.
- Apply an even layer of base color. Dry.
- Drip the colors chosen for the design into a bowl of water. Several varnishes can be used. In this case, the drops should fall exactly into the center of the spreading circles.
- Dip your nail into the pattern on the water.
- Use a cotton swab or toothpick to separate and collect excess varnish on the water.
- Remove your finger from the water and let it dry without wiping it.
- Do the same procedure with other nails.
- When the polish is dry, coat your nails with a fixative.
Watch all the intricacies of water marble in a short video tutorial.
What should you pay attention to?
We’ve already figured out how to make a marble manicure with gel polish. But like any other job, there are some peculiarities that need to be given special attention.
Recommendations that will be useful in the process of drawing:
- For the first method with water: the liquid in the container should be at room temperature. Water that is too hot or cold will cause the polish to dry quickly before you even dip your fingers into it.
- A feature of the same water method is that the nails should be lowered parallel to the liquid, because the main task of this action is to leave an imprint of mixed colors.
- It is better to take gel polishes for such a manicure that are not old and not too thick - this can greatly spoil the result. In addition, you should select them from the same manufacturer, otherwise there is a risk that the paints will not “work” together. Then you won’t get streaks, but an ugly dark spot on the nail plate.
- Experienced professionals advise choosing contrasting shades so that the result is bright and rich, which is what women so want in the summer season.
- Marble manicure is great for special events or going out. But in everyday life it sometimes looks ridiculous, especially in combination with a strict office dress code. If you do a marble manicure for every day, then it is better to abandon textures such as metallic or mother-of-pearl and give preference to pastel colors rather than bright ones.
- Sometimes a manicure may not work out the first time. Before a special occasion, it’s better to practice in advance and get good at it, rather than trying to make a drawing five minutes before going out, which many people do.
Every girl who has absolutely no skills in working with nails will be able to master the marble manicure technique. It is important to see in advance how to do everything step by step, to purchase the necessary materials and tools for the work process. Don't give up if it doesn't work out the first or second time. Beginners always have problems, they just need to practice more. Many ways of applying a beautiful design help beginning craftswomen easily master the craft.
Marble manicure with gel polish
This type of manicure is best done in professional salons, as it requires special care and perseverance. Masters perform this procedure using a special brush. The convenience of gel polish is that it does not dry, so you can use it to create any ornament. There is no need to rush; you can correct the lines with a brush and partially mix shades.
- Degrease nails, give them the desired shape, remove cuticles.
- Apply a thin layer of base gel coat. Dry in a UV lamp.
- Paint your nails with the main color. Dry in a UV lamp.
- Pour clinser into a small container for subsequent cleaning of the brush.
- Drop the colors of the gel polishes chosen for the design onto the foil.
- Dip a thin brush into the drop and draw patterns on the nails. Curved, weak lines of any length should be applied. The pattern should imitate the structure of the stone.
- After each detail, dip the brush into a container of clinser, and then move it along the newly drawn strip. This way you can achieve blur.
- Let the drawing dry.
- Cover with gel top and dry under a lamp.
Marble varnish
For those who find the methods described above on how to make marble nails too difficult or time-consuming, a special marble nail polish may come in handy. This cover allows you to achieve a marble effect with just one coat of varnish. Thus, a marble manicure can be created in just a few minutes.
Usually such varnish is easy to identify by its appearance. It already looks like marble in the bottle, and it retains the same effect on the nails. It consists of fractions of two or three colors that do not mix with each other. As a result, the nail polish gives a mottled marble effect.
[yandex3] [google3]
How to make a marble manicure with varnish
There is also a convenient option for creating a manicure using a spoon. This method can be compared to the water method, but there is no need to use a container of water. However, when performing this manicure, it should be taken into account that the layer of the top coating - the pattern - will be thick, so it requires longer drying. Not everyone can achieve marble design using this method.
- Prepare and polish your nails.
- Cover with base coat. Let dry.
- Drop the varnishes chosen for the design into a spoon.
- Use a toothpick to stir the varnishes.
- Dip the nail plate into the spoon.
- Next, pull out the nail and let it dry.
- Remove excess polish from leather.
- Cover with a colorless fixative.
With decorations
By itself, a marble manicure looks complete and without additional decor, but when the coating needs to be added to the solemnity, sparkles, rhinestones and patterns are used.
A double silver ribbon accents the length of the nails and complements the gray matte finish.
A similar option, but with stripes of different widths.
Design of two nails in the Ruffian style - the cuticle growth area is highlighted in gold. By the way, the photo shows a very feminine combination of colors – muted mint and beige.
A metal rivet adds variety to the ribbon design.
A spectacular and bright manicure with the addition of dense sparkles on the little finger.
Festive manicure for long nails with rhinestones.
Fashionable this season, plant motifs in tandem with a stone pattern are a truly natural manicure.
Glitter decoration idea. Look how finely the marble pattern is made - this option is appropriate for any occasion, including everyday wear.
Plum matte with rhinestones and marble will complement a festive dress or formal suit.
And again Ruffian, but in a graphic version.
For very long nails, a combination of several decorative additions is suitable. Due to the large area, there will be no feeling of overload.
Marble manicure and French manicure with mica decor.
Drawing marble with a toothpick
A very beautiful drawing can be obtained if you use the technique of drawing on wet gel polish.
- On the colored layer of gel polish, dried in the rays of the lamp, apply another layer of the same color.
- Using a toothpick, pick up a different shade of varnish and begin drawing lines along the wet base. It is better to use several shades of varnish of the same range.
- Then we slightly mix the borders in some places and blur the lines.
- Dry the layer in a lamp and cover with finish.
Using marble gel nail polish
The easiest way to create a marble manicure and at the same time economical in time is to paint your nails with marble gel polish. The original new product is currently presented only in some specialized stores. The product contains small particles of flock (villus) or other small inclusions, which create the marble effect. The application procedure is the same as when painting with conventional gel polishes. By drying your nails under the rays of a UV lamp, you can become the owner of a beautiful textured manicure.
Selection of special gel polishes with marble effect
Manufacturers offer modern fashionistas gel polishes with a marble effect, which greatly simplify the creation of an original design. Usually these are pastel shades interspersed with dark or black shimmer.
A metallic finish or rubbing in different shades can add originality to the design. The only disadvantage of this option is the small selection of color shades of gel polishes.
Gel polish with a cracking effect – craquelure – is gaining popularity. Thanks to its unique composition, it creates a marble effect, forming cracks after application to the base layer. To make the design look brighter, craquelure is applied to a contrasting color of the substrate.