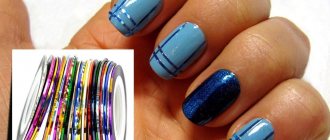
Illustration of a master class on gel polish
Many girls do not always have extra time and money to create a manicure in specialized salons. Therefore, master classes for coating nails with gel polish are quite in demand. If you carefully follow the recommendations of the master class on painting nails with gel polish, over time you can achieve a salon-quality result. The training video master class on gel polish coating will clearly show all the stages of completing the master class on gel polish.
Coating nails with gel polish is a complex technological process that cannot be recreated without having certain knowledge and skills. A master class on applying gel polish will be an excellent assistant for self-study.
Important! Shellac is the name of a polymer coating. The technique of applying it is equivalent to the presented master class: nails with gel polish. The unique composition of the product does not require prior coating of the nail plate with a primer.
For independent work you will need:
- basic, colored and top material;
- primer;
- degreaser;
- means for removing the dispersion layer;
- nail file, block for polishing the surface of the nail;
- Ultraviolet lamp.
Training video: master class on applying gel polish
The presented gel polish master class - video for beginners will teach you how to properly apply a gel manicure without leaving home. Then there will be no need to attend special nail design courses. Also, after watching the video master class with gel polish, you can avoid problems with peeling, cracking and swelling of the material applied to the nails.
As a result of independently mastering the gel polish master class for beginners, you can create a glossy manicure with your own hands. Thus, freeing yourself from trips to a professional manicurist, significantly saving money.
Don’t be upset if, when applying a varnish coating yourself, “the first pancake turns out to be lumpy,” because professionals in their field were also trained by trial and error.
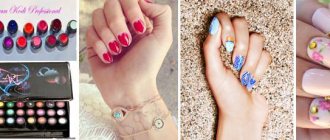
How to do a manicure and cover your nails with gel polish at home - master class with photos
Salon procedures require time and expense, try taking care of your nails at home; if you do this regularly, you won’t have problems with your hands.
Gel polishes last a long time and look more impressive than regular ones. You can buy them, as well as a special dryer, in a beauty salon store or order online, which is even cheaper. Working with such devices is much easier than it seems. Study this mini-lesson and move from theory to practice.
- What's included in a home manicure kit?
- Step-by-step nail treatment and design technique
What's included in a home manicure kit?
Required set of tools for home manicure:
- nippers and trimmer for removing cuticles;
- manicure scissors for cuticles and nail trimming;
- polishing file;
- cuticle file.
Of course, this is an incomplete set, but it is quite sufficient for manicure at home.
You will also need materials:
- gel mask to soften cuticles;
- mineral oil for the skin around the nails;
- colored gel polish;
- gel base coat;
- sparkles.
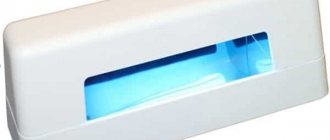
An ultraviolet lamp is required to fix the varnish. If you don't have a lamp, read about nail design methods and options in another publication.
Step-by-step nail treatment and design technique
Prepare natural nails: remove old polish, degrease the surface.
Apply cuticle remover gel, leave it on for 10 minutes, then remove with a cotton swab.
Carefully remove softened skin, burrs, and trim nails. Thoroughly polish the nail plates and degrease them.
Apply the base coat under the gel polish, dry it under a UV lamp (2 minutes).
Apply the first layer of colored gel polish to the dry base coat (no need to dry!).
After a few minutes, apply a second layer of colored gel polish and let dry.
Use a topcoat (final) colorless gel, dry it under a UV lamp. Remove the sticky layer formed after drying with a special liquid.
Draw a simple design with white gel polish (no need to dry!). The simpler the motif, the easier it is to decorate it. Complex patterns are suitable for special occasions; they are best done in a nail salon.
Sprinkle the design with glitter powder. This can be done on clean paper so that the remaining powder can be used for another manicure.
Use the UV lamp again to dry the drawing. Brush off any remaining powder with a brush. Apply mineral oil to the cuticles, rub it in, and distribute the residue onto your brushes. The oil is quickly and easily absorbed; there is no need to remove it.
A simple home manicure does not require a special setting; it will not be difficult to do it in passing. You can apply ready-made parts to the topcoat: snowflakes, balls, rhinestones. A manicure at home takes no more than an hour, while in a salon you will spend 2-2.5 hours.
Having mastered this simple science, you can even earn money by doing manicures for your girlfriends or colleagues at low prices. You can practice creating interesting motifs even on thick cardboard, using the cheapest materials.
Don’t rush to leave the “Women’s Hobbies” site, we still have a lot of beauty tips and other useful articles for those who like to live an interesting life.
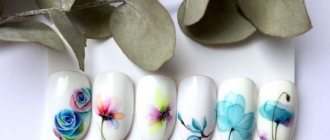
Photo of nail polish coating
Even more photos at the link: Gel polish photo.
What should newbies do?
First of all, beginners need to learn that the method of nail care primarily depends on the properties of the nail plates themselves:
– Thin nails need calcium coating. It promotes better hardening and reduces the likelihood of delamination.
– For thick and hard nails, softening is needed using various oils.
It is important to remove all excess cuticle. This must be done carefully, with due patience. To do this you will need the following equipment:
1. Pusher;
2. Wire cutters;
3.Cuticle remover;
4.Hot water.
All of the listed tools can be seen in the photo:
The next step is to decide on the shape of the brush. Oddly enough, the choice of nail shape depends on this:
– For a square brush, you should use an oval model for forming the nail plate;
– Square nails are suitable for elongated brushes;
– For semi-oval shaped hands, you can make nails of any length, width and shape.
Editor's choice: Monograms on nails step by step: tips for creating designs for beginners
The sawdust of the plate must be done carefully, using a fine file. It will not damage thin nails and quickly grinds them down to the desired length.
It is necessary to cut only in one direction. After this procedure, you can apply a buff. It will help remove the sticky layer and remove small particles of the surface layer of the plate from the sawn edge.
At the end of all procedures, it is necessary to apply a strengthening gel - varnish or other coating - to the nails.
More durable coating
What to do when you need good nails, with an excellent design for a long time, for example, on vacation, etc. In this case, a product called shellac comes to the rescue.
Shellac is a kind of rubberized coating. Initially, this product has a liquid consistency. But under the influence of a UV lamp, it becomes hard, strong and durable (compared to conventional varnishes).
This type of coating has excellent consistency, a wide variety of colors, enormous strength and harmlessness to the nail plate. The main thing when applying is not to forget about disinfection and degreasing of the plate. This is necessary so that the shellac does not crack, does not curl, and lies flat and smooth.
If a girl has a lamp with ultraviolet rays at home, then we can assume that most of the design solutions on her nails are already feasible.
Coating with acrylic paints for nail design can be used either as an independent unit or in conjunction with gel polish.
Pros of acrylic paints:
- Low cost;
– Versatility;
– Low consumption;
– Possibility of mixing, both with each other and with other coatings;
Editor's choice: Manicure for small nails: features and stylish ideas
– Quite liquid, which makes them easy to apply.
With the help of acrylic, even beginners can easily create a real master class. It is not difficult to paint on any varnish: flowers, hieroglyphs, portraits, entire paintings with landscapes, three-dimensional drawings and much more.
Acrylics are usually sold in sets of ten colors.
The most beautiful marble manicure ideas
If you have already mastered the technique, take note of interesting options for marble manicure. You can easily repeat any pattern at home!
White marble manicure
This is a very elegant option - pay attention to a white marble manicure if a special event awaits you. This color would be appropriate for both a wedding and graduation.
Marble nail art with other techniques
Marble manicure goes well with other techniques - it can be done with shellac and gel polish, complemented with French or lunar nail art. Also, you can make only a few nails marble, and paint the rest differently.
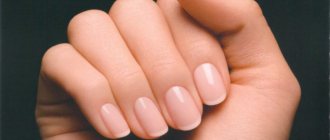
Nude marble manicure
Nude is still the hit of the season, and a manicure in pastel colors, with pink, beige, and gray polish goes perfectly with a marble pattern.
Bright tones of marble manicure
If you are ready to experiment and like to stand out from the crowd, choose bright shades in marble manicure. Blue, red, burgundy and many other tones are also found in natural stone - so they will 100% look spectacular on your nails!
Green marble manicure
A manicure that imitates turquoise or malachite should be placed in a separate category. This is one of the most beautiful and noble colors.
If regular green nail polish often looks too provocative, marble coloring transforms it into a stylish manicure for real ladies.
Photo source: Pinterest
Chameleon varnish
An exclusive new product in the field of nail art – chameleon varnish. With this coating you can create an original and stylish manicure in a matter of minutes.
The main secret lies in a special technology that allows you to change the color of the varnish depending on temperature conditions.
For example, outdoors in cool weather the manicure color will be one, but in warm home conditions it will be different.
Chameleon varnish is no different in quality from conventional coatings; it lasts on the nails for about a week. The composition does not contain additional harmful chemical compounds and can be used on an ongoing basis without causing harm to the nail plate.
Another feature of thermovarnish is the effect of color gradation, which can be observed in the process of changing one color to another. When applied to long nails, the effect of color gradation will be constantly present, since the temperature of the tips and root zone of the nail plate will be different.
Manicure with gel polish
For a denser coating, gel-based and varnish-based compositions are used. To do this, it is recommended to use step-by-step instructions for creating a manicure with gel polish.
For work you will need the following tools and materials:
- Gel polish;
- Files;
- Degreaser;
- Basic composition;
- Finish coating;
- Decorative elements in the form of sparkles and rhinestones.
We soften the cuticle using a chemical for a hardware-free manicure. We push back the skin with orange sticks. We model the length and shape of the nails.
Note!
Beautiful manicure with rhinestones - beautiful ideas for short and long nails. Review of current manicure decoration ideas for 2019-2020- Lunar manicure: trends and trends for 2022. Beautiful solutions and stylish combinations of the season (100 photos)
Light manicure: the best ideas, current season trends and features of using light shades (110 photos + video)
Carefully file off the top layer of the nail plate. You should not make sudden movements that can cause deformation of the deep layers. Next, apply a thin layer of degreaser.
Now let's start applying the base coat. Place it in an ultraviolet lamp for 3 minutes. Apply the 2nd layer and leave to dry. Remove the remaining sticky layer with a cotton pad soaked in degreaser.
Next, we apply the color coating. The number of layers depends on the intensity of the shade. Each layer should dry within 2 minutes.
We place decorations in different parts of the nail plate. The final step will be applying the finishing layer. Most often, such compositions do not have a sticky layer.
Water marble manicure
- Apply a base coat to your nails and give it time to dry.
- Choose two polishes. These can be shades of the same range or contrasting colors. Drop each varnish one by one into a glass of water. Repeat the procedure 2-3 times. A kind of rainbow should form on the surface of the water. Use a toothpick to create the desired pattern.
- Dip each nail one at a time into a glass of colored liquid. Remove any remaining varnish on the surface of the water with a stick. Wipe the area around the nail plate with nail polish remover.
- Finish the finished manicure with a top coat.
Read also: 7 life hacks for those who don’t know how to paint their nails
Marble manicure using film
- Apply a high-quality base coat to your nails in one coat. Wait a few minutes for the base to dry.
- Cover the nail with two coats of a neutral shade of polish (black, white, sand or pale pink are best).
- While the base color is drying, apply PVA glue to the skin around the nail. In the future, it will allow you to remove excess varnish in one motion.
- Take a neutral polish (which you used in the previous step) and a contrasting shade of polish. Place one dot of each color on the nail plate. Then place a piece of plastic wrap on top and press it against your nail. This way you can imitate a marble pattern.
- Carefully remove the film and PVA glue. If there is still excess left on the skin, remove it with a cotton swab dipped in nail polish remover.
- Repeat the procedure for other nails. Seal the finished result with a top coat: this will smooth the surface and protect the manicure from chipping.
Read also: Manicure with triangles: 35 ideas and master class