Marble manicure is an unusual nail design, despite the fact that marble is found in nature, but on nails such a print looks especially chic and rich. Unusual winding lines that create the effect of marble are easy to make even at home. Marble nail design can be performed using various techniques: using special gel polishes with a marble effect, needles, and water techniques. To ensure that your manicure turns out right the first time, below we will consider all the subtleties and rules for creating marble nail art.
What is marble manicure
Marble manicure is a type of nail design that involves creating stains on gel polish or varnish that imitate the color of marble or other natural stones.
The design came into fashion in 2022, when natural motifs were reflected in nail art, although the first appearance dates back to 2013.
You can create a design using:
- gel polish and brushes;
- polyethylene;
- stamp for stamping;
- alcohol;
- acrylic paints;
- using water.
Some manufacturers, especially in Chinese online stores. They also offer varnish with a marble effect, but the result in this case is not very expressive - stone stains are difficult to see.
Varnishes with marble chips, such as those from Blise, can also help imitate natural stone. The effect of stone in this case is achieved through small inclusions of particles of different colors and sizes.
Also in stores you can find slider stickers with a marble pattern. The largest selection, of course, is on Aliexpress and other similar sites.
Review of materials and tools for stamping
Ideas, master classes on creating marble nails with gel polish
The techniques presented above allow you to independently create creative combinations of marble manicure, taking into account your own preferences.
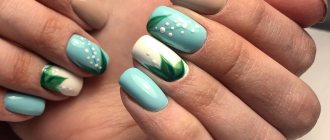
Fashionable white finish
The most elegant and discreet, and at the same time, sophisticated type of stone manicure is white marble.
You can diversify it in several ways:
- Pink marble. It’s not difficult to make such a design; just apply pink veins to a white base background, distributing them as you wish. To give 3D volume, pink lines are duplicated with a dark color or sparkles.
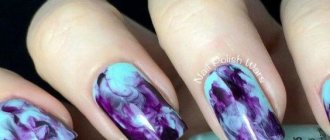
- Gray marble. The marble design, made in gray, looks no less gentle. For greater expressiveness, it is advisable to perform a manicure using plastic film.
- Black and red veins on a white background look quite bright, so it is best to create a pattern using a toothpick or brush.
- will add an exquisite shine to the classic white marble nail art . You can apply them to your nails with a brush or toothpick. A pattern with imitation stone, made using aquatic technology, will look original.
Stylish marble jacket
The combination of stone pattern and classic French is always a winning option. On the one hand, these are timeless classics, on the other – newfangled trends.
You can combine them in different ways:
- apply a marble design on one or two nails, and decorate the rest with a traditional French nail polish;
- on each nail plate, draw a white smile a little wider than with a classic French jacket, and then draw a stone pattern with the selected color;
- draw a colored French smile and draw veins of contrasting color, shading them with black. This option will give the picture a 3D effect.
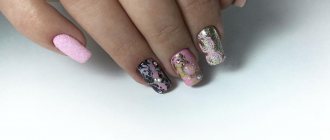
Options with glitter
Marble nails with glitter can add a festive mood.
Depending on the desired effect, you can choose one of the design options:
- Cover several nails completely with glitter, and decorate the rest with stone (with this option, the color of the sparkles and the main background can match, or you can play with the design in contrast).
- You can add shine to an already applied marble pattern using a sponge, glitter and transparent gel polish: mix glitter and varnish and blot with a sponge, then transfer the resulting mixture to your nails, duplicating the existing pattern.
- Apply chaotic veins to the drawing and duplicate them with glitter in the color of the main lines, or play with them in contrast.
Negative space
The “negative space” technique looks impressive with a marble pattern, creating unique images.
Options for combining 2 trends:
- Create a marble design on one nail, and use the “negative space” technique on the two adjacent ones, painting part of the nail with the same color that was used in the marble design.
- Create a stone design on half of the nail, separating it from the transparent background with a strip of metallic foil or a contrasting line. This option allows not only horizontal division; vertical and diagonal stripes will also look beautiful.
- Marble nails with the “negative space” technique can be alternated: one finger can be painted completely, the next half, and so on. To combine the composition, the veins of stone nail art and the dividing strip are made in the same color.
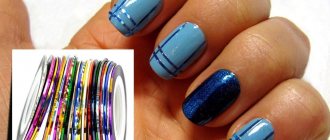
Options with foil
Nail designs using foil remain at the peak of popularity.
Marble manicure is easy to perform using this material, using different types of foil:
- using tear-off foil , as if creating natural stains like on natural stone. To do this, pieces of foil are glued to the main background of the nail in random order and covered with transparent gel polish.
- Thermofoil allows you to create a marble pattern using heating. With this method, the pieces of foil lie more evenly and retain a brighter color and shine.
- Transfer foil creates a rainbow effect, as close as possible to natural colors (such foil looks especially beautiful on a turquoise or green background).
Nail art design
You can add individuality to marble nails with gel polish using accent elements:
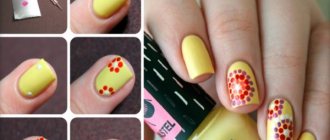
- Small flowers or plant elements will look gentle on a light marble pattern. The only condition: the flower design must be neat and precise so as not to merge with the stone background of the nail.
- Accent holes, separated from the main background of the nail by empty space, look original. The design will only benefit if it is made in bright, rich colors. For greater originality, the hole can be made not classically semicircular, but triangular or square.
- Fashion trend 2019-2020 became a marble manicure, done with several bright gel polishes. Usually the darkest of the selected shades serves as the background, the remaining colors are distributed in random order. It’s quite easy to make such a drawing using aquatics.
Marble designs on nails made with gel polish are gaining more and more popularity. This is explained not only by the fashionable craving for everything natural, but also by the undoubted simplicity and beauty of such a design.
Author: Loboda Yulia
Palette for marble manicure
In this case, of course, there are no restrictions, but the combinations provide the closest proximity to natural stone:
- white and pink;
- white and black or gray;
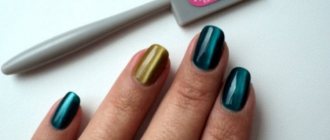
- blue and blue. In this case, you will get an imitation of turquoise;
- different shades of green will give the feeling of malachite;
- beige color and its derivatives will help create an extravagant but discreet manicure, suitable for everyday wear;
- black with metallic shades - gold and silver.
Tips for creating a marble manicure:
- choose medium density varnish . A varnish that is too thin will not spread, and a thick varnish does not mix well and does not give smooth streaks. All products for marble manicure must be of high quality, otherwise the coating will quickly peel off. Consider professional brands - OPI, Essie, Sophin, Rio Profi;
- be patient . Like any technique, marble cannot be rushed. If you don’t want to sit over the drawing of each nail, choose several nail plates that will be accent and work on them properly;
- marble manicure requires some skills, so be prepared that the design will not turn out perfect the first time . At first, practice on tips to get better at it.
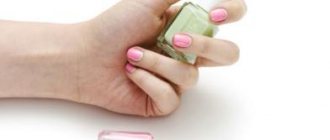
Making marble on nails for the lazy
If the methods described above seem complicated and time-consuming to you, then there is the easiest, fastest way - you need to buy a special marble nail polish and paint the plate with it in the usual way. If the varnish is thick and dense, then one coat of coating is sufficient. This nail design can be created with gel polish in a matter of minutes. The main thing is to choose quality material. It is best to buy such varnish from a reputable manufacturer, be sure to pay attention to the expiration dates of the material. Of course, such varnishes are expensive, but thanks to them you can get excellent results in the shortest possible time.
But, saving time on creating a marble effect, you can work on nail design. For example, add some zest to your nails: stick adhesive tape, make a casting, add rhinestones, stones, broths, combine several types of manicure.
Marble manicure looks amazing, this is one of the few designs that will look new every time. After all, divorces turn out different every time. With our detailed descriptions of the process of creating a marble manicure, you can independently bring to life the nail look that many girls love.
Gel polish and brush
Perhaps the most obvious way to create a stone effect is to paint with a brush. In order for the design to be successful, basic artistic skills will be required.
Prepare for work:
- gel polish in two shades. It is better if the funds are from the same company. To create a classic marble design, use white and black;
- base and top;
- thin brush. Such brushes are available in almost all brands of manicure products – ruNail, TNL, Irisk. The photo below shows a Runail Nail Art Nylon brand brush No. 000/3, 12 mm.
Prepare the background
- Wipe the nail plate with degreaser and after it evaporates, apply base;
- Dry the base layer in a lamp for 30-120 seconds. depending on the type and power of the device;
- Cover the nail with white gel polish and then dry it. If necessary, reapply the background color to ensure an even coverage;
Creating a drawing
- Apply a thin layer of top coat over the dried gel polish;
- With a thin brush dipped in black gel polish, begin to draw barely noticeable thin lines. With a damp top the lines will blur – this is normal, as it should be;
- Draw stripes randomly, differently on each nail, until their number is sufficient for your idea. The lines do not have to be clear, so some tips can be deliberately shaded.
If you are not satisfied with the result, remove the pattern using a disk soaked in cleaner and lightly buff the surface with a 180-240 grit file. Wipe with degreaser, apply topcoat again and start over.
The final stage
- Dry the pattern in a lamp. In ICE this will take 60 seconds, in UV – 120;
- Apply the finish to your nails and dry again.
Before applying the finish, the design can be supplemented with rhinestones, sparkles or other decorative elements. In this case, it is better that the top applied to create the pattern has a sticky layer.
How to create a marble manicure with gel polish by hand
Marble nails can be done in various ways, the most popular among artists is to draw the print by hand using different colors. Advice for girls who have decided to get marble on their nails for the first time: print out a photo for yourself with an example of a marble print.
So, let’s do a marble manicure with hand-drawn print:
- We degrease the plate, working well in the areas near the skin so that the enamel does not flow there.
- Apply primer and base in a thin layer, rubbing in. Dry your fingers in a lamp. Remove the sticky layer so that the color coating does not spread or pull off.
- We apply a single-color coating (black, white) in one or two layers, dry it in a lamp.
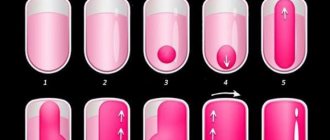
- Looking at the marble patterns in the pictures, it becomes clear that this effect is created by mixing dark and whitish stripes. Therefore, we will continue to draw them. On a piece of foil we mix different colors, but similar shades. If the main color is dark, then draw the lines light, and vice versa. We paint spots and stains with a thin brush with different pressure levels. To achieve the desired effect, lines should be drawn chaotically, unevenly, slightly sloppy. There is no need to put pressure on the brush; it should barely touch the surface of the plate. You need to draw out the colors, leave the lines thin in some places, and weave in others. After drawing the lines, we send the fingers into the lamp.
- For whitish lines, mix the top with white color. When drawing lines, it is necessary to control the process, not to overdo it with the whitish color, so that the effect of marble is truly created. After this, dry the fingers in a lamp.
- Apply a thin layer of top coat on top and dry.
Tips from experts in the nail industry: - When doing a marble manicure with gel polish by hand, you don’t need to get carried away with the lines, because this activity is very addictive. After making several winding stripes, you need to look at the nail from the side: if the marble print is already visible, then you should stop. — It is recommended to dry each finger after decorating it so that the paint does not spread.
Once you get the hang of doing marble nails with gel polish, you will definitely want to repeat the manicure again and again. After all, by drawing your nails by hand, each time you will create your own unique design.
Alcohol solution
Tools and materials:
- gel polishes in black and white colors;
- base and top;
- alcohol solution. It is better to take pure alcohol rather than tincture;
- brush. The brush should be densely packed and with not too long bristles, for example, “Column” No. 01 from Irisk.
Manicure brushes - types, purpose, how to choose and care
Preparatory stage
- Do a manicure, degrease your nails, apply a thin layer of base and dry;
- Cover your nails with white gel polish and dry as well. If necessary, repeat the color application.
Creating a Pattern
- Moisten a sponge or lint-free cloth with an alcohol solution and wipe the nail thoroughly;
- Using black gel polish on the alcohol surface, draw a thick line diagonally - from the right corner of the cuticle to the left corner of the free edge. When applying a strip, do not press the brush too hard - do it with light pressure, as the varnish immediately “floats” on the alcohol surface;
- Take a brush and lightly press it onto the liquid black gel polish, blot the stain;
- Remove unnecessary details of the design from the surface using a brush dipped in alcohol;
- In the other corner of the nail, make one small streak with black varnish and repeat blotting with a brush;
- Dry the design in a lamp and cover with top coat.
Be careful, the method using alcohol dries the skin very much, so after finishing the procedure, be sure to moisturize the cuticle and periungual area with oil.
Varnish and acrylic paints
- nail polish of any color;
- black acrylic paint, for example, from the Runail set;
- a thin brush, for example, the same Runail Nail Art Nylon No. 000/3;
- small container with water.
The varnish can be used without additional means - a fixative and a base, but their presence will help preserve the design a little longer.
- Prepare your nails - do a manicure, apply color and wait until completely dry;
- Squeeze a couple of drops of black acrylic paint onto a small piece of foil or plastic;
- Wet the brush with water and pick up a little dye, wiping off the excess on the foil;
- With light movements, begin drawing a marble pattern on your nails. A mixture of paint and water allows you to make not clear lines, with minor stains;
- If desired, add a little sparkle to the pattern and wait for the marble to dry completely in the open air.
Painting with gel paint and pigments on gel polish
Types of designs on nails with liquid stones
A modern palette of colors helps to create an analogy on the nails of a real precious stone: emerald, ruby, topaz or garnet.
You can design your own stone that will be unique in color, design and setting. For example, you can make a ruby with veins of malachite or opal, or create real crystal interspersed with emerald. It all depends on your imagination, availability of free time and patience.
Types of designs on nails with liquid stones:
Types of beautiful designs on nails with liquid stones
Types of designs on sharp nails with liquid stones
Different types of designs on nails with liquid stones
Types of designs on luxurious nails with liquid stones
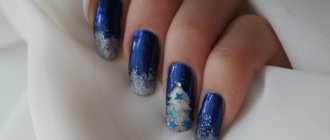
Using dense polyethylene
- base and top coat;
- gel polish in gray or black;
- a small piece of polyethylene - 10 by 10 will be enough. The polyethylene must be dense so that when compressed it forms edges and does not crumple into a lump.
- Prepare the background for your future marble manicure by applying a base and a white background. Each layer is dried separately in a lamp;
- Apply dark gel polish to the crumpled polyethylene;
- Print the pattern from polyethylene onto your nail, dry it in a lamp and seal it with topcoat.
Stamp for stamping
Using this method, you can create an imitation of malachite or amethyst on your nails. At the same time, special skills and abilities are not needed to implement such a manicure. This method can be used both at home and in beauty salons.
- base and top coat;
- gel polishes in three different shades, close to the colors of the selected stone. For malachite, for example, two dark shades of green and gray are used;
- stamping stamp with a silicone pad;
- liquid tape.
Before creating a pattern, do a manicure, cover your nails with a base and color.
- Cover the skin around the nails with liquid tape;
- Place a few drops of different gel polishes on the stamp. Don’t be afraid of mixing them - this is what will allow you to create a pattern close to the natural color of the stone;
- Stamp the polish onto the nail, but not as in the stamping technique, but with short pressing movements, as if you were dabbing the nail plate. The varnishes will mix with each other and create a realistic stone print;
- Remove the adhesive tape and dry your nails in a lamp and seal with topcoat.
If streaks have formed under the nail, remove them with an orange stick before polymerization.
Overview of stamping technology
Liquid stone on short nails
Liquid stone on short nails
You can rarely see the “Liquid stones” design on short nails. To perform this type of manicure, masters usually extend the nail plate. This helps to create plenty of space to create designs and stones.
It is worth noting: Real masters of nail art work incredible miracles and use this decoration technique even on short nails.
Liquid stone on short nails:
“Liquid Stone” pattern on short nails Beautiful “Liquid Stone” pattern on short nails
Liquid stone on short red nails
Liquid stone on short nails with a delicate pattern
Liquid stone on short nails with white manicure
Liquid stone on well-groomed short nails
Liquid stone on stylish short nails