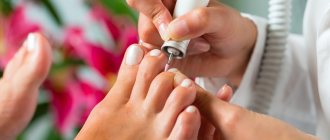
To keep your feet healthy and attractive, you need to take good care of them, including a pedicure. One of the popular types of foot treatment is hardware pedicure. It can be done both in the salon and at home. Today we will look at what treatment is, how to do a hardware pedicure and what is required for it. We have also prepared step-by-step instructions for you for beginners.
Advantages of hardware pedicure
The main advantages of foot treatment include:
- safety - there is no risk of cutting the skin or leaving other damage, as with the classic procedure;
- delicacy - suitable for those with thin sensitive skin and even children;
- hygiene - the possibility of infection with a fungus is excluded, since no microdamages remain on the skin;
- long lasting result – after grinding with a machine, the skin remains soft and tender longer,
- A hardware pedicure should be done on average once every 4-5 weeks, while a classic pedicure should be done every 2-3 weeks.
Advantages and disadvantages
This type of procedure has many advantages:
- The gel, which is used to soften the stratum corneum, acts gently without touching living cells, so the risk of injuring the skin is zero. In addition, this product has a disinfectant effect;
- The use of various attachments allows you to treat the skin even in the most inaccessible places;
- Massage is an undoubted positive addition to the procedure;
- After the procedure, the skin grows much slower than with a classic trim pedicure;
- This type of procedure can be done for both women and men. In addition, many doctors recommend hardware pedicure as a preventive measure for foot diseases with diabetes.
Like any other procedure, hardware pedicure has its disadvantages, which include:
- High price. In order to pamper your feet with a hardware pedicure, you will have to shell out a considerable amount of money;
- The opportunity to get an appointment with a non-professional. With this outcome, be prepared that within a few days you will have to visit the beauty salon again;
- If the feet are in a neglected state, then one procedure will not be enough. You will have to come to the salon 5-10 times.
Types of hardware processing
Classic hardware pedicure . With this treatment, a device for hardware pedicure is used on the heels, under the toes, and on other rough areas. They use it, only with a different attachment, to remove the overgrown cuticle and file down the overgrown edge of the nail.
Uncut pedicure . The key difference from the previous treatment method is that the device does not remove the cuticle. It is not removed mechanically at all, but is only softened with special preparations with acids or oils. After this, they move it away with an orange stick so that it looks neat.
SPA pedicure . SPA pedicure is the most intensive foot care complex. Before treatment, the feet undergo spa treatments - steaming in a bath with salt and oils, peeling, massage and others. For SPA pedicure, special moisturizing and nourishing creams and oils are used.
How does a medical pedicure help with fungus and more?
Medical pedicure for nail fungus
About 20% of people suffer from fungus that has settled on the skin of the feet and nails. The following symptoms are observed:
- Changing the color of the nail plate;
- Nail deformation;
- Severe skin dryness and flaking;
- Redness of the skin, especially between the fingers;
- Formation of small cracks in the skin;
- Itching;
- Unpleasant smell.
Fungus can be cured quickly and painlessly with laser nail plate removal. The procedure does not cause bleeding. First, you should treat the skin of the feet and nails, after which you can begin antifungal therapy. Medical pedicure is a good method of fighting fungus because it does not take much time to treat the disease and does not require a large amount of medications. When a new nail grows, the specialist will do corrective treatment. To prevent the infection from spreading, the procedure is performed in surgical sterility.
Medical pedicure for ingrown toenails
A nail can become ingrown due to:
- Nail injuries;
- Too much shortening of the nail plate;
- Fungal nail diseases;
- Hereditary nature;
- Inconvenient shoes: narrow or small.
An ingrown toenail is accompanied by pain on the side of the nail, swelling and redness. It is important to take action in time, otherwise pus will appear under the skin, infection will occur, and over time the pus will leak out. If you do not contact a specialist in time, then it is extremely undesirable to treat yourself, because there is a possibility of infection in the blood.
The following are the methods for treating ingrown toenails that a medical pedicure offers:
- Goldspang
. A special plate is attached to the nail, which straightens the edge of the nail, which allows you to treat the problem area.
- Surgical
. This is a radical method of treating ingrown toenails, in which the nail plate with the defect is simply removed.
- Trimming the edges of the nail
. The method is acceptable if you contact a specialist immediately.
- Laser nail removal.
- Orthonyxia
- straightening the nail using special staples.
- Prosthetics
.
- Podofix plate,
which is a strip of elastic plastic and is glued to the nail using a special glue, after which it is attached to it with a metal wire. This method of treatment is used for the proliferation of nearby tissues (hypergranulation), treatment of calluses with a core in the area of the nail fold, and curled nails.
- Onyklip plate.
Used for increased sensitivity of the side roller. An epoxy-coated metal plate is glued to the nail.
- Duroplastic plate,
covered with fiberglass. It is attached to the nail, and it lifts its edges above the side ridges due to its springy properties.
- COMBIped technique
used for unilateral ingrowth of the nail plate, inflammation of the nail folds and curling of the nail. A metal staple with one curved end is inserted under the nail plate. On the other side, the staple has a plastic pad that is attached to the top of the nail, so you can only adjust one edge of the nail.
Medical pedicure for diabetic foot syndrome
If you suffer from diabetes, then a possible complication is diabetic foot syndrome, in which the following occurs:
- The skin, nerves, blood vessels, bones, joints are affected;
- Blood circulation in the extremities is impaired;
- The threshold of sensitivity in the limbs decreases;
- Legs go numb;
- The temperature in the lower extremities decreases;
- Injuries and wounds take a long time to heal;
- Nails become deformed, the nail plate becomes thicker;
- Dry skin is observed;
- The leg muscles atrophy;
- Trophic ulcers and fungal infections appear.
We can conclude that if you have diabetes, you should under no circumstances remove calluses, ingrown nails, or perform other actions that could damage the skin. The best way out is to contact a specialist and get a medical pedicure. Professionals using special devices will be able to remove rough skin and calluses using diamond tips. They will also be able to relieve you of the problem of ingrown toenails. To improve blood flow in your legs, you should also sign up for a massage session.
Medical pedicure for cracked heels and toes
Sebaceous glands nourish and moisturize the skin, but there are no sebaceous glands on the feet. This is associated with the appearance of cracks. But this is not the only reason for dry skin on the feet. Another reason is a lack of vitamins and a dense stratum corneum, which causes the heels and toes to crack. The cracks cause pain, making it impossible to fully step on the foot. Blood flows from the wound, which leads to the risk of infection or dirt. Since the skin layer is thick, it receives little nutrition and is subject to constant stress. All this only makes the situation worse, and such wounds take a long time to heal.
Causes of cracks:
- Failure in the endocrine system;
- Wearing flip-flops, flip-flops and slippers;
- Poor quality pedicure;
- Dry and hot air;
- Fungal infections.
Cracks can be easily cured with a medical pedicure. Special tools are provided for this. The rough layer of skin is cut off, the edges of the wound are polished with a ceramic tip, then the crack is treated with ointment. In the future, this ointment should be used at home on your own until the skin heals.
Medical pedicure for hyperhidrosis
It has already been said that the skin of the legs does not have sebaceous glands, but it has many sweat glands. Hyperhidrosis is a disease associated specifically with increased sweating of the feet. If the hormonal balance in the body is disturbed, or you wear shoes that do not allow air to pass through, or you have experienced stress, or the temperature is elevated, then sweating increases. As a result, an environment with elevated temperature and humidity is formed in which bacteria multiply and fungus spreads.
Hyperhidrosis is treated with reflexology, which stimulates blood circulation and improves the functioning of the nervous system. The medical pedicurist performs acupressure using cooling and relaxing agents and essential oils. Some remedies can also be used for home treatment.
Medical pedicure for corns and hyperkeratosis
Since the feet regularly experience pressure and stress, the skin in those places where strong pressure occurs coarsens, becomes hard and dense, which is why dry calluses and stratum corneum form. When a callus appears, a person feels pain, especially when walking for a long time. Your foot hurts a lot and you get tired quickly.
The causes of hyperkeratosis are as follows:
- Being overweight or tall, which puts increased stress on the feet;
- Standing work, for example, hairdresser. As a result of prolonged exposure to certain points of the sole, the skin becomes horny;
- Impaired metabolism;
- Lack of vitamins;
- Inconvenient and low-quality shoes;
- Deformation of the feet;
- Excessive dryness of the skin of the feet.
Medical pedicure in such cases involves treating the affected areas with ceramic caps. To soften the skin, they do not use baths, as in a regular pedicure, but special formulations consisting of liquids and gels.
Medical pedicure for skin or core nails
A skin nail is a type of callus that is a manifestation of hyperkeratosis. The core nail is smaller in area, but penetrates deep into the skin. This disease is called skin nail because when walking a person feels pain, as if a nail had pierced the sole of the shoe and dug into the leg. Typically, these calluses appear on the heels, balls of the feet, knuckles on the outside of the toes, and between the toes. The causes are wearing tight shoes, injuring the foot with a pebble caught in the shoe. In the latter case, the body protects the foot from damage, resulting in the formation of a callus. At the site of “irritation,” epidermal cells divide and grow, resulting in hyperkeratosis that penetrates deeply. In addition to the listed reasons, this disease also occurs as a manifestation of a dermatotropic virus.
Skin nails are treated during a medical pedicure. It is drilled out with special drills and cutters. This is the most effective way to get rid of a core nail. When it is removed, a hole remains. To prevent inflammation from starting, a medicine is injected into it. Typically, five treatments are required for complete cure.
What is good about medical hardware pedicure?
- Medical pedicure is safe. The risk of skin breakage is very small, so the client is unlikely to become infected.
- The possibility of damage is also reduced by the fact that the skin is softened not by steaming or baths, but by special preparations.
- The possibility of cross-infection is eliminated since the procedure uses disposable tips. They stimulate reflexogenic zones, which leads to improved well-being.
- The products used (creams, lotions, softeners) contain wound-healing components.
- The procedure should only be performed by a specialist with medical education.
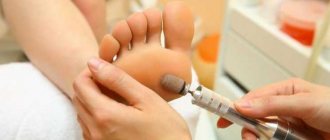
What you need for a hardware pedicure
To do a hardware manicure and pedicure, you will need a device for a hardware pedicure, attachments for it, including:
- nozzles for hardware pedicure of small diameter for processing the overgrown edge of the nail;
- needle-shaped and spherical burs for the cuticle and side roller;
- large-diameter nozzles for removing corns, calluses, and areas of rough skin.
In addition to the apparatus, you will need a bath in which to steam your feet, soft buffs for polishing your nails, moisturizing and nourishing creams. You also need colorless caring varnishes and colored decorative coating.
Description of the procedure
Is it possible to get a pedicure if you have nail fungus? It is possible and necessary. But the pedicure will be special, medical. And it can only be carried out in specialized clinics after consultation with a podiatrist. Differences between medical pedicure and classic:
- During a medical pedicure, a specialist uses a device with cutters. They remove the areas of the nail affected by mycosis and give them shape. Hardware treatment eliminates the appearance of wounds and cuts through which the fungus could continue to spread.
- During the procedure, medications with antifungal properties are used.
How to learn how to do a hardware pedicure at home
To do a hardware pedicure at home, you first need to understand the attachments and cutters for the machine. Training in hardware pedicure begins with studying the classification of attachments.
Diamond bits
Above we have listed the forms of nozzles and indicated what they are used for. It remains to deal with the rigidity of the cutters. When choosing hardness, you need to follow the basic rule: hard cutters are used to shorten nails and remove calluses and corns, soft cutters are used to treat cuticles and small rough areas.
Diamond cutters have colored serrations that indicate hardness. So, the hardest ones have black notches, the medium ones have blue ones, the softest ones have red, green, yellow ones.
Ceramic tips
Ceramic attachments are suitable for training in hardware manicure and pedicure. They are used by beginners as they are softer and safer. Made from corundum, a material with a grainy surface. Their hardness is distinguished as follows:
- blue and pink have a hardness of 100 microns, that is, they are the softest;
- white ones have a hardness of 200 microns, they are medium;
- black and brown have a hardness of 400 microns, they are the hardest.
Sand caps
Sand or silicon carbide caps are an effective tool for treating rough skin. They are placed over the cutter and used once, after which they are disposed of. To treat your feet efficiently, you need a three-stage treatment:
- an 80 grit cap is used to remove the underlying rough skin;
- a cap of 150 units is needed for sanding, that is, removing unevenness from the treated skin;
- A cap of 320 units is used when polishing the foot, making it smooth and soft.
Processing technology
When treating feet with a machine, it is important to select the intensity of pressure. If you press the cutter too hard, the skin can be damaged. The direction of movement is also important. Experienced professionals advise:
- when training, choose a cutter rotation speed lower than recommended;
- position the nozzle at an angle of 35 degrees relative to the surface being processed;
- process the cuticle from the center to the edges, nail folds - according to the growth of the nail;
- move the cutter in the direction opposite to its rotation so that the nozzle does not slip;
- Do not press the attachment too tightly and do not hold it in one place, otherwise you may damage the skin;
- Be sure to apply the cream after treating your feet.
A detailed video tutorial with instructions for a novice master can be viewed here:
Step-by-step instruction
Hardware pedicure is performed in several stages. Let's look at each in detail.
Removing the coating
If the client has previously had a pedicure and covered her fingers with gel polish, first of all it is necessary to remove it. To do this, you will need a carbide or ceramic cutter. The pedicure milling machine must be turned on at a speed of 20-30 thousand revolutions per minute. If you set a lower speed, there is a high risk of overheating of the nail plate and discomfort for the client.
Withdrawal occurs in zones:
- The central part is removed.
- From left to right, the side zones are cleared. The work must be carried out with a cutter in a lying position.
We use the tip of the cutter only near the side rollers. We clean the area near the cuticle carefully, trying not to touch the delicate skin - a cutter for removing the coating can damage the cuticle. If there is gel polish left at the base of the nail, it can be removed in the next step. The same applies to the area near the side bolsters, especially if they are deep enough.
At this stage, the master can level the nail plate, smoothing out all the dimples and protrusions with a cutter. The base coating in areas of detachment must also be removed.
Cutting length
The next step is cutting the length. The master can do this with the same cutter, or with a straight-end attachment. In this case, during the work, you can immediately round the ends to achieve an exact soft square. If it is not convenient to carry out this procedure with a cutter, then you can use a file with the necessary one.
The length of the toenail is an important point that the nail technician should know about. If the client asks to leave enough nails as is, explain what consequences excess length may entail - cracks in the nails, premature peeling of the coating, increased pressure on the nail. If even after this educational program the client insists on length, leave it.
According to the rules, the nail plate should not be too long. To check the safe length:
- Grasp the client’s finger with one hand;
- Place the finger of the other hand perpendicular to the nail;
- Press your finger. This is how the shoe will put pressure on the nail while walking.
If you only feel a touch to the nail, it means the length is optimal. If there is a tingling sensation or other discomfort, then the nail must be cut down.
3. Shaped sawdust
The toenail should be square and its tips rounded. It is not allowed for the tips to fit into the recesses on the side rollers. They should lie on them. If it was possible to give the shape with a cutter, which is possible on nails with lowered side ridges, then the master can only trim the nail with a file. To do this, you need to take a file, place it at a right angle to the nail and start filing.
When the end is straight and the desired length, proceed to the corners. It is problematic to round them with a file, since it enters from the side only a few millimeters. To smooth out the corner a little, the master must pull the side roller to the side, place a file and lightly process the side of the nail without rounding it.
Then the file is placed in parallel and the corners are rounded with long movements.
If the corners are too soft, then it is better to leave the sawdust until the base or other strengthening material is applied to the nail.
After the big toe has been filed, the remaining nails must be treated in the same way. The little finger usually has little or no nail bed. There is no point in trying to cut a square out of this. The finger will still be practically invisible.
Cuticle treatment
Cuticle treatment begins with moisturizing it. Moving dry skin is dangerous because there is a risk of damaging it. An antiseptic is used to moisturize.
After this, you can begin to remove the pterygium. This can be done with a pusher, carefully pushing back the cuticle and cleaning the side ridges, or with a curette.
The next step is processing with a milling cutter. For toenails, it is better to choose the “Drop” cutter. When working with it, you must follow one rule - do not touch the skin and nail with its tip. It is sharp, so there is a risk of sawing through the surface. It is better to work in the sinus with the part of the cutter that is closer to the end. In this case, the “belly” of the drop should not touch the nail.
To remove pterygium, it is better to start working from the middle of the nail, first in one direction, then in the other. During the process, the cutter should be positioned semi-sideways to the cuticle, lifting it. The side rollers are first processed from top to bottom, then you can move the cutter pointwise up and down, as if cleaning off the raised scales.
You need to start working at a speed of 10 thousand revolutions. In the process, you can increase the indicator, depending on the density and condition of the skin.
After all the nails have been processed, it is necessary to bring the cuticle to perfect condition. To do this, you will need a “Ball” cutter with a blue or red notch. During operation, only the middle of the cutter is used, which must be held parallel to the cuticle or side ridges.
If during filing the cuticle has fallen because it was simply moved with a pusher, but not separated from the nail, it needs to be lifted. This can be done with the same ball-shaped cutter, holding it parallel to the cuticle at an angle of 90 degrees.
After treatment, you need to wash off and clean the remaining dust from the treatment. To begin with, the nails are treated with a degreaser. After this, you can take an orange stick or pusher and remove the residue from the side ridges and sinus.
Skin types
The choice of attachments and operating parameters of the device depend on the condition of the skin of the feet. The master himself assesses the amount of work and sets up the device. Each skin type has its own characteristics that affect the procedure.
Normal
Such feet are characterized by slight roughness in the heels and outer lateral part of the sole. Corns may form in the summer due to dirt and dust that gets into open shoes. In most cases, pedicure is limited to polishing; cutters are rarely used. The result lasts for at least 3 weeks.
Average
A more problematic type, characterized by a tendency to dryness. It is considered the most common in our climate zone. The skin becomes yellowish due to the thick stratum corneum; if not properly cared for, calluses and cracks appear. The procedure takes longer and requires grinding. The effect lasts for an average of 2 weeks.
Problematic
Due to increased dryness, the soles of the feet become covered with cracks, calluses, and become very flaky. It hurts to step on a person's feet. One treatment procedure is not enough. Every week and a half, you can restore the health of your feet with the help of the device and correctly selected attachments. The master also gives recommendations for home health improvement.
What are the types of foot skin problems?
Foot skin problems can be either cosmetic or medical. The consequence of insufficient care of the skin of the legs is increased dryness of the skin, hyperkeratosis, which lead to the development of such defects as
- corns;
- cracks;
- Calluses.
Increased sweating and hyperhidrosis also cause a lot of problems.
Among the pathological processes affecting the skin of the feet, fungal infection and psoriasis occur most often. One of the most serious problems faced by podiatrists is diabetic foot. In this case, the development of symptoms is due to endocrine pathology, diabetes mellitus. At the initial stage, the pathological process is characterized by dry, cracked skin with reduced sensitivity. If you neglect preventive measures and care for the skin of your feet, this will lead to aggravation of the situation and the formation of non-healing ulcers, damage to the muscle layer and even bone.
In this regard, hardware treatment of diabetic foot is an event that helps preserve not only aesthetics and quality of life, but also health. This technology allows for care without damaging the skin.
Pedicure at home: instructions
This is a completely simple procedure, it won’t take you much time, and the result will make others admire you! There are many ways to do a DIY pedicure at home. We'll look at step-by-step instructions on how to do it right!
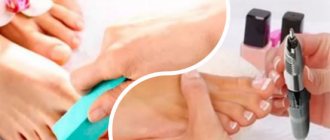
Required Tools
For this you will need:
- high quality scissors and tweezers,
- orange stick,
- wire cutters,
- brush,
- file,
- cotton pads,
- and nail polish remover.
In addition to the above tools for pedicure at home, you must have a bath, scrub, callus and corn remover and, of course, foot cream. You can take any cream that you use daily, be it moisturizing or deodorizing.
If you have all these tools, then you can easily repeat the salon pedicure process. The main thing is to store them correctly. It is better to do this in a special cosmetic bag, clean and dry. After each use, thoroughly sterilize each item.
Pedicure: step by step
When creating a pedicure at home with your own hands, you should follow the instructions. So, let's consider all stages of the procedure.
Step 1: Start with a foot bath. Before performing this procedure, you should remove all nail polish. For it, you can use sea salt, soda, calendula or chamomile tinctures. Or you can buy a ready-made softener with an antibacterial effect. As the water in the bath cools, it should be filled with hotter water so that your feet are well prepared for the pedicure process. You should steam your feet for about 20-30 minutes, then wipe dry with a towel.
Step 2: removing corns. Next, you need to take care of your feet, removing all corns and calluses. They can be removed using a pumice stone or a razor specifically designed for this purpose. Walk the pumice stone in a circular motion over the entire foot - this will help get rid of dry skin. To give your legs a more well-groomed appearance, use a scrub. Distribute and massage your feet, toes and between your toes. After this procedure, rub the cream into your feet.
If there are calluses and cracks, you can remove them using tweezers .
Step 3: prepare the nail and cuticle. Under no circumstances should you cut the cuticle, just push it back with a stick. You can apply an emollient cream or oil for this. Next, the nails should be trimmed and filed, but do not round their edges. This can lead to ingrown nails and you can’t do it without the help of a specialist.
Don't forget about dirt under your nails! Clean it thoroughly!
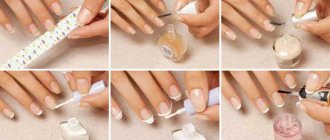
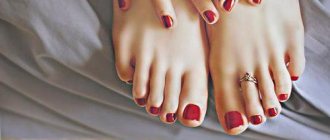
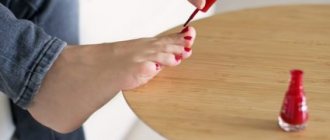
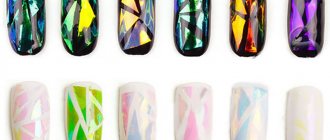
Step 4: Applying varnish. The first layer is a transparent nail base. It will protect the surface. Apply colored varnish in one or two layers, allowing each of them to dry thoroughly. Apply a fixing varnish on top to prevent the color from chipping.
This completes the DIY pedicure at home! There is nothing complicated, the main thing is to learn how to do it correctly!
Result
A medical pedicure does not guarantee complete restoration of your nails. This is just one element in the complex treatment of onychomycosis. In addition to pedicures, it is also necessary to regularly go for laser treatment of fungus, take medications and apply antifungal drugs. However, thanks to a therapeutic pedicure, you can give your feet a more aesthetic appearance:
- You will get rid of peeling skin on your feet.
- The color of the nail plates will take on a healthier appearance.
- The nails themselves will take a certain shape and thickness. In contrast to split and brittle nails, the effect will be noticeable immediately.