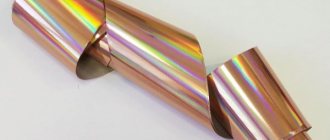
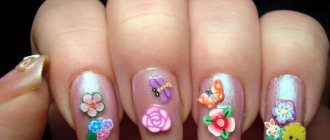
Foil for nail design
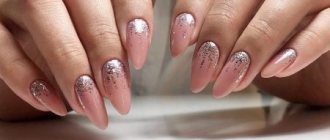
We won’t be lying if we say that rhinestones have somewhat lost their former relevance, but girls still have a penchant for luxurious glitter on their nails. What to do - tame your desires or find a healthy alternative to them? For an experienced manicurist, the answer is obvious - use a trendy and unusual nail art design, such as a foil print, reminiscent of a glare of precious metal.
The best photos that reflect the essence of such a popular trend in manicure are collected in our inspiring selection.
Manicure based on transfer foil and glue
If you follow the step-by-step instructions, the implementation of a beautiful manicure idea will become especially simple and fast. So, to achieve this goal you should:
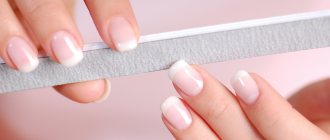
Rid the nail plate of the previous coating and do a trim, or European manicure.- Then, using a file, you should give a separate nail some shape, and also polish the nails using a buff with an abrasiveness of 300 grit, degrease them and apply a base.
- After a few minutes, dry everything thoroughly in an ultraviolet lamp, and then remove the sticky layer using a special napkin.
- Next you need to paint your nails in the color of foil or cover them with a transparent base. Don’t forget to dry everything with an ultraviolet lamp and then remove the sticky layer. (If you are using a classic (simple) varnish, then it is not necessary to repeat the previous step).
- If the polish dries completely, you should completely treat the nail plate with glue. If you intend to create any pattern, then process only a separate part of the nail.
- Wait a few minutes until the coating becomes transparent. The exact time is determined by the glue company.
- Then you should apply the inner white part of the foil to the area where the glue was applied.
- Using a cotton swab or other handy object, you should evenly distribute the foil over the surface of the nail, and after a few seconds, remove it with a sharp movement in one direction.
- After a few hours (about 2 hours), the topcoat is applied to the surface of the nail plate. Experienced craftsmen use a gel finish. If you don't wait for the right moment, the foil can easily shrink and lose its attractive appearance.
What types of nail foil are there?
Before you run to the nearest supermarket or explore the deposits of your kitchen cabinets at home, find out for sure how suitable classic foil in a roll is for such painstaking work. The Prostonail guide will tell you about the variety of varieties of this material in order to choose the most effective and impressive specimen for the collection.
Transfer foil
Ultra-thin foil for nails in jars. Its standard length is a meter and width is about 3 centimeters. The main feature is a pattern or spraying applied to the surface that can be imprinted on the nail plate in a matter of seconds.
Liquid foil for nails
It has a thick, viscous consistency. Essentially the same gel polish or shellac with the addition of glitter of different sizes, diameters and degrees of shine. Convenient when working with brushes.
Holographic Nail Foil
When applied to nails, this type of decor acquires an unusual holographic finish, shining with all the colors of the rainbow. You can find the product in the assortment of popular mass market brands such as avon or divage.
Self Adhesive Nail Foil
Having this type of material in your arsenal, you can do without glue. This is because on the back of the product there is already a sticky layer to fix the design.
Screen foil
Foil with a pattern for decorating plain pigmented surfaces. Ideal for those who do not have special artistic skills.
Broken glass foil
The design of shattered Glass Nails looks stylish and unique, and its creation only takes a few minutes. A transparent thin plate of foil is cut into fragments and laid out on the nail plate, secured with a top coat.
Tear Foil for Nails
The name itself gives a direct hint at the principle of use. The instructions are as follows: tear off a piece of the sticker and attach it to the desired area of the nail.
Crinkled nail foil
Behind the walls of the miniature jar is hidden a very unusual crumpled foil, which must be fixed with nail glue.
Matte foil
Sounds like a phantasmagoria, doesn't it? And it looks no less impressive. The colored foil simply transfers its pigment onto the sticky layer of gel polish, polymerizing under the LED light.
Lace foil
In fact, another type of transfer foil. Only its print is stylized as lace, which looks luxurious in a French manicure.
Thermo foil
Film for nails, differing in the way it is fixed. In order for the designs to migrate from the roll to the surface of the claw, you need to preheat the material under the heat of ultraviolet light.
Foil for casting
A special casting technique replicates the metallic sheen of the same type of artistic activity. Silver or gold foil creates the illusion of a product “forged” by the hand of a skilled craftsman.
Lesson 2 – How to make a stylish nail design with tear-off foil
Another uninteresting and simple manicure design option. It's even simpler than the previous one. After all, if the tear-off foil may not stick or stick, but somehow it’s not right, then nail designs with the help of foil “from jars” are almost always obtained. It is convenient to place tear-off foil on short nails. If you cover it with 2 layers of top, it will wear well and for a long time.
Let's make a now fashionable two-color print with a strip of foil on the border of the shades.
Design materials:
- Base, glossy top, matte top, white gel polish, bright gel polish (purple, pink, light blue, blue, green, etc.);
- Tear-off foil (sold in a jar).
Step-by-step photo instructions
Step 1 – Make a white backing.
Step 2 – Paint the edge diagonally with any bright color.
Step 3 – Take a piece of foil and tear it into small pieces using tweezers and a dot or needle.
Step 4 – Place foil on top.
Advice for beginners
Many novice masters put foil on gel polish in order to save time. However, it is better not to do this. On a top coat, you can easily move the foil, but on gel polish this will no longer be possible, because it will immediately get dirty.
Step 5 – Once the foil is fixed in the lamp, cover it with another layer of glossy topcoat. If the pieces stick out a lot, you can sand them a little with a file. Just don’t forget to remove dust and degrease afterwards. After this, the design is covered with a matte topcoat.
This is what a two-color manicure design with foil looks like in its finished form.
How to use nail foil
How many people - so many opinions. There are as many types of foil as there are features of their fastening. You will learn about the most important nuances from our training table.
| Type of foil | How to use |
| Zhataya | Similar to ultra-thin tinsel, soft foil. You need to take it with tweezers and lay it on a sticky layer. Used for extensions with an aquarium effect |
| Thermal film | After preheating some of the material under the lamp, attach it to the nail without using glue. |
| Sheet foil | Having cut out the desired pattern, apply glue to its reverse side and fix it on the plate. |
| Ribbon | Requires jeweler precision when applied. Used for geometric decoration in stripe style. The reverse side is sticky |
| Transferable | Tracing paper on an adhesive basis, which accurately transfers the print to the manicure by applying |
Bias jacket with foil
There are a huge number of options for decorating nails with foil, but there are ideas that are always popular among fashionistas, such as an oblique French manicure with foil. It can be done either using transfer foil or tear-off foil.
To complete it you will need:
- any color varnish to your taste; - special glue; - foil - silver, gold or bronze; - gel pen or special nail pencil; - basis for manicure.
With tear-off foil
Step-by-step instructions with pictures
Step 1. We treat the nails as with a regular manicure, after which we paint them with varnish and wait for it to dry.
Step 2. Cut out small triangles from foil of such a size and shape that they can be applied to the edge of the nail from its middle to the side;
Step 3. Lubricate this area of the nail with glue and apply a triangle, press it with a cotton swab or orange stick, carefully smoothing out all the irregularities on the foil;
Step 4. File off the excess and apply a fixative.
With transfer foil
How to do it with a photo
- prepare the nail in the usual way;
— apply the varnish, let it dry and apply glue along an oblique line;
— apply transfer foil, press well with an orange or cotton swab;
- tear it off and apply a fixative.
Manicure with foil at home
Girls, looking with inspiration at the pages of their favorite glossy magazine, are perplexed by the complexities of metallic manicure design. In fact, the process itself only takes a few minutes and is easy to do even at home. Below we will tell you how to glue foil so that it retains its original attractiveness for a long time.
Popular manufacturers
The products of Jina are the most highly regarded. It is sold in special tubes with a brush, which simplifies the application process. The glue from this manufacturer adheres perfectly to the nail plate, retains its hold for a long time, and also does not require intensive drying with additional devices. You can purchase the product for 80 rubles.
Before applying the glue, a layer of the main color of varnish is applied to the nails. And only after the base has completely dried, they begin to use glue, during which it is applied to the entire surface. If the glue changes color , you can start gluing the nail film. Otherwise, the foil will not stick well enough or will come off completely.
Products from HONGYI have also earned worldwide recognition, and not only glue, but also rhinestones are in demand. The first product comes in small jars along with a thin brush. The bottle contains 16 ml of the product, and its cost is 160 rubles. It takes 5 minutes for the glue to dry completely, and there is no need for additional drying under ultraviolet rays, and any glue that gets on the skin around it is cleaned very quickly.
The well-known brand Rio Profi produces high-quality transparent glue, with which you can create perfect nails with a glossy finish. This product has the ability to be evenly distributed over the plate and dry in 3 minutes. Bubbles with a volume of 10 ml and costing 149 rubles are available for sale.
Another well-known company is Global Fashion. The glue from this manufacturer successfully dries in just a few minutes, and when dry, it changes color from white to transparent. Once this happens, you can begin to apply the foil to the nail. The market offers 15 ml tubes with a thin or regular brush. The cost starts from 135 rubles.
Nail foil for regular polish
The application algorithm is even more simple compared to the previous task:
- do a classic manicure by pushing back the cuticles;
- polish the nail plate, removing roughness;
- Apply primer to extend durability;
- use nail polish and wait until it dries completely;
- prepare the desired pattern by “trying it on” on your nails in advance;
- apply glue to the back side of the decorative material;
- apply the foil with the matte side to the coating, straightening it with a pusher or stick;
- remove the protective layer away from the nail bed;
- fix the result with a finishing topcoat, apply for a few hours after the end of the procedure.
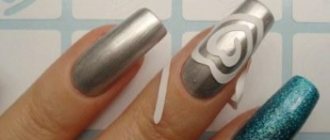
Mirror manicure with foil
Another name for it is reflective manicure.
The nail is covered with foil in a special way, creating a mirror effect. For this design, only smooth transfer foil is suitable; there should be no patterns or embossing on it. How to do:
- prepare your nails as usual and cover them with base;
- then apply glue;
— apply the foil to the nail with the matte side;
- smooth and press firmly so that there are no uneven spots or air bubbles left;
- after a few seconds, tear off the protective film with a sharp movement, the foil itself should remain on the nails;
- if something doesn’t work out, then remove the foil with nail polish remover and repeat the procedure from the beginning;
- Finally, apply a special coating to your nails for shine.
I want to say right away that if you cover the nail with a fixing agent, the foil will shrink and crack, and in addition, the nail will lose its mirror shine. You need to wait more than 2 hours and then apply a fixative or leave it like that, but in this case the mirror manicure with foil will not last long.
Mirror manicure: video
But the best way to achieve a mirror manicure is with thermofoil; there are no special features in its implementation; you just need to choose a film of the appropriate color.
How long does nail foil last?
The answer to this question interests all lovers of experiments. Agree that when you visit a beauty salon and make a strong-willed decision to try an unusual design, you hope that at least the manicure will last for 2 weeks. Don’t let your soul be tormented by vague doubts - high-quality, well-glued metal decor lasts for 14-16 days. Things are somewhat different with nail art in its home interpretation. Unfortunately, the glossy design, when worn carefully, retains its presentability only for up to 3-5 days.
Casting on nails step by step
Photo step by step describing the process of creating gold casting on nails using transfer foil.
Although, of course, in the video this technology is described in much more detail and better. White French on long almond-shaped nails with gold casting. Typically, gold and silver are the most popular colors for this type of design.
To be honest, what interested me in this photo was not so much the casting as this blue and gold design with a cracking effect.
Very beautiful manicure. I note that very often casting on nails is done simultaneously with Liquid Stone. These are related designs and are often seen together.
Gold casting on the nails plus an ombre effect in the transition from soft pink to soft blue.
Tips with red varnish and gold casting.
A very impressive slider design with gel paints with an owl design on the nails.
How to replace foil?
In the previous paragraphs, we have already clarified the fundamental rules and method of using metal foil. If you are wondering why overpay for a bundle of shiny material and how to replace it, we recommend the following methods as an alternative:
- cosmetic glitter;
- pigmented varnish or gel polish with glitter;
- decorative mica;
- mirror powder.
Manicure using foil is often called “Hollywood” and one cannot but agree with this. It looks stylish, catchy and quite expressive, so that even a calm everyday outfit in basic shades will sparkle in a new way, highlighting the impeccable taste of its owner.
What is transferable and non-transferable
Types of translation:
- Holographic.
- Plain colors (mirror, matte, gold, etc.), embossed.
- Colored with patterns.
One tone, more is suitable for monochrome covering the entire plate or for casting. Embossed paper can create a variety of multi-faceted and deep effects, as there are various prints and patterns on its surface.
Non-transfer (sheet) is more dense in structure, cut to any size in parts to form different compositions. You can make any shapes or ornaments of your choice. Attached to the nail bed with regular varnish or a fixative, specialized glue. Also, when extensions are applied, it is applied to a wet gel or acrylic glue.
It is lower in price, easier to apply and suitable for inexperienced neil-art artists. Recommended for express design.
The transfer is ultra-thin. A rich range of colors with a variety of decor, patterns and foil designs on the nails.
How to apply foil to gel polish: ideas and secrets from the pros
The nuances of applying foil to gel polish
Beautiful and well-groomed nails have always been a special pride for women, and if they are also interestingly decorated, then the envy of others is guaranteed. They knew about this back in Ancient Egypt, which is why the wives of the pharaohs covered their marigolds with gold. Since this was allowed only to them, even wealthy ladies sighed when looking at such beauty, but it’s not worth talking about ordinary people.
It’s good that in our modern age there are no such rules, and any girl and woman can afford to wear bright shiny nails. This effect can be achieved using foil and gel polish. To do this, you don’t even have to make an appointment with a nail specialist in a beauty salon, just read below about how to apply foil to gel polish, stock up on materials, be patient and get to work.
Types of decorative foil
Everyone clearly understands that for manicure it is necessary to use special, and not household foil. This material has its own special composition, which allows it to be quite durable and have different color shades and shapes.
Decorative foil is mainly divided into two types:
Untransferable or tear-off
This foil is usually sold in rolls or stickers. It has good strength and is quite dense. Typically used for aquarium design in nail extensions or to create interesting patterns.
Directions for use: Before applying tear-off foil to your nails, it must be cut into pieces. And only then glue it onto a sticky layer (gel, acrylic or special glue) using a needle, tweezers or toothpick, creating various patterns.
Transfer foil
On sale it is presented in the form of rolls in small jars, notebooks with tear-off sheets or strips. The choice of color shades and applied patterns that will be imprinted on the nail is simply huge and can suit any taste. How to use such foil during application: apply foil on top of the sticky layer, and it is worth considering that this should be done with the matte side, then the material can be imprinted on the nail. To ensure that the design does not lose its shine, it must be covered with a layer of topcoat.
Additional Information! To completely cover the nail, gold and silver foil is usually used. Mirror foil or imitating gold leaf (potal) also looks good on the entire surface.
Nail preparation
Before you do a gel manicure with a foil design, you need to carry out a nail preparation procedure.
Materials:
- orange stick;
- nail clippers;
- nail polish remover;
- nail file;
- cotton wool discs;
- nail brush.
When everything you need is ready, you can start processing your nails:
- Using a cotton pad soaked in liquid, we remove the old varnish manicure (if a design with gel polish was previously made, it should be removed with special means).
- Using a stick, lift the cuticle.
- Using pliers we cut off the cuticle and burrs from the side rollers.
- Using a file, we shape the free edge of the nail and lightly file the surface itself. This is necessary to remove shine from the nail.
- Use a brush to remove sawdust and excess dirt. Degrease using nail polish remover.
Applying foil to gel polish
After the nail is completely prepared, you can move on to solving the main question: how to glue foil to gel polish?
We will look at the simplest version of nail design using transfer foil, applying it to the entire nail.
To do this you will need the following:
- acid-free primer;
- base coat;
- colored gel polish;
- transfer foil;
- special glue for foil;
- pusher with a rubber tip;
- finishing coating;
- lint-free wipes;
- nail polish or adhesive remover;
- cuticle oil;
- UV lamp.
Application steps:
- Apply the primer and wait about 1 minute for it to dry completely. We use the base, seal the end, polymerize for 120-180 seconds.
- Apply two thin layers of colored gel polish, dry each for 120 seconds.
- Remove the sticky layer using napkins and liquid.
- Apply glue to the entire nail and let it dry slightly.
- Note! Foil glue is white in color, but after drying it will become transparent and invisible. So don't be afraid to use it.
- We apply the foil with the matte side and wait for the glue to dry completely. At the same time, using a pusher, we carefully level the surface of the material from the center to the sides in order to print the design well.
- We quickly remove the film. If the procedure is carried out correctly, a perfectly printed foil will remain on the nail.
- We cover the entire nail with the finish and be sure to seal the end and dry for 180 seconds.
- Apply oil around the nail and gently rub in with massage movements.
Errors when applying material
Very often you can hear that it is impossible to do such a manicure at home or that it is just a hassle. Let's look at the most common mistakes that are made when creating such an interesting nail design:
A poor result may be due to the low quality of the materials used.
The glue was not applied to the entire surface or simply did not have time to dry before the film was torn off.
Thanks to such an interesting design material as foil, you can change a lot in your manicure without even leaving home. Show a little imagination and experiment, the main thing is not to give up if something doesn’t work out the first time. Beautiful nail designs require patience and some experience, so don't hesitate to get started.
Photo of nail polish coating
Even more photos at the link: Gel polish with foil photo.
Video with master class
2nails.ru
How to glue foil onto gel polish
Brilliant manicure has not lost its position in nail art for several seasons in a row. Design is done in different ways - gel polishes with a mirror shine, rubbing, metal powder. One of the easiest ways to create a sparkly design is with foil. It looks like a thin metallized film of different colors and textures. Attention! Food foil is not suitable for nails.
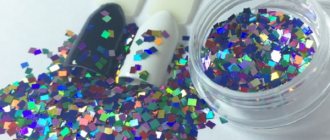
Types of foil and design advantages
Foil film for decoration can be plain or colored. The color scheme matches almost all fashionable shades of coatings. You can choose a shiny decoration in the color of your varnish, a tone darker or lighter, contrasting, gold, silver.
Foil is available in sheets, small rolls, in jars, in the form of ready-made glitter, cut strips or stickers:
- with smooth or structured surface:
- glossy, giving a mirror shine;
- matte for the effect of velvet nails;
- holographic, with small and large 3D patterns;
- gradient or rainbow, with color transitions;
- textured - crinkled, creating the effect of gold leaf, embossed, with various patterns on the surface;
- with color prints, images of flowers, birds, monograms.
The film has two sides - one glossy, with a pattern, the other matte, reverse. It can be glued to gels, varnishes, gel polishes, an undried base layer, to natural and extended nails of any length in different ways - with glue, printed as a decal, laid out on the surface. There is a shiny thermal film. You just have to hold it near the lamp, and it easily sticks to the nail plate, taking its shape.
With the help of this decor they create castings, “broken glass”, ornaments, drawings, mirror manicures, French manicures and other original design options, depending on the creativity and imagination of the artist. Foil looks organic and separate and as an additional decoration, successfully combined with all materials. It is easy to work with at home. With a small consumption of metallized film, you get ample opportunities in nail art.
How to use metallized decor correctly
Methods of gluing depend on the material itself and the design being created. It is difficult to cast with thick non-transfer foil. It has difficulty laying flat on the plate and forms bumps that have to be masked somehow. Therefore, it is better to cut out patterns, stripes, and designs from it. The elements are attached to a nail plate coated with regular varnish, a fixative, or with a special glue, or they are placed on wet gel polish, gel, or acrylic when extending nails.
Film with a transfer layer is thinner and more convenient to use. You need glue to work. It dries well, securely fixes foil decor, and ensures that your manicure lasts, even if you are doing household chores.
Apply a thin layer of glue to a dry nail with a colored coating. Let it dry - wait until it becomes transparent. We degrease the shiny piece on the back side (be careful not to tear the film) and press it firmly against the plate on all sides. With a sharp movement we remove the film, and the entire shiny layer is imprinted on the surface. Cover with a fixative. Remove the transfer foil with nail polish remover. The technology for transferring foil to gel polish is the same, but instead of glue we use a sticky layer, and the fixer here is the top coat (2 layers).
There is a metallized film with its own adhesive base. The colored layer is fixed on a paper backing, which can be easily removed with tweezers before gluing. Plates with pre-cut stripes, waves and other shapes are sold. They can fill the entire nail diagonally, lengthwise or crosswise, lay out patterns, and decorate a manicure. To ensure that the design lasts well, the manicure is completed with a top coat. For thin materials, a regular finish is sufficient; for denser ones, you need a layer of rubber or other dense, dense topcoat to even out the bumps and protrusions, and then another layer to secure it.
Crinkled foil is sold in containers because it is very thin. It is applied using the laying out method, which is why it has another name - laying out. It is very “alive” and can fly away even from breathing, so you need to be careful and careful when working. We tear off a piece and take it with a dot, stick or other convenient tool. Place, lightly pressing, on a sticky layer of gel polish in a certain place, for example, on the smile line of a Frenchman. It is very convenient to create a design with a craquelure effect. We correct the drawing with a sponge with a degreaser. There is no need to dry, immediately cover with a medium-thick topcoat.
You can glue it to the entire surface. To do this, align the metal sheet and cover the entire nail plate with it. The thin material adheres well to the nail. Carefully remove excess and cover with top coat.
The thermal foil film is made directly to the shape of the nail, it does not need to be torn off or cut. Choose your size, remove the corner from the backing with tweezers, place it in a lamp for drying gel polish and heat it for about 10 seconds. Be careful not to heat up the adhesive surface. When the film becomes soft, transfer it to the nail, smoothing it with a silicone pusher. We cut off the excess on the free edge with a special file for thermal films and remove it. To secure the design, cover the nail with two layers of top coat.
How to apply transfer foil correctly?
Transfer foil is the most convenient to work with, so we recommend it for beginners. For the design you will need a standard set for preparing nails for manicure, tweezers, glue, silicone sticks, gel polish and shiny decor.
Operating rules (apply to glue):
- We push back the cuticle, remove the shine from the nail and degrease it.
- Apply the base, sealing the free edge.
- We dry it in the lamp for the prescribed time. If the nail is thin, cover it with a second layer of base or strengthen it with acrylic powder.
- Apply the selected shade of gel polish, one or two layers, dry each well.
- Stir the glue well so that there is no separation of the composition. Cover the surface of the nail with a thin layer. It is very important to do this in a thin layer, otherwise there will be no necessary adhesion. Avoid contact with the sides and cuticle; it is better to retreat 0.5 mm.
- Air dry the glue until the milky tint completely disappears. How long this will take depends on the air temperature in the room and the quality of the glue itself.
- We take foil. The main thing is not to get confused about where the side that will be applied to the nail is. Remember: the manufacturer always folds the film in sheets with this side inward. Cut a piece to cover the nail plate. This can be done with a finger, a pusher or a stick, as you wish. Press well, smooth over the surface and remove sharply. The foil design remains on the nail plate, and the film is in your hands.
- Carefully remove unnecessary remnants of decor from the finger with nail scissors or file it with a nail file. Do not get carried away so as not to spoil the coating. 2-3 movements are enough.
- We cover the design with a finish with a sticky layer 2 times so that the foil does not peel off - the first layer is very thin, the second is a little thicker. Dry each layer in a UV lamp for 3 minutes (or 1 minute in ICE). Don't forget to seal the end of the nail. The top not only secures the design, but also enhances the shine of the metal particles.
Before applying the top, wait a minute or two so that the decor can better adhere to the adhesive base. This way the manicure lasts longer and does not peel off.
It’s a little faster to print foil onto gel polish without glue:
- Preparing your nails.
- Apply gel polish. Dry thoroughly, otherwise the material will slip on a wet surface (in LED - 1 minute).
- We take the decor and apply it to a sticky layer of gel polish. Gently smooth with a silicone sculptor or other tool over the entire surface, paying attention to areas near the side rollers and cuticle.
- We remove the leftovers. Everything is imprinted on the nail.
- Cover with top.
To ensure that the design lasts for a long time, follow the correct technology for applying gel polishes - remove the glossy layer and degrease the nail plate, paint over (seal) the ends. Don't forget the final top coat and the foil will last as long as you wear your manicure.
Design ideas
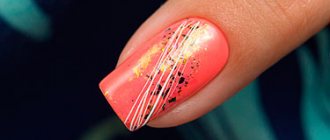
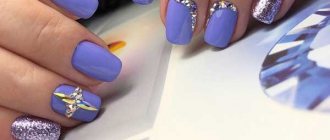
The trend this year is naturalness, so gold and silver still do not go out of fashion in manicure. Gold and silver decor looks beautiful on dark or bright colors, making them even deeper and more expressive. French, moon manicure, stripes on all fingers, an accent on several nails, on a matte or glossy background, a combination of foil with hand-painted, rhinestones and other decorative elements - you can choose a design for a holiday or everyday wear.
An interesting combination is a matte black moon manicure with a golden smile.
It's difficult to create patterns with transfer foil because you can't create clear borders. But for abstract drawings this is an ideal option.
For designs with geometric shapes, it is better to take self-adhesive strips. They will hide all defects and irregularities. If you use gel polishes of different shades in one drawing, they need to be dried separately. You can start creating compositions in stripes by drying each color well.
With foil it is easy to create a fashionable mirror manicure. The main condition for obtaining a sparkling surface is a perfectly smooth nail plate. If there are defects, it needs to be well leveled with a base.
"Broken glass". We cut the metallized film and lay it on the surface, simulating broken glass. How to cut strips correctly? Nail scissors are not suitable for this. It's better to take regular stationery. Cut triangles of different sizes from a sheet of foil. Rectangular fragments can be obtained by cutting the film vertically, then folding the sheet and cutting again horizontally. We use the same principle to make diamonds. You can make circles with a simple hole punch. The gel polish base can contrast with the foil or be the same tone as it. Metal fragments look impressive on both black and light.
Holography on a pastel background, despite its brightness, looks fresh and gentle.
Mesh foil. A film with an openwork pattern is applied to glue or a sticky layer of gel polish of any color. We remove it very carefully so as not to disturb the drawing. If you see that some element has not been printed, lower it back into place, press it with a pusher, and then remove it without sudden movements.
Casual craquelure design. We press on the sticky layer of gel polish in different places of the plate and tear off a piece of transfer foil. The effect is of worn, aged gold and silver.
donajerdona.ru
How to correctly transfer foil to gel polish
Instructions for using the IBX system. Questions and answers
IBX is the world's first indoor system. The penetrating and strengthening system works inside the nail, unlike most traditional products that act on the surface. IBX technology is aimed at maximum absorption and penetration into the nail plate.
Read completely
Single-phase or three-phase Bluesky gel polish system. What to choose?
There is a firm decision to buy gel polish for home use, but what to choose? What systems exist and which one is better? In this article we will look at the difference between the single-phase and three-phase Bluesky gel polish systems.
Read completely
Gradient on nails: photo ideas, tips and secrets, educational photos and videos
This year, gradient manicure - ombre - has gained particular popularity in the nail industry. It is an excellent basis for various designs. Let's take a look at the trendy types of gradient nails this season.
Read completely
Pearl rub: features of the new product, technique and subtleties of application on varnish and gel polish
There is never too much rubbing, and the nail industry annually presents to our attention new types of sparkling pigments for irresistible nails. Today we will introduce you to another new product that has won the hearts of ladies of all ages.
Read completely
Polygel (acrylic gel, polygel) - a breakthrough in materials for nail modeling
Acrylic gels (polygels) became a response to the wishes of nail artists to combine in one product all the advantages of two classical systems for modeling and designing artificial nails. This drug promises to become the most popular product of the year in the nail industry. Today we will introduce you to it in more detail and teach you how to work with acrylic gels correctly.
Read completely
odiva.ru