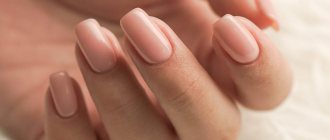
One of the most popular cosmetology services is nail extensions. Not every girl has long and strong nails; modeling (or extensions) can help her. This procedure allows you to forget about your hands for a month and look stylish and well-groomed. Extensions in salons are expensive, but if you want, you can learn everything yourself and do a manicure at home. You just need to be patient and work carefully.
Acrylic for nails
What is acrylic
The material for nail extensions is often acrylic. It is obtained by combining powder and monomer, which harden in heat. It takes up to 7 minutes to harden the surface, but the procedure is considered complete only after one or two days.
Acrylic nails are easy to remove. To do this, they are kept in a special solution. Acrylic nail plates do not require special care, but they are very durable and suitable for people who work a lot with their hands (cashier, cleaner, etc.). Their advantage is the ability to create a variety of designs.
Acrylic for nails: history of origin
Dentist Maxwell Lapp helped with his discovery many of today's fashionistas who prefer bright, long nails. In an attempt to stop his wife from biting her nails, he applied dental material to them, which later led to a revolution in the manicure business. Acrylic dental material was in great demand among manicurists, and dentists assisted them in this. This is how the world learned what acrylic for nails is. Subsequently, the technology for its preparation changed and improved; craftsmen changed the chemical composition of the material in order to rid it of the pungent odor. Subsequently, it was possible to create a gel that hardened only under ultraviolet rays.
Gel and acrylic: which is better?
What is better for nail extensions: gel or acrylic? All materials have their pros and cons, and before choosing, you need to weigh everything well. The difference between materials is not only in properties, but also in extension technology. The difference is not noticeable on the hands, so the choice depends more on the desire of the master.
Arched nail extensions
Before extensions, nails are filed and a small layer of natural gloss is removed. Then artificial plates are formed. The difference is as follows:
- Acrylic gel for nail extensions hardens faster and easier. The gel requires a special lamp with ultraviolet radiation. Gel polish should not be left in the open sun.
- The difference between the materials is in the removal of extended nails. The gel is cut off, the acrylic is removed with a special liquid.
- The gel was developed later than acrylic and contains additional materials. It is lighter and people get used to it faster.
- The gel base has a glossy surface, while acrylic has a matte surface that requires a varnish coating.
- The glassy surface of the gel can provide great opportunities for complex design patterns.
- The difference between gel and acrylic is the texture. The gel is less dense and allows the nails to breathe, protecting them from fungus.
- At low temperatures the gel becomes brittle (it is afraid of frost).
- Nail plates with gel coating grow faster.
When choosing a material, they primarily rely on experience and customer recommendations.
Important! During the extension procedure, try not to swallow dust when filing the edges. It can cause a sore throat and cough.
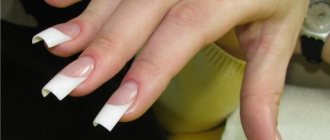
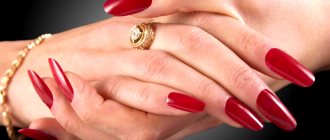
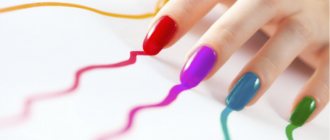
The result of acrylic extensions
Characteristics of acrylic paints
Acrylic paints can safely be called unique, since they have some properties that are not typical for other analogues. It has already been said that the material is suitable for any surface. This significantly expands the scope of its application. The paint is water-based.
Thus, during its production it is possible to obtain a dye of any consistency and viscosity. In addition, the evaporation of water causes the dye to harden.
As long as the water from the dye has not evaporated, acrylic paint remains liquid and is easily washed off with ordinary water. But after the moisture evaporates, polymerization of the acrylic occurs. It covers with a durable film that does not even interact with solvents. A layer of hardened paint is securely attached to the canvas and does not allow moisture to pass through.
The pigment in paint is only one of the components. Acrylic is a polymer that is also used by pedicurists for nail extensions. High speed of hardening and polymerization is a distinctive feature of the resin. Acrylic itself is transparent, so the presence of pigment in the paint is mandatory.
But the main feature is that during polymerization the resin does not affect the color shade in any way. The artist can be sure that the entire color palette will retain its original appearance after drying.
By the characteristics of acrylic paints we mean not so much technical parameters, since they are not understandable or interesting to everyone, but the main properties in which the materials are different or similar to analogues.
Moisture resistance allows the use of acrylic in the decoration of plumbing fixtures, as well as in the construction industry associated with high humidity. As for painting, here too this property plays a certain benefit.
The picture, painted with acrylic paints, is not afraid of water and other moisture. If a child decides to show his creativity not on paper, but on a special tablet, then his drawing will delight the eyes of his parents for a long time.
Acrylic hardens fairly quickly. The polymerization time of the resin is about two hours. This factor is taken into account both in painting and in everyday life. For any artist, it is important that the painting becomes transportable as quickly as possible. Considering that acrylic paints adhere well to any surface, they open up a wide space for experimentation.
There are certain features in the composition of the paint. The dye itself is added in the form of a pigment. It does not enter into a chemical reaction.
This means that it is possible to experiment with color.
First, the artist can create a preferred viscosity by adding the desired amount of water to the polymer. Secondly, adding additional color will not affect the physical properties of the paint itself. There is even an optical dye added to acrylic that glows in the dark. All that remains is to choose the appropriate color scheme.
Acrylic paints are capable of creating a palette, as they are easily mixed with each other. Those painters who are well versed in the theory of color production can save significantly by mixing their own shades on a tablet, rather than buying certain colors in a store.
The paint dries quickly, but not instantly.
Thus, after mixing the paint, you can continue experimenting for some time. According to most painters, the polymerization time of the resin is optimal. If desired, you can wait until one layer has set before applying subsequent layers of paint.
Acrylic paints are sold in jars or tubes. Paints in tubes are thicker. Their consistency resembles sour cream or butter. Since it is much easier to obtain thinner paint by adding water than to increase its viscosity, paints in tubes are in great demand.
Liquid paints are good in cases where it is necessary to form layers on a large surface, that is, for large-format work. Tube sizes may vary. The optimal volume is about 60 ml. Small tubes are convenient to take with you to the open air. Liquid paint cans are also available in a wide range of capacities.
For children, they usually buy jars of 55 g, but there are containers of 1 and 4.5 liters. Liquid paint can be further diluted with a special thinner or plain water, but this will require another container.
It is important to close the container tightly after work so that the water does not evaporate and the acrylic does not dry out.
It is necessary to remember the adhesive properties of the resin, so it is recommended to carefully clean the neck of the jar or tube so that you do not encounter problems when opening it again.
Acrylic nail extensions
Acrylic was first used to create dentures, until one of the dentists thought of giving his wife acrylic nails. The material quickly gained popularity. The working technique may be different, but they always keep in mind that the material hardens very quickly. Acrylic gel for nails is extended onto tips and forms. The first method is fast, it takes no more than an hour, but it is used for wide square or oval-shaped plates. Thin, sharp nails are difficult to grow. Extension to molds allows you to choose any type of plate.
Acrylic nail extensions
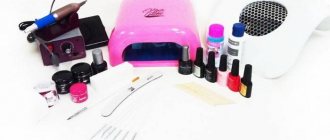
Having chosen the appropriate equipment, prepare the necessary instruments and tools for the work. You will need:
- Acrylic powder;
- Disinfectant;
- Glue for tips;
- Liquid for cleaning brushes;
- Finish coating;
- Special brushes, files, molds (or tips).
You can purchase a ready-made extension kit.
Important! There are contraindications for applying acrylic. It cannot be used for fungal diseases, diabetes and individual intolerance.
Tip extensions are a fairly simple procedure that can be easily repeated by a beginner.
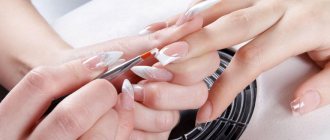
Step-by-step instruction:
- The hands of the master and the client are cleaned and disinfected.
- The nail plate is freed from the cuticle, removing the film underneath it.
- Using a file, remove the top layer of the glossy coating until a white surface is obtained.
- Tips are selected taking into account the shape of the nail.
- Glue is applied to the tip from the inside and the prosthesis is pressed to the finger.
- Sand with a tip file and remove dust with a brush.
- Degrease and treat with primer.
- Take the liquid with a brush, dip it in acrylic powder, put the composition on the plate and form a nail.
- They file, remove scratches and polish the surface.
- Lastly, you need to apply oil to the cuticle and rub it into the surface.
Important! You can't do without a primer. It increases the strength and durability of the manicure.
Extension to forms is more complex and requires skill. At the same time, you can realize any fantasy and make nails of any shape.
Description of work step by step:
- Hand disinfection.
- Removing the fatty layer from the nail plates with a file.
- Release from the cuticle.
- Lubricating the surface with primer.
- The shape is given a bend by putting it on the finger, and the primer is used again.
- Dip the brush into liquid and acrylic powder.
- The ball is placed on the mold, making a French and white tip.
- Dip the brush into the liquid and powder again, placing the ball in the center of the plate, forming a joint.
- The second ball is smeared near the cuticle and the surface is smoothed with a brush.
- The third acrylic ball strengthens the stressed area.
- After waiting for the material to dry, remove the forms and file down the sides of the nail.
- Sand the surface to a shine and apply cuticle oil.
Keep in mind! If you use less powder and more liquid, it will be easier to shape the nail.
Building up acrylic onto top forms is easier, takes less time and gives a flat and smooth surface.
Step by step working method:
- Hand cleaning and disinfection.
- Preparing the surface of the plate for extension, as in the previous method.
- Degreasing and selection of shape.
- Distribute 2-3 acrylic balls inside the mold using a brush.
- Press the workpiece to your finger and squeeze out excess material, waiting about 7 seconds.
- From the inside they give shape.
- Wait until the end of polymerization and remove the mold.
- File the edge and apply oil to the cuticle.
Important! Forms and types should not be confused - they are different things. Tips are disposable, forms are reusable materials.
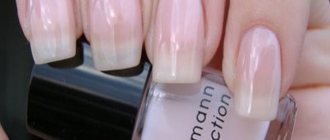
Acrylic nails
Acrylic is a plastic, hygienic and load-resistant material. It contains acrylic polymer and liquid monomer. When growing, the polymer and catalysts combine to form a soft plastic mass that quickly hardens and allows the base to be shaped, polished, and painted on the surface.
To get beautiful marigolds, follow the instructions and accurately carry out the work in stages.
Combined extension step by step
What you need for nail extensions
Acrylic and gel coating can be combined in two ways. They differ in the order of application, the number of layers and technique. The basis can be either acrylic or gel.
With an acrylic base, 2 types of nail production are possible:
- The acrylic base is coated with gel. That is, the nail is extended from acrylic, and the top is covered with gel for shine. In this case, there is no need to use varnish;
- interior design is performed using acrylic. With this technique, a layer of transparent acrylic is applied to the nail plate, and a design of colored acrylic paint is applied to it. Next, the nail is built from a transparent gel. The gel is applied, dried under a UV lamp, applied again and dried again. Then a layer of finishing gel is applied.
If an acrylic composition is created on a gel nail, then the nail itself is formed from the gel, and the design is made from acrylic. This could be tinting or stucco elements.
Combined extension
The master extends the nail according to the standard procedure for making a gel coating:
- hands are treated with a disinfectant;
- the cuticle is carefully pushed back;
- use a soft file to remove the top layer of the nail for reliable adhesion to the gel;
- the surface to be treated is degreased;
- then the template is placed. At the same time, you need to make sure that it “sits” correctly - it is not pulled up or down too much;
- at the next stage, apply the primer and dry thoroughly;
- Gel is applied to the nail and template to the required length. It is necessary to ensure that the gel does not get under the cuticle; to do this, the finger must be slightly tilted down;
- The coating is dried under the lamp for about 3 minutes;
- then you need to cut down the gel surface a little. This is done for a better connection of acrylic and gel. Acrylic will not adhere well to a surface that is too smooth. An acrylic pattern is attached to the prepared surface and everything is covered with gel;
- dries well again;
- the sticky layer is removed with a special product;
- after the gel hardens, the templates are removed;
- a special file is used to give the nail the required shape and length;
- after using a file, use a brush to remove all dust;
- The finishing gel is applied in a very thin layer. In this case, it is necessary to cover the junction of the polymer and the natural nail;
- dry again for 3 minutes under the lamp;
- the sticky layer is removed;
- Oil is applied to the cuticle and rubbed into the skin.
Note! Creating a gel nail with a voluminous design made of acrylic inside (sculpting) is a very delicate and painstaking work that requires a certain skill. Of course, such work cannot be called an everyday option. This manicure is performed for special occasions: weddings, anniversaries, and so on.
Pros and cons of the material
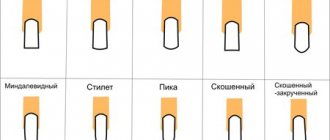
Forms of extended nails
Advantages and disadvantages of covering nails with acrylic
| pros | Minuses |
| Acrylic nails are easy to remove | Unpleasant smell |
| Acrylic does not require special care | Dull finish requires polishing and varnishing |
| Artificial nails can be repaired | Poor quality acrylic may turn yellow |
| The material shrinks unnoticed by customers | Healthy nails are a prerequisite for acrylic coating |
| Acrylic dust is larger, less volatile and less inhalable than gel | It is prohibited to apply acrylic if you have a fungal disease. |
| Possibility of creating any design |
How to make gradients with acrylic paints
Making a smooth transition of colors in quick-drying paint is really not easy.
If the area is small, then you can wet the acrylic paint with water directly on your work surface and create transitional colors.
It’s another matter over a large area. In this case, you will have to use drying retardants. They will slow down the rate of water evaporation and give you extra time to work.
Advice from manicurists
When you decide to get extensions, you need to keep a few things in mind to save time and keep your nails in excellent condition. It is important to know:
- When applying nail extensions for the first time, do not extend nails that are too long. Out of habit, they can get in the way; taking them off and putting them on again when needed won’t work. Only after getting used to hands with long nails can you go further.
- You need to be careful with artificial nails. You will have to get used to working on the keyboard, using the phone, and even opening door handles. Over time, long nails will become invisible and stop getting in the way.
- Having contacted the master at the salon and choosing the shape and design on their own, they explain their wishes to him in detail and listen carefully to the specialist’s advice.
- If you don’t like the first experience, you can remove acrylic nails ahead of time, but only a master should do this. Under no circumstances should you attempt this procedure on your own. This can damage the nails, then treatment will take a long time.
- Artificial nails can correct the imperfections of natural plates if there are defects. A beautiful manicure can influence a person’s character, make him more confident and get rid of bad habits.
- Artificial nails should not be tapped on hard surfaces, opened or bent, or used to bend anything.
- Extensions cannot be used if you are pregnant or taking antibiotics or hormonal medications.
Beautiful hands have always been and will be a symbol of a well-groomed woman. Not everyone has beautiful and strong nails. For those whom nature has deprived of them, extensions are a unique opportunity to forget about the problem and look stylish and fashionable. Acrylic manicure does not require special care and is quite durable. This achievement of our time allows us to experiment with different design options.
History and production of acrylic fabrics
In 1944, she developed a synthetic fabric, the serial production of which began in 1950. So, acrylic (fabric): what is it and what is it made from? This is an inorganic material with great strength and lightness, thermoplasticity and light resistance. Acrylic fibers are formed from a chain of synthetic polymers and are made in long continuous strands. Thanks to this, the acrylic fabric looks even, smooth, and the weave pattern of the threads is quite distinct. Acrylic is also popularly called “artificial wool”.
In 2010, the world was shocked by interesting news. It turns out that scientists have invented “liquid tissue.” The mixture applied to the body from a sprayer hardens, following the contours of the body, and turns into real fabric, which can subsequently be washed, ironed and otherwise used. In this way, you can make material from almost any fiber. Considering the softness and pliability of such fabric, one can only imagine how impressive the dress will look on an ideal figure.
How long does acrylic last?
Depending on the strength, correction of the extended nails will be required after 3-4 weeks. If you delay this, your natural nails may break.
Extensions not only allow you to make your hands look well-groomed, but also correct their natural irregular shape. The procedure acts as a strengthening of the native nail plates. Acrylic has no harmful effects on the body. You can paint it with paints or decorate it with sparkles.
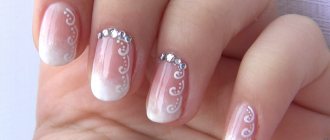
Design of extended nails
Technicians
If the decision was made in favor of acrylic rather than gel extensions, then you will also need to decide on the technique used, since there are different ways to work with this material. It must be taken into account that acrylic hardens very quickly, therefore, when carrying out the procedure at home, all actions must be distinguished by their efficiency.
All options for such extensions are discussed in more detail below:
- Extending nail plates with tips is the fastest option for the procedure, since it will take no more than an hour. This technique is ideal for those with square or fairly wide nails. The only drawback is the impossibility of creating a thin and pointed manicure, since the process of cutting out the desired shape will take too much time and take a significant amount of effort.
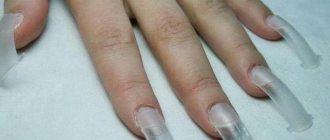
- Extension of nail plates on top forms. This technique involves laying out the working material in a special recess, which is located inside the mold, after which it is applied and pressed directly to the nail, ensuring uniformity and reliability of fixation.
- Extension of nail plates on lower forms. To carry out this procedure, you will need to use a brush, using it to lay out small acrylic balls. Using them as the main blank, you can make a whole nail of absolutely any shape and length.
Popular articles Macaroni tea set
Why do acrylic paints darken after drying?
When working with acrylic paint, you need to take into account one of its features; after drying, the paint will acquire darker tones.
Why is this happening. Everything is explained by the physical and chemical properties of the paint and its composition. Water evaporates from the emulsion, the concentration of pigment in the binder increases, so the tones are more saturated. This process is also called “wet to dry color change.”
It is most noticeable in dark colors and less noticeable in light colors. Everything comes with practice, so a beginner can be recommended to do coloring and various color mixtures until the eye gets used to distinguishing these moments as work progresses.
Features of painting with acrylic on fabrics
As a material, make your choice on silk or cotton fabric. The paint will adhere to these surfaces and will stick much better.
The fabric must first be washed, ironed and stretched onto the frame. If you are painting, for example, the front side of a T-shirt, be sure to place, for example, cardboard between the front side and the back so that the paint does not soak through.
A sketch of the design is made on the surface, which is then painted with acrylic. The product must dry for at least one day after this. Then the drawing must be ironed. And after another two days, the product can be washed. It is advisable to use the gentle cycle in the washing machine or hand wash.
If this is your first time drawing on fabric, then first take your old thing to try on it, because the whole idea may not work out the first time. You can use a stencil to create a design.
Distinguish acrylic paints from oil paints
The binding component of acrylic paint is water, and in oil paint it is linseed oil. Hence the name, acrylic paint is classified as water-based paint, while oil paint is oil-based.
This precisely determines one of the main properties of paint - drying speed. Water evaporates very quickly, so water-based paints, including acrylic ones, dry quickly. Oil paints take a long time to dry, up to several weeks.
Paintings painted with oil paints may turn yellow over time, and the intensity and saturation of colors decreases. The same cannot be said about acrylic painting. Acrylic paint does not change the brightness of the color over time.
To preserve the quality of the coating, it is preferable to treat a painting painted in oil with a protective layer of varnish on top. Acrylic painting does not require additional protection, since acrylic creates a durable film on its surface. The surface of an oil painting is prone to cracks over time. The acrylic layer is flexible, so the images are not subject to cracking.
Oil painting is sensitive to changes in temperature and moisture, while acrylic is resistant to such influences.
Some pigments used for acrylic and oil paints are not universal. They exhibit a certain chemical sensitivity to a specific environment.
Acrylic paint is universal. It is used in various techniques and can be mixed with various fillers, for example, sand, cereals, to give relief to the design.
In what genres can you paint with acrylic paints?
As you probably already guessed, you can paint with acrylic in absolutely any genre. These include all kinds of landscapes depicting nature, these are portraits with varying precision of detail, these are still lifes with images of fruits, bouquets and dishes.
The everyday genre, quite common, currently conveys the social life of a person. Historical will take you back in time. Battle - tells about battles and battles. In animal painting, the main characters are animals. And the nude genre glorifies the natural beauty of nudity.
Acrylic painting technique on glass
Painting with acrylic paints on glass is very fun. To do this, you will need slightly specific tools, such as cotton swabs or toothpicks, in order to make adjustments in the work.
The working surface of the glass must be degreased before work; for this it is advisable to use alcohol. Then a sketch of the drawing is made with a marker on the glass. Apply paint in layers, allowing time for each layer to dry. Use the brush to lightly touch the glass so that the acrylic lays as evenly as possible.