What's included in the nail extension kit?
For beginners, and even some professional craftsmen, it is sometimes more convenient to buy a ready-made set of materials than to type everything separately. The filling may vary and this is one of the most important parameters affecting the cost. What is included in the kit depends on the type of extension the artist plans to perform: gel or acrylic. There are also universal kits. Some also include design accessories.
Professional kit
The kits for specialists contain high quality materials. The filling depends on the type of extension that is planned to be performed. If a master is going to model acrylic nails, then you need to pay attention to kits with the following assortment:
- tips (a backing for artificial material to form a free edge of a certain length);
- cuticle oil;
- guillotine for cutting tips;
- base coat;
- forms;
- acrylic powder (several types, usually transparent, white, camouflage);
- natural bristle brush;
- liquid (liquid mixed with acrylic powder to form an artificial nail plate);
- glue;
- remover without acetone (liquid for removing artificial material);
- orange sticks;
- primer (a product that degreases the natural nail plate);
- antiseptic;
- mixing containers;
- files with abrasiveness 100/100, 180/180 and 180/240 grit;
- brush for removing dust from the surface of the nail.
The configuration of the collection for working with gel is significantly different. This includes the following materials and tools:
- tips;
- multifunctional product that works as a dehydrator, antiseptic, and liquid for removing layers;
- forms;
- top coat with UV filter;
- glue;
- cuticle oil (softens the skin, making it easier to remove with chopsticks);
- tip cutter (to adjust the length of the artificial substrate);
- orange sticks (for pushing back cuticles and removing stray lint);
- solution for removing the sticky layer;
- cream;
- primer (degreases the nail plate and provides it with good adhesion to the artificial material);
- scissors;
- dust removal brush;
- files with abrasiveness 100/100, 180/180, 180/240 grit;
- electric ultraviolet lamp (for home use, you need a device with a power of approximately 36 W with a timer);
- synthetic brush (flat, square or rectangular);
- buff 120/120/120 grit (a block with rough surfaces for final leveling and grinding);
- rhinestones, glitter and bouillons of several shades, other decorative accessories;
- gels.
It is worth saying more about the main material for extensions. The composition may include the following gels:
- basic (applied in a thin layer, serves as a base);
- sculpting (applied in several layers);
- single-phase;
- for finishing;
- colored.
Starter kit for nail extensions
Filling kits for beginners is a little easier. In the starter collection you can find materials of average quality, but its price will be affordable. This is the best option for artists who want to practice extensions. Standard basic sets may also differ from professional ones in that they contain neutral and most popular shades of acrylic and gel, for example, transparent, pink-beige, white. What may be included in the starter kit:
- materials for extension and correction (gels or acrylic powder and monomer);
- files of different shapes and degrees of abrasiveness;
- tips;
- cuticle care product;
- forms;
- lint-free wipes;
- UV lamp;
- primer;
- orange sticks;
- glue;
- a natural bristle brush for modeling acrylic nails or a synthetic brush for working with gel;
- wire cutters;
- buffs to eliminate roughness.
Necessary materials
In addition to the tools used for work, pay attention to the preparation of consumables and compounds that will be applied to the surface of the plate.
Gel
The main composition, which is used for extensions. It is spread over the mold and then dried in a lamp, creating a dense coating.
There are two variants of the basis used for the technique:
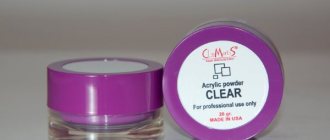
- Gel. A special gel that has a fairly thick consistency, which makes it quite difficult to distribute it evenly over the nail bed. The porous structure of the gel ensures that the nails remain in good condition when worn.
- Acrylic Powder. The powder is mixed with the liquid to a homogeneous consistency, and then the solution is distributed over the nails. Often acrylic has a rather aggressive effect on the sensitive area, which is why it is used less often.
The options differ in the method of preparation and application, so it is recommended to choose from them based on the girl’s convenience.
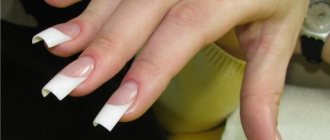
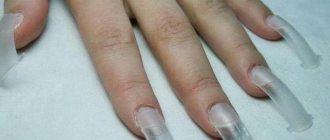
Tips
An alternative to extensions onto forms is tips. They are ready-made designs of artificial nails (blank or already designed), which you simply need to attach to your fingertips.
To fix the tips, a special manicure glue is used, which firmly bonds them to a smooth surface.
The main difficulty of working with tips is that you first need to pay attention to their selection, based on the size and shape of natural nails.
Primer
The primer should not be confused with a bonder or degreaser; all three compositions represent different stages of preparing the nail plate for applying a decorative coating.
The primer is needed to increase adhesion to the gel polish, which is why the pigment remains in the same state for up to a month or more. It is not a polymer, so it hardens spontaneously 20-30 seconds after application.
Cuticle oil
Any correction of the nail plate involves careful treatment of the cuticle. It involves cutting off the keratinized epidermis or simply pushing it aside.
In order to prevent the rapid growth of the cuticle after the end of the manipulations, to make it visually neat and natural, at the end of the session, nail technicians often apply a special oil to it. It will moisturize the epithelial cells, nourishing them with microelements. The oil should also be used after visiting the salon - 2-3 times a week before bed.
Finish
To prevent premature convergence of the extension result, you need to cover the gel polish with a finishing layer - top. It is applied in a thin layer, including the end of the plate, and then dried in a lamp for a minute.
The use of a finish should not be neglected, as it preserves the glossy shine of the nails and prevents chips and cracks for a long time.
At the end of the session, most often you need to remove the sticky layer from the top. For this, a special cleaner and a lint-free cloth are used; the solution can be replaced with a degreaser.
Sterilization products
A mandatory stage of preparation for extensions is disinfection of instruments. It needs to be carried out, regardless of how you stored it and how many people use it as a standard.
For home disinfection, you can use a regular alcohol-based antiseptic, which destroys most pathogenic microflora.
Salons use special ovens and the method of soaking instruments in an alkaline solution, only after which they are treated with an antiseptic. This three-step cleaning procedure for the devices used will ensure their absolute cleanliness and sterility; they can only be touched with gloves.
If you miss this step, if you accidentally damage the periungual area, you risk introducing dirt or infection into the body by transferring it through unsterile instruments.
Pros and cons of purchased collections
People considering whether to purchase a resource kit should be aware of its positive and negative aspects. Advantages of the collections:
- The kit will be cheaper than buying all the products separately.
- Purchasing the kit online will save you time.
- As a rule, the materials and tools included in the kit are correctly matched to each other, so they are easy to work with.
- The collection includes everything you need so that even a beginner can easily complete a full extension.
The kits are not without certain disadvantages. Their main disadvantages:
- Not all products from the same manufacturer are equally good. For example, one company may produce excellent acrylics, but low-quality files.
- Professional craftsmen will have to complete the set or replace individual components in accordance with their preferences.
- The kit includes products of a certain volume; you cannot choose one or another quantity.
Famous brands
Nail Creation is a well-known company producing materials and tools for the nail art industry. It has been operating in Russia for twelve years and has established itself here as a promising company with a wide range of high-quality products.
Catherine Nail Professional is a respected and well-known company with products in demand all over the world. A well-known manufacturer of materials for gel extensions, non-acid gels, tips, decorative varnishes and salon equipment. This company has more than 20 thousand salons around the world.
Professional Nail Systems - a company that has existed for over 30 years, has invented tips for extension technology and gels for three-dimensional design.
Nails undergoing extension procedures must be completely healthy.
How to choose a kit for nail extensions at home
It is difficult for almost any person, especially a beginner, to decide which kit to purchase, although the breadth of the range offered on the market is impressive. If you want to buy a nail extension kit, use the following tips:
- The quality of materials is directly affected by the manufacturer. It is not recommended to buy products from little-known brands, even if they offer a temptingly low price. Check out online reviews of different manufacturers. The opinions of craftsmen who have already worked with certain materials will help you make the right decision. The company must provide quality certificates for its products.
- It is advisable to immediately buy a collection that includes at least a minimum number of design accessories.
- There should be a lot of nail files in the kit, because they wear out faster than anything else. It is important that they have varying degrees of abrasiveness.
- If you plan to regularly do nail extensions, make sure that the set can be expanded. It is preferable to buy consumables from the same manufacturer in the future.
Distinctive features of gel and acrylic
The problem of choosing one of these materials is relevant for both craftsmen and clients. As a rule, women try both gel and acrylic nails, and then determine which they like best. With masters the picture is not too different. Some work only with acrylic, others exclusively with gel, but most specialists master both types of extensions in order to provide clients with the widest possible range of services. The durability of nails and their appearance depend not so much on the material as on the professionalism of the artist. The properties of the natural plate play a role.
Acrylic nails are obtained by mixing powder and monomer. When they react, these substances turn into a thick mass, which gradually hardens completely at room temperature. Features of acrylic:
- The material is easier to remove from the natural nail plate than gel. A special liquid without acetone is required.
- For the extension process, only a brush with natural bristles is used. First, it is dipped into the monomer, then dipped into the powder for a couple of seconds. The resulting ball is transferred to the nail with a backing (tip or stencil) and an artificial plate is formed. This is where difficulties arise. Firstly, you need to work with acrylic quickly, and secondly, it is difficult to guess the correct ratio of monomer and powder to obtain the desired consistency of the ball. These problems go away with experience.
- Acrylic nails are slightly thicker than gel nails, but they are not as brittle.
- No UV lamp is required to dry the material.
- The acrylic extension procedure takes less time than gel extension.
- Psoriasis - treatment and reviews
- Homemade oatmeal cookies: recipes
- What kind of fabric is viscose
The second material, unlike acrylic, is immediately ready for use and does not need to be mixed. Gel is a viscous and sticky substance with a consistency ranging from semi-liquid to jelly-like. Hardens under the influence of ultraviolet radiation. Peculiarities:
- The polymer gel plate is thinner than the acrylic one, and its strength is lower.
- Each new layer of coating must be dried in an ultraviolet lamp for a certain amount of time, otherwise it will remain liquid. The gel reaches a solid consistency only under the influence of UV rays.
- The coating shines very beautifully even without sanding or polishing.
- Modern gels are self-leveling. They immediately form a homogeneous, flat surface that does not need to be filed or sanded.
- The material does not emit an unpleasant odor.
- There is no need to rush when working with gel. You can do everything slowly and carefully, achieving the desired result. The material will still not harden until it hits the lamp.
Which is better - tips or forms?
Both of these consumables are used to model the shape and length of the nail. A novice master may have questions about what is preferable to use. The choice should be made based on the shape of the natural nail. The tips are glued to the free edge. It is cut to the required length, the surface is filed down and modeling material is applied on top. Tips are not suitable for nails that are too wide and curved down.
The form is made of thick paper with an adhesive base. It is placed under the free edge, and material is applied on top. Using special marks on it, it is easy to give the desired shape and length to the artificial nail. Thanks to the shapes, the line of the nail plate is more aesthetically correct, but they are more difficult to use. If you plan to work with clients, it is better to master both types of material and use one or the other based on the characteristics of the natural nail plate.
Features of acrylic and gel
There is no clear answer to this question. To choose, you need to analyze the features of one and another material, choose the one you like best.
Acrylic is formed by mixing powder and liquid. For nails, these products are considered quite safe. The advantages include easier removal from surfaces.
Features of the gel:
- Acrylic nails are slightly thicker than gel nails.
- The gel coating has a natural shine.
- The coating is less durable than acrylic.
- Has no smell.
- You can work with the gel slowly and be careful, since it does not harden without an ultraviolet lamp.
- Self-leveling, the surface is created smooth and uniform.
- Drying of each layer of gel coating is carried out in an ultraviolet lamp.
Features of acrylic:
- Acrylic may have an unpleasant odor.
- After mixing the powder with the liquid, you need to act quickly enough.
- Removing the coating using acetone-containing liquids.
- The extension process is faster than the previous method.
- No UV lamp needed.
- The nails are quite thick and strong.
How well the new coating will hold up and look depends not only on the choice of gel or varnish and the professionalism of the person doing the extension, but also on personal characteristics, the properties of the nails, and the shape they take as they grow.
Where can I buy
Purchasing a set is profitable because, on average, its price is 25% less than the cost of consumables and tools separately. Beginners can choose kits in retail stores or online. Very cheap goods, for example, are presented on the Aliexpress website, however, sometimes you have to wait a long time for orders. Professional craftsmen are advised to pay attention to the products offered in specialized nail industry stores. As a rule, high quality kits from well-known manufacturers are presented there.
Best Starter Kits
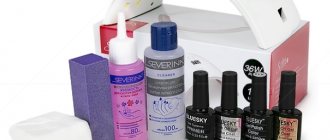
An inexpensive “For Beginners” kit is offered by Masura. It includes:
- LED lamp 18 W, white;
- base, top, colored varnish in the shade Petals of red;
- sticky layer remover, Dadi Oil and accessories.
All products are optimally suited to each other, easy to apply and polymerize with high quality. Cuticle oil will provide additional care.
If you plan to do not only a manicure, but also a pedicure yourself, then choose the “Optimal for Home NEW” set, which includes:
- UV lamp ruNail with a power of 36 Watt RU 818, which has a convenient shape and large size;
- Bluesky base and top;
- degreaser and Artificial Nail Remover from In'Garden;
- Dadi Oil cuticle oil, cleansing gel for hands and feet.
The set does not include colored gel polishes or accessories; you can purchase them additionally. Protecting the skin from aging and disease - sunscreen for the face against age spots.
Girls who prefer maximum durability of their manicure are recommended to use rubber-based gel polishes, for example, the Cody brand.
The Kodi Beginner Basic Set includes:
- UV 36 W or LED 9 W lamp;
- base, top, colored varnish Kodi 7 ml;
- degreaser and coating remover from Severina;
- accessories: universal abrasive file, sander, 5 orange sticks, pack of lint-free wipes 100 pcs., adhesive foil tape for designs and stencils.
With this set you can perform manicure and pedicure without leaving home.
Price – from 5000 rub.
How much does the kit cost?
The price of the kit depends on many parameters. The cost of the kit is influenced by the number of materials and tools included in the composition, the presence of accessories for decoration, and the brand. Approximate prices for popular sets:
| Name and manufacturer | Equipment | Cost in rubles |
| NOGTIKA, Acrylic extension kit |
| 1590 |
| Runail, Gel nail extension kit |
| 2210 |
| NOGTIKA, Set for gel extensions |
| 1790 |
| EzFlow, Competition Powders Proline Acrilyc Kit, Professional kit for modeling acrylic nails | Contains all necessary consumables and tools. Designed for 35 full procedures. Includes:
| 9360 |
| Irisk Professional, Set for gel nail modeling |
| 1410 |
| EzFlow, Get It! Cover Gels Professional Kit | Set for 55 full extensions, containing:
| 8030 |
| Patrisa Nail, Starter set No. 1 “Gel nail extensions” | Suitable for working at home. Compound:
| 2575 |
| .Ibd., Traditional UV Gel Student Kit, Student kit for modeling gel nails |
| 5090 |
| InGarden, Starter kit for acrylic + gel extensions | Contains materials for 25-30 procedures. Set contents:
| 10660 |
| Irisk Professional, Acrylic nail extension kit |
| 1220 |
Step-by-step instructions for nail extensions using tips
- Treat your hands with antiseptic and wait until dry.
- Use an orange stick to move the cuticle.
- File your nails to the shape of the tips.
- Sand the surface of the nails with a buff.
- Re-treat your hands with antiseptic.
- Select the tip size for each plate.
- Apply a little glue to the hole of the tip and press it to the edge of the nail for 10 seconds. Remove excess glue with a napkin.
- Use a tip cutter to give the desired length and create a shape with a nail file.
- Treat the entire surface of the plate with a buff and sweep away the dust with a brush.
- Apply primer to the natural nail area and wait until dry.
- Cover the surface with gel. You can rotate your hand to distribute the gel evenly.
- Dry the nail for about 3 minutes in a UV lamp.
- Reapply the gel and dry again.
- Remove the sticky layer with a special solution.
- Degrease nails and apply finishing product.
- Dry your nails one last time.
- Remove the sticky layer with a solution and treat the cuticle with a special oil.
The process of gel nail extension on tips
Gel nail extensions
After the extension procedure, it is advisable to take vitamins containing calcium so that natural nails do not weaken.