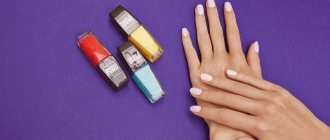
Hardware manicure and its advantages
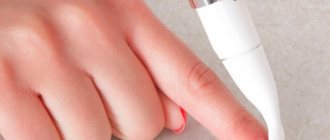
Hardware manicure is a type of manicure in which manipulations such as removing the cuticle, treating the side ridges and sinuses of the nail are done using an electric machine (apparatus) and replaceable attachments (cutters) of various shapes. This method of treating nails and the skin around them is now the most common among masters.
And this is easy to explain by its obvious advantages:
1. Security. Unlike classic manicure, where cutting tools are used, the likelihood of injury is virtually eliminated.
2. Long lasting effect. Nails look well-groomed and tidy for two weeks. And by regularly moisturizing the cuticle, this period can be extended.
3. Cost-effectiveness in the long term. Of course, you will first have to spend money purchasing the necessary tools, but in the end it turns out to be a very profitable investment.
However, with all the advantages, it is worth noting that you will first have to carefully study the theory, watch a single video lesson, or even take specialized courses on performing hardware manicure. Because first you should learn how to select the right attachments for the required manipulations, set the required speed for this in order to avoid injury to the nail plate.
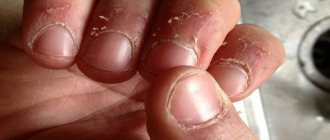
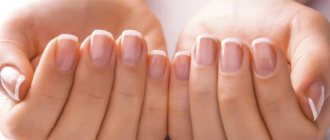
Manicure: nail cuticle care
Hand care at home begins with treating the cuticle and softening it.
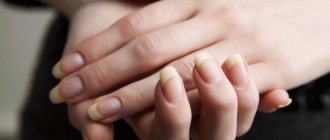
When it dries out, hangnails appear on it and it ceases to perform its functions of protecting the nail. An unkempt, dry cuticle can cause inflammation of the nail plate and a fungal infection.
You can soften the stratum corneum with a bath of warm water. To heal and strengthen the nail plate and relieve irritation, you can add sea salt to it. Hands are immersed in the solution for 10 minutes.
After the softening procedure, dry your hands with a soft cloth.
Then, we take a stick carved from an orange tree in our hands and carefully push back the cuticle.
Next, the cuticle is removed with special nippers or nail scissors. Nourishing cream is applied to the hands.
Trimmed manicure is a classic one. It is considered the best for neglected nails. But when using it, it is important to work very carefully so as not to harm the cuticle.
A step-by-step trimmed manicure looks like this:
- filing the nail plates to give them the required shape;
- soaking your hands in a bath with a warm solution of sea salt;
- moving the cuticle away from the nail with an orange stick or metal pusher and then removing it with nail scissors or clippers.
After removing the keratinized layer of the cuticle and cleaning the area of the side rollers, the hands are soaked again and the cuticle is pushed back. Nourishing cream or oil is applied to your hands. The skin of the hands is massaged until they are completely absorbed.
Fact about manicure
In the Middle Ages, during the heyday of witch hunts, you could pay with your life for a beautiful manicure. Well-groomed, painted nails were considered a sure sign of witches.
Trimming isn't the only way to get rid of dry cuticles. It is not suitable for all hands. Due to the close location of capillaries to the surface of the skin, there is a risk of harming already thinned skin. Droplets of blood will begin to appear on the surface, painful sensations will appear, and infection may enter the wounds.
View this post on Instagram
Posted by Unreel (@extremeofficial)
There are several methods of manicure aimed at strengthening and healing the nail plates, making your hands soft and attractive:
- Hardware – carried out on special equipment. Removal of dead skin cells is carried out using various replaceable attachments without damaging the cuticle. Along with the cuticle treatment, minor damage to the nail plate, such as unevenness and splitting, is removed. The procedure is quick and painless. But before you start using the device, you should familiarize yourself with its operation. You can perform a hardware manicure 2 times a month.
- A European manicure differs from a classic edged manicure in that the stratum corneum of the cuticle is removed with an orange stick or anything with a rubber tip. Before removal, special softening cosmetic oils are applied to the skin located near the nail. European manicure is one of the most gentle and neat. It is safe for those whose capillaries are located close to the surface of the skin.
- The method for cleaning the cuticle with fruit acids is based on softening the rough skin to such a state that it is cleaned from the surface of the nail plate using an orange tree stick.
Care must be taken when using cuticle removers. Excessive exposure of them on the nails can lead to injury to the nail plate and cause burns.
What tools are used for hardware manicure?
The necessary tools can be divided into basic and additional.
The main things you will need to purchase are: • A machine or milling cutter for hardware manicure,
• Nozzles or cutters (often as accessories with the device).
Below we will talk about each of them in more detail. Additionally, it is recommended to have:
• An exhaust hood for collecting small particles that fly during operation of the device,
• Disinfector and sterilizer,
• Consumables (orange sticks, cuticle oil, brush, personal protective equipment, etc.)
Advantages
The gel polish dries for two minutes under a lamp, after which it is not afraid of any scratches or smudges. Worn from two weeks until the nails grow and the presence of an empty space on the nail calls on the fashionista to change her manicure. Apply with a brush, just like regular varnish. Until the varnish has hardened under the lamp, you can work with it and adjust it if not everything turned out smoothly the first time. If you do everything correctly, it will look weightless on your nails. The gel polish retains its glassy shine throughout the entire wear time, as if you had just applied it.
How to choose a manicure machine
The choice of devices is now especially diverse.
But this tool is not cheap, so you should approach its purchase responsibly. • Firstly, you probably already know where you will use it - only for yourself or to work with clients on-line. Devices used for home use are smaller in size, power and speed of rotation of the nozzles - 20 thousand revolutions and 35-50 W of power are enough. For salon manicure, choose machines from 25 thousand revolutions per minute and a power of 100 W.
• If you need to go to a client’s home, then pay attention to a device with a built-in battery, or one that runs on batteries. It is usually lightweight and quite compact to carry.
• If you are a beginner, then first take a machine with a set of cutters selected for it, which are not so easy to understand given their huge variety.
• The machine must have a reverse function (rotation of the attachments in both one and the other direction).
• Clamping of attachments on the handle can be manual (you need to tighten it), semi-automatic or automatic. For the interior, it is better to take the latter option - it will save time on replacing cutters, but will also cost more.
• The strength of the noise it makes depends on the engine the machine is equipped with. In expensive models it is almost inaudible.
One of the most determining factors when purchasing a device is its price. Know that a high-quality device will not be cheap. If you are looking for a balance between price and reliability of a router, then pay attention to this model.
Pros and cons of regular varnish
Regular varnish has advantages in the form of a different palette of colors and a relatively low price, and you can change it every day. But the downside is that regular polish takes a long time to dry and does not stay on the nails for a long time, and even some have a very strong and unpleasant smell. With constant contact with water, the varnish on the tips breaks off, and the manicure no longer looks perfect.
For those fashionistas who don’t have much time to dry and constantly change their manicure, gel polish is suitable.
Master class on performing manicure with a machine
1. The first step is to prepare your hands. They need to be washed with the product, dried and disinfected with an antiseptic.
2. If there is an old coating on the nails, then we proceed to remove it. To do this, select a cone-shaped nozzle from the set. We hold it sideways in relation to the nail and, without strong pressure, remove the gel polish layer by layer. We work on the sides of the nail and at the cuticle with the tip of the cutter.
3. Correct the shape of the free edge. Here you can work with either a milling cutter or a file that is more familiar to you.
4. Let's start processing the cuticle.
a. We lift the cuticle. The keratinized skin can be lifted either with a cutter (for example, a rounded cylinder) or with an orange stick. The movements are smooth and do not put pressure on the skin. The cutter constantly moves parallel to the nail and does not stay in one place so as not to make a cut. Use reverse in your work: the hand moves to the left, and the router rotates to the right and vice versa. First, the nail is processed in one direction, then the reverse is switched and we work in the other.
b. To get deeper into the sinuses of the nail and remove the pterygium, change the cutter to a needle-shaped one.
c. At the same time, we grind the side rollers.
d. We cut off the raised cuticle with a finely abrasive ball-shaped nozzle. The movements are performed in the shape of a smile from one side roller to the second.
e. We complete the cuticle treatment by polishing the skin with a soft conical nozzle with a rounded end.
5. Shake off excess dust with a brush.
6. To complete the hardware manicure, apply oil to the cuticle area and rub it in in a circular motion.
Manicure at home: business plan
First, you need to decide on the costs. Despite the fact that this is the most budget-friendly option for starting your own business, you will still have to spend money on some items necessary for your work. We tried to choose the most optimal and economical solutions for you.
- Work table. A manicure table that is convenient for both you and the client costs about 5-7 thousand. The cost varies depending on the manufacturer, configuration and size. We suggest you purchase a regular desk, but without a back partition. Of course, you will have to look for a suitable model, but most likely, it will cost significantly less than professional furniture.
Photo from the site do.ngs.ru
- We suggest that you buy all tools not in expensive professional salons, but order them from China. In this article you will find out which sites are the most profitable. It's much cheaper, and the quality won't suffer one bit. If we compare, the average price, for example, of a lamp for drying varnish is about 5 thousand, and the same price among sellers in China is about 1000-2000.
- In addition to tools (files, buffs, orange sticks), you will need a sterilizer - from 2 to 5 thousand.
Photo from the site Manikyres.ru
- And, of course, varnishes, gels and care products. it all depends on you and your capabilities. But the optimal set of colors that can be offered to clients will cost approximately 5-8 thousand rubles.
In order to understand pricing, it is best to go to the nearest salons and find out the prices for the services that you are going to include in your price list. Study the prices of your competitors and set yours depending on these numbers and your skills. For example, if you are just learning how to make a certain design, it would be right to discount it. This way you will attract clients and be able to practice so that you can raise the price later.
Errors when working with the device
Errors during training are not excluded, but they can be minimized if you know many of the nuances in advance.
• When working with the device, your hands must be dry; you do not need to apply any products or oils.
• When learning to use the device, do not set the machine to high speeds, as this often leads to nail injuries.
• Use cutters for their intended purpose. Many beginners choose bullet and flame cutters to lift cuticles. However, they leave cuts.
• Select the correct abrasiveness. If the cuticle is hard, then you can take a coarser cutter, and if it is thin and soft, then you should use a cutter with red or yellow markings.
• Let the device rest. To prevent it from overheating, the machine should be stopped during operation.
• When polishing, do not hold the cutter in one place or close to the edge of the nail plate.
• Clean the cutters after working with the machine. The attachments need to be disinfected and cleaned of sawdust. Otherwise, this will not only reduce their service life, but also lead to problems with nails and hand skin.
A few words about disinfection and sterilization
Speaking about hardware manicure, one cannot help but touch upon the topic of sterilization of instruments and their disinfection after work.
This must be done after each use of the device. Minimum treatment consists of placing the cutters in a special container with a disinfectant for 15-20 minutes. After this time, the nozzles are removed and washed under running water, after which they are wiped dry with napkins.
The second stage of instrument processing is its sterilization in a dry-heat oven at high temperatures. Special craft bags are used to store sterile instruments.
Only this procedure can guarantee the health of you and your clients!
A little history of manicure creation
The first varnishes appeared in the 20th century. They were the same light pink color, poor quality and only stayed on the nails for a couple of days. Along with varnishes, removers began to be sold. In the 30s, varnishes of different colors appeared on store shelves.
In the 80s, the technology of nail plate extensions with helium was developed. In beauty salons, nails began to be decorated with paintings.
In fact, the ancient Egyptians used henna to color their nails.
The pharaoh's wife, Queen Nefertiti, painted her nails red, Cleopatra preferred colors with shades of gold.
In ancient times, not only the female population, but also the male population took care of their nails.
Men of a higher status painted their nail plates black, while the lower class used green for coloring.
View this post on Instagram
Posted by Unreel (@extremeofficial)
In those days, nail paint included beeswax, gelatin, and clear acacia resin. The color of this coating was given by vegetable dyes, mainly red shades.
To color the nails of the nobility, gold and silver powder were added to the composition.
At that time, already in China, gold overlays inlaid with pearls existed for the emperor’s nails.
Over time, nail art has undergone many changes; from the privilege of the upper classes, it has become the property of the general public. Currently, many salons are open to strengthen and improve the health of nail plates, give them an attractive shape, and decorate them with painting, rhinestones, and foil.
True, not all women have time to visit salons; they try to take care of their hands at home.
The procedure is simple, anyone can master it. In this article we will try to teach proper care of the hands, giving a beautiful shape to the nail plates, and restoration of the gel coating.
What are online courses?
A person’s desire for development leads to the fact that he is constantly in search of new knowledge and skills. If previously it was possible to gain knowledge only by attending face-to-face classes, now you can do this without leaving your home. Here, masters of their craft offer video courses, webinars, and online workshops. But at the same time, you can ask a specialist questions. For this purpose, special group chats can be opened, or the question can be asked during a live broadcast.
Such training has many advantages, for example, the opportunity to study at any convenient time and place. The same cannot be said about full-time training. This requires presence at a given time and place, and this will also require additional travel time. And with the modern pace of life, every free minute plays a big role. Also a big plus will be the lack of direct contact with other students and the teacher, which is very useful during the quarantine period. Also, if the classes are provided in the form of video lessons, then they can be reviewed more than once, which will allow you to better understand and assimilate the material.
Well, as in any business, there are drawbacks. If the teacher is located in a different time zone from you, and the lessons will be held in the form of live broadcasts, then difficulties may arise with time comparison.
Everything you need to apply gel polish
You can learn how to do a manicure from scratch, just like in a salon, using gel polish, if you follow some rules. Also for these purposes you will need to purchase some tools, materials and devices.
Tools:
- Cuticle nippers.
- Scraper.
- Files with different spray fractions and a buffer for polishing the nail surface.
- Orange sticks for correcting application and removing old coating.
Devices:
- Device for hardware manicure with cutters.
- UV lamp.
Materials:
- Liquid for degreasing and disinfecting the nail plate and for washing off the sticky layer.
- Base coat.
- Gel polish of the required shade, preferably several.
- Top coating.
- Lint-free wipes and cotton pads.
- Cuticle oil.
Application technology
Learning how to do your own manicure like in a salon is easy and simple. You just need to follow the rules and do everything step by step, carefully and patiently. Painting nails with gel polish is not done quickly; it requires an average of about two hours of time. For beginners, maybe more. The main thing is to hone your technique and not skip any of the points. You need to start with a simple classic manicure:
- Using a scraper blade, you need to push back the cuticle.
- Using pliers, carefully cut off the cuticle with a single strip.
- Using a manicure machine and a rough file, you need to smooth out the rough skin around each nail.
- Using a buff, lightly remove the thinnest layer from the surface of the nails. You don’t need to rub each nail long and hard, but just roughen the nail plate a little. This is necessary for the best adhesion of the nail to the coating.
- Apply degreasing liquid to a lint-free cloth and wipe each nail, around it and under the nail. After this, you should not touch your face with your fingers, scratch your head or touch the nail plate.
- The base coat is applied in a thin layer like regular varnish on the entire surface of the nail and on the nail end. Apply first to only one hand.
- The hand with the applied layer is placed in an ultraviolet lamp and kept there for two minutes. If the lamp is equipped with a timer, the light will go out after exactly two minutes.
- Gel polish is applied to the base layer. The first layer should be thin. It is important to paint over the free cut of the nail on all sides, so the gel polish will last a long time and will not peel off.
- After each gel layer, it must be dried in a UV lamp for 2 minutes.
- When the desired effect is achieved, the top coat can be applied. Using the top, you can correct unevenness and bumps on the surface of the nail.
- The final drying is done in a UV lamp, then the sticky layer of the top coat is wiped off using a cotton pad and degreasing liquid.
- Cuticle oil is coated on the cuticle of each finger and rubbed in with massage movements.
All of these actions must be done from start to finish for each hand separately. This will protect your nails from getting lint on the sticky layer of your unfinished manicure.
After a manicure, you must refrain from any contact with water for two hours.
During the entire period of wearing gel polish, it is important not to do extreme things with your nails, such as opening bottles and cans. To make gel polish last longer, you do not need to file the nails covered with it and try not to cling to rough surfaces with your nails.
Sakramel. Online manicure training
Description. Sakramel online school offers comprehensive nail art training from scratch. They have prepared a selection of useful courses, after completing which you will be able to immediately attract your first clients and earn income.
By paying the full cost of all courses, you will receive:
- 78 hours of video lessons containing maximum useful information.
- 18 online lessons with instructor support that will make you a true professional.
- Constant support from experienced teacher Marina Litvinova.
- An international certificate that will be an official confirmation of your qualifications.
- Access from any device: you can watch lessons not only from a computer, but also from a tablet and even your smartphone.
- Video lessons in high quality, which allows you to view in detail every small detail shown by the teacher.
The most important thing is that after completing all courses, you will have lifetime access to them. This way, you can view them at any convenient time to refresh your memory and consolidate existing skills.
TOP 10 courses on copywriting training - the most complete overview, only the best training programs
Copywriting is one of the most popular professions in freelancing. However…
Authors: Sakramel.
Cost: from 1,490 rubles per month for all courses.
Pass the course
Types of manicure courses
Most often, courses offer three training programs:
| Program | Description | |
| 1. | Starting | It is chosen by those who want to learn how to do manicures for themselves and their loved ones. It costs less than others, but it includes theory, practical exercises and video lessons. |
| 2. | Standard | It is suitable for beginners who plan to take care of their nails professionally in the future. After completing the entire proposed course, the student must pass a test, after a positive result of which a certificate is issued. |
| 3. | Professional | This program includes more practical sessions with a teacher, assignments on live models, group and individual consultations, and discussion of problems in special forums. At the end of such a course it will be necessary to pass exams in theory and practice. |
Infohit. Classic manicure
Description . This training program is intended for those who want to learn how to do a classic manicure. Today, with the Infohit online school, you can do this right at home, without attending classes in person.
The best courses on contextual advertising in 2022 - only top schools
The best courses that will make you a contextual advertising professional.
In this course you will learn:
- how to properly disinfect tools for safe work;
- how safe it is for the client to work with wire cutters;
- how to perform a classic manicure in accordance with modern requirements;
- how to organize your workplace to achieve maximum efficiency;
- how to remove old coating, prepare work area and apply new coating.
The course program includes 17 lessons. The first part consists of 10 lessons, they are aimed at theoretical information. The second part, respectively 7 lessons, are practical exercises, thanks to which you will gain your first experience.
The main advantage is that after completing the courses you will be awarded an official certificate, which confirms the completion of training and advanced training. If you take a responsible approach to learning, you will soon receive all the necessary skills to open your own business and work with your first clients.
If you want something more, I advise you to look at fashion design courses. In this profession you will be able to realize your full creative potential and at the same time receive a stable and high income.
Authors: Infohit.
Cost: full price – 3,500 rubles. There is currently a discount, the price has been reduced to 747 rubles. The first lesson can be viewed for free.
Pass the course
Infohit. Nail design using the embossing technique
Description. If you are already working as a nail technician, you need to learn something new, upgrade your skills and attract new clients. In this online course from Impulse, you'll learn how to use multiple colored gel polishes in one job and create beautiful images.
Upon completion you will learn:
- create beautiful patterns in the style of “chasing”;
- create unique drawings in bas-relief style;
- use a special technique called “casting”;
- create designs with a metallic effect that will appeal to every client;
- work with gel pastes of any color and combine them in one composition.
Immediately after training (thanks to the presence of practical classes in the program), you will be able to offer your regular customers a new service, as well as attract new ones. This will have a positive impact on your income.
Website creation courses: TOP 12 best training programs for beginners
The popularity of IT professions is growing every year. One of the popular destinations…
You will still have a certificate of advanced training. It can be shown to clients to prove your professionalism.
Another option for realizing creative potential is furniture design courses. This is an excellent option to obtain a profession that is in demand on the labor market and highly paid.
Authors: Impulse.
Cost: full price – 3,200 rubles. There is currently an 86% discount and the price has been reduced to 447 rubles. To familiarize yourself with the course program, you can watch the first lesson for free.
Pass the course