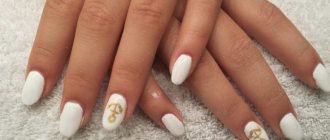
Every girl has at least once tried to create designs on her nails, because it’s so nice to feel like a real artist when your own hands are the canvas for creativity. The creative process of drawing is impossible without the main tool of any artist - a brush. In the nail industry, there are manicure brushes that are divided into categories based on their shape, the thickness of the bristles and the material from which they are made. From our article you will learn what these tools are for creating designs on nails, in what situations they are used and much more.
What you need to know about nail design brushes?
To learn how to create beautiful designs on your nails, it is not at all necessary to have professional artistic skills. With the help of a properly selected brush and some experience, you can create beautiful nail art yourself. The choice of a manicure brush depends primarily on the result you want to see on your nails .
Nail design brushes are classified according to the following parameters:
- According to the material.
- According to the thickness and shape of the pile.
Let's take a closer look at each of the categories of brushes, with which you can create designs of any complexity on the surface of your nails.
Care
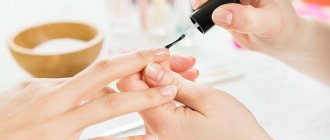
You should know not only which manicure brush is intended for what, but also about the rules of care. Such tools can only be used for nail design. You should not draw on paper with them to avoid deformation of the pile. When using standard paint instead of varnish, the hairs of the manicure brush usually fall out.
Not only does prolonged contact of an instrument with water lead to a change in its shape, but also short exposure to liquid causes the loss of its original appearance. Hot water will improve the appearance of the brush.
To prevent the varnish from drying out on the villi, they must be washed after performing a manicure. If this is not done in a timely manner, acetone will have to be used for cleaning, which damages the structure of the fibers. The pile wears off quickly when using a texture with an uneven surface. To prevent this, do not rub the brush too hard on the napkin.
To increase the life of the brush, cuticle oil is applied to it after completing the manicure. Only washed and dried instruments can be placed in the storage case.
Natural and artificial brushes
As a rule, natural brushes for painting nails are made from kolinsky or sable wool. Thanks to the excellent quality of the pile, with proper care they will last you quite a long time. With this type of brush you can make designs on your nails using any type of paint.
Synthetic brushes, made from high-quality polymers, are much cheaper than natural ones, but will last you much less. Typically, artificial manicure brushes are the choice of beginner nail art masters who want to learn how to create simple designs on their nails.
What tools are needed for manicure at home: complete list
- 1
Tweezers and scissorsEven if you prefer an unedged manicure, you cannot do without these tools - you will need them to adjust the length of your nails and remove hangnails. Well, if you trim the skin at the base of your nails, tweezers or scissors are even more necessary. There is also a separate tool designed to cut off excess - this is a knipser (the official name of those same “nippers”). Its advantage is safety, which is ensured by the fact that its blades are slightly curved inward.
- 2
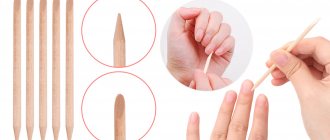
Tools for pushing back cuticlesWe are talking about a metal pusher and orange sticks. Both are used, as a rule, after softening the cuticle and applying a remover gel. It is believed that when using an orange stick you have less risk of injuring your nails, so it is preferable for home manicures.
Additionally, you can use a scraper (its second name is “dovetail”) - this is a manicure knife that is also used to process the cuticle. As a rule, it is very sharp, so it is more suitable for professionals. There is also a trimmer - a tool with a V-shaped blade that can easily cut a strip of cuticle; However, you need to act without pressure so as not to get hurt. Before you start processing the cuticle, we recommend that you read our instructions.
- 3
BathThis can be a separate container specifically for manicure or just a fairly deep bowl. It is filled with water and soapy water to soften the cuticle.
- 4
FilesIt is known that you cannot do without them, but not everyone knows what kind of files are needed for manicure. It is better to have several - with different abrasiveness (it determines the hardness of the working surface).
- 5
BuffThis is one of the types of files - the softest. Therefore, it is used to polish nails, giving them smoothness and shine.
- 6
Nail polish removerThis is a universal product that can be used to remove both regular and permanent coating. It is better to choose formulas without acetone so as not to harm the skin of your hands. Nail polish removers these days include caring components - for example, avocado extract can be found in the ingredient list of Gentel Remover from Maybelline New York.
Gentel Remover, Maybelline
- The products are sold in different formats: in a regular bottle or in a bottle with a special sponge soaked in liquid. Choose the option that seems more convenient to you.
- 7
Cotton padsThey are indispensable for removing gel polish, as well as correcting blots when applying color. Cotton swabs will also help correct inaccuracies.
- 8
FoilThis is necessary if you decide to remove the durable coating at home. Foil is used to wrap the fingers with cotton pads dipped in gel polish remover attached to the nails.
- 9
Degreasing coatingIt is applied to nails prepared for manicure so that the layer of varnish “adheses” better to their surface and the result is more durable.
- 10
Varnish baseThe base increases the durability of the manicure and protects the nail plate from the penetration of coloring pigments into the nail structure. High-quality base coats even out the nail plate, fill small cracks and prevent chipping. See for yourself - try All In One Base from Essie.
All in one base, Essie
- 11
Colored varnishWhat varnishes are needed for manicure? It’s good to always have several universal shades on hand: white, nude, red, black, and choose additional ones according to the occasion. You can easily find both in the Essie collection: from deep wine to bodily
- 12
Top coatingThis varnish seals the result. And it provides a beautiful glossy “finish” that gives the manicure a special shine.
For example, No Chips Ahead from Essie will do.
- 13
Means for express drying of varnishThey come in different formats: it can be a varnish, a spray, or a drip dryer like Quick-e from Essie.
The principle of operation is the same: the product creates a protective film that prevents layers of varnish from mixing and thereby speeds up drying. You can find more tips to help dry your polish faster here.
Drops for quick drying of varnish Quick-e, Essie
- 14
Cuticle oilThis product is useful at the final stage of manicure - oil is applied to the skin around the nails. Once absorbed, it saturates the skin with useful substances and gives your hands a neat appearance.
Cuticle oil Apricot, Essie
Take a closer look at Essie's Apricot product; it contains cottonseed, almond, soybean and sunflower oils.
- 15
Hand creamSince a beautiful manicure is not only neat, well-groomed nails, but also good condition of the skin of your hands, do not forget to use a moisturizer. Try, for example, cream from Kiehl's.
Classification of brushes by shape and size
The thickness of the bristles is determined by the generally accepted numbering of brushes with values from 0 to 8. Where 0 or 00 is an indicator indicating that this is the thinnest brush, and 8 is the largest, most often used for modeling artificial tips.
You can create beautiful designs using a brush of any shape, depending on what composition on your nails you want to bring to reality. Large elements require a thick brush, while small patterns and strokes require a more delicate and elegant painting tool. Let's take a closer look at each type of design brush.
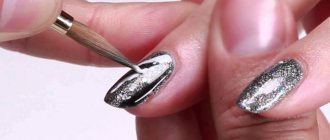
- A thin liner brush (hair) 2 mm wide has a bristle 2-3 cm long. This manicure tool is designed for drawing clear straight lines and filigree curls. With a thin brush you can quickly and beautifully recreate an animal print.
- The fan brush is distinguished by the fact that its bristles are presented in the form of a fan, with the help of which it is very convenient to apply glitter or sparkles to the nails, as well as shade colors and halftones. With this brush you can create a gorgeous manicure with an ombre effect. To do this, you need to apply several shades to the palette, pick up paint on a brush, the width of which allows you to cover all the colors, and transfer them to your nails. Also, a very beautiful and original design is obtained by lightly touching the surface of the nail plate with a fan manicure brush.
- A thin brush with a width of 0.5-1 mm. With its help, drawings in the form of graceful curls are perfectly created. Also, with a thin brush you can draw the perfect smile line in a French manicure and decorate any design with small elements. Using a thin brush requires dexterity and dexterity, so it is suitable for girls with some experience in the field of nail art who already know how to create patterns on their nails. It will be difficult for beginners to master this instrument the first time, especially on such a miniature “canvas” as marigolds.
- A flat brush is an ideal tool for painting wide patterns such as flowers, gzhel, etc. Using several different colors in the palette, you can recreate a stunning ombre effect on your nails with smooth transitions from one shade to another. Moreover, working with such a tool is not difficult even for beginners. The resulting drawings are distinguished by incredible depth and smooth lines.
- A petal brush is visually similar to a flat brush, but has a beveled edge. This tool is used in Chinese nail painting when it is necessary to create neat and beautiful petals. Drawings created with a beveled brush turn out to be very expressive and deep.
Knowing what types of nail design brushes there are, you can learn how to create the most unique, fantasy designs. If this is your first time deciding to do artistic painting, then spend some time learning. Start with simple patterns in the form of lines and dots, combining them into a single composition. When your hand movements become more confident and your drawings become clearer, you can safely begin to create more complex patterns.
The final video about the types of manicure brushes for painting on nails and their use will be very useful for both novice designers and more experienced nail art artists. Having learned how to decorate your nails yourself with beautiful designs, you will receive a lot of positive emotions from this process. A wonderful manicure and a great mood are the main components of a successful image that evokes admiration. Be beautiful!
How to use
Before determining which brushes are needed for makeup, it is important to understand what exactly you want to achieve by applying decorative cosmetics. If you are not a professional makeup artist who needs to create many different looks every day, then five basic tools will be enough
Commonly used brushes:
- Putty knife;
- Kabuki;
- Fan;
- Beveled;
- Barrel for shadows.
Standard set of makeup artist brushes
Description of how to use brushes correctly:
For problem skin types or prone to dryness, you should definitely use oval makeup
They will allow you to gently drive the cream and base into the skin without lifting the peeled epidermis; The movement should be made towards the hair or the lower part of the face - depending on the area being treated; It is important not to use the same tool for different cosmetic products. For example, if you need to apply powder and then blush, it is important to use two different brushes
Or better yet, three, so that one can remove excess crumbly products from the skin; To draw thin lines, it is important to use thin tools, and for large planes - wide or volumetric ones. When painting, do not press on the fleecy part, but lightly rub it over your face.
How to use makeup brushes