A beautiful, elegant manicure is what every woman strives for in order to look well-groomed and be confident every day. For those who doubt their drawing abilities, special transfers and nail stickers created specifically for the original design will help diversify the boring, monochromatic varnish coating. It is very easy to apply sliders yourself, sitting at home, so they are very popular and are an alternative to visiting an expensive nail salon.
Read on to find out what types of this design trend there are, as well as how to use various stickers correctly, and how to apply them beautifully to create a spectacular and attractive manicure.
What types of manicure stickers are there?
There are many options for adhesive films with pictures that allow you to experiment and show imagination when using them. They are classified depending on the method of fastening, whether they are based on glue or whether water is required during the process. Get to know each species and its features better.
Under gel polish
Gel polish applied over the design will allow you to firmly fix the image and walk around with a beautiful manicure for a long period. Ordinary transfer stickers, in the form of a transparent sheet and a pattern, work well under gel polish. It is separated from the substrate, applied to the prepared nail and removed after a period of time.
Sliders are also attached under gel polish. It is cut out of a paper base in the shape of a nail. Then immerse in warm water, apply and remove excess moisture with a swab. Next, a fixing layer is applied.
A film with a photo print looks beautiful under gel polish, allowing you to create a chic and mesmerizing manicure. No water is used. Photographic films can be purchased either in a ready-made form, or as a solid sheet from which a design is cut out according to the nail.
Water-based (transferable)
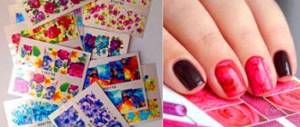
Water-based stickers will delight you with a wide variety, bright patterns, and photo designs. Making water images is very simple and does not take much time. In addition, this design is absolutely safe and will not affect the condition of the nails. To use, you just need to cut out the desired shape, moisten the material in water, separate it from the paper backing and attach it to your nails.
How to apply water stickers correctly
How to use water stickers
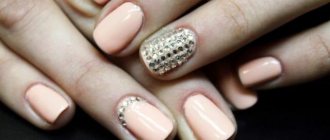
Metallized stickers
This option will allow you to create the most spectacular and fashionable manicure. Matte and glossy metallic effects can be applied to the entire plate, or can be attached in beautiful patterns combined with a colored coating.
Such stickers are also trimmed before attaching. You can warm them up with a hair dryer or near a light bulb; it is better not to do this in water, as it may not turn out neatly and with streaks.
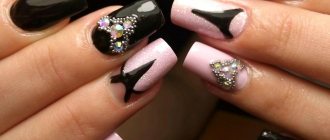
Slider design
This sticker design is properly called slides. They are thin films with a transparent base and a printed pattern. They can be used for nail extensions, creating stunning nail art. The slider design features high-quality printed images that look realistic and bright.
3D stickers
Such options are made on an adhesive and water basis. They have convex details that create a three-dimensional image and will not interfere with everyday life when applied to your nails. The beautiful relief looks original and unusual, but during the attachment process you need to be careful not to create unnecessary folds on the sides.
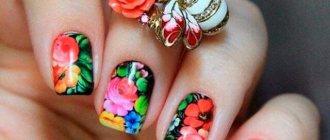
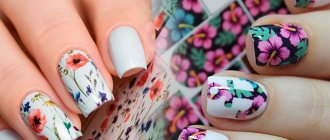
Stickers with photo design
Photo stickers allow you to apply the most incredible and very realistic images to your nails. Perfect for those who don’t know how to draw themselves, as they have a finished design. All identical pictures can be duplicated on each finger, or they can have a similar theme.
Advantages
Despite the huge competition, water stickers for gel polish successfully hold a leading position among all possible manicure options. And this is not surprising, because compared to other design solutions, you can apply water-based stickers under gel polish without using special equipment and even without experience or training. In addition, the use of this method has a number of other advantages;
- The ability to complement the existing design - due to the fact that the gel polish is applied before the moment when it is necessary to apply water-based stickers, a woman can choose the most optimal one and stick the option she likes.
- An easy technique to implement – absolutely anyone can stick this decoration on, which is why it is widely used. This also eliminates the possibility of transferring consumables, which significantly reduces material costs.
- Durability – properly selected gel polish allows you to reliably glue any material, so that your nails are in well-groomed condition for the longest possible time.
Benefits of manicure with stickers
Manicure using decorative stickers and transfers is very popular among women of all ages because it has many advantages. Consider the most important of them:
- Various types of additional accessories for manicure provide an excellent opportunity to make your nails well-groomed, original, bright and stylish.
- You can purchase this decor in many specialized stores. A wide range of different stickers will not leave any fashionista indifferent and will allow you to create new, beautiful images. This will allow you to look stunning at any celebration and event and feel confident.
- With their help, you can quickly replace a boring, monotonous design by adding all kinds of sparkles, rhinestones, metallic shine and shine to your nail decor, depending on your imagination.
- Attaching this type of design is very simple and quick; the process will not be difficult even for beginners. To do this, you can read the instructions, tips for beginners, and also look at pictures showing everything step by step.
- By doing your own manicure at home with stickers, you can significantly save your budget on decorating your nails and not spend money on a nail salon.
Preparing the nail plate
The technology of applying slider and photo designs to gel polish requires preliminary preparation. To understand how to prepare your nails for creating a slider design with gel polish, you need to study the instructions, which present all the steps step by step:
- Clean the nail plate. Remove any remaining old varnish or other coating.
- Prepare the nail plate. Degrease, polish with a soft file,
- give the desired shape.
- Remove cuticles using special products. You can remove the cuticle mechanically. If you plan to apply the entire length of the sticker, give preference to an unedged manicure.
- Coat your nails with a base polish and dry them under a UV lamp. Do not touch the sticky layer.
- Apply color coat. It is important to dry each layer properly, otherwise the decor will not be durable. If you plan to apply the sticker to the entire nail, you can skip this step.
How to choose?
When choosing a suitable nail decor, first of all, get acquainted with the application technology if you are new to this field. Making decorative designs correctly is not difficult, but some options will require a little familiarization and training.
Experienced craftsmen should focus directly on design, that is, the style and themes of a given material. It will also be useful to get acquainted with well-known manufacturers of quality products that do not peel off quickly after application.
We present to your attention several well-known brands of thermal stickers that allow you to make an original design and decorate your nails:
- Sally Hansen nail stickers give you the salon-like effect of nail care. There are options that are glued to the entire surface of the nail plate, and there are separate three-dimensional pictures. A new collection has been released - varnish stickers made with real varnish, which are very easy to stick.
- Decoupage stickers from the company Amy are popular, allowing you to create an incredibly delicate, feminine design on your nails. Lace patterns are made on a silicone base, so they do not tear or bend when attached to the nail plate.
- An excellent choice would be nail options from Faberlic, which are made in the form of translucent films with the theme of lace or other images. Fix them on a white or colored substrate. You can find out more about how to apply Faberlic stickers in the instructions.
- Accessory stickers are represented by a large collection of art. Allows you to glue a water picture without much effort. Very durable stickers, manicure lasts for a long time, is not afraid of washing dishes and cleaning around the house. They can be removed with a special tool.
- The collection of foil nail foils stickers is varied; the type called Hollywood manicure, interspersed with glitter, is especially popular. To properly stick nail foils, there are simple instructions that even a beginner can understand. You can read it on each set of products.
Types of stickers
The choice of nail stickers is so large that it is impossible to fit them into a small section of the article. Let's look at the main types that are popular:
- Transparent film with a pattern. Represents patterns, ornaments or designs with high pigmentation. They are translucent, and therefore are always applied to a colored base. Typically in a contrasting color.
- Continuous film (photo printing). Features a high density pattern. These stickers are designed to cover the entire nail plate. Usually they are used to accentuate a manicure and are glued to 1-2 nails. For greater clarity and brightness of the design, experienced craftsmen advise choosing a white varnish or base as a base.
- Applications and stickers with a given shape. Sliders can be small patterns, stripes, lace. Some of them are designed for a specific manicure: French, moonlit, etc. With others, you can “play around” and place it in the corner of the nail, at the base, in the center, or try a combination of several applications.
- Volume sliders. They are distinguished by their pronounced relief. Such stickers are difficult to distinguish from artistic paintings if they are applied correctly. To ensure that the designs remain voluminous, almost the entire top is removed from the relief with a brush.
Some stickers require soaking in hot water (about 50 degrees). They begin to stretch, which makes them fit better to the nail plate and do not form folds.
Nail design using pictures
There are a lot of options for how to paint a fashionable manicure using thermal film and stencils. The choice of plot and image depends on the occasion for which it is all intended, whether it is an everyday option, or for a holiday, celebration, or theme party. Consider examples of interesting options:
- For a daily trip to work or school, you can use transferable and stick-on options in the form of a common French jacket, which includes stripes on the tips of the nails. You can also diversify the design of red nails, for example, by gluing Chinese characters.
- For autumn, a background with warm palettes of brown, burgundy, beige with stickers of autumn leaves is relevant. A maple leaf or openwork leaves on the ring fingers look good, and the rest can be made plain. Decorating with the Eiffel Tower on the fingers looks impressive for those who prefer the French style.
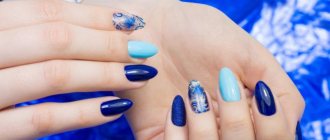
- For summer, you can choose bright designs on pink, green, blue nails, and also use a marine theme with images of mermaids, sea stones, sailboats, anchors, shells, and fish.
- For a party, you can use a black design or mirror films. Nails with black panther stickers will definitely not go unnoticed. Briefs with the style of Harry Potter or Harley Quinn are in fashion now.
- A white jacket decorated with lace, openwork patterns, and ribbons is suitable for a wedding. You can attach shiny liquid stone or rhinestones to your nails.
- For little girls - fashionistas who want to become like their mother, you can pick up and stick stickers for children. It could be a funny Mickey Mouse, a rainbow smile, beautiful butterflies, bright flowers, heart-shaped designs with rhinestones, ladybugs, cute cats, or scenes from the Hello Kitty cartoon and much more.
Benefits of water based nail stickers
- The film that is attached to the nails does not harm the plate. Therefore, many girls prefer to use water stickers in everyday life. Beautiful ladies have an excellent opportunity to change the design daily or every other day. Agree, neither shellac nor extensions can boast of such features.
- In addition to all of the above, water stickers do not stretch, which makes them convenient to use. They don't stick to your fingertips like regular adhesive-based sliders. When in contact with warm water, the stickers do not change shape (do not wrinkle), this allows you to calculate the size and compare it with the periungual fold.
- To create a manicure, you don’t need to put in much effort, drawing out an ornament and gluing rhinestones. Leading manufacturing companies produce ready-made stickers with pictures, light patterns and full-length photographs on the market. At the same time, you can find products in the form of lace with attached sparkles and crystals.
- Using water stickers, you can highlight several fingers on your hand; you don’t have to make your manicure extravagant. In addition, a pleasant pricing policy attracts more and more girls. Using water-based nail stickers is 10-12 times cheaper than having a professional paint the same pattern with acrylic.
- Thanks to the large color palette and an unlimited number of different designs, every girl will find an option for herself. Many lines contain wedding stickers and other thematic themes (New Year, Birthday, Christmas, Easter, March 8, etc.).
- A positive feature is the longevity of wear. If you fix water-based stickers with clear varnish, the result will last for 1-2 weeks. At the same time, the shade will not fade, and chips and cracks will not form on the surface. Conveniently, the stickers can be removed with regular nail polish remover that does not contain acetone.
how to use magnetic nail polish
Preparing nails for applying self-adhesive stickers
Before you start decorating the nail plate, you should prepare properly, peel off the previous decor, if necessary. To do this, you should do a neat manicure, because the cleanliness and neatness of your nails determines how the manicure will ultimately look.
"Advice. Using a special device, push back or cut off the cuticles and clean any existing dirt. Use a file to file the shape and polish the surface.”
If the picture looks like a continuous film, then you will not need to apply a base varnish. If the sticker is partially attached to a certain area, then you can paint the nail with a simple varnish of the desired tone, in an even layer.
Next, you need to have a certain set of tools at hand. You will need a container of water to apply water stickers, scissors to remove excess material and cut out the shape beautifully, alcohol to degrease the plate, finishing varnish, a nail file, cotton swabs and the products themselves. Also, before starting the process, read the useful recommendations and step-by-step instructions to have an idea of how to properly glue water-based stickers, use foil, transfer and glue holographic, transparent, and roll-roll products.
Application of 3D stickers
Most often, stickers with a volume effect are made using the principle of waterless application. This is due to the fact that the pattern is more complex and it is not always possible to apply it to the thinnest film. Some tips on how to use this type of nail stickers are given below.
- Prepare stickers, cut if necessary;
- Prepare your nails;
- Degrease the plate;
- Apply a layer of base and dry;
- Apply colored varnish, preferably in two layers;
- Let it dry a little, but not completely;
- Peel the sticker from the base;
- Place the sticker on the plate and press down slightly in the center;
- Press down along the edges;
- Make sure there are no air bubbles;
- Apply a layer of top coat and dry;
It is quite difficult to apply this type of nail stickers with your own hands.
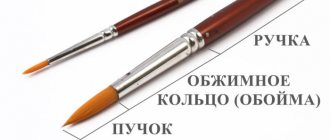
They are made on a thick base. Therefore, they can bulge and adhere poorly to the surface. Typically, such stickers are made in small sizes. [yandex3] [google3]
How to glue stickers on nails at home: step-by-step instructions
When the nails are ready for the process, and all the tools are nearby, you can proceed to gluing the accessories. To do this, follow the following step-by-step recommendations:
- Using an orange stick, carefully remove any remaining skin and work around the sides. Polish the surface with a special buff, removing roughness.
- Degrease the plates with cotton wool and alcohol. To do this, moisten a cotton pad with alcohol and treat the surface. You can also apply a protective agent that will protect against the influence of glue.
- If your manicure requires it, paint your nails evenly with a base polish of the desired color.
- Adjust the size of each slide by placing it on your nail. This is done before the backing is removed. Use scissors to trim off excess material. Note for yourself which side you will need to glue the product.
- If you are going to use water stickers, dip them in water for a few seconds. For stickers, you will need tweezers to evenly pick up the sticker and apply the sticky layer.
- Apply the nail stickers to the nail plate on your hands or feet and carefully smooth them out with a cotton swab. Cover with protective varnish.
Try to carry out all application steps as carefully and thoroughly as possible in order to get an excellent result and enjoy the beauty of your manicure for a long time.
Photo design
It’s worth talking separately about how to make nail stickers of this type with your own hands. They can be performed on thin or fairly thick film. Accordingly, gluing the latter is significantly more complicated. In addition, the film may or may not be transparent, and the design may either cover the entire plate or only some parts of it.
There are no tips on how to properly apply gold or other stickers with a photo design effect to your nails. From a technical point of view, their gluing is absolutely similar to the application of other waterless stickers. The only difficulty is that those who want to cover the entire plate with photo design will find it very difficult to stick this thick film. Perhaps, before using large nail stickers, you should practice on small photo stickers that are intended to be applied to the tips of the nails during a French manicure.
In addition, before gluing large stickers on your nails, you need to polish as much as possible all the unevenness of the nail plate. Otherwise, the sticker will not stick well, bubbles will form under it, etc. Such a manicure will be extremely short-lived, as is the case if the nails peel.
If you have already purchased nail stickers, then before gluing them, watch the video below. It will be able to answer some questions if they arise, and will also help consolidate the information received in theory.
What is thermal film for nails?
The first thermal film for nails appeared on the hands of Hollywood beauties in 2007. Then this manicure was called Hollywood and it was performed with Minx films. A manicure with thermal film will allow you to decorate your hands with real works of art - creating such designs with a brush will take more than one hour of time and not everyone, even an experienced master, can do it. Today, such nail art is available to every girl, moreover, you can perform it yourself at home and do not need to purchase special equipment.
Buying thermal film will not be difficult; it is sold in specialized stores with goods for nail art or in online stores, and there are plenty of manufacturers of this material, and the variety of designs will satisfy the needs of even the most sophisticated fashionistas: bright prints, delicate floral patterns, predatory designs, space motifs or the glitter of gold - there will be a lot of ideas for creating a design.
Advantages of thermal film
Thermal film for nails appeared in Russia not so long ago, but it has already managed to win many fans thanks to its numerous advantages. Among them it is worth noting the following:
- Thanks to this material, every girl will be able to decorate her hands with beautiful patterns, and creating a design will take no more than half an hour, provided that you decorate all the nails with patterns. If you glue thermal stickers on only some fingers, the time for nail art will be reduced significantly.
- Thermal film can be used on both natural and artificial nails.
- The materials for its manufacture do not emit an unpleasant chemical odor and do not harm the nails.
- Thermal films do not lose their beauty when exposed to sunlight, whereas shellac, for example, fades in the sun.
- If you follow the coating application technology, the result will last up to 2 weeks.
- Thermal film allows nails to breathe and protects them from negative environmental factors.
And of course, shrink film for nails is fashionable and beautiful. Your manicure will definitely not go unnoticed by others.
Manicure with stickers
What are stickers and what types do they come in?
Stickers, plates, sliders, films - all these are different names for the same material. In addition to those described above, there are 3D stickers.
Features of 3D stickers
For voluminous nail art you will need varnish and, of course, the stickers themselves.
- Prepare the nail surface.
- Apply base and dry.
- Apply the chosen color in one or two layers, dry each layer.
- Select an image, mark its shape and separate the pattern from the backing (pry it off at the edge).
- Place the image on the nail, smooth it out so that there are no air gaps.
- Apply a fixative - top coat.
Now you know how to properly apply stickers on your nails. The procedure is simple, inexpensive in terms of money and time. Just a few minutes, accuracy - and your manicure is flawless
.
Photo of a beautiful slider design for short nails
The big advantage of the slider design is that it can be used on nails of absolutely any length. Short nails look very neat, even if you apply a rather bright and active design on them. There are a lot of design options using slider stickers, given their diversity, and in order to decide what you want, we suggest that you familiarize yourself with photographs of the most successful options for short nails.
Hello girls! Today there are a huge number of nail art methods and the range of materials is constantly expanding. A long-known handy material is nail stickers. Perhaps you can tell me, we know how to glue them. Well, I kept wondering why they are called transferable, if on all the forums and videos girls glue wet films with a pattern. (after thinking, I decided maybe I was confused, well, excuse me....) And as it turned out, this was wrong. If you are interested, please see cat.
Slider design for nails
(slider: translated from English, slide means to slide, slide) are a variety of drawings that are made by hand.
Therefore, they give nails a sophisticated, sophisticated look. They can be combined with sparkles, rhinestones, and colored jackets. Glue colored butterflies and flowers onto a pure white background. There is a huge variety of stickers in terms of the number of colors, shapes and composition of designs. You can arrange them together, or you can limit yourself to decorating 2-3 fingers on your hand. Thanks to the thin material, the slider design looks natural, as if drawn by hand. Very similar to neat hand painting. So, there are two types of stickers. How to apply stickers on nails depends on their type: 1) Water-based transfer stickers 2) Adhesive-based stickers
In the first part, I will tell you how I made friends with water-based transfer stickers.
Background:
(yes, wait, you’ll see everything soon): I don’t go to salons to get manicures, I have my own nails, but I’m just tired of colored polishes. I wanted something new. And I knew that stickers existed. But I thought it would be childish. That's what I thought until I went to a professional store. And there is such a selection of stickers! Moreover, these were flowers and butterflies and so on. And very, very different in the method of gluing. I thought, I can handle this. I have to try. And I took a couple.
Closer:
I tried transfer stickers first. The seller said that they were like hand-painting. They cost 90 rubles, 20 pieces per pack. These are stickers applied to a paper backing. To apply them to the nail plate, you need to moisten a pre-cut sticker or a separate element of it in water. Sometimes it is very difficult to distinguish between a neatly attached water-based nail sticker and a skillfully executed design. It turns out very beautifully - the varnish layer on which the design is applied is very thin (which cannot be said about my previous torments with film). How to glue them: 1) Degrease the surface of natural nails or apply varnish 2) Cut out the sticker you like 3) Place in warm water for 30-60 seconds - warm water and 10 seconds is enough 4) blot with a cloth, remove excess water 5) transfer the sticker with base onto the nail and press gently. Apply top coat. It’s at point 5 that the real trouble is ((On many sites they write something like this: water-based transfer stickers: take them out of the package, cut out the desired design, place them in water, apply the peeled off film to the gluing area, and after drying, cover with a clear varnish or top coat. BUT This film is a transfer film, as the seller told me! It won’t stick to nails or dried polish. Remember when you had transfer stickers in your childhood. It should be the same here - I thought so and kept it in my head all the time. As it turned out, I didn’t I took off the transparent film and thought that the stickers were transferred to it. I watched a lot of videos and photos of lessons - one girl even took a special photo of how she did it. Well, I resigned myself - film is just film. And so, one day, crawling around a French blog (if you need to provide a link, please let the moderators know) I accidentally saw a video on how to apply water transfer stickers and decoupage to your nails. Pfft, I thought, I already know that, but I decided to watch the decoupage. And I was really shocked. Girls -they really are transferable! Without any films and they look like painting on nails! I recently saw examples of stickers on tips in a professional store. There are no films there! Just a sticker. I had some in reserve at home and immediately started trying it. PS, yes, that’s how I looked down. Don’t laugh. I didn’t understand it in the video before.
How to Actually Apply Water Transfer Decals Properly
1) Apply the desired color of varnish and let it dry completely. I used holographic, since I don’t have a more suitable color varnish:
2) We cut out our stickers as it is convenient for us - it’s better to just use a rectangle or an oval:
3) As you can see, the sticker has a transparent protective film on top. It comes off easily, it is not glued. So, we unfasten it and throw it away! Like this:
4) We still have this paper backing with a sticker:
5) Take a jar of water and lower our paper backing there for 20-30 seconds. Can be held with fingers or tweezers:
6) Next, carefully remove the sticker from the wet paper backing with tweezers so as not to tear it! Here are the water transfer stickers just like in childhood. And without any extra films:
7) We get this little sticker:
The main thing is to make sure that you have removed the film correctly! 8) Place the wet sticker on the nail - you can safely move it carefully while it is wet. 9) Having placed it, soak it with a cloth to remove excess water.
10) And cover with a protective coating. And... done! And without any bubble films... like I had before.
That's how I figured out how to actually apply water transfer decals. Thank you for your attention! I am Evgeniya
In order to make a fashionable and bright manicure, you need to resort to the help of new objects and materials. How could it be otherwise, if new products in the manicure industry often save not only money, but also time. Such helpers are new and already popular water stickers for nails.
Hearing the name of these stickers, you can immediately guess that you can’t do a manicure without using water. And this is true, but don’t be afraid that applying stickers will take a lot of time. Most often, the opposite happens - stickers save time, and a manicure can be created in a matter of minutes.
It often happens that a girl wants to have some kind of pattern or design on her nails, but her artistic abilities are not conducive to applying the design on her own, and there is always not enough time to visit the salon. In such cases, water stickers will help you get a manicure and put the girls in a good mood.
It should be noted right away that stickers require precision and accuracy, because they are not removable, but simply glued to the nails. In principle, the procedure is simple, but for beginners it will seem like a difficult task; some simply give up this activity halfway to success, because the sticker is not always stuck the way the author wants.
So, step-by-step instructions will help you figure out how and what to do with water stickers. First you need to choose which stickers will decorate your nails, buy them and read the instructions (sometimes they differ, depending on the manufacturer). After this, you need to choose the main color of the varnish, which will become the background for the designs on the stickers. Basically, craftsmen advise using light colors, since against their background the stickers will look more beautiful and brighter. After all, if the background is of some bright color, it will distract the eye from the sticker itself.
After choosing the polish, you need to manicure your nails. Usually girls decide for themselves which type of manicure they need. But the procedure for removing cuticles and softening the skin should always be present, since such light actions can extend the life of the applied varnish and design. The same applies to a nail file; it must be used often so that the nails do not lose their shape and do not spoil their appearance. Also, using a nail file, you should always sand the nail plate before applying varnish.
The procedure of steaming and moisturizing the skin is also mandatory, because not only the nails should look good, but also the skin.
After the manicure is done, you need to start applying the base coat. It is worth noting that stickers can be used on the basis of different materials - varnish, gel polish, acrylic and others. If a regular varnish is chosen for the base material, then you can immediately begin applying it. If you choose gel polish, then you need to prepare, since usually a primer, a base, and only then the gel polish itself are applied before the gel polish.
Under no circumstances should you put a sticker under gel polish, as such actions can not only ruin your manicure, but also your natural nails. Of course, gel polish requires working with an ultraviolet lamp, so each applied layer must be polymerized in the lamp, and only then the next layer and sticker are applied.
Acrylic is one of the hardest materials to work with nails, as it can dissolve even the applied sticker. Therefore, each application must be done the first time so that the sticker is fixed and does not move.
The sticker is always placed on some kind of cardboard-like backing, so you need to remove it from the cardboard and be sure to remove the top transparent film. After the film is removed, the sticker must be cut into those parts that should be placed on the nail. At this stage, you can cut the sticker to the shape of your nail, but if you have doubts about accuracy, you can do this after applying it to your nails, simply removing the excess parts of the sticker.
When the fragments are cut, they need to be dipped in water, and after waiting 10 seconds, the sticker can be taken out and wiped dry with a napkin. Next, the sticker needs to be attached to the nail and pressed firmly in the direction in which it should be located on the nail.
When the sticker sticks, it should be immediately coated with top varnish, and when it dries a little, you can remove excess parts of the sticker using a toothpick. In principle, after this the manicure can be considered complete and the top coated with a fixative. If the sticker is made on gel polish, then it should be applied to the sticky layer of the base polish and covered with a topcoat in two layers.
As you can see, the procedure is simple, it is done with different varnishes and attached to the nails using the sticky side. It is these features of the product that can significantly affect the quality and appearance of the entire manicure.
For a more detailed study of the technique of applying stickers to nails, you need to refer to video and photo reviews of this process. Experienced girls who already know how to apply stickers to nails will tell and show you how to do it correctly and accurately.
How to prepare your nails for stickers?
The final result depends on how neat your nails are. Therefore, first remove the cuticle, clean, adjust the shape, use a degreaser.
Cuticle removal
If the cuticle grows, it slows down the growth of the nail, causing the formation of burrs and grooves.
Proper treatment of the cuticle makes hands well-groomed.
It consists of moisturizing living cells and removing dead ones. It is not necessary to do a traumatic manicure, there are more gentle ways.
For example, before removing cuticles, take a 15-minute hand bath with sea salt and 1-2 drops of essential oil. Suitable:
- tea tree - heals skin
- grapefruit - strengthens nails
- lemon - whitens
- almonds – strengthens, moisturizes
After the bath, rinse and dry your hands. Treat the cuticle with a cuticle softener. Using a pusher, push away the “living” skin. Remove keratinized areas using any special tool:
- trimmer - its working surface resembles the letter V
- cuticle files - with safe plastic ends
- cuticle pencil - with nourishing oil inside
Surface degreasing
Applying a base or sticking stickers directly on your nails depends on which sliders you use. Small stickers are attached to the varnish. But for films that cover the entire surface of the nail, varnish is not needed.
In any case, for the sticker to stick well, it must be attached to a dry, grease-free surface.
.
Suitable for these purposes:
- A dehydrator is a product for cleansing the nail plate and removing excess moisture.
- Cleanser is a product for removing the sticky layer on a top coat.
- Nail polish remover or alcohol - for degreasing unpainted nails.