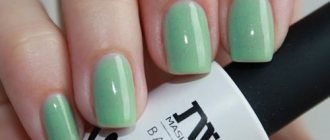
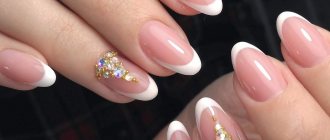
Correct application of gel polish on tips
Nail extensions are one of the most common ways to lengthen the nail surface. The process can be carried out using a special gel or overhead tips. Any of these materials will help give the desired shape and design to your nails.
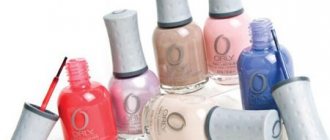
Applying gel polish to tips is the most common option, because Shellac can advantageously emphasize the special beauty of false nails.
What are tips?
Tips are an artificial nail template that is glued on top of the natural one using special glue. The main purpose of using tips is to lengthen the nail plate.
Plastic templates for nails are distinguished:
- Shape (elongated, curved or straight).
- By color (white, transparent or matching the color of a natural nail, available with colored designs).
- By purpose (for French or adding length).
When searching for suitable material, you should be extremely careful, as you can often find fakes of low quality. Such tips bend poorly, weigh down the nail plate and do not allow air to pass through to the nail. All this leads to premature correction.
High-quality tips are made from elastic materials that allow the nail plate to breathe. This artificial nail template is as close as possible to the natural one, so the master won’t have to file off a lot of unnecessary stuff.
How to choose a good palette
There are different plastic molds for applying varnish samples. Some have a completely transparent structure, others are milky, and others are white.
To apply the sample, it is better to use milk palettes. Or natural, slightly yellowish in color. The applied sample on them will be closest in color to the painted nail.
Some palettes cannot withstand the action of solvents - acetone or alcohol. These are not worth purchasing. Good professional palettes are made from durable plastic and are easy to work with.
Right choice
When lengthening your nails using tips, pay attention to some factors that significantly affect the accuracy of your manicure.
- If the shape of your nail plate is flat or, on the contrary, too convex, you should purchase special tips that fit the shape of your nail.
- For standard-shaped nails, the most common templates are suitable and do not require any additional actions.
- If it so happens that the surface of your nail is “wavy”, you can take standard tips, but you need to glue them with a special glue - gel. It is he who is able to fill all the unevenness of the nail plate and tightly attach the artificial nail. This glue dries for a long time and is extremely convenient to use.
- When the free part of the nail grows upward, in this case a short length of the tip is what is needed, since such a nail will not become deformed as it grows.
Choose tips strictly according to these rules, because the beauty of artificial nails depends entirely on their accuracy and naturalness.
note
Unlike gel, working with acrylic is more difficult. This is a less plastic material and you need to work with it with clear movements and quickly. Another disadvantage of acrylic extensions is its pungent odor and the possibility of allergic reactions. However, there are also advantages over gel: a harder coating, easy to remove, you can model complex shapes and designs of artificial nails.
In addition to tips, you can perform gel nail extensions on forms. These are special templates made of different materials, which are removed after extension.
Tips for nail extensions are conventionally divided into three zones:
- contact (the area where the template is glued to the nail);
- stop line (located on the inside and aligned with the natural nail when gluing);
- free edge (varies in length and shape).
We recommend: Manicure casting: description of design and technique
When choosing tips, you should take into account the thickness and elasticity of the material from which they are made. Among the most popular materials are nylon and ABS plastic.
Tip processing
Having selected the tips you need, do not rush to glue them right away; first, take a few steps that will make your false nails more natural.
An artificial plate requires the following processing:
- Remove the sharp corners of the tip according to the shape of your nail.
- Carefully sand the artificial plate so that it fits snugly and completely follows the shape of the nail.
- Thoroughly degrease each tip.
After treatment, try to touch the artificial nails as little as possible so that excess particles from your hands do not spoil the strong adhesion.
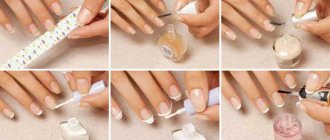
Preparing nails for lengthening
Before applying gel polish to the tips, you should properly glue the artificial nail. Although this process takes a little time, it is also the most responsible.
- First of all, we put the handles in order.
We perform nourishing or softening baths (depending on the needs of your skin).
- We process the nails.
We remove or push back the cuticles, clean the nail ridges from excess skin.
- File your nails to the desired length.
It is better to make the nail plate shorter, leaving a free edge of 3 - 5 mm. This length is well suited for working with tips.
- We polish each nail.
Here it is enough to remove the glossy layer.
- Apply degreaser, followed by primer and let dry completely.
- Now you can safely apply glue to the feet - the line marked on the tips.
We wait 10 – 15 seconds, gently pressing it onto the nail.
After making sure that the material holds tightly, you can safely move on to the next stage.
Creating a home manicure
In their work, beauty salon masters use a professional line of Lacomchir products. To get beautiful and well-groomed hands, you don’t have to leave home and go to a beauty salon. You can treat them with Lacomchir gel polish at home. With a little practice, you can easily paint your nails yourself, especially since this procedure does not take much time.
The process of creating a home manicure is completely simple and covers several stages:
- Shaping.
Using a nail file, give the plates the desired shape, shortening them slightly and leveling out the unevenness of the surface layer. You should not use a metal file - it will peel your nails. It is better if you use a sapphire or sand file. After treating the nail, shake off the dust and treat the surface of the plate with an antiseptic. Dry your hands. - Remove the previous layer.
It is advised to remove the remnants of the old coating from the nail. Treat the surface of the nails with a special liquid. Remove cuticles using a special softening gel. Push back the skin with a wooden stick and carefully cut it off. Wash your hands and dry your nails with a nail dryer. - Sand your nail.
Remove shine by treating the nail well, creating optimal conditions for applying gel polish. Degrease your nails with special wipes. Remove excess oil from your nails. Treat the inner edge especially well. This way the nail will be better prepared for applying gel polish. - Paint the surface with the base.
Apply the product carefully, being careful not to stain the cuticle with varnish. Dry your nails with ultraviolet light using a special device - Apply colored shellac.
First apply one layer, when it dries, apply another layer of gel polish. Dry with ultraviolet light. Finish with a color sealer.
Application of color coating
It is recommended to start the process of covering artificial nails with the little finger of the right hand, drying each nail in a UV lamp. Only in this case will you be protected from getting gel polish on the cuticle.
The coating procedure itself consists of the following steps:
- Level the surface of the existing nail.
- We file down the free edge and give it the desired shape.
- Apply degreaser.
- We “merge” the natural nail and the tip.
To do this, apply an even layer of gel to the entire surface, paying attention to the end of the nail, and then dry it. The surface should be flat and smooth, without sharp transitions or notches.
- Switching to gel polish.
Apply a thin but even layer of Shellac until the desired color density is achieved. Dry each layer thoroughly in a UV lamp.
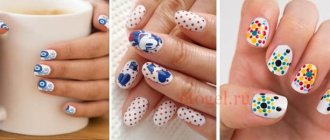
- If desired, we do artistic painting, use sand or rhinestones to give a bright design to your nails.
- We apply the finish coating, paying special attention to the end, and then dry it.
- Remove the sticky layer and apply softening cuticle oil.
After all procedures, we moisturize the skin of our hands with a nourishing cream.
Basic mistakes during application
Correct application of the product can give your nails a well-groomed appearance. Failure to comply with technology will ruin the overall impression.
When processing, you should follow simple rules:
- Preparation.
Before applying the selected gel polish, the nail plate is processed and leveled, the cuticle and eponychium are pushed back. Then the surface of the nail is treated with a special nail file to remove the shine. Nails treated in this way hold gel polish better. - Surface treatment using a special liquid - a dehydrator - containing a special pH formula.
This procedure allows for the strongest adhesion of the gel polish to the surface of the nail. - Basic surface treatment.
If the nail plate is too thin, a special product, a primer, is applied to its surface to give the nail greater density. Modern products have gentle properties and do not corrode the surface of the nail layer. Primers are primers for treating nails. The end of the nail being treated is also covered with primer to avoid peeling of the cosmetic product.
How does the correction happen?
No matter how “strong” your manicure is, after two to three weeks the nail plate grows back and correction is no longer possible.
The main steps are as follows:
- Carefully file off the “old” layer of gel polish without damaging the nail plate.
- If necessary, remove cuticles.
- We eliminate all irregularities present on the surface of the nail. When peeling off the tips, apply an additional layer of gel to tightly attach the artificial part of the nail.
- If the surface is leveled, we begin the already known process of applying Shellac.
Remember, any extension partially injures the nail plate, so give your nails a “rest” from time to time.
Magic rainbow of shades
Among the wide selection of manicure products and materials, Lacomchir gel polish is very popular due to its properties and reliability. Once applied to the surface, the varnish does not chip off or crumble the next day. According to reviews from manicurists, this varnish best meets the required qualities. In addition to all the specified characteristics, it is distinguished by a fairly low price.
Despite the low price, this gel is distinguished by its reliability and excellent quality, which sets it apart from the products of other companies.
In addition, it is available for both professionals and beginners and those who like to do nail design at home.
Why gel polish?
Shellac is a fairly durable material that occupies one of the first places when choosing a high-quality coating for both natural and artificial nails.
Advantages of the material:
- The dazzling gloss will not wear off or fade for several weeks.
- When applied correctly, gel polish has a long service life, without chips or abrasions.
- Inexpensive manicure for everyone.
- Shellac can be applied to an artificial or natural nail surface.
- The varnish is environmentally friendly to the body and is allowed during pregnancy and lactation.
- Even a beginner with little experience can handle the application.
The main thing is to follow the correct technique for using gel polish and only then will you be able to consider the significant advantages of Shellac coating.
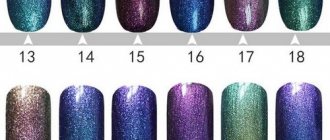
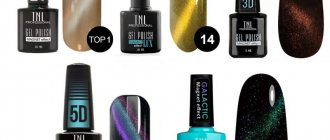
The radiance of colors
The market offers a rich palette of Lacomchir gel polishes of all colors and shades, so the ability to choose the polish of the desired color is practically unlimited. There are both soft, delicate pastel colors and bright, acidic shades. The color of gel polishes is enhanced by inclusions of glitter and reflective particles. When applied to the surface of the nail, you can achieve both a bright glossy surface and a calm matte finish.
Such painting, like the magic of colors, will not leave any woman indifferent. Everyone will find their own color and be able to make the right choice.
Gel polishes in cute pastel colors - azure, lavender, peach, soft milky pink, are presented in two series: “NC” and “DC”.
Review of Lacomchir gel polish - in the next video
Helpful information
If you decide to add length to your nails, you should learn some basic rules that will help you achieve maximum naturalness of your nails.
- Correctly chosen tips are the key to a successful manicure. Each nail should be given special attention, since cutting out the desired shape of the nails of the right hand may not coincide with the left.
- The tip application should take up a little less than half of the entire nail. If the artificial nail takes up more space, it needs to be cut down.
- Do not ignore the process of polishing the nail plate. You should not file off the entire nail, just remove the glossy layer for a strong grip.
- It is better to apply the glue to the tips using a toothpick. Remember, the specially designed material dries within 15 seconds, so act quickly.
- For beginners, it is better to purchase a special gel glue, as it takes longer to dry. Its adhesiveness is high, but at the same time you have time to apply it evenly and carefully glue the tips.
- The artificial material is so versatile that you can apply regular nail polish over it to create a “quick manicure.”
An artificial tip will serve you for quite a long time, but as the nail grows, you will have to resort to correction.
Do not forget that chemical compounds have a detrimental effect on your nails, so take breaks between extensions. At this time, take nourishing baths to strengthen your nails with the addition of sea salt or special restorative mixtures for nails.
Advantages
Lacomchir gel varnishes compare favorably with varnishes from other companies due to such inherent qualities as:
- relatively low price;
- a wide range of different shades;
- almost complete absence of odor.
This gel has a subtle, pleasant, unobtrusive aroma that is almost imperceptible. It does not cause headaches. If you use the product at home, then when applied, the smell of the varnish will not cause any other negative sensations or harm the body.
Thanks to its properties, Lacomchir gel polish is easily applied to the surface of the nail, dries quickly, and gives your nails a beautiful, well-groomed look. One of its main characteristics is good coating durability.
Having done a beautiful manicure, you don’t have to worry about damage and scratches. The applied product can last for 20 days or even more if worn carefully.
The application of gel polish is widely practiced in beauty salons around the world. Masters involved in the nail service industry prefer to work with this type of product. This coating technique is very popular among fashionable nail salons and a large number of their grateful clients.
The obvious benefits of covering nails with gel polish include:
- ease of the procedure;
- ease of operation with certain knowledge;
- quick drying of gel polish;
- color preservation;
- maintaining the shine of the surface until removal;
- gentle effect;
- non-toxicity of the substances used;
- long period of wearing gel polish.
When applied correctly, the coating does not lose its shine and does not require painting or any correction. Thanks to this coating, the hands look well-groomed and the nail plate looks protected.
Photo of nail polish coating
Even more photos at the link: Gel polish photo.