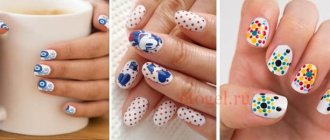
Is it possible to mix gel polishes, how to get a new shellac color
You can mix gel polishes. It is in this way that many masters can realize any client’s wishes without extra costs, making do with a limited number of colors, textures and effects of gel polishes. Getting a unique shade is not difficult; it is enough to have a maximum of 10 colors. However, in order to guarantee durability of the manicure and safety for the client, it is necessary to adhere to some mandatory rules for mixing shellac and gel polishes.
The recommendations are as follows:
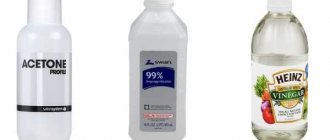
- It is not advisable to mix coatings from different brands and companies. Since manufacturers produce paints and varnishes using various technologies, there is no guarantee that the synthesis of different materials will polymerize well and will be durable (not to mention the risk of an allergic reaction);
- It is permissible to mix paints of the same brand, obtaining new and interesting shades. Depending on your skill level, you can do this either on the nail itself (applying colors in layers), or by mixing the material for all fingers on the palette at once.
- After mixing the colors, keep the mixture away from sunlight and the glow of manicure polymerization lamps;
- It is better to create new colors by trusting reliable brands, the less the risk of sediment forming in the mixture or changing color during wear;
- do not mix large volumes at once, experiment drop by drop without transferring the material (which is especially important for expensive, branded gel polishes);
- It is best to prepare the mixture in an opaque container (closed palette or jar). If there is a large flow of clients, you can use the remains of the batch for painting in one design or another;
- The following colors must be in your manicure arsenal: black, white, blue, green, red and yellow. To create variations with a shimmering effect, also purchase gel polishes with gold and silver sparkles.
Practicing manicurists highlight the following useful recommendations for mixing gel polishes and shellacs:
- It is best to combine enamels with each other, since their rich pigmentation usually covers microglitters and mother-of-pearl.
- When mixing colors for all nails, do the mixture on all fingers at once, and not for each separately. Unless of course you want to create a gradient effect from the little finger to the thumb. The disparity of light looks ugly and not expressive.
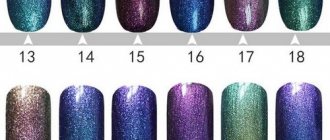
- It is best to test the manufactured color before the client on a tip or palette, polymerize it in a lamp and cover it with a top coat of the same brand. Check out the results under different lights. If you like all the options, you can offer the client an experiment. In order not to forget what colors this or that mix consists of, masters practice applying droplets of color to a chamomile palette or display under the result nail. This cheat sheet is especially convenient to use when there is a fairly large number of different coatings from the same manufacturer.
How to intelligently change the color and increase the practicality of store-bought nail polish
Creating your own nail polish colors, changing its shades to more interesting and sophisticated ones, adding sparkles, etc. is a fun and exciting activity not only for schoolgirls, but also practical for everyone who uses nail polishes. There are many shades on the market today, but finding the right one is still very difficult, especially since in our stores, even boutiques, not all colors from the brands’ palettes are available. Or maybe you need a specific color of polish for one time, but you don’t want to spend money on a whole bottle? Or do you want your nail polish to match your eye shadow in your makeup?
Our method of getting a new shade of nail polish or mixing your own color is cheap: the cost of clear or original colored nail polish and cheap Chinese eye shadow. In the case of glitter, the cost of a bag of glitter is added. The process is simple, and you don’t need to wait for the result - mix and use. The effect using shadows after application and drying is many times more matte and shimmering than regular store-bought varnish. What many will like: with shadows, the varnish dries much faster - since with shadows you will need 1 layer of varnish instead of three - that’s two!
Prepare : - Several shades of powder (regular pressed) eye shadow or powder blush (you can easily take the cheapest ones), - Transparent or original colored nail polish (to choose from), - Nail polish remover, - Small brush - separate (optional), - Toothpick, - Paper and tape (optional), - Cocktail straw/wrap (optional), - Cotton pads (optional) or paper, - Tin foil (optional), - Plate ( optional), - Dry craft glitter (optional).
Mix and test the desired color
1. Wrap a plate in tin foil.
2. Using a brush in a nail polish bottle lid, place a small amount of clear nail polish onto the foil on a plate.
3. Using a cocktail straw, scoop up a tiny amount of eyeshadow in your desired color and pour over clear nail polish. Using a separate brush, mix the first with the second.
4. Look at the shade. If desired, add varnish or shadow to make the tone lighter or darker. Or enter a different eyeshadow shade to get a new color. This is your sample. Experiment in this way, writing down the amount and shades of shadows you add for the future, until you get the polish of the desired color.
All this can be done on regular printer paper, but it slightly distorts the final shade of the varnish, because it is too white.
Making nail polish of the desired color
1. If desired, glue a small cone of paper and adhesive tape to make it easier to pour the shadows into the bottle with varnish. Each shade of shadow will need its own cone, because even the smallest amount of shadow affects the color of the polish!
2. Open a bottle of clear nail polish. Insert the cone into its neck and hold it with one hand. Second, scoop up the amount of shadow you estimate by eye that will be needed for the entire bottle, and pour it inside through the cone. Here it is better to have too little shadow than too much!
The shadows should be crushed in advance with a tube directly in their original container, or you can pour a little onto paper and grind it with a tube or a small knife. Because otherwise it will be much more difficult to mix the shadows with the varnish.
Gently flick the cone to dislodge any remaining eyeshadow powder inside. Using a brush wiped off from varnish or a toothpick, carefully collect the shadows from inside the neck of the bottle and from the end of the cone, pushing the particles inside.
The glitter is added in the same way if you want to use it. Remember that glitter may already be in the eyeshadow or blush, so if you want to get the effect of molten gold in the polish, it is better to use eyeshadow with disproportionately smaller glitter than the glitter from the packet. Also note that if the clear nail polish is new, you will need to pour some of it into a clean bottle first, as the eyeshadow will need space inside. You need to pour approximately this amount (on the left):
3. Now close the bottle tightly and shake. And shake and shake. Strong and active. Until the contents are completely homogeneous. This will require some time and effort on your part.
4. Done - test the result on foil or paper. Or directly on the nails. Wrong shade or color - add shadows (add just a little at a time!) and shake the bottle again.
In the future, before using the polish, shake the bottle thoroughly in case the additives begin to settle to the bottom over time (especially for glitter).
Changing the shade of nail polish
Suppose the purchased varnish lays on a transparent layer, but this does not suit you. Or the shade on the nails is not dark enough. In principle, the whole process is exactly the same, only:
1. Add eyeshadow/blush to the bottle a little at a time, mix and try, especially if you need to change the shade only a little.
2. To use, select the shadows/blushes that are as close in shade to the polish as possible if you just want to make it opaque. If you change the shade, take the shadows only a little darker and only from the same shade range or the same palette as the varnish itself (a palette of natural shades, a palette of muted shades, a palette of matte metallic shades, etc.), otherwise, in addition to changing the shade, The color of the varnish will shift to the side.
Add-ons:
— To clean a separate brush, use nail polish remover and cotton pads;
— The average total amount of shadow used per full bottle of varnish is 113 g (for a full opaque shade - on the left in the picture; on the right is an example of when only half of this volume of shadows is added to the varnish);
— The total volume of glitter per bottle is about ½ tsp;
— To make it easier to mix the varnish with additives, you should place a small glass colorless bead in the bottle before shaking, and leave it there for the future;
— There are reviews that after adding shadows, the polish also stays on the nails longer;
— Polish with additives is removed in the same way as regular polish: the cuticles and other shadows do not stain!
Sources: www.instructables.com/id/Mix-Your-Own-Nail-Polish-Colors-And-Save-Money www.instructables.com/id/how-to-make-nail-polish www.instructables.com/ id/DIY-Custom-Color-Nail-Polish
Mixing colors using the color wheel
The second thing the color wheel is used for is mixing colors to get the desired shade.
. Mixing varnishes will be problematic - they dry quickly, but paints, gel paints or colored gels mix easily, which allows you to get a large palette and make the desired design.
I have already talked about how secondary and tertiary colors are obtained by mixing. You can always make a color darker or lighter by adding white and black in different proportions. This way you can get colors from one sector of the color wheel.
It is worth remembering that opposite colors on the color wheel can be used in a design, but not mixed together, as this will result in a muddy color that does not look good on the nails.
How to apply light gel polish
Even well-mixed gel polish may not apply well. This happens for the same reason of uneven distribution of pigment. If any part of the nail appears to have whitish stripes, it means that the application was incorrect. In manicure schools they teach you to paint your nails with nude polishes. The same rules apply for light manicures with gel polish.
It's all about the position of the brush. When it touches the nail at a 45-degree angle to it, it causes uneven pigment distribution. Only a horizontal touch, almost in the air, will allow you to make an even, beautiful stroke. Turning the brush, which is practiced when applying red varnish, is also not suitable. This will cause a whitening effect at the turning point. And repeated strokes over already applied varnish will result in streaks.
Application technology
In order for a manicure to live up to expectations, it is necessary to adhere to a strict sequence. Firstly, the biogel is first applied according to all the rules and canons of nail strengthening. The procedure is carried out from start to finish, with the exception of the last step - applying the finishing layer. It is not required if the top of the nails will be covered with gel polish. Secondly, before applying Shellac there is no need to make a substrate (the first preparatory layer, the base). This role is already performed by biogel. Thirdly, shellac is applied using conventional technology and secured with a final protective coating. There shouldn't be any changes here.
If you adhere to the correct technology for applying one material to another, then they will not reject each other. A properly applied coating will not chip and your nails will not look too compacted. It is also noteworthy that Shellac applied to biogel does not in any way affect the basic properties of the latter. The material will not interfere with air circulation, as well as the influx of beneficial vitamins from the outside (for example, from strengthening nail baths, which can be done even when the nails are covered with biogel).
Manicure is one of the components of a woman’s image, but it’s not always possible to do it. Shellac coating may be a way out of the situation. Shellac is a long-lasting coating that lasts up to three weeks on nails. A manicure using this coating can be done at home.
You will need
- UV lamp, orange stick, file, electric manicure set (you can do without it), sponges, degreaser, base, colored shellac coating, top coat, liquid for removing the sticky layer, cuticle oil.
Instructions
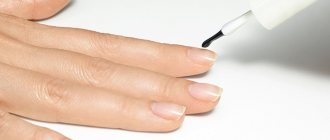
We process the nail. Give the nail the required shape and length. Remove or push back the cuticle with a stick. Then you need to sand the entire nail so that it becomes smooth (you can use a nail file or an electric manicure set).
Then we proceed to the direct application of shellac. First, apply the base in one thin layer, dry in a UV lamp for 1 minute. If any excess gets on the skin around the nail, remove it with a stick before drying it in the lamp.
Then we cover it with colored shellac in 2 layers, drying each layer for 2 minutes.
And the last step in application, cover the color coating with top coat in 1 layer and dry for 3 minutes.
Rate this article:
Combining colors in manicure is a subtle science that requires certain knowledge, although many people are given this sense of color from birth. In this article I want to look at the theory of color combinations using the color wheel. It is used constantly not only in manicure, but also in combinations of clothing and accessories, makeup, and even by professional artists.