We girls always want to be beautiful and well-groomed. But time does not always allow you to visit a beauty salon for such purposes. And we have to look for other options on how to make ourselves beautiful. But of course this is possible in simple, home conditions.
Our nails are what people immediately pay attention to. And if there is an untrimmed cuticle on your nails, or an unevenly filed edge of the nail, this will all lead to the impression that you are not a well-groomed girl.
But don't despair, because there is a way out. In this article we will try to tell you how to properly create a beautiful, well-groomed manicure at home.
Preparation: hygienic manicure
It doesn’t matter what you do with your nails next - cover with polish, gel polish or transparent enamel, the first step in home nail care should be a hygienic manicure.
Without a manicure machine, you can resort to two techniques at home:
- Trimmed - the cuticle and side ridges are cut with scissors or nippers;
- European - the cuticle softens and moves to the base of the nail.
Unedged European manicure - execution technology
I personally advise you not to do a trimmed manicure yourself if you don’t know about the structure of the cuticle and the technology.
Simply cutting the cuticle is not enough for two reasons:
- The uneven, torn cut will turn into painful burrs in a couple of days. Moreover, on the day of the procedure it will seem that the manicure went perfectly and you did everything right;
- On different fingers, the cuticle may have a different structure and proximity of capillaries. On one finger you can cut the skin painlessly, but on the other you can cut yourself. The wound will hurt and may even become inflamed.
To prevent this from happening, give yourself a safe European manicure that minimizes the risk of injury. There are dry and wet European manicures. The first is carried out using special cuticle removers, the second using a softening bath.
Dry manicure is easy to do - apply the product to the cuticle, wait the time specified by the manufacturer and move the cuticle with an orange stick. Let's look at wet unedged manicure in more detail.
The procedure will require:
- bath with warm water. You can use a deep cup or basin. Water temperature 37-40 degrees;
- orange stick. Prepare 2-3 pieces - due to interaction with water, the sticks may get dirty;
- file for sawing the shape. For natural nails, use a 180/220 grit file.
Also have a couple of paper towels ready to dry your hands.
- They filed away the form .
Be sure to do this before the bath, because then your nails will become soft and it will be impossible to file them. Choose the shape based on the characteristics of the nails and length. You can just be nice and remove the length if you’ve previously had a manicure with a manicurist and he chose the shape; Nail filing: varieties of shapes and techniques - Inspect the side ridges, which are located to the left and right of the nail . If they become rough, carefully, without touching the nail plate, go through them with the same 180 grit file. The most important thing here is not to touch the nail with the working surface of the file;
- Place your hands in the bath for 7-10 minutes . During this time, the cuticle will become softer and easier to move;
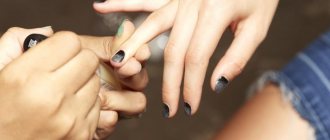
- Take an orange stick and begin to slowly move the cuticle with the wide end towards the base of the nail . Do not press the stick too hard so as not to injure the nail and cuticle. Repeat the action with all fingers;
- Dry your hands with a towel.
What is manicure, its types and popular nail design options
We make designs and decorations on nails
To create drawings we will need varnish, multi-colored acrylic paints, thin brushes and glitter. At home, it is best to draw uncomplicated drawings, since it will be difficult to draw something complex on your own on different hands. But for such cases there is a way out. These are stickers and stencils.
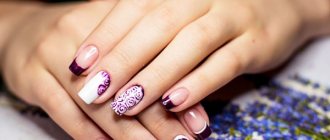
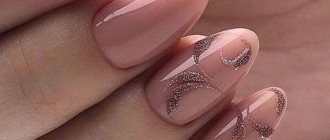
Examples of applying more complex patterns.
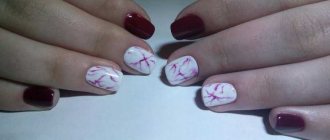
We use stickers for an interesting design.
To create an ombre you need three types of varnish and a piece of sponge. Apply the polish onto the sponge in even stripes and then apply it to the nail. Then add glitter and cover with finish.
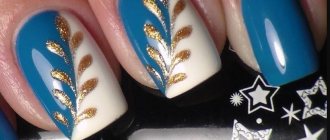
We use decor and foil.
Instructions: manicure at home with varnish
Let's start with instructions on how to do a manicure at home with regular polish. Despite women's fascination with long-lasting gel polish, many still remain committed to regular polish.
The question arises - what are the instructions here? I painted it, dried it and went. In fact, proper application of polish involves more steps, and also increases the wear time of the polish and reduces the impact on the nail plate.
For proper coverage you will need:
- degreaser;
- base for varnish. It will help smooth out minor roughness and level the surface for applying varnish. The brands Domix, ruNail, Solomeya, Kinetics have them;
- colored varnish. Choose gel polishes from the “free” category. Essie, Zoya, OPI have these. The essence of these free-coatings is that they do not contain aggressive chemicals that damage the nail plate;
- cotton pad or lint-free wipes;
- varnish fixer – OPI, Zoya, Pronail, Irisk.
- cuticle oil. Choose natural oil, without mineral impurities. Only in this case will it be beneficial - the cuticle will soften and there will be no hangnails. Pay attention to Aravia, Nano Professional, CND oils.
If you have liquid tape, have it ready too - it will help protect the skin around the nail plate and prevent the polish from running.
- Degrease the nails using a napkin or disk moistened with a degreaser;
- If you have liquid tape, now is the time to apply it to the skin around the nail;
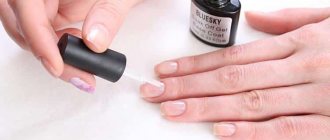
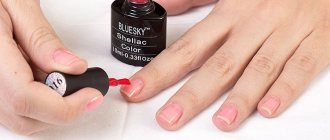
- Wait until the product has completely evaporated and apply the base coat. Start applying with your little finger. Do not try to paint the entire surface in one motion - the side edges will still have to be tinted. First, make a stroke in the center, closer to the base, move the product towards the cuticle, and then stretch it along the side edges, as shown in the figure;
- Wait until the base is completely dry. This usually takes 3-5 minutes;
- Apply colored varnish. The application pattern is the same as in the figure above. Also start from the little finger and move towards the big toe. If the color does not apply evenly - it leaves streaks, stains, then after the first layer has completely dried, apply the second;
- When all 10 fingers are painted, let them dry. Drying time depends on the coating manufacturer - from 5 to 15 minutes;
- Apply varnish sealer. It will make the surface more glossy and also increase the wear time.
In an attempt to speed up the drying of the polish, girls dip their nails in cold water. Do this gently - the varnish does not dry, but hardens, which means that after returning to normal temperature it may smear. If you don’t have time to wait, use special dryers for varnish - they reduce the drying time by 2 times.
When all layers are dry, apply oil to the cuticle to soothe it after a hygienic manicure and provide additional hydration.
Gel nail extensions: where to start and how to master the technology for a beginner
Manicure at home with gel polish
A manicure with gel polish allows you to forget about repainting your nails for 2 weeks, which is why it is chosen by women more often, including for home manicures. The basic set of tools for the procedure is larger here, because gel polish does not dry in air and requires mandatory polymerization.
I once read on one forum that gel polish will harden if you hold it in direct sunlight. Indeed, solar UV radiation promotes hardening, but there is no need to talk about a durable, well-dried coating here.
If you want a beautiful and long-lasting manicure, prepare:
- UV or LED lamp;
- base and top for gel polish. It is better if they are from the same manufacturer. Choose proven brands - CND, Beautix, Nano Professional;
- colored gel polish – one or several colors, as you like;
- buff for polishing;
- nail degreaser;
- lint-free wipes;
- clinser if the top has a sticky layer.
- After a hygienic manicure, use a polishing buff to walk over the surface of the nail plate. Do not three nails too hard - 2-3 light strokes on each nail to remove the glossy layer;
- Dampen a cloth with degreaser and wipe each nail;
- After the product has evaporated, apply the base. Start with your little finger - make a wide stroke in the center, slightly retreating from the cuticle, then move the product closer to the base of the nail and only then work on the sides. Cover 4 nails with the base, except the big one, and put them in a lamp to dry. The time depends on the type of device - in LED - 30-60 seconds, in UV - 120 seconds.
- Now start applying color - also from the little finger. The application scheme is the same. Put your hand in the lamp, the same amount of sushi - 30-60 or 120 seconds;
- Apply top coat as the last layer, dry and remove the sticky layer with a cleanser;
- Now work on your thumbnail by repeating the previous three steps - applying base, color and topcoat. Do the same on the second hand.
How not to do your own manicure
Remember that simply cutting off overgrown cuticles with nail scissors or clippers is ineffective. It is much better to use special cuticle solvents so as not to damage the base of the nail and get rid of overgrown skin.
Don't get your nails done very often. Cutting your cuticles once a week is an acceptable frequency of self-manicure. If you remove the skin every 3-4 days, there is a high risk of damaging the cuticle and causing nail problems.
Self-manicure is also good for those who do not go to a salon or nail service. In this case, the frequency of the procedure should not be more than once every one and a half to two weeks, so as not to damage the nail and cuticle.
How to remove gel polish at home
To remove regular nail polish, you will need a napkin or cotton pad, as well as nail polish remover. It is better if the liquid is without acetone - it is less harmful to the nails. Simply wipe each nail with a cloth soaked in the product until the polish is completely removed.
To remove gel polish you will need:
- foil. Regular food grade food will do. Cut 10 long strips about 10-15 cm;
- gel polish remover. You need a specialized product; a regular one for varnish will not work. When choosing a product, pay attention to the composition - the more gentle it is, the better for your nails and skin
- file 150/180 grit;
- lint-free wipes or cotton pads - 10 pieces, 2 times the size of a nail;
- orange stick;
- cuticle oil.
- The top coat was removed from each nail with a file. This is necessary in order to hold the remover less and reduce its harmful effects on the skin and nails. You only need to remove 1 mm of the product, so don’t overdo it—your nail shouldn’t show through the coating;
- Soak a napkin in the product and place it on the nail so that the entire plate is covered;
- Wrap a strip of foil around your finger to secure the napkin. In addition to fastening, the foil enhances the thermal effect, due to which the bonds between the layers break down;
- After 15 minutes, remove the foil from 1 finger and check if the coating has softened. Using the wide side of the orange stick, carefully remove the gel polish. If somewhere the coating has not come off, wrap the nail again in a napkin and foil - do not press on the nail with a stick and do not try to clean off the gel polish. This way you will damage the nail plate;
- Repeat the previous step with all nails and wash your hands with warm water and soap;
- Dry your hands with a towel and apply oil to the cuticles and nails.
Coating remover - how to choose and use
Common mistakes in home manicure
- poorly prepared cuticle . If you have a hard cuticle, then it is quite difficult to move it carefully and the result is a sloppy manicure. To soften the skin, apply oil to the cuticle at least once a day, then it will be much easier to do an unedged manicure;
- cuticle trimming . I have already written that I do not recommend doing a trim manicure yourself. Another reason is that the more you cut, the faster the cuticle grows;
- many layers. It is better if the coating consists of 3, maximum 4 layers, and each of them should be as thin as possible. This rule applies to both nail polish and gel polish;
- applying polish or gel polish to the skin . This usually happens due to a poorly done hygienic manicure, which does not allow the color to be applied accurately. If you are not confident in your abilities, use liquid tape, otherwise the manicure will look untidy;
- uneven layers . Nowadays this mistake is less common, since almost all nail coating products tend to self-level. However, try to keep the layer even without any bumps or depressions;
- under-dried coating . As soon as you start painting your nails, three hundred things immediately appear that cannot be delayed. As a result, you smear the polish or don’t hold the gel polish in the lamp enough. It will be faster to dry the coating properly than to redo the manicure later;
- improper removal of the coating . The biggest temptation is to remove the gel polish without soaking it in an even, beautiful layer. Along with it, you also remove the top layer of the nail, which becomes weak and thin.
10 mistakes when doing hardware manicure and how to avoid them
Training video: master class on applying gel polish
The presented gel polish master class - video for beginners will teach you how to properly apply a gel manicure without leaving home. Then there will be no need to attend special nail design courses. Also, after watching the video master class with gel polish, you can avoid problems with peeling, cracking and swelling of the material applied to the nails.
As a result of independently mastering the gel polish master class for beginners, you can create a glossy manicure with your own hands. Thus, freeing yourself from trips to a professional manicurist, significantly saving money.
Don’t be upset if, when applying a varnish coating yourself, “the first pancake turns out to be lumpy,” because professionals in their field were also trained by trial and error.