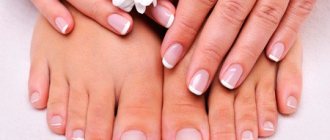
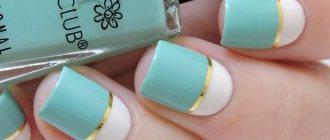
French shellac is a classic manicure made using one of the strongest coatings.
The main advantages of this manicure are its versatility and durability. This design is suitable for any nail shape. So you can safely choose it as a high-quality alternative to any other type of manicure. You will find step-by-step instructions in our article.
Advantages and disadvantages of shellac
This coating has three main advantages:
- it is very durable and can decorate nails even for a month without the need for correction;
- due to its durability, this coating strengthens even the weakest and most brittle nails;
- a brighter color, much more attractive than the shades of regular varnish, allows you to achieve the perfect manicure.
But against the backdrop of such attractive advantages, there is also a serious drawback - shellac is quite difficult to work with.
You can create a French coat yourself correctly at home only if you have sufficient experience working with this coating yourself, as well as if you have all the tools necessary for the work and a special lamp for drying.
But application is not the only difficulty in working with gel polish. Separately, it is worth noting that to remove this coating it is necessary to use foil and a specialized product, without them there is a possibility of seriously damaging the nail plate. In order not to harm your nails, you need to follow the instructions step by step for creating a French manicure using shellac.
Peculiarities
The main feature of French manicure is its relevance and versatility. Fashion trends change from season to season. And only this type of manicure always remains in the top. It is suitable for both special occasions and everyday looks.
If you have all the necessary tools, it is quite possible to do it at home. It won't take much time, but it will look great.
With the classic design (with a beige base), the nail growth line at the base will not be as noticeable as when covered with bright colors. Shellac lasts quite a long time on nails, so this aspect becomes very important.
Required materials and additional tools
To paint a French jacket using shellac, you need a fairly impressive list of materials and tools:
- Standard manicure set , with which you need to prepare your nails and give them shape;
- Any degreaser for treating the nail plate;
- Primer is a kind of nail primer applied before a manicure;
- Shellac itself is a base for manicure, a fixative, white or any other color to highlight the tip of the nail, as well as the color of the base if you want to make an opaque jacket;
- Special lint-free wipes , which remove the sticky layer after the manicure has dried;
- Special stencils for creating a neat French manicure.
First step: nail preparation
Before you start applying shellac (French) to short nails, as well as to long nails, a base must be applied to the plate. Before this, it is worth pre-treating the cuticle and the stratum corneum of the nail. To make the coating last longer, file off the surface of the nail with a soft tool or polish. Do this very carefully and gently. If the damage is severe, you can get into serious trouble.
When all the nails are finished, remove any excess cuticle. Use tweezers or scissors for this. You can also use a special processing device. Remember that before applying French shellac, you cannot perform a wet manicure. Otherwise, the coating may not adhere well to the plate.
French manicure technology
A French manicure performed with shellac is not much different from creating any other nail design. Let's look at it step by step:
- First, the nail is prepared for creating a design, filed and shaped.
- The surface of the nail plate is degreased and covered with primer.
- A transparent manicure base is applied and dried according to the instructions, the sticky layer is removed.
- If you want to create an unusual colored jacket, apply the main color of the varnish in two layers, each of which is dried. If a classic manicure is planned, this step is skipped.
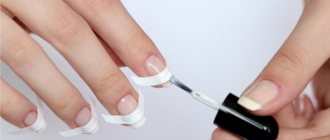
- Draw a “smile” line. If you don't have enough experience, you can use stickers. Stencils are glued onto the nails , leaving the free edge of the nail open for painting, it is covered with white or colored varnish, and the resulting result is dried in a lamp.
- a fixative is applied to the entire surface of the nail plate and the nails are dried in the lamp for the last time.
To treat the edge of the nail, it is better to immediately choose the shellac that gives a dense color; in this case, applying two layers is not recommended.
The video below contains a detailed master class on creating a French manicure using shellac.
French shellac tutorial at home:
1) Before applying new gel polish, you need to prepare your nails. If you have any coating on your nails, be sure to remove it. I had gel polish applied. I do a light wash on the nails, cover each nail with cotton wool with a special liquid for removing gel polish, and wrap it in foil. After 10-15 minutes, you can remove the gel polish. It can be easily removed with an orange stick or a manicure spatula. Whichever is more convenient for you. We pass the surface with a buff. We give the nails the desired shape, if necessary, and do a manicure (baths with sea salt, trim the cuticle, etc.)
2) The nails are already ready - now we proceed to the manicure. First, degrease the surface, then apply Ultrabond to bond the nail plate and base coat. Then we apply the base coat. It’s better not to rush with it, since the base is thick, but it applies evenly. Each layer must be dried in a lamp for 2 minutes.
3) Now with a thin brush we draw the line of the smile, but it will be slightly irregular in shape, on one side it will be too high.
4) Draw this on all nails. I did it on my little finger and ring finger in one direction, and on the rest - in the other direction.
5) We apply the French polish in one layer, since the white varnish is thick and fits well on the nail.
6) Now, using gold paint and dots, we put dots along the French line. You can make them the same size or from larger point to smaller point. Everything is your choice.
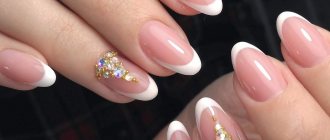
7) On the ring finger we attach rhinestones to the base. They are easy to transfer from the box using a doser or use a toothpick. Let them dry in a lamp for 2 minutes.
Now we cover all the nails with a top coat.
We pay special attention to the finger with the stones; we paint it last, because we need to secure the stones well so that they do not fall off on the first day of wear.
Wipe all nails with liquid to remove the sticky layer.
9) Lubricate the cuticle with oil or hand cream. After all, the manicure must be completed, and that is why it is necessary to soften the skin around the nail plate.
Now our French shellac manicure is ready.
You can make a French coating on your legs, but instead of dots, draw a line with gold paint. This is also your choice, I just offer it as an option so that your image is completed. In general, I believe that French coverage will always be in fashion and can be worn for a very long time, and you won’t get tired of it.
See other ideas for gel polish design at home.
Now we can say for sure that the manicure is complete. Good luck with your creativity!
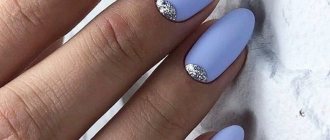
Existing color palettes
There are a huge variety of shellac colors to choose from to highlight the tip of your nail and create a beautiful colored base. Almost every brand has suitable options among the colors. Thus, the CND brand alone has many varnish options for the perfect coating.
| Existing Color | Features of French manicure |
| Cream Puff | Very white varnish for a classic design |
| Studio White | A more subtle white, reminiscent of ivory |
| Negligee | Translucent, barely noticeable milky shade with a pleasant pink tone |
| Beau | Delicate pink shade that hides imperfections of the nail plate |
| Clearly Pink | Quite bright pink, as close as possible to the natural color of the nails |
| Mother of Pearl | Transparent varnish with unobtrusive small sparkles |
| Zillionaire | Nail polish with a combination of silver and gold sparkles, making the manicure festive |
However, among other brands you can also choose colors suitable for a classic French jacket.
| Existing brand | Matching colors |
| Perfect Match Lechat | Pink Bibbon, La Princesse, Paloma, Pink Lady |
| IBD Just Gel | Seashell Pink, So In Love, Juliet |
| Color Couture Entity One | In the Nude, Strapless, Peek-a-Boo, Spotlight |
| In'Garden So Naturally | Scarlett, Tenderness, Amor, Ivory |
| Gel FX from Orly | Bare Rose, First Kiss, Pink Nude, Sheer Nude |
| Harmony Gelish | Bashful, Tassles, Taffeta, Little Princess, Moroccan Nights |
| Opi Axxium | Passion, Italian Love, Bubble Bath, Alpine Snow |
| Opi GelColor | Passion, Samoan Sand, Funny Bunny, Kyoto Pearl |
| Jessica Geleration | Blush, Endure, Naked Gun, See Thru |
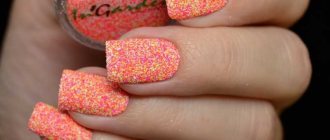
Manicure for short nails
Ideas for designing small nails are very diverse. You can draw a pattern, glue liquid stones, add rhinestones, sparkles, stripes, etc. to the plates. Let's look step by step at how to make a delicate gradient manicure with shellac (ombre) on short nails:
- We suggest using white and red, which are very suitable for festive gel nail designs. First, a degreaser is applied to the nails, then they are lubricated with a base and dried in a lamp;
- After this, the most interesting part begins - drawing the gradient. The peculiarity of working with gel is that each shade will need to be dried in a lamp;
- First, apply the base and let it dry. After this, the extreme gradient is painted over. To do this, apply a few drops of varnish to the sponge. Then dry again. This is repeated until the moment of complete sketching;
- The materials can be applied immediately - if, for example, the gradient is not complex. In other words, spread all the polishes one by one onto the sponge, and then apply it to the nail. This will save a lot of time, although the pattern will not be as beautiful as when drawing each gradient level separately;
- Afterwards you need to fix the design and dry it with a lamp. The sticky layer can be wiped off with alcohol.
You can also make a mirror shellac manicure, it is perfect for a wedding or just a festive one. This is the easiest technique for beginners. To make it yourself you won’t need anything other than a lamp, foil and varnish fixer. The nail is cleaned with a buff, then a base is applied to it. Foil is glued to the base. It is trimmed around the perimeter and leveled. The second layer should be applied with a fixative. Afterwards, the nails are dried in a lamp.
Secrets of creating a French jacket
Creating a French manicure using shellac at home for beginning manicurists can be made easier thanks to several tricks:
- For short nails, a large edge of the nail is not suitable; it will only visually shorten it;
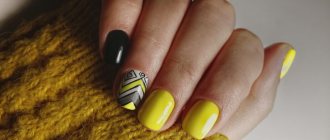
- you can easily experiment with the classic “smile line” by making it multi-colored, zigzag or covered with sparkles;
- Among the color combinations you can choose not only natural pink and white, but also white and lilac, distinguished by a diamond tint, white and glossy pink, white and pearlescent pink.
Experiment
How to make a reverse French
Not so long ago, a new manicure technology gained popularity. Its name, indicated in the title of the current item, is often used by professional craftsmen. But beginners or amateurs who are familiar with gel manicure only in general terms prefer something different. In this case we are talking about lunar manicure. Doing it at home is quite simple. But reverse French gel polish will look very impressive, stylish and fashionable. The main thing is not to be afraid to try new technology.
It consists of the following steps:
- First you need to prepare the varnishes of the desired shades. For the classic version of a manicure, light pink and white polish are required; for colored shades, you can choose arbitrary shades, that is, those that suit a particular person.
- Lunar design is also done using special stencils or a thin brush. Experienced craftsmen use the second tool because they have sufficient dexterity. For beginners, it’s better to start with the first one to ensure the clarity and accuracy of the nail art.
When everything you need is ready, let's move on to action - performing reverse French with gel polishes at home:
- After applying and drying the base, coat the nail plates with varnish of the main color. For the traditional version - transparent or pink, for the colored one - any other.
- Fix the manicure under the lamp for three minutes.
- Then we draw a “smile” at the base of the nail with a thin brush or decorate the nail plate using special stencils.
- Dry the resulting design under the lamp for three minutes.
- And we finish the job by applying a top coat, drying for two minutes and removing the stickiness with a cleanser.
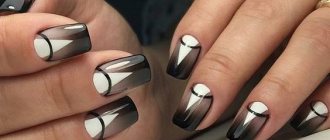
Design idea
From the existing varieties of designs, you can easily choose the perfect manicure that you will immediately like with its appearance. There are a huge number of French options that can be created using shellac.
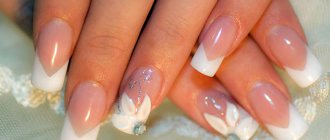
French New form is the best option for square nails. Its difference lies in the fact that the smile line is made in the form of a corner, opened towards the base of the nail, while the smooth edge of the nail plate is completely painted over.
Crystal French is a new technology that allows you to turn the edge of the nail either into a completely transparent nail plate, or into an imitation of iridescent translucent crystals of crystal and diamond.
Reverse French , or “Sideways French”, is more different from all other designs, since the “smile line” here does not cover the edge of the nail, but stretches along the nail plate along the entire surface of the skin or highlights only one edge of the nail near the same skin .
Inverted Half Moon nails, or “moon” manicure , characterized by highlighting the natural semicircular zone at the base of the nail using colored varnish or jewelry.
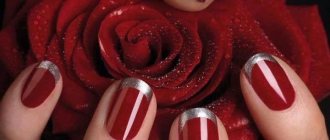
Fan-french is the use of a wide variety of methods to decorate the edge of the nail. Multi-colored stripes, full-fledged designs, and the use of sparkles and other decorations that imitate a standard jacket in shape can be chosen as design techniques.
A double smile is a fairly simple technique based on the combination of two smile lines made in different colors.
French millennium looks very bright and attractive , where glitter is used instead of varnish to highlight the edges of the nail. This festive option is quite simple, but at the same time very elegant.
Separate options are color and wedding jacket . The first is made in different shades, and the second completely gravitates towards white with traditional wedding elements (bows, lace).
The technique of creating a French manicure using shellac is quite labor-intensive; it will be difficult for a beginner to cope with it. You will need more equipment, tools and skill than to perform French with regular varnish. But this process is worth it, since this manicure will last much longer than usual.
More interesting articles:
How long does high-quality shellac last on nails?
Shellac is loved by many women because of its strength, durability and beautiful appearance. However, one of the most important questions is: how long does shellac last on nails?
If you read the instructions, you will find that gel polish can stay on your nails for 14 days, but it will last longer, it’s just that during this time your nails will grow and an untreated stripe will appear in the cuticle area.
If you read the instructions, you will find that gel polish can stay on your nails for 14 days
It is invisible in most cases, but some women want a more perfect look. Gel polish can last up to 1 month - everything is individual for everyone, and depends on the quality of application of the product. On average, shellac lasts 3-4 weeks.
However, if you often have to work with chemicals and soap solutions, the product may not withstand such intensity, especially in the place where the layer is the least thin. Then the shellac will last 1-2 weeks.
Why shellac?
Nail designs can be done with any varnish. But today it is shellac that is gaining great love and popularity very quickly. This type of coating has very high strength, as well as the ability to maintain its appearance under any household influences.
The advantages of shellac include:
- Durable coating;
- Glossy shine;
- The ability to preserve and grow nails;
- Harmlessness;
- Durability;
- Large palette of shades.
Therefore, shellac is simply ideal for French manicure. It will allow you to create a long-lasting coating, preserve your nails, and also keep them in good shape for at least 2 weeks, and sometimes more.
How to make French shellac at home
More often, French shellac at home or in a salon is done using a three-phase system. The basis is a base, top and two colored gel polishes. If you have white paint, it is better to use it. The material allows you to create an elegant smile with a rich white color.
The list of products and tools that are used in this manicure will not be long. You will need: lint-free wipes, degreaser, primer, base, top coat, colored varnishes, hair brush, gel paint. The materials needed for the three-phase procedure can be easily found commercially. Everyone should use the brand they prefer. It is not necessary to choose a beauty product from one specific brand.
*We perform nail treatment using any technique. The length of the nail must be adjusted, the cuticle must be trimmed and the plate degreased.
*We begin to apply the primer and base. After the base coat has dried, apply colored varnish as a camouflage effect. Here everyone uses their own shade: transparent nude, pink tones or beautiful beige.
*The colored varnish has dried, apply topcoat, dry in a lamp and remove the dispersion layer.
*We will draw with paint. It fits better on a degreased surface. Using a hair brush, pick up a little colored gel; in the classic version, this is white gel paint.
*Indicate the width of the jacket. After this, start setting the height in the corners, using smooth movements to connect the side edges with the middle. If you can’t draw a line the first time, dip the edge of the brush into the paint and draw a thicker outline. Then paint the free edge. Be sure to paint along the end. Then you can re-coat with top.
*Degrease the plate, remove the dispersion layer. The design is ready.
If you don’t have paint on hand to create a strip, you can use white gel polishes. Draw a line using smooth movements. You need to make the design immediately after the camouflage has dried. First apply the base and camouflage varnish, then smile. Finally, the design is covered with a top.
Click "Like" and get the best posts on Facebook!