Do you want something completely unusual, catchy and extravagant? Try creating a smoke effect on your nails! This design was invented quite recently, but has already gained incredible popularity among those who like to experiment with their image. It can be bright or moderate, but in any case it looks very original. In this article you will find photos that will help you understand what this manicure is. And if you want to master a design that is new to you, we will tell you how to make it - we will offer detailed step-by-step instructions for its implementation and several training videos.
Peculiarities
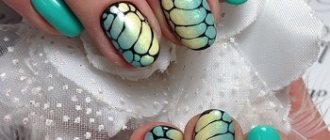
Manicure with streaks is a modern technique of applying a pattern, thanks to which you can create compositions in the form of a volumetric haze. In addition, this design allows you to give your nails an unusual and bizarre shape, and the interesting combination of a translucent background and puffs of smoke favorably emphasizes the beauty of the hands.
Patterns can be either multi-colored or plain.
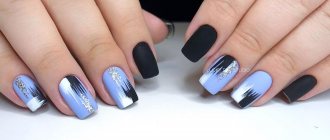
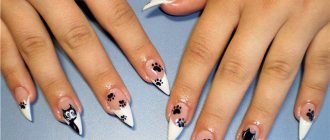
This “nail art” on a black base looks special; it is most often chosen for an evening look, since it is ideally combined with long outfits. Suits and other formal attire complement this manicure well.
You can decorate nails of any length and shape with “smoky” decor. To create an unusual pattern, you need to use gel polish of various colors.
Blurred lines in manicure are done using alcohol or regular nail polish remover.
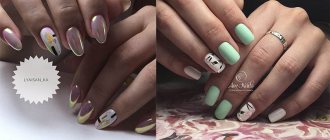
Current design ideas for manicure in gray tones for the 2022-2023 season (photo)
Don't be afraid to experiment with gray in design. Moreover, now you don’t need to invent anything, just look at the photo gallery and choose the appropriate nail design option in gray tones.
Tools and material
Before you begin the creative process, you need to master certain nail art skills and prepare everything you need for the job. Today, there are many materials for designing a manicure with a smoke effect, and masters most often choose only a few of them.
- Gel paint. It is considered the ideal raw material for the execution of such a design. The main advantage of this paint is that, when combined with an alcohol-based liquid, it can form a translucent haze.
- Gel paste. This material is also great for creating unusual designs. To give an expressive outline to the composition, the viscous paste must be mixed with a small amount of nail polish remover.
- Stained glass gels. Thanks to their homogeneous structure and wide selection of tones, such gels can be used to create an interesting color play. The pattern is applied in an even layer to the nail plate and has smooth transitions of swirls from one shade to another.
At the same time, it is not necessary to purchase stained glass gels - you can make them yourself by mixing acrylic paint with a top coat or a special modeling gel.
In addition to the above, to design a manicure you will need a flat and thin brush, acrylic powder of any shades, a multi-colored base and ready-made stickers with an original print.
How to do it?
A manicure with a hazy effect can be performed in various ways, each of which differs in the choice of material and the technique of applying patterns.
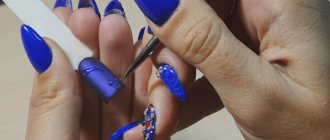
For beginning craftswomen, a design option that requires regular nail polish, a saucer of water and a small object with a sharp end is suitable.
This can be either a needle or a toothpick. With this water manicure you can create an even and beautiful smoke effect on your nails. Colored drops of varnish are placed on the plate, then the finger is dipped into water and original stains are formed there.
In addition, you can draw wavy lines from varnish using special brushes. At the same time, a thin brush allows you to apply lines of any width, and a flat one helps to fix their sizes, so it is usually used for shading.
For girls who prefer to do their own manicure at home, the idea of creating a smoky design using beautiful stickers is also suitable.
Typically, this method is chosen by those craftswomen who have little experience in “nail art” or do not have free time to create a manicure. Original sliders and stickers allow you to achieve a clear smoke effect. To do this, it is enough to decide on the color background and size of the image.
A regular base is applied to the nails, after which the sticker is applied and smoothed over the surface, and it is secured with a special finishing agent.
Classic technique
Don't be afraid to experiment - you will definitely succeed! Despite the external complexity of the design, this manicure is quite simple to do, so be patient and tune in to the result. Let's look at the first implementation option.
- Perform a standard hygienic manicure. Remember that well-prepared nails are already half the success.
- We remove the old coating, carefully work on the cuticle area, removing it in any way convenient for you - by cutting or using a remover and an orange stick.
- We give the nails the desired shape and lightly sand their surface with a manicure buff.
- Evaluate the results: if you think that your nails look perfect, then proceed to apply a decorative coating.
- Cover your nails with a base coat for a neater manicure that lasts longer. Dry it in a lamp.
- A smoky manicure looks incredibly beautiful on a black background, so that’s what we’ll use. Paint your nails with black gel polish, dry in a lamp and remove the sticky layer. This can be done using a special product or regular alcohol applied to a napkin.
- Now take white gel polish. Its brand does not matter - you can use the decorative coating of your favorite company.
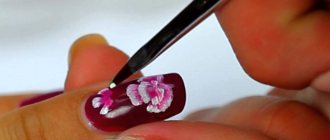
- Dip a thin brush into it and draw a random line diagonally on the nail. It should be a little thicker on top and thinner on the bottom. Don't draw too carefully - it simply indicates the direction of the future "smoke".
- Dip the brush into gel polish remover and begin to blur the line with light movements. Do not erase, but rather wash away. You will see how the design takes on the shape of smoke flowing over the nail.
- Dry the gel polish in a lamp.
- If desired, the manicure can be left in this form, simply covering it with a top coat. But we will make the design more interesting.
- For this we will need stained glass gels in blue and green colors. Using a brush, cover the lower part of the “smoke” with a very thin layer of green stained glass gel, and make the upper part blue.
- That's all - all that remains is to cover it with topcoat and put it in a UV lamp for 30 seconds.
Nail art with acrylic powder
We looked at the first option, but the manicure can be made even more expressive if you use acrylic gel powder.
- Repeat all the procedures described above until the white line is blurred, but this time you do not need to remove the sticky layer.
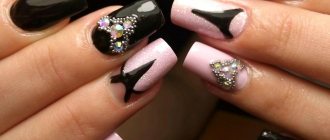
- We'll experiment with pink and orange acrylic powder. Using a brush, rub orange powder into the lower part of the “smoke” stream, and pink powder into the upper part.
- If there is any pigment left on the black background, carefully remove it with liquid to remove the sticky layer.
- We fix the result with a top layer and dry it in a lamp.
- With acrylic powder, the “smoke” takes on even greater volume and expressiveness. Be sure to try this design - it will not disappoint you.
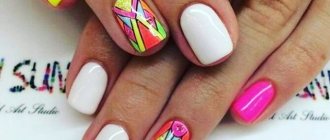
- Design with colored gel polishes
- A beautiful design can be achieved using additional colors of gel polishes. We will not describe the initial procedures, since they are completely identical in both the first and second cases. Let's start making a new design right away.
- Use yellow gel polish to carefully paint the upper part of the “smoke.” Decorate the bottom in blue. It is better if gel polishes are liquid. If they are too thick, it is better to add a little topcoat to get a more sheer coverage.
- Dry in a lamp.
- Apply top coat, dry again in the lamp and remove the sticky layer.
As you can see, this design can be done in many different ways, none of which can be considered complicated. Smoke effect nail art is very easy to learn and looks amazing.
Design with colored gel polishes
A beautiful design can be achieved using additional colors of gel polishes. We will not describe the initial procedures, since they are completely identical in both the first and second cases. Let's start making a new design right away.
- Use yellow gel polish to carefully paint the upper part of the “smoke.” Decorate the bottom in blue. It is better if gel polishes are liquid. If they are too thick, it is better to add a little topcoat to get a more sheer coverage.
- Dry in a lamp.
- Apply top coat, dry again in the lamp and remove the sticky layer.
As you can see, this design can be done in many different ways, none of which can be considered complicated. Smoke effect nail art is very easy to learn and looks amazing. You can see this for yourself by watching a useful video that discusses all three described methods of execution.
Interesting ideas
The hazy effect on nails can be achieved with either colored, white or translucent varnish. It all depends on the girl’s personal preferences and the style of her image.
At the same time, you should not be afraid to experiment and make any creative fantasy come true.
White clouds of smoke
To get an unusual transparent haze, you will need thick black and white gel polishes, top and base. First, you need to cover your nails with a special base in the form of gel polish, then carefully apply a two-layer black base, first drying each layer. Then you should clean the sticky layer with a cloth and start drawing white stripes.
They are placed throughout the entire volume of the nail plate, and they will serve as a direction for the “smoke”. In this case, the strips are made thin on one side and thicker on the other.
Finally, the brush is dipped in alcohol liquid and begins to be drawn along the lines - as a result, the white varnish will “float”. Next, you should wait until the decorative layer is completely dry, and at the end fix it with a finishing coat.
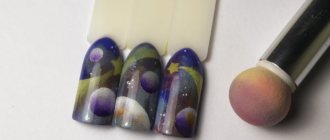
Volumetric drawing
Many fashionistas prefer to have a “smoky” manicure not only with color, but also with volume. If you use regular gel polish for work, you will not be able to achieve scale, since this material has a low density. Therefore, for creativity you need to stock up on a special base, dense-textured varnishes (colored and black), and a finishing topcoat.
In this case, it is necessary to draw stains not only with the help of a thin and flat brush - you will also need a fan brush for the work.
The nails are first covered with a base coat, and then with two layers of black varnish. Using white gel polish, small wavy stripes are created, then the brush is moistened in liquid and the outlines of the lines continue to be formed.
Additionally, the drawing must be sprinkled with acrylic powder: it is evenly distributed over the entire surface using a fan brush. The finished design is fixed with a fixative.
Colored smoke
For such a design, both acrylic multi-colored powder and stained glass paints or gels, which are used for nail extensions, are suitable. The procedure for creating “nail art” is quick and simple. Pre-prepared nails are covered with a base coat, then two layers of black varnish are applied and dried in a UV lamp.
Using such a brush, lines are drawn and the nails are dried again in the lamp. Then they mix the top coat or gel with the stained glass paint and begin to carefully apply the resulting haze.
For this design, it is important to use several colors at the same time, making smooth transitions. As a result, the marigolds will acquire a special mystery and gloss. It is not recommended to complement the design with other decorative elements, otherwise you will end up with an awkward composition, as a result of which the relevance of the haze effect will be lost.
Best ideas
The smoke effect on nails can be white, translucent or colored. It all depends on your mood. Here you need to experiment and choose what you like. Usually this design is not decorated with anything, but for originality you can add a few rhinestones on other nails.
White haze
You can create a transparent haze using simple gel polishes. It is important that they are very thick. Making a translucent haze is quite easy at home. Let's take a closer look at all the intricacies of this unique coating.
What you will need:
- base;
- black gel polish;
- white gel polish;
- lint-free napkin;
- flat or thin brush;
- top
How to make a smoke effect on your nails:
- Cover your nails with gel polish base.
- Apply the black shade in 2 layers, drying each one well.
- Use a lint-free cloth to remove the sticky layer.
- Dip a thin brush into any white gel polish and draw a thin line along the entire perimeter of the nail. This line will be the direction of the smoke.
- On one side it can be thick, and on the other it can taper and be thin.
- Dip the brush into gel polish remover and draw it along the line.
- The white gel polish will begin to “float” a little. This layer must be thoroughly dried.
- Cover the design with a finishing coat.
Video instructions
How to make a colored smoke effect on your nails can be seen in the video below.
Volumetric smoke
How to add volume and neatly decorate smoke? After all, this is quite difficult to do with simple gel polishes, because they do not have sufficient density. Now we will tell you in detail how to decorate smoke tubers.
What you will need:
- base;
- black gel polish;
- colored gel polishes;
- flat or thin brush;
- colored acrylic powder;
- nail polish remover;
- lint-free napkin;
- fan tassel;
- finishing top.
How to make a smoke effect on your nails:
- Cover your nails with a base coat and then 2 coats of black gel polish.
- Remove the sticky layer with a lint-free cloth.
- After drying everything well, use a thin or flat brush with white gel polish to draw a small wavy line.
- Moisten the brush in nail polish remover and carefully repeat the outline of the strip on the nail.
- Without removing the sticky layer, sprinkle colored acrylic powder onto the nail using a fan brush.
- The design is ready. You can cover it with topcoat or leave it like that.
Secrets of stylish nail art
We have collected for you the most unusual secrets that will help you create an original coating:
- stains can be made with a thin or flat brush;
- You can add volume to the design using acrylic powder;
- the best substrate for design is black gel polish;
- use special stickers with a ready-made print design;
- the smoke effect looks good on nails of any length;
- It is recommended to decorate only 1-2 fingers on one hand.
Execution technique
The smoke effect on nails is created in several ways. But they are all quite simple in their implementation. It is enough to find available tools that every home user who likes to decorate their nails has at home. Let's take a closer look at each. And then you decide for yourself which one suits you best.
Simple brush
To create a smoky manicure, you can use a thin or flat brush. It is with their help that a wavy line is created, which will then need to be blurred a little. A thin brush will help you create a line of any width, but a flat brush has a certain size, but it is better to shade it.
Stickers
If you don’t have the time or desire to paint something on your nails, then stickers and sliders will help you create an original haze. All you need to do is select the desired image with volumetric smoke on any background. All you have to do is carefully attach the slider or sticker and smooth it over the surface of the nail using an orange stick. You can secure the design with a finishing coat.