One of the most popular and beautiful designs in nail design can be called monograms. But not all novice masters know how to draw them. This review is just for those who want to learn how to draw these beautiful decorative elements. It contains step-by-step photo and video lessons, training cards and photos with design ideas. Monograms on nails are rarely seen in their pure form; this design is combined with different manicure techniques, as well as nail accessories. The result is a very beautiful combined manicure.
Large selection of training cards for painting nails
Creative ideas and good taste are closely related to basic knowledge. Beautiful ornaments, floral patterns, interesting combinations of bright colors come with experience.
Important! Beginners need to master simple drawings, then move on to more complex lines. Working out fine lines will improve the results of your work.
Training cards for painting nails with monograms
Well-groomed hands will be emphasized by a beautiful nail design with artistic details. There are many sketches for original drawings; they are used for painting. Patterns called “monograms” have gained popularity in this direction. This includes curls, squiggles, flowers and ornaments. For your first experience, it is better to use sketches for beginners.
Beginners are offered simple drawings, which can be used to practice basic elements and working with a brush. You can print out practice cards for painting nails with simple monograms.
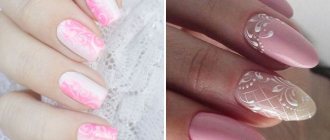
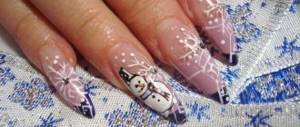
A sketch of monograms in the form of delicate patterns will complement a French manicure in pastel colors. You can draw one pattern on all nails or apply it to one. The composition is well suited for celebrations.
For a more sophisticated and lace manicure, use training cards for a more complex art design. There are a lot of fine lines and small details, so it is better not to combine a large number of colors, but to stick to a few shades.
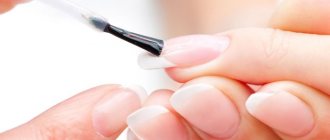
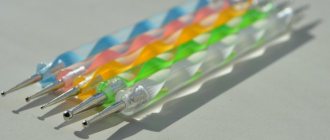
In the photo you can see how the process of painting with a thin brush on printed material takes place. Masters recommend purchasing several brushes of different thicknesses, which need to be changed for individual elements.
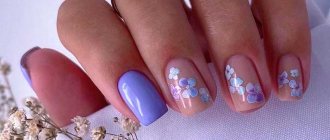
Beautiful ornaments in the form of flowers are one of the options for monograms. Drawing floral patterns is considered to be of medium difficulty. This is a feminine manicure that will truly decorate your hands.
After painting training sheets or cards, you can move on to tips. Below is a clear example of how to draw a pattern.
Artistic skills developed using manicure sketches will allow you to draw luxurious monograms with the finest lines. This art design will create different looks for fashionistas.
Training cards for Chinese painting
Manicurists create bright floral designs using Chinese painting. As you know, floral elements are the basis of Chinese painting. A special feature of the drawing is the double stroke technique with a smooth transition of colors.
Advice! To master oriental craftsmanship, you need a lot of practice and a flat brush. First, they practice basic strokes in one direction, then in the other.
The basic sketch consists of leaves and petals. First of all, use a stroke of a light shade, then a darker one. Masters advise beginners to take their time and practice individual elements more.
In the next option, you can try to draw flowers with veins on such practice sheets for painting nails. This is a more complex floral manicure design in a purple shade.
Here is a detailed diagram of the main elements of oriental design. Here you need to pick up the paint correctly and carefully shade it. For this, an acrylic composition or gel polish is used.
After going through many difficulties, a masterpiece of manicure design emerges. The full palette of shades is expressed in the color composition. In this technique, the design is made simultaneously on several nails, which gives a modular design.
The result largely depends on which brushes are used for each detail. Here is a selection of six brush options for proper use. Chinese color manicure is multifaceted, so more professional skills are required.
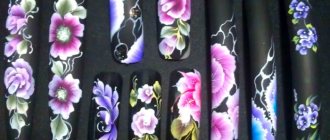
In addition to white sketch sheets, special black paper is used. It is convenient to work out the finest lines and strokes here. Black color also looks original in manicure.
Professional masters claim that the result will be visible only after a month of practice. Chinese painting is a labor-intensive process due to the technique and many complex elements.
Types of stencils for nail design
Water based
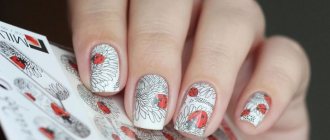
Water stickers
They are a thin and elastic film with an image , which is applied to paper for convenience. They are used after wetting in warm water.
Adhesive based
Thanks to the adhesive layer, the stickers adhere well to the nail plate and help create clear designs.
French stripes
Stamping disc
One of the most popular stencils, because not everyone can boast of the ability to draw a perfectly straight line. And with the help of special strips you can make a French jacket even at home.
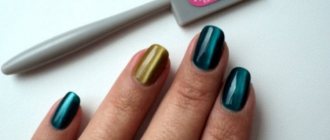
Stamping disc
The main tools of this technique are a stamp for transferring the finished drawing and plates with drawings . The stamp has a rubber or silicone tip, which allows you to transfer the finished image through the print.
Airbrush stencils
Airbrush stencil
They are rarely used at home, since this technique requires a special tool - an airbrush , which is quite expensive. The template is firmly fixed with the help of an adhesive base, and after spraying the paint it is removed, leaving a beautiful design.
Vinyl stencils
Vinyl stencil
They are very similar to paper ones, but have a number of advantages. So, they have a more varied design. With their help, you can create absolutely any decor without fear of smearing the design.
And thanks to the specifics of the material from which they are made, such templates fit more tightly to the surface of the nail plate, which allows you to make patterns with clear and even lines and draw the most intricate shapes.
What it is
French manicure strips are special stencils that allow you to create a neat French manicure. They come in different shapes, but the most popular are the classic ones - semicircular, they provide an even smile line, both on natural and artificial nails.
Stencils for French manicure can be glue-based or water-based.
The classic version of the French coat is a pastel-colored base, and the free edge of the nail plate is painted white. Today, this design is made using any color instead of white. Special stickers for French manicure, which are glued to the free edge of the nail, instead of a white coating, will help to diversify your French manicure. French nail stickers are:
- The stickers are self-adhesive. They are very easy to use and have many themes: from simple cartoon characters to photographic portraits. They also come with a 3-D effect.
Fimo design. Products of various shapes made from polymer clay. They do not have any adhesive base, so to decorate with them, use wet nail polish. Instead of varnish, gel is used on extended nails.
- Lace stripes. The required amount of lace is cut off and dipped into water. After this, they are easily peeled off from the base and transferred to the nail using tweezers.
- Metal and acrylic elements. They are used as additional decoration and are attached with special glue for manicure.
- Sliders - applied to an artificial or natural nail, sealed with gel on top and dried in a UV lamp.
French stickers in the photo.
Also called French manicure stickers are ready-made adhesive-based strips that are used to evenly apply the smile line of a French manicure.
How to learn to draw monograms
Monograms are a stumbling block for many manicurists. I so want to beautifully draw these even, symmetrical and perfect curls, but my hand doesn’t obey, my brush is not the same and my material is bad... But others can do it so simply and subtly! Sound familiar?
Girls, I’m very glad that you finally decided to look for information on how to learn how to draw monograms. After all, it’s much easier to take a little time and read the advice of those who have faced the same problems than to get into trouble with them yourself, right?
In order not to be unfounded, I will show one of my designs from three years ago with monograms, and how I draw them now:
The difference, in my opinion, is obvious :) As you can see, you can learn everything on your own - I have not completed any courses in this area. The only question is how long it will take you. Personally, I resisted for a long time and did not want to take on their development, but the time has come, and I gave up!
What is the main conclusion I made, and what I would like to advise everyone to do: even if they tell you what materials and what brush to use, they tell you about technique and brush pressure, you won’t get results without training! Yes, you will spend more than one evening of your free time on this and ruin a dozen tips - but only perseverance will help you achieve the desired result. To tell you the truth, I am still critical of my monograms and continue training - I want to be even thinner and more symmetrical!
The long preface is over, I hope you got something useful out of it :)
So, where to start learning how to draw monograms? That's right - from basic elements and training cards. My blog has a whole section with practice sheets on various topics: from basic lines and ornaments to monograms, which you can download and print for exercise.
However, this information was published about 4 years ago, so I consider it outdated. Such monograms that you can find there are no longer painted by top manicurists. Technology has changed, and we need to adapt to these changes. Therefore, I made new maps, using which I will show my exercises.
Monogram training cards consist of two parts: basic elements and simple curls in the first, slightly more complicated elements and entire nail compositions in the second.
The exercises are designed in such a way as to learn how to draw an element from different directions: top, bottom, right and left. Usually reverse movements (for example, with the right hand from right to left) turn out a little worse.
Here you will also learn symmetry in drawing: each pattern is mirrored in two versions.
And yes, you can find a lot of interesting training cards online, but you have to pay for them. I send them by email for free, for your reposts of this page on social networks :).
How to use training cards?
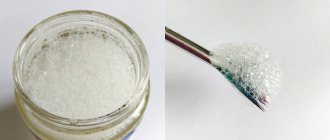
- They need to be printed. For this, it is best to use glossy paper - since it is more similar to the surface of a nail, it will not absorb paint, and the brush will glide better.
- If you don’t have glossy paper, you can laminate the sheet, put it in a file or cover it with tape - this way you will also get a reusable training card on which uneven elements can be erased and drawn again!
- The elements of the design on the card are made in such a way as not to exceed the size of the nail plate (this is why you need a ruler), so it will be difficult to repeat the pattern from a computer without printing.
- What to draw with? For training, I would advise using a cheap gel paint that you don't mind. It’s good if it’s black – on white paper, imperfections are best visible. You can also paint with acrylic paints, but they “stretch” a little differently, so it’s better to choose what you’re going to work with on your nails.
- How to dry gel polish on paper? In general, after a while it will air dry on its own, but it’s good if you have a lamp with a removable bottom - then drying will not be any problems. Read about my favorite and lifesaver SUN UV5 from Aliexpress. Well, if you made a reusable card according to my recommendations, then you don’t have to dry it at all, but erase everything and leave it for further training in your free time.
- About brushes. Girls, I can tell you one thing: you can buy at least a dozen thin brushes for monograms, and not one of them will paint the way you want. So I recommend starting with one, and then practice trimming and adjusting until you get what you want. Remember, the brush should not be very thin (three hairs), otherwise it will be difficult to hold a drop.
- How to draw. The first element on the map is the one we will practice drawing. Then it is duplicated translucent, so first we draw along its contours. Does everyone remember the copybooks at school? Everything is done here by analogy.
Well, in order to learn the technique directly, I recommend watching my training videos, because it’s better to see it than to read it, right?)
How to get cards?
All you need to do is repost this article on any social network and leave a link in the comments along with your email address.
PS I do not have the opportunity to respond to a comment immediately and send cards upon request on the same day. Therefore, I send mailings with training cards once a week (most often this is Monday). Please be understanding, since reading comments that this is garbage and deception is not very pleasant. Thank you for many more thanks!
PPS I also recommend regularly watching training videos on this technique, for example, on the Instagram account @venzelgram, where master classes by professional craftsmen are published, here is one example:
Publication from ➰ ONLY WENZEL (@venzelgram) Nov 22, 2022 at 2:44 PST
Original nail design ideas using stencils
Geometric Mess
Take varnishes of different shades and apply them in longitudinal stripes to the nail plate. Cut several narrow strips of tape and stick them randomly onto your nail. Then cover it with a plain, preferably matte, varnish.
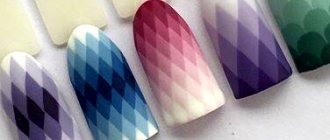
Manicure with triangles
Cover the nail with a plain base polish. Cut out several small triangles from tape and stick them on the nail, creating a design. Then apply a contrasting color of polish and let it dry.
Instead of triangles, you can use any other figures for decoration: hearts, diamonds, stars, etc.
Wavy French
The template for such a manicure is most conveniently cut using special serrated scissors for needlework. Cut a strip with wavy edges, glue it to the tip of the nail and cover it with polish.
Instead of waves, you can use paper lace.
To create an original manicure, you simply need nail stencils. You can buy them in a specialized store or make them yourself. These stencils are very easy to use, and the results are incredibly beautiful.
More interesting articles:
The sequence of creating a manicure
Surprising with a gorgeous nail design is not too difficult a task. From the beginning to the end of the process you need to go through only 2 stages.
To get started, stock up on the following:
- antiseptic;
- varnish of the desired colors;
- fixative;
- workpiece
Stage 1. Nail preparation:
- dip your fingers in a warm bath and hold for about 5 minutes;
- trim and file nails to achieve the desired length and shape;
- remove the cuticle;
- We use an antiseptic to treat the skin around the nails.
stage. Using a sticky stencil:
- apply the background varnish on which you will place the pattern and wait for it to dry;
- attach the blank to the nail the way you intended to place the design;
Advice!
When applying the stencil, make sure that it fits tightly to the nail; if air gets in, the picture will be blurry and the polish will smudge.
- apply varnish to the entire nail on top of the stencil (the color should be different from the base);
- wait for the second layer to dry;
- remove the template (lift one edge up and pull);
- apply a fixative;
- After the design has dried, coat the nail with finishing varnish.
The procedure takes no more than 15 minutes, and the effect can be amazing.
If you use gel polish, then the procedure is as follows:
- apply the base and dry under a UV lamp for about 2 minutes;
- place the blank on the nail (check if it fits tightly);
- paint the stencil with varnish (you can use acrylic paints);
- delete the template;
- After the surface of the nail has completely dried, cover it with fixing varnish and place your fingers under the UV lamp for 2 minutes.
If you don’t have tape on hand, and you have cling film and foil in your kitchen arsenal, then painting your nails is as easy as shelling pears:
- Apply a base coat that does not show through.
- Apply a varnish in a contrasting color to the base onto the foil.
- Wrinkle up the cling film and press it onto the foil.
- Make a stamp on the foil, then do the same on your nails.
- Do a similar procedure with the other varnish.
- Apply top coat to your nail.
Advice
! It is better to choose the color of the varnish and the pattern depending on the season. Also consider the place where you are going to show off your manicure.
By showing your imagination and defeating laziness, you can make your fingers irresistible in these simple ways. Use our tips and be beautiful!
How to make stencils for manicure with your own hands
Do you urgently need a spectacular manicure, but don’t have any stencils on hand? Let's not waste time, let's get to work! How to make templates:
- We arm ourselves with applique or manicure scissors.
- We scroll through slides in our heads with designs for headbands or patterns for stamping and settle on the one we need.
- We find a photo on the Internet and print it out or draw the selected stencil and cut it out. It is better to print on paper with an adhesive backing, but if this is not available, then use regular paper.
- We cut 10 copies, although it is better to add a few more at once, in case the sticker gets damaged.
- If you need to make a stencil several times, we strengthen it with tape to create density and so that the paper does not get wet.
- Let's get straight to the manicure!
How much does beauty on your nails cost?
Like any product, stamp stencils can be purchased in regular online stores. The most popular are, of course, French stripes, their cost is low
(depending on the manufacturer and the number of strips in the set, the cost ranges from 100 rubles). Ordinary stencils will cost about 600 rubles, but if you are interested in stamping nail art, then you will have to pay about 1000 rubles. for one disc.
But you can find cheaper options:
- from Salon Professional;
- stencils for nail decoration Angevi;
- YRE stamping kits cost 50 rubles. per set and you can choose a combined option (the set includes not only standard stickers).