What kind of foam is needed?
Absolutely anything, except shaving foam won't work. You can use:
- Bubble,
- Liquid soap,
- Shampoo,
- Bath foam, etc.
The liquid can simply be shaken in a glass until foam forms or placed in a bottle or jar (for example, baby food), which is convenient for reusable use when working with clients.
If you shake just a little, the soap bubbles will be large; if you shake for longer, the bubbles will be smaller. The final design on the nail depends on this.
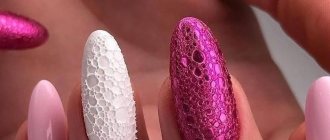
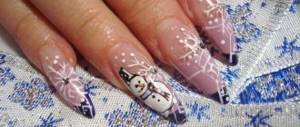
“Bubbles on nails” or manicure using the “bubbles” technique - nail art that blew up the Internet! (62+ photos)
Are you familiar with the new nail fashion trend Bubbles? A new type of nail art literally blew up the Internet. Magic bubbles shimmer on the nails of the most popular beauty bloggers.
An unusual pattern seems to be bursting out from somewhere inside. The technique is quite simple, despite the apparent complexity of the design.
@justnails.pl @leonovastudio_nails
@leonovastudio_nails
@sheva.nail
Pros and cons of textured bubble nails
The trend for bubble nails has spread so rapidly and contagiously precisely because it has a lot of advantages compared to other nail techniques.
Let's look at the advantages of this new and at the same time well-forgotten old design:
- This decoration option is perfect for nails of any length and shape.
On short nails, the design looks like textured stone beads, which will appeal to clients who prefer the unity of manicure and favorite jewelry made from natural materials. However, this image looks most impressive at a length of medium and above.
If the client’s natural nails cannot boast of flexibility, strength, or lasting length, it is worth resorting to strengthening.
Another way to flaunt good length and trendy nails is to get nail extensions using acrylic, gel or polygel. If you choose colored polygel or acrylic with glitter for extensions, the artist will no longer need to use additional decorations, and the final design will look modest, elegant and quite office-appropriate;
- The design, made in compliance with technology, does not cause discomfort when worn and does not cling to clothing.
Despite the fact that the surface of the nail is ribbed and not completely smooth, foam nails are easy to care for, maintaining the beauty of the manicure right up to correction.
Contaminants that get into the design/pattern are easily washed out with water, regardless of whether they are made with a matte or glossy topcoat;
- When performing a manicure, the master is not limited in the choice of tools in order to polish the nails quickly and at the same time beautifully.
Tips-sticks for applying foam, bottles of foam for washing with a special dispenser, cups for acrylic liquids for diluting the soap base in water are used. It is also possible to apply foam with a fan brush (makeup brush).
And if the foam turns out to be as dense as possible, then to save time you can apply it directly with gloved fingers.
As for the downsides, these include the following:
- foam nails - a design involving about 4-5 layers of material on the nails.
This means that the client’s nails must either be in good condition initially, or prepared for wearing a multi-layered look, so as not to suffer at home or at work;
if you forget the stage of “combing” the texture (when the prickliness of the dried top is removed with a buff or nippers), such a design will be uncomfortable for the client to wear (it will cling to clothes, hair, and may leave scratches on the skin;
- Despite the apparent simplicity, you need to maintain a balance of correctly applying foam to the almost finished design.
The beauty of foam nails is ensured by the even distribution of foam. It should lie in a uniform layer, covering the area both at the cuticle and at the free edge. If the foam does not reach the cuticle, you will end up with an unaesthetic indentation. And if the free edge is not covered, the visual integrity of the textured surface is violated.
In this case, the indentation should be no more than a millimeter so that the top with foam does not flow into the subcuticle pocket when drying in the lamp.
- the master works at speed. It is better to create a foam texture one nail at a time, since the bubbles quickly collapse and there is a risk of not having time to dry them in foam form.
How to create this beautiful design quickly and correctly, avoiding possible disadvantages and experiencing only the advantages?
Let's look at a step-by-step manicure using the simplest options - foam nails stylized as frozen lava and rubbed foam.
How to do Bubble manicure at home?
creating a design with bubbles is quite simple. But if you are doing this for the first time, perhaps the texture may not be expressed enough. We will tell you in detail how and how to perform a manicure with foam, so as not to make mistakes.
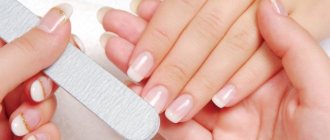
Preparation and necessary materials
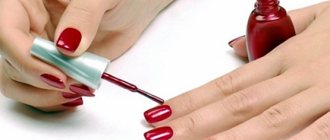
Nail art is performed at the final stage of coating with gel polish, so first you need to do a manicure using your usual technique and cover it with color. For registration we will need:
- orange stick or wide brush;
- cotton swab;
- soap;
- top without sticky layer;
- LED/UV lamp.
The foam can be anything from shampoo, soap or shower gel. You can use what you have on hand. The main thing is to shake it well; for greater effect, you can slightly inflate a few bubbles with a straw. Below is a step-by-step implementation technology.
Bubble and rub. Step-by-step instruction
There are two similar models. This is a manicure with shimmer and glitter based on rubbing or using cat eye gel polish. Under the top you can only rub it in, and the cat's eye will become more textured.
How is a cat eye design made? First, gel polish is applied, then top coat and top coat again, but with foam. The disadvantage of this design is that it can stick to textiles and cosmetics, hand cream gets stuck in large bubbles, and you have to wash your hands more thoroughly.
The option of manicure foam scrubs is more practical, so let’s look at it in more detail. So, detailed instructions with photos on how to do a foam manicure.
First you need a black holder. Take the base and two thin layers of black gel polish.
Next, we create the same bubble effect by preparing a bottle or any other container with soapy water in advance. Which foam is suitable for manicure? Let's take a product that foams well, such as baby bubbles or bubble bath. Some people make foam from liquid soap. In general, take any cosmetic product that you have and beat it. A small bottle with a narrow neck (baby water or cleanser with a narrow neck) is best so that when you press on the top of the neck it forms a foam cap that can be easily transferred to the nail.
To create the same bubble effect, you need to apply a non-sticky topcoat and add foam to the wet layer. This must be done carefully so as not to smear the top on the surface. Then the calendula along with the foam is quickly sent into the lamp.
After the top and foam have dried, you need to wipe the surface with detergent to keep it dry and clean.
Then it's up to the problem. You can use color, but I wanted to try to create some sort of gradient. I caught a blue beetle and May. It is more convenient to use an old brush for application, because it will be difficult to rub the pigment onto a textured surface with a sponge or finger.
After both pigments have been applied to me, I take a separate top and brush so that fine dust from rubbing does not get into the working bottle and apply it. Before drying, you can turn your finger and hold it slightly to level the surface, then return it to its original position and dry.
Anything! The foam design is ready. The lighter your cat eye or rubbed eye, the brighter the glow and shine, the more dramatic your manicure will be.
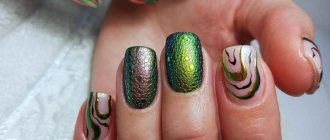
Texture pattern. Step-by-step instruction
For several seasons in a row, the texture of crocodile or python skin has been trending. This year will be no exception. Thus, foam on nails can create a very interesting effect similar to these materials. In step by step photos I will show you how to make the famous lizard design.
I used a fairly bright green color as a basis. By the way, green will be very popular this summer and comes in all shades, from lemon green to mysterious dark green.
I then painted the lizard with black gel paint. Before creating the design, I covered the nail with the thinnest layer of topcoat without any sticky residue. Why is this necessary? Some gel polishes and gel polishes quickly spread over the surface, causing the outline of the design to become blurred and unsightly. To prevent this from happening, it is necessary to remove the viscosity from the working surface. So when drawing, it is not necessary to periodically dry the image in a lamp.
After the lizard was drawn, I covered the tip with a velvet top.
Removed the stickiness when the top cooled a little after the lamp.
I then took the top coat (again no stickiness) and applied with a fine brush to the image area only.
Immediately, he carefully applied the foam to the design and quickly directed the spikes into the lamp.
After drying, bubbles with foam formed only in the area of the pattern, such as scales. To complete your manicure, you simply need to go over the entire surface with cleanser.
Now you know how to make a custom design using foam rubber. To prevent the top and bubbles from spreading, you need to act very quickly.
Texture sea pattern. Step-by-step instruction
There can be many ideas for foam manicure. But most importantly, this bubble manicure is associated with sea foam. And therefore, in the summer, it seems to me, there will be a lot of options for “beach” designs using this technique. I'll show you step by step how I made two versions of the nautical themed design. The first one is with a sea wave.
I used a yellow-beige shade as the base. Traditionally applied in two layers.
Then I applied the blue shade along the edge, blending it lightly with the top coat. It's dried up.
So let's make bubbles. Mix top coat and white gel polish. The color should be milky translucent. We apply the resulting composition to the border between the flowers, do not dry it, but immediately cover it with a solution of soap foam and then polymerize.
I emphasize once again that we dry with foam.
After this, the foam is removed using detergent. If desired, it can be applied to the edge of the top to partially cover the foam.
I wanted to add a pattern to the design. I took the top coat, pre-mixed with white gel polish, and painted a star. Then with the top clean I made a few drops in the center of the photo sending them to the lamp.
Then I ironed it and sprinkled it with acrylic powder.
As a result, I got a gel polish with voluminous foam. You can also do a bubble manicure with foam, but covered.
Matte nails combined with an accent foam manicure
Stylish, gentle, cute... All this is about the newfangled bubble manicure with foam in a matte design, made in a variety of variations.
If we are talking about an everyday manicure with foam, then a matte effect in a delicate shade of blue, pink, cream and beige for spring-summer, or a calm dark color for autumn-winter is the ideal choice.
At the same time, you can play with different textures and combine a velvet coating with a rub on a foam design - a chic idea for a festive Bubble Nails manicure.
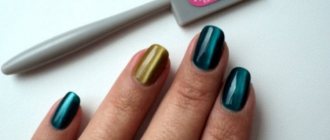
Bubble Nails Color Combinations
Bubble manicure, the photo gallery of which was initially full of shades of pink, has succumbed to some changes. Now craftsmen use almost the entire color palette of bright shades, as well as some dark colors.
| Color | Combines |
| Pink | Turquoise, mint, white, gray, light blue, olive |
| Yellow | blue or light blue, pastel purple, lilac, some pale shades of red, light green |
| Blue | Pink, yellow, gradient transition to purple or lilac, white |
| Green | Orange, yellow, black, cream |
| White | Pairs with almost all colors, best with blue, pink and black |
| Black | Versatile, suitable as an addition to any color |
In Bubble manicure, pastel colors are most often used, which are combined with bright ones.
Mirror rubbing and nail design using the Bubbles technique
An incredibly beautiful and unique foam manicure is offered with a mirror rub, which can be used not on the entire surface of the nail, but partially covering its individual sections, thus obtaining a very impressive and brilliant nail design for a holiday and for an evening look.
The chameleon rub looks interesting on a couple of nails with a foam manicure in tandem with a monochrome glossy or matte finish on the rest of the nails.
Advantages and disadvantages
Although bubble manicure is considered very strange, many girls still decide to do it. Like any other type of nail design, it has its pros and cons. The main disadvantages of bubble design include the material used in nail extensions. This is acrylic. Under the influence of acrylic, nails become weak and brittle, and then their further restoration requires a lot of time and care. Therefore, it is not recommended to wear this manicure for more than a month.
The “balls” are also uncomfortable to wear. This design is difficult to get used to. In addition, when choosing a bubble manicure, a girl should be prepared for the fact that others will misunderstand her and stare at her. Despite the presence of negative characteristics, this design also has positive aspects:
- Extraordinary. For lovers of extravagance, this is the best option for nail design.
- Persistence. The manicure is made from durable acrylic, so the paint lasts a long time, at least a month.
- Unique effect. Manicure looks beautiful on short nails, which in bubble design are the main competitors of long nails.
Gradient effect in nail design with bubbles
Color transition or color stretching is always an interesting and unusual technique in nail art, which masters quite often resort to when creating a newfangled nail design with foam using the Bubbles technique.
The same rubbing, or rather the use of several of its shades, will allow you to achieve a super cool gradient, creating a beautiful color transition on the nails, finally complementing them with a foam relief design.
Looks solemn and stunning!
Bubble manicure
Modern fashion forces women to constantly search for something bright and new. This applies not only to outfits and hairstyles, but also to manicure, which is a must-have addition to any look. For those who like to distinguish themselves with an unusual appearance, a bubble manicure is a good option. Nails decorated in this design allow girls to always be the center of attention.
Bubble manicure appeared quite recently, but has already managed to amaze everyone with its unusualness. The nails in this design resemble bubble gum balls in appearance. In fact, this is nothing more than a variation of 3D manicure, which allows you to increase the volume of the nail plate, thanks to which the masters manage to obtain the original shape of an inflated ball. This manicure is well suited for the fair sex, who like to constantly experiment and choose non-standard looks.
Stylish monochrome bubble manicure with foam in black
For those who don’t like bright and colorful effects on their nails, we recommend paying attention to the stylish monochrome manicure with foam, made in black.
Masters offer interesting solutions even with plain black gel polish, creating bubbles on individual nails, and also by covering not the entire plate, but only individual sections of it, which looks stylish and unpretentious.
Bubble Nails Nail Design Ideas
You can do a manicure in the following style:
- Gradient. A gradient transition can very often be found in various nail art techniques, including bubble manicure. The acrylic ball is made in the usual or simplified way, but for the color coating it is not a single-color varnish that is used, but a neat transition from one color to another.
- Decoration with beads or stones . The “bubble” can be decorated with rhinestones or stones. You can glue them with special glue. Most often, the stones are applied to one or two nails, and the rest are left with a regular bubble manicure.
- Drawing . The drawn print can be made in any style: floral, fruity, abstract. The main thing is to combine colors correctly.
Passionate red foam manicure for true ladies
The second most popular shade, after black coating, in a monochrome foam manicure is red. The always exciting, temperamental and feminine red color of manicure fits very harmoniously into the fashionable foam nail design.
The Bubbles technique allows you to create an accent relief design in a red manicure on several nails or using a matte foam effect over the entire surface of the nails.
Types of bubble manicure
Look at the bubble manicure in the photo: the original idea is to make your nails look like bubble gum bubbles. Therefore, this type of design is characterized by:
- Bright “ruminant” shades - pink, yellow, orange, less often blue and green
- Plain design or designs in the form of stripes, lines, dots, like on chewing gum
- Smooth glossy nail surface
Soon after the trend spread, nail designers began experimenting. Nowadays, a bubble manicure doesn't have to make your nails look like pink bubble gum. It can be supplemented:
- Ombre of 2-3 shades that combine with each other
- Rhinestones, glitter, “broken glass” film
- Elements of volumetric modeling - bows, flowers and others
- Painted - plain or multi-colored
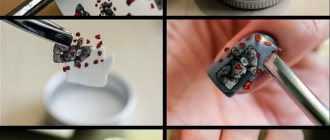
Foam manicure designed with rhinestones, crystals and stones
When looking for a festive and celebratory manicure design for any important event (Birthday, New Year, Valentine's Day), take a closer look at the new styles of foam manicure with rhinestone decor, a scattering of crystals and crystal chips.
Looking at a fashionable foam manicure, you can be convinced that it itself is unusually bright, so the stones should be delicate and unobtrusive, and used as a laconic addition to a trendy bubble manicure.
Bubble manicure
Modern fashion forces women to constantly search for something bright and new. This applies not only to outfits and hairstyles, but also to manicure, which is a must-have addition to any look. For those who like to distinguish themselves with an unusual appearance, a bubble manicure is a good option. Nails decorated in this design allow girls to always be the center of attention.
Bubble manicure appeared quite recently, but has already managed to amaze everyone with its unusualness. The nails in this design resemble bubble gum balls in appearance. In fact, this is nothing more than a variation of 3D manicure, which allows you to increase the volume of the nail plate, thanks to which the masters manage to obtain the original shape of an inflated ball. This manicure is well suited for the fair sex, who like to constantly experiment and choose non-standard looks.
Nail design “different handles” with foam effect
To create a beautiful accent using the fashionable trend of manicure with foam, another stylish technique in nail design will allow you to use the “different handles” manicure. So, on one hand we suggest using the super-fashionable foam manicure Bubble Nails, while on the other hand we suggest using a monochrome coating.
This tandem of foam manicure and a plain finish looks stylish and not boring.
Bright foam manicure design
A stylish manicure solution with foam will look great in the hot summer if you use a bright coating and an appropriate design.
A neon color can become the main color, while on nails with bubbles it is best to use a light-colored base, on which a bright bubble design with foam will look great in a matte neon color.
Shape Features
America is considered the birthplace of many fashion trends, and bubble manicure is no exception. Although this nail design won few fans, it still managed to attract attention. His distinctive feature is the non-standard shape of his nails. During extensions, specialists give the nail plate an unusual appearance of a ball, which is very similar to a bubble from chewing gum. To achieve a stunning effect, masters also additionally decorate the manicure with rhinestones or beads. The result is an unusual convex and slightly humped nail.
Of course, there is no need to argue about tastes. Therefore, some girls see in such a manicure something interesting, unique, constantly attracting the eye. For other ladies, the design turned out to be too strange, and they associate the so-called “balls” not with bubbles of chewing gum, but with some kind of disease of the nail plate. Despite the presence of opponents, this trend is beginning to become popular, since a manicure in the form of “balls” helps to look brighter and extravagant.
Combined manicure with Bubble Nails design
A real celebration on your nails is possible! A luxurious combined bubble manicure with foam, rhinestones and sparkling gel polish is a win-win tandem for an intriguing, memorable and elegant manicure for a special occasion.
Here the master’s imagination knows no bounds, which is clearly demonstrated by the example of a fashionable foam manicure in an exciting combined nail design.
Who is a manicure suitable for?
Look at the bubble manicure photo: it is done only on short nails. To give your nail the shape of a bubble or a ball, you need its length and width to be approximately equal. Due to this, a manicure cannot be done:
- For those with large and oblong nail plates
- For women who do not want to part with the length of their nails
American women have massively appreciated the trend and are willing to follow it. But among European fashionistas, the controversial trend did not cause much enthusiasm. Therefore, this type of design can be recommended only to women who prefer creative solutions, are not afraid to experiment with their appearance and are not forced to adapt to the requirements of the dress code.
To realize the idea, craftsmen use acrylic. Applying the material in large quantities can worsen the condition of the nail plate and weaken it. Therefore, if you want to experiment, evaluate the condition of your nails. It's worth getting a bubble manicure only if your nails are healthy, don't flake, aren't prone to cracking, and can withstand the test of a large volume of acrylic.
How to choose the right materials for foam design
To avoid any difficulties when creating bubble nails, you need to prepare the necessary tools and materials in advance:
- manicure accessories (scissors, nippers, spatula, file, buff);
- base, single-layer gel polish, top (liquid or medium thickness);
- soap scum;
- tool for applying foam (brush, sponge, etc.);
- paper napkins;
- other: gloves, antiseptic, cuticle softening oil, hand cream, disposable gloves (if necessary). You can choose any means for creating foam. The bubble effect is achieved by using household chemicals for washing dishes, shaving and washing foam, and soap. You can try several options and understand which one is more convenient to work with.
- To obtain a pattern with small bubbles , the product is mixed with water and shaken vigorously for a long time.
- Large cells are obtained if you shake the mixture briefly and lightly.
Bubble manicure technique
If you still like this unusual trend, then we will briefly tell you how to make bubble nails.
- Prepare your nails in the usual way, as you usually do before getting a manicure.
- Apply primer and dry it.
- Apply a thick layer of acrylic, starting from the middle, to create a bulge there.
- Give your nail the desired shape.
- Dry in a lamp.
- Apply varnish.
- Use decor if desired.
Essentially, the process of creating bubble nails is similar to extensions. You can make it at home only if you have all the necessary materials and you have the appropriate skills. In other cases, it is better to go to a professional salon and ask them to give you a bubble manicure. But even in this case, you will have to work hard to find a master who will take on this work. The technology is completely new, and it has not received sufficient distribution in Russia. Therefore, the masters may simply shrug their shoulders in bewilderment at your request.
I would also like to warn you right away that the load on your nails when wearing this nail art is much stronger than when doing nail extensions . Therefore, after removing the manicure, you will have to restore your nails for a long time using all kinds of baths and medicinal products. Is it worth it? You decide.
Types of bubble manicure
Bubble manicure gives room for imagination. Proof of this is the large number of varieties, each of which has its own characteristics.
Main types of manicure:
- Lava (pumice) effect. Nails are covered with gel polish of the same color, the result is fixed with a matte top coat.
- "Cat". It involves a combination of soap foam and coatings that create volumetric glare (magnetic rubbing, etc.).
- Foil under foam. It is performed using single-color shellac, matte or glossy foil.
- Colored foam on a contrasting background. Nails are coated with shellac and dried in a lamp. A layer of gel polish of a contrasting color is applied on top, and foam is distributed over it (without pre-drying).
- Rubbing. Foam manicure looks good in combination with any products (especially those that imitate jewelry or metals).
- Rhinestones. Jewelry can be of any shape. The main thing is that they are combined with the selected texture and shade of shellac.
- Smooth foam. After applying the foam, the nails are carefully polished and covered with a glossy top coat. This allows you to create beautiful highlights, make wear more comfortable and last longer.
- Neon foam. Involves the use of bright, “screaming” pigments. A good option for brave, confident girls. These nails look best in summer (especially in combination with tanned skin).
- French. The nail is covered with pastel pink or soft beige varnish, and a different color and soap bubbles are applied to the crescent-shaped tip. If desired, several nails can be done using this technique, and the rest can be covered with a single-color varnish.
- Three-dimensional decor. 3D elements go well with the foam design option. These can be sliders, volumetric flowers, patterns and shapes. If necessary, liquid metal can be used. To make such a design beautiful, you need to have good taste.
If you go too far with the number of decorative elements, the manicure will look funny and even vulgar.
Lava foam manicure technology
Photo author: @kirichenko_nails/Photo author: @markelova__darina
- Complete preliminary preparation of the nail is performed: a hardware manicure with a machine or a combined manicure using clippers. If lengthening is not intended, a degreaser and then an acid-free primer are applied to the nails with the gloss removed;
- Nails are covered with a base. Depending on the intended image, this can be a camouflage tint base (used as an independent color coating), a strengthening rubber base, or a duo of hard and elastic classic bases. The material is applied in one layer and polymerized in accordance with the manufacturer’s recommendations for the prescribed time in a hybrid, UV or LED lamp;
- The selected color gel polish coating is applied to the nails in 1-2 layers. This can be a monochromatic manicure in a dark color palette, or a delicate lava in a nude color palette (chocolate stylized with bubbles), or a daring disco-neon lava. When choosing a material, you should give preference to the most pigmented material (ideally, use a dense single-layer);
- After drying the gel polish in a lamp, the sticky layer is removed from it, and a matte top coat without stickiness is applied in one thin layer to ensure the wearability of the finished design. The top is dried in a lamp;
- Apply the second layer of matte top very thinly with a semi-dry brush. Doesn't dry out! Soap foam is applied to the selected nail (or to all nails in turn), after which the nail is immediately placed in a lamp for polymerization;
- Use a paper towel to blot off any remaining foam. A lint-free cloth soaked in cleanser is used to treat the surface of the nail with a foam pattern;
- There is no need to cover the design with a third layer of topcoat. If, after drying, particles of the top coat remain with sharp edges or there are flaws in the polymerized top foam in the area of the cuticle and side ridges, this can be removed with nippers or smoothed out with a soft buff. The buff needs to be strictly soft, so as not to cut off the entire textured effect, and so that the nail is slightly smoothed and not scratchy. Movements of the buff on the nail should be light and smooth;
- The classic version of lava nails does not require the use of additional decor. But if desired, matte lava nails (if only part of the nail is decorated with foam) can be supplemented with rhinestones, broths or “Spiderweb” gel paint.
Photo author: @korkhovam/Photo author: @manikur_v_pushkino
Foam manicure technology - rubbing under foam
- Repeat steps 1-3 of the previous design. We choose a dark (black) gel polish to make the design look as spectacular as possible;
- Such a spectacular image as a foam rub looks most expressive when the base (gel polish) is applied using the “under the cuticle” technique. This allows you to wear such manicured beauty longer without losing aesthetics while the natural nail grows smoothly;
- The selected mirror rub is rubbed onto the dried top without stickiness - with a gloved finger or an applicator. Depending on the type of rubbing, the top can be cold (completely cooled) or hot (immediately after the lamp) at the time of rubbing. In this case, the rub can be applied both to gel polish (and then the nails are covered with foam) and to foam bubbles after drying in a lamp. Before applying the foam and drying the top with foam in a lamp, the manicure should be completely prepared: brush off the rub-in with a brush (brush), buff the ends of the nails to seal the rub-in with a second layer of top coat;
- After polymerization of the foam in the lamp, the remaining foam is blotted with a napkin, the nail is wiped with a cleanser, and the surface with the pattern is carefully buffed. If the client wishes, the design can be supplemented with additional decorative elements.
Photo author: @karrina_bg_nails/Photo author: @natalykashtanova
While practicing to create one or another type of foam design, nail artists noted several important recommendations, following which the chances of creating absolutely irresistible foam nails increase significantly. Here are some of the most significant lifehacks when performing a Bubbles Nails manicure.
Bubles nail design tips
To avoid mistakes when designing bubbles, you need to follow the following recommendations:
- Strengthen thin nails before designing.
- Strictly follow the sequence of actions.
- Use thick shellacs, which are applied in 1 layer.
- Send your hand into the lamp immediately after applying the foam.
- Treat nails one at a time. After drying in the lamp, inspect the finished work for any thorny areas.
- Remove protruding jagged edges with a buff or nippers so that the bubble manicure will last a long time and your nails will not catch on anything.
What is bubble manicure
Bubble manicure got its name from the English word bubble, which means “bubble”. The designer who came up with this creative idea and who remains unknown for certain, was inspired by the appearance of bubble gum. The essence of this type of manicure is to make the nails voluminous, giving them a round shape, reminiscent of a swollen bubble of chewing gum.
To realize the idea, acrylic is used: the master applies it layer by layer to the nail plate and dries it. After applying an n-number of layers, the nail becomes round and voluminous.