Proper filing of nails is the basis of not only a beautiful manicure, but also healthy nails. The wrong sawdust can not only complicate the manicure process and worsen its results, but also significantly harm the nails and weaken them. Photos and videos posted in this material will tell you how to properly cut your nails into a square, oval or other shape.
[yandex1] [google1]
General rules for filing nails
There are several simple rules that will help not only create a beautiful manicure relatively quickly, but also maintain the health of your nails. They cover not only the sawing technique, but also the selection of materials and tools for this. In order to properly file your nails, you need to know the following:
- Filing can only be done on dry nails;
- Carefully select a file according to the degree of abrasiveness and material, as well as ease of use;
- Do not use iron files; they contribute to nail splitting even with the correct filing technique. The most acceptable option is glass files;
- Nails must be filed strictly in one direction on each side. You cannot alternate the direction of the sawdust, as this promotes delamination and significantly weakens the nail.
To learn how to properly file your nails straight, you can watch the video below. It shows all the stages of this process, as well as its nuances.
Tools for making oval shapes
A proper manicure cannot be achieved without certain tools; to perform it you must have:
- Scissors. With their help you can trim the free edge of your nails and give it the desired shape. They also remove hangnails, and with a certain skill, cut off the cuticle. To perform a manicure, you should buy stainless steel scissors.
- Tweezers. Their main purpose is to remove the cuticle; unlike scissors, it’s easier and cleaner to do this; they can be used to remove even minor defects.
- Files. You need at least two of them: one for correcting the shape, and the second for grinding. When choosing a file to give an oval shape, you need to focus on the condition of the nail plate; if it is thin, then you cannot use metal products, you need to choose their glass counterparts. The sanding file is made on a paper base, and on top of it there is a soft material that helps polish the nail and make its surface smooth and shiny. You can also use it to remove remnants of the previous decorative product.
- Spatula or orange cuticle stick. These two tools have different configurations, one of them is made of wood, and the other of metal or plastic, but they are intended for the same thing - preparing the cuticle for removal.
Without the listed tool, performing any manicure will be impossible.
Square and trapezoid
The square shape of nails is currently the most fashionable and popular. She is quite glamorous, easy to design, and many girls choose her. However, it is the most difficult to create from natural nails; in addition, it is fragile and can break and crack during use, even if the nails are strong enough. So, how to cut square-shaped nails correctly will be described in the instructions below.
- Trim the free edge to the desired length. In this case, make the cut in a straight line perpendicular to the longitudinal axis of the finger and its tip;
- Start cutting from one side. The file must be held parallel to the finger and perpendicular to its tip. This way the line will be straight;
- Repeat the procedure on the other side of the nail. At this stage, it is very important to ensure that the sides remain parallel to each other and do not narrow;
- Now file down the free edge. The file must be held perpendicular to the axis of the finger;
- As a result, the free edge should have acquired a square shape and acquired two right angles on both sides. Further, if you wanted to get a “clean square” shape, you don’t need to take any measures;
- If you have chosen the “soft square” shape, then after this you need to slightly round the right corners of the free edge;
- With a “rounded square” shape, you need to round the corners as much as you like.
The trapezoid shape is created in the same way, but by filing the sides it is necessary to ensure that they converge to the desired degree.
Rounding and making the trapezoid soft is not recommended. [yandex2] [google2]
How to give the correct shape?
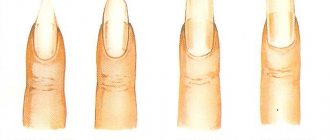
Traditional nail shapes include the following types:
As for the triangular shape, which gives the nails a sharp look, this type of manicure is currently not in demand.
The shape is selected depending on the type of fingers.
- The square shape fits thick and thin fingers.
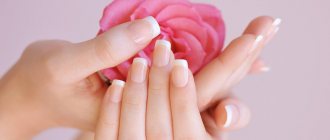
- Oval is considered the most universal and belongs to the classic. It is suitable for short nails.
- The almond shape looks good on long nails. Visually makes the fingers long and gives the whole hand a feminine look.
Let's take a closer look at the recommendations for manicure with different nail shapes.
Step-by-step work plan for a square shape.
- The file is positioned perpendicular to the edge of the nail being processed. It is washed down directly.
- The sides are filed parallel, in amplitude from bottom to top.
- If desired, the corners of the nails are given a rounded shape.
How to make an oval shape.
- Draw a conditional line from the middle of the nail cuticle to the end. Let's focus on it. The line will become the basis of the nail file pattern for an oval shape.
- We place the file at an angle. We make cuts from side to center. In this way we process the nail on both sides.
- We file the shape of the nail, removing the corners, and create a rounded shape.
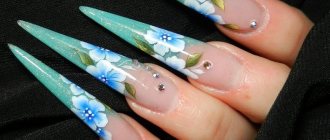
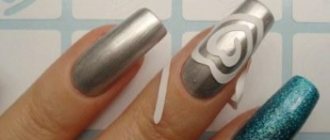
Stylet
The stiletto shape is a very sharp nail. These plates are also quite fragile, but can last quite a long time if you are careful when using them. Often this form is also coated with gel for greater reliability and strength of the nail. But if you know how to file nails of this shape correctly, then this can also contribute to greater stability of the manicure.
- Start filing the nail from the place where the free edge grows into the finger, that is, from the end of the smile line;
- The direction of the sawdust should tend to the center point on the straight cut of the nail;
- As soon as the central point of the cut and the point at the end of the smile line are on the same straight line, move on to filing the other side of the nail;
- Treat the other side of the nail in the same way;
- After this, a right angle should have formed at the tip of the nail;
- We round the right angle a little, making pendulum-like movements with a file in both directions from the highest point of the free edge of the nail.
It is convenient to form this type of free edge from a triangular shape. However, a similar statement applies to almost any other nail shape. Square nails have clearer and smoother sides, and therefore any shape can be cut out of them as smoothly and clearly as possible. In this case, you will not have to worry about how to properly file your fingernails.
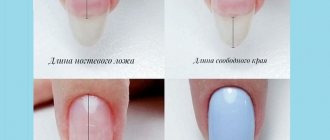
Length selection
The choice of length is not just the client's desire. This issue must be approached wisely. Based not only on the architecture of the nail plate, but also on the anatomy of the hand.
Technique for selecting manicure length:
Assess the length of the nails along the entire hand. Choose the middle option and act.
If the client wants to maintain the length, we rely on the best preserved nail. It also happens when one nail is broken. Then we focus on the maximum other length. And we build up the broken one using acrygel.
We compare the thumbs of the hands separately from the others. This way the calculation will be more accurate.
In addition, we compare the fingers according to the shape of the cuticle. It is important that the form follows it.
It is important to select the length proportionally. Because not all nail plates are the same. For example, the stock of the middle finger is the shortest by nature, and the stock of the little finger is the longest.
The biggest misconception is that the length is selected only once. This is wrong. After all, nails grow at different speeds. Because of this, everyone needs a different correction.
In this case, the length should be the same from the cuticle line to the free edge.
- Mentally draw a central axis from the growth of the cuticle to the free edge. The sawdust of the shape is made precisely with emphasis on the axis.
- Focusing on the axis, the task is to make the shape symmetrical on both sides.
- In the area of expansion of the nail bed, we adjust the desired shape. Therefore, sawdust is made only up to this zone.
What about the selection of the file?
If we are talking about a natural nail plate, the following file lengths are suitable:
If you choose the smaller side, the file will be too hard. And more than 220 is considered a grinder.
The shape of the file is selected based on the preferences of the master. It is important that it is comfortable to hold. After all, this is your daily tool.
Most often, craftsmen love an arched file. First of all, it is recommended to process the file. This will be more careful towards the client. The edges will not cut the skin of your hands.
Shape square
Square is the most common shape. It is easiest to create for both a beginner and an experienced craftsman.
The sawdust form technology does not have any special techniques. The most important task is to cut clearly parallel to the central axis.
Considering the client’s desire, make a choice: soft or clear square.
Technology of sawdust square step by step:
- The nail file works at 90 degrees. The movement is from left to right.
- We remove the perpendicular to the mental central axis
- Learn to position the client's hand correctly. The finger should be directed so as not to ruin the symmetry.
- Smooth edges are filed in relation to the same axis. To do this, it is recommended to place a file under the nail plate.
We repeat the action on the other side.
It is important not to saw through the nail plate. The consequences may cost more than a manicure. Damaged nail plates require not only a lot of investment in medications, but also time. Sometimes it will take a year.
It happens that the free end grows downwards. Such nails are called “pecking” or vice versa up. In this case, a square will be the best solution.
Rounded
The standard shape we get is usually by matching it to the fingertips. Ideal for women who do a lot of manual work every day. Rounded nails have also proven to be effective for fragile and brittle nails because they are not subject to scuffing and damage. If you want to get this nail shape, file it down, matching the shape and length to your fingertips, after a few weeks your nails will be beautifully and, above all, evenly rounded. It may be discouraging that your nails will be short at first, but later you will enjoy beautiful, perfectly rounded nails.
What you need for nail extensions
You need to stock up on extensions in advance. They will last a long time, but periodically you need to buy more of them that are being used up (gel, primer, etc.). I must say that the consumption is very economical. One jar of gel is enough for about 5 - 6 full-fledged extensions, and if the nails are not quite long, then even less money is spent on them. As for the primer, most likely you won’t even be able to use it to the end, since it will first expire.
For extensions you will need to buy:
- UV lamp;
- hand sanitizer;
- extension forms;
- primer;
- nail degreaser;
- files for artificial nails: 120 and 180 grit;
- buff;
- brush for removing dust from nails;
- cuticle sticks;
- flat extension brush;
- extension gel;
- decorative products;
- liquid for removing the sticky layer (cleanser).
Recently, LED lamps have appeared on sale that polymerize the gel faster than ultraviolet lamps.
Not only an ultraviolet lamp is suitable for polymerizing artificial nails. You can also use an LED lamp. The difference between them is that the latter is powered by LEDs. Due to this, the drying time of the gel is reduced. It will take 3 minutes to polymerize the gel in a 36 W UV lamp. An LED lamp will cope with this task in 1 minute. In general, the difference between them is insignificant.
You need to take a responsible approach to choosing a gel for extensions. There are different types of gels, each of which corresponds to a specific extension system. For example, a three-phase system involves the use of three gels: base, camouflage and finish (top). For a two-phase system you will need a main gel and a base. The single-phase extension system is the most convenient for beginners. It uses only one gel.
See also: Types of manicure and its features, modern fashion trends in manicure
You don’t have to make a design during extensions, but simply cover your nails with regular varnish (it lasts a very long time on artificial nails)
Execution technique
You can make oval nails not only in the salon. Today, modern women have many opportunities to shape their oval shape at home. The approach to this issue begins with performing a high-quality hygienic manicure, because without it the manicure will not look beautiful, and most importantly, well-groomed. Let's take a step-by-step look at the main stages of the technique for creating an oval shape.
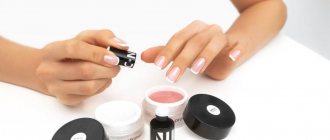
Preparing tools
In your work you will have to use a file, manicure scissors or cuticle cutter (cuticle tweezers), an orange stick, and a pusher with a spatula. In order not to injure the skin and protect it as much as possible from irritation, it is advisable to purchase a special oily cuticle remover. This is a clear product that will prepare the skin for painless removal. It does not corrode the skin, but softens it, thereby simplifying manicure.
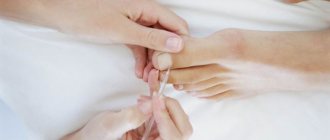
Cleaning cuticles and pterygia
After carefully opening the bottle of cuticle remover, apply a thin layer to the skin around the nail bed, excluding the area at the top where the nail grows. As soon as the product is applied to the nails of one hand, they are softened in a bath of warm water. It is advisable that the temperature be at least +40 degrees, since cold water is harmful to bones. After 4-5 minutes, remove the tray, wipe your fingers and begin to clean off the excess skin. To do this, take a pusher (a metal tool with a spatula), first push it back, and then lift the cuticle.
Next, with careful movements, the excess skin is turned upward, thereby forming a line for the future cut. It is cut off with a cutter or scissors, trying to remove it in one line. Removing excess skin from the nail allows you to visually lengthen the plate, which is especially important for short and wide nails. After the skin is cut, check the quality of the peeling using an orange stick. It is passed around the nail. If something rises upward from the cut, the flaws are immediately trimmed.
Length and shape
The length is chosen according to the shortest nail
It is important to consider that it should look the same on all nails. You will have to use your own eye, you should not spare nails that are too long and leave them on, even if only one is broken
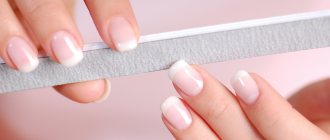
You will have to use a file for your work. In this case, its movements should be directed only in one direction. Ignoring this nuance will lead to delamination of the nail and rapid chipping of the applied coating. The file is pressed with its flat side in relation to the nail and moved in the direction from the base of the nail to its edge, while trying to ensure that the movements of the file are delicate.
First, the sides of the nail plate are filed, only after that they begin to round it. As you round, make sure that symmetry is maintained on both sides of the plate. You can focus on the base of the nail bed. It would be useful to check the quality of the work by turning the nail away from you with the top edge facing up. You should not equate the sharpness of the upper edge of the oval, because it will be different for the little finger and, say, the thumb. A narrow and small tip may appear sharp, while a wide and large tip may look like a soft square.
To avoid errors when working with a file, you should often pay attention to the base of the nail being processed.
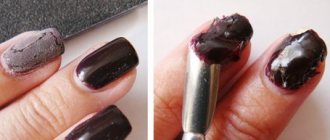
Shutdown
After the nail is filed, it will need to be protected from possible breakage. This is done through decorative manicure. If it is not yet provided, you can apply a soothing cream to the skin treatment areas. You can buff the nail plates only before directly applying gel polish. You cannot saw them with a coarse abrasive; for this you use a soft grinder.