What do we think about first of all when starting a manicure? In addition to hygiene and neatness, the purely aesthetic effect of the procedure is of great importance. The nails should be beautifully decorated. The beauty formula for manicure is the harmony of shape and color. That's why decorating your nails starts with giving them shape.
Important!
A common mistake is to trim the length of your nails with scissors. It would seem that there is nothing “special” about this: if you trim a little, you will have to cut less, but this is a deceptively simple way out. When we cut our nails with scissors, we bend the nail plate, and under the influence of pressure, its edge becomes covered with microcracks. Brittle nails may even begin to crumble from this procedure. In any case, we weaken the nail plate in this way, which has a bad effect on its strength and ability to maintain a given shape. Don't be surprised later if your nails start to break, flake or curl. If you want your nails to please you with their strength, remember: we do not cut our nails with scissors, but only file them or cut them off with special clippers!
Is it possible to file nails with gel polish?
Gel polish coating is a rather expensive procedure, which is usually performed by a specialist (in a beauty salon or at home). Therefore, many women believe that such a coating is highly resistant to external influences. In fact, this is not so: gel polish, like any other varnish, can:
- flake off;
- deform;
- change color over time;
- change its texture;
- collapse.
In this regard, you should not subject your nails coated with gel polish to filing or cleaning. These procedures must be carried out strictly before applying base and varnish. Moreover, for three days after applying gel polish, you should not wash your hands in hot water or visit a steam room or sauna. When exposed to high temperatures, the gel coating loses its shine and quickly becomes dull.
If you need to use household chemicals (for example, to clean a stove or wash dishes), this should only be done while wearing protective rubber gloves. Otherwise, the gel will react with chemicals, and the coating will begin to rapidly deteriorate.
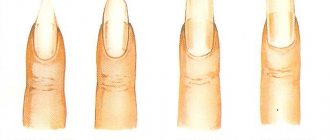
Giving your nails an oval outline
Let's look at the process of obtaining the selected form step by step:
- Getting rid of old coating. The surface of the nails must be prepared before performing the procedure. Using a disc soaked in nail polish remover (it is better to choose a variety without acetone), remove any remaining decorative product.
- Performing water procedures. You need to make a bath for your hands; in cosmetic stores you can buy special salt compositions for caring for the skin of your hands and use them. If this is not possible, then you just need to thoroughly wash your hands with soap and hot water.
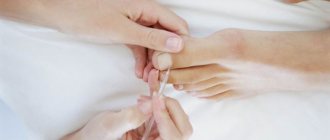
- Cuticle trimming. Using an orange stick or spatula, separate it from the nail plate and then remove it with scissors or tweezers. This technique will make your nails longer and create a well-groomed look.
- Giving nails the desired length. Use nail scissors to trim your nails and then check the length of each of them, they should be approximately the same, minor deviations can be corrected in the next step.
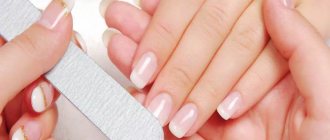
- Creating an oval shape. The file for correcting plates must be pressed with its flat side against the nail and moved from the base of the tip to its tip. Movements should be smooth and rounded. After this treatment, the nails will acquire the desired shape.
- Sanding the nail. Its surface may be rough and have irregularities; they can be smoothed out with a special file.
- Hydration. After performing a manicure, you need to rinse your hands in water and then rub oil or cream into the plates and cuticles.
This is a standard algorithm for giving nails an oval shape; it will be slightly adjusted depending on the length of the nails and the type of nail plate (meaning natural or extended).
Owners of short nails should take into account that the oval should be done completely from edge to edge of the nail, and not partially. The oval shape on them will look especially impressive if the woman has an oval cuticle line.
Too long nails with this shape will look ridiculous; you shouldn’t let them go too far into an oval design, as they can quickly break off. Their ideal length is 5 mm. When making an oval shape on your nails, you should leave their sides straight.
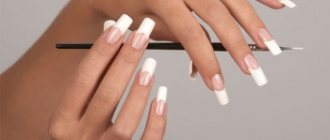
Extended oval nails are made in beauty salons using gel or acrylic. These two methods of creating a long nail plate differ in the hardening of the coating. To obtain an oval shape, special thrips of the required length are used.
Which nail file is better to choose?
Before choosing a file, you need to decide what exactly it is needed for. All nail files can be divided into four groups, depending on the main function:
- tools that give the desired shape to nails made of artificial materials (for example, acrylic);
- files intended for the care of natural nails;
- files used to seal the edge of the nail;
- grinding tools.
Files also differ in hardness. The toughest ones are used for working with artificial nail plates. Experts say that the most durable and easiest to use files are glass ones. They are inexpensive and are often used at home. However, they are fragile and often break.
Professionals most often use nail files with ceramic coating. With their help, you can not only give shape, but also seal the edge of the nail. Using this tool you can carefully remove the cuticle. The only disadvantage of ceramic nail files is their high price. When working with artificial materials (for example, acrylic), professionals most often use diamond-coated files.
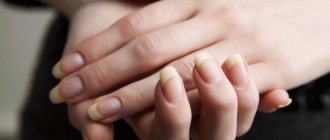
Features of nail care
The nail consists of the hardest keratin that the body produces. Its location on the stock protects the fingertip from mechanical injury and damage. It is the main influence of negative environmental factors. Because of this influence, most often it quickly wears out, breaks and is injured.
Proper care
On a note. Nail plates require regular care. With a lack of attention, they begin to peel off, fade, and their external qualities are lost. By selecting quality care, you can restore their lost health.
There are 3 main groups of products intended for the care of nail plates:
- Basic group;
- Group of special care products;
- Varnish coatings.
The basic group of care products includes:
- Varnish removers. Those containing acetone or other aggressive substances pose a danger to fingers. They have a strong degreasing effect, as a result of which the plate dries out, becomes dull and delaminates. To remove varnish, use liquids that do not contain acetone. You can purchase them in specialized stores.
- Files to give the desired shape. For different types of nails, files with different abrasiveness are used. High abrasiveness of the file used on the fragile free edge can lead to cracks and chips of the nail plate. How to file your nails without damaging them? Glass files with high abrasiveness, which gently process the free edge, are very popular. In order for the treated edge to be less exposed to external factors, it is polished with a nail file with the lowest rigidity.
- Baths and compresses for nutrition. It is especially good to make compresses from vitamin complexes containing essential oils. This will nourish the nail with the necessary substances for a healthy appearance.
- Cosmetics for softening and removing cuticles. Before removing the cuticle, it should be softened and moved to the base of the plate. Otherwise, the removal process may damage it, since the cuticle is closely adjacent to the nail.
On a note. Special care products include a variety of creams, gels and tonics designed to restore, nourish and moisturize.
There are also varnish coatings that contain vitamins A, E, protein supplements and calcium. Their use helps improve the structure of the nail plate.
The varnish used to cover the nails should not dry them out. It should be of a liquid consistency in order to dry faster.
On a note. When choosing a varnish, you should pay attention to its composition, since it must cover the natural nail with a protective layer that protects it from the negative effects of paint pigments.
How to use a nail file
In order for your manicure to always look perfect, you should follow the basic rules for using a nail file:
- The procedure can only be carried out if the nail plate is completely dry. If you ignore this rule, you can easily break your nails, as water makes them fragile, brittle, and vulnerable.
- The tool should only be moved in one direction (for example, right to left or left to right).
- If your nails are fragile and break easily, the direction of movement of the file can be changed.
- When choosing a shape, you should not blindly chase fashion. It is necessary to focus on the condition of the nail plate, as well as the shape and length of the fingers.
For those who lead an active lifestyle and often do housework, the classic oval shape is best suited. The main advantage of this form is that it is very easy to restore the shape of a broken nail at home. The square shape doesn't suit everyone.
It can only be recommended to those with long and thin fingers. It should be borne in mind: if a square nail breaks, you will have to contact a specialist to correct the shape. In addition to a variety of files, you can use a special tetrahedral polishing tool.
How to file nails
There are several rules that should be followed when filing nails if we do not want to damage them and we care about their good appearance.
If you are concerned about a specific nail shape, always dry them before removing the polish. Your nails will be harder and their shape will be easier to control. Do not file your nails while wet. Wet nails will be flexible, making them difficult to shape. Don't file your nails in the air. Place your entire hand on the tabletop to keep your finger stationary while cutting. It will be easier for you to give your nails the desired shape. Try to file your nails in only one direction, especially with metal saws, because filing your nails in both directions causes them to separate. If you want your nails to look aesthetically pleasing, then try to have your three middle fingers nails of the same length. The big toe should be 1mm longer and the little toe 1mm shorter than the middle nails. Don't press too hard. This will result in an uneven cut, as the compressed part will be more rigid than the part under less pressure from the file. Hold the file perpendicular to the nail plate. Wash your hands after filing to ensure you have properly shaped your nails.
How to hold a file correctly
Under no circumstances should you hold the instrument in your fist, otherwise your fingers and wrist will quickly get tired. Professionals with extensive experience working in beauty salons hold a nail file like a spoon or like a fountain pen. In this case, the first finger presses on the surface with the required force. This grip can be used at home.
Attention! If you hold the file incorrectly, you can easily break your nail. Therefore, if you do not have the skills to work with this tool, it is better to turn to a professional by visiting a beauty salon.
Manicurists who take part in professional competitions know another way to hold a nail file. From the outside, this method looks especially impressive. The tool is clamped at both ends. The file is clamped with the thumb and index finger at one end, and the ring and middle finger at the other end. This gripping method allows you to treat a large area of the nail plate in a short time.
You cannot hold the file so that four fingers are at the top and the thumb is at the bottom. With this gripping method, the arm muscles quickly become overstrained, which negatively affects the quality of work.
When filing the nail sinuses, the working tool should be held at an angle of 45 - 50 degrees so as not to touch the skin of the finger, otherwise you may get injured.
In order not to injure the delicate and sensitive cuticle, you need to hold the tool in such a way as to make movements from top to bottom.
Common mistakes
By eliminating common mistakes, you can avoid damage to your nails, bad mood, and expenses on visiting the salon. For special occasions, you can spend money on the services of a nail technician, but if you don’t plan to take photos and videos, you can create a stylish look with a beautiful manicure yourself. Listed below are the 10 most common mistakes that inexperienced women make at home:
- Using a low-quality or unsuitable nail file. Judging by reviews and comments on forums, approximately every second woman or girl does not know how to properly handle nails. This results in complaints of split nail plates, broken tips and more painful injuries. It is worth remembering that a professional in a salon differs only in knowledge, experience and the availability of the appropriate tools. Nothing extreme or supernatural.
- Hard abrasive is the main “enemy” of the nail plate. If you use a rough iron file, the tip of the nail will become covered with microcracks, which from impacts and water will deepen, leading to deformation and breakage. For natural nails there are wonderful ceramic and glass files. A plastic product will cost less. For final processing you need to get a polishing file.
- Shortening nails with a nail file. Experienced masters remind you of the main secret of a good manicure - no more than 10 movements with a file. This will prevent damage to the plate. Therefore, when you want to get rid of long nails, you first need to cut them off with a nail clipper or nail scissors, and then file them. The choice between clippers and scissors depends on the width of the nail. A clipper is suitable if the width of the blades is equal to or greater than the part being cut.
- Filing nails and doing other things at the same time. This is not the case when you can be distracted from the process. Accuracy, attentiveness and control over all actions are required. If you look away from your manicure but continue to file your nails, you can injure your skin or create a crooked line. It is important to control the process and the result; at the end of the treatment, inspect all the nails again for the presence of delamination and cracks.
- Work with a nail file in different directions. You should forget about the advertisements or films you have seen where nail files are treated haphazardly with a file. The correct movement is only in one direction, from edge to edge. If you cannot form an oval in this way, you should move from each side to the center.
- Creating a shape on painted nails. While the nails are hidden by the varnish coating, it is not possible to see delamination and other defects. You can resort to this method only as a last resort, when the manicure is broken or cracked. In such a situation, you just need to smooth out the sharp edge with a couple of movements with a file so as not to harm the plate. Next is a manicure according to the standard procedure, starting with cleaning, trimming the length and ending with polishing and applying varnish.
- Filing your nails because you have nothing to do. If you're bored, you can find more useful activities. You can properly file your nails no more than once a week. This will keep your manicure neat and your feet healthy.
- Treatment of wet nails. Not quite the correct method, even if you work with a soft file. If your brushes are immersed in a bath before a manicure, you should allow time to dry afterward to avoid the appearance of microcracks on your nails.
- Incorrect holding of the tool. Even a good file can disappoint if not used correctly. Therefore, it is worth paying attention to correctly holding the tool. You need to place your thumb on the bottom of the file, and the other four on the top.
- Deep filing at the edge of the nail. Excessive deepening will lead to inflammation, suppuration and cuts.
- Using a file not for manicure, but for other tasks. Masters do not recommend using a file to clean dirt from under the free tip of the nail or solve other problems not related to manicure. The tool must remain clean and level and used strictly for its intended purpose.
Despite the abundance of mistakes above, it is very easy to avoid them - you just need to follow the instructions on how to file your nails correctly. Accuracy, patience and the desire to learn how to do a beautiful manicure will help you always remain irresistible.
Preparing the nail plate for filing
Before starting the procedure, the nail plate needs to be prepared. First of all, you need to carefully push back the cuticle and remove hangnails, if any.
Pre-requisite:
- Completely remove any remaining old varnish.
- Degrease the nail plates. If they are dry and brittle, skip this step.
- Trim your nails using nail clippers to make cutting easier.
- Select a tool of suitable rigidity. For natural nail plates you should choose soft files, for artificial ones - the hardest ones.
After this, you can begin the procedure. Sawing begins with the fifth finger and ends with the first. This sequence is strictly observed on both hands.
Advantages of an oval nail plate shape
The oval design of the free edge of the nail most reliably repeats its natural shape. But not only this is a decisive factor when choosing it, the following characteristics are also positive:
- Versatility. With such a manicure, a woman can go to work, to parties, events, and also engage in her favorite hobby. The oval shape looks equally good on the hands of young girls and older ladies.
- Practicality. The sharpened free edge of the nail does not have sharp edges, which is why it does not cling to various objects and things.
- Uniqueness. Nails with such an edge are easy to file into any shape and create varying degrees of sharpness.
In addition, any design can be used for oval nails.
How to cut nail shapes correctly
Before you give the nail plate the desired shape, you should decide on the length. After this, the shape is outlined in general terms and the nail is polished. To give the classic oval shape, the ends must be carefully rounded. To achieve a square shape, the ends are carefully cut in a straight line.
The selected shape is corrected using a file, which should move from the center of the nail plate to its edge. The irregularities are gradually removed, and the plate takes on the desired shape. After this, be sure to wash your hands and wipe with a towel, then apply a coating to the dry nails.
How to file extended nails and is it possible to do it?
If an oval shape of nails is chosen for an extended manicure, there are usually no questions about how to file correctly - the classic oval does not break and does not cling to clothes and accessories. If an artificial nail accidentally breaks or cracks, creating a sharp area, you can easily and quickly file your nails and fix the problem without going to the salon.
Working with extended nails requires care and the right tools. Haste and an inappropriate file can cause delamination, tearing of the material from the natural nail plate.
Stores with accessories for manicure and nail art sell special abrasive files designed for working with polymers during extensions and maintenance.
It is more profitable to take a double-sided tool, the abrasive part of which has different hardness. The process is simple - carefully rub a coarse abrasive over the sharp area several times, then remove the roughness with a fine abrasive for polishing.
If the damage is large or complex, it is better to contact a specialist at the salon. He will quickly restore the attractiveness of your manicure with professional tools.
Oval and almond
They are characterized by the complete absence of angles when making sawdust, only arcs and semicircles. Oval is not for everyone. If initially the nail has a round cuticle, or itself is barrel-shaped, then when we file an oval on the short free edge we will get a circle, which does not always look beautiful. An oval is suitable for triangular or square nail shapes near the cuticle.
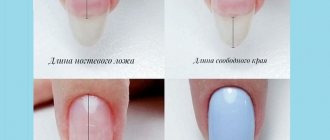
When cutting an oval, it is necessary to estimate the distance from the growing point to the free edge so that there is enough length to round and eliminate corners. If, when filing an oval, the length is not enough, then we get an angle, a sharp refraction from the growing point towards the free edge.
This sharp refraction angle will be very noticeable from the side. Therefore, it is better to recommend the oval to clients with low-set growth points. Then, when sawing, we get an elongated roundness, without sharp angular bevels.
How to file an oval with a file:
- We place the file under the free edge of the plate from below, pull back the side roller so that it does not interfere, and begin sawing from the growing point towards the central axis along the arc line. Having reached the top point of the length along the central axis, we move to the second side and repeat the oval cut from the point of growth to the central axis. The primary task is to create smooth oval side parallels without corners, sagging or straight lines.
Almonds are sawn using the same principle, only more narrowly. You can call the almond shape a narrowed oval. It should also not have corners, straight lines or sharp bevels along the side parallels to the center.
- Almond-shaped sawdust is carried out from the lateral growth points in semi-arcs from below towards the central axis. Symmetrical.
- The more you need to narrow the oval into an almond shape, the greater the distance required from the growing point to the tip. This way we get a smooth transition and an elongated taper.
When viewed from the side, arcs from the growth points should be clearly visible, and not a sharp narrowing with beveled corners.
Also, we will not get a beautiful “almond” if the shape of the nails itself is initially flat, without a pronounced upper arch from edge to edge. This problem can only be solved by removing the straight flat edge, and building up an artificial arch on the upper or lower form or tip.
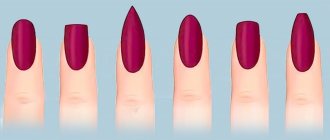
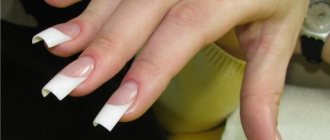
Ballerina
Pointe shoes, ballerina - two names for popular manicure.
- First, we remove the length with a file at a right angle to the central axis, as when forming a square.
- Next, the sawdust is performed according to the same pattern as “almonds”. The file is placed under the nail plate and with movements left and right we form light, smooth arcs towards the square edge. No sharp bevels. For this form, it is important to have a long nail plate.
- The edges can also be filed into a clear or soft square.
After completing the filing, it is recommended to go over the surface of the nail and tips with a buff or polisher to remove all unevenness, roughness, or minimally adjust the ends.
By choosing the right nail shape, taking into account the client’s initial data, it will be much easier to complete the filing process. If you are a beginning master, try to first master all the options using training tips.
Manicure with gel polish for beginners: step-by-step lessons
Manicure with gel polish is a common occurrence, because ordinary varnishes are already fading into the background due to their impracticality. Gel polishes allow you to get a high-quality coating that can please the eye for 2-3 weeks. Of course, there were some downsides. After 2.5 weeks, the overgrown part of the nail catches the eye, which spoils the impression of the manicure done. It’s okay if you have the opportunity to visit a specialist, but there are situations when going to the salon is impossible for certain reasons. In this case, a manicure with gel polish under the cuticle will help.
This technique increases the wear time of gel polish. Within 2 weeks, your nails will look as if you just recently had a manicure. Of course, making it at home will be problematic. To get a good result you need to have certain skills.
The secret of applying gel polish under the cuticle First, with a standard brush, gel polish is applied to the nail as close to the cuticle as possible. Then the side ridges and cuticle are pushed back with a light finger pressure and gel polish is carefully applied to the unpainted area of the nail with a linear brush. The result is recorded in the lamp.
If you still want to try it, it is recommended that you first watch video tutorials that are dedicated to learning how to do a classic manicure with gel polish.
Video tutorial: How to carefully apply gel polish under the cuticle?
https://youtube.com/watch?v=HyH_qzbNDmA%3F
STEP-BY-STEP INSTRUCTIONS WITH PHOTO FOR APPLYING GEL POLISH
The first stage is preparing the nail plate.
Roughen the surface of the nail using a buff.
We remove dust and degrease the nail using a special product for degreasing and removing stickiness from nails. We carry out all manipulations using lint-free manicure napkins.
Apply primer.
The second stage is coating.
The first layer consists of the base (base coat). Dry in UV (2-3 minutes) or LED lamp (30-40 sec).
Next, a color coating is applied (gel polish in 1-3 layers depending on the consistency). Each layer is also polymerized in the lamp (the exposure time is similar).
At the end of the manicure, a finishing coat (top) is applied. Also dried in a lamp. If necessary, remove the sticky layer using a special product that was used to degrease nails during the preparation stage.
Thus, the minimum kit for a beginning manicurist looks like this:
To remove gel polish:
- Gel polish remover;
- Foil or special finger pads;
- Cotton pads;
- An orange stick, or a pusher, or a special cutter.
For a manicure:
- Manicure set with scissors, clippers, pusher, spatulas, etc.
- Orange sticks;
- Remover (cuticle softener);
- Cuticle oil;
- Files;
- Manicure machine (if you want to do hardware manicure at home).
To prepare your nails for applying gel polish:
- Buff;
- Lint-free wipes;
- Means for degreasing and removing stickiness;
- Primer.
To apply gel polish:
- UV or LED lamp;
- Standard set base top;
- Colored gel polish;
- A linear brush (for manicure under the cuticle) and a set of brushes for artistic manicure (if desired);
- Nail decor (if desired): foil, rhinestones, microbeads, acrylic powder, stickers, stamping kit and much more.