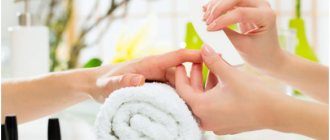
The shape of nails is individual for each woman, it depends on the shape of the fingers, their thickness, length, as well as the woman’s style, lifestyle and taste. But the almond shape of nails is an exquisite classic!
We have heard the expression many times that what is fashionable and new is the well-forgotten old. And these words have repeatedly been confirmed in styles, clothing cuts, hairstyles or color schemes, as well as in the shape of the nail plate. The almond shape was the biggest buzz in the 50s! And now her popularity has again captured fashionistas all over the world on a new scale.
Almonds are different from other shapes you know like round or square nails. But this particular form is very popular on Instagram among bloggers, craftsmen and other famous celebrities. Therefore, the topic of today’s material will be the almond or almond-shaped nail shape!
How to give almond shape to your nails: basic rules
Important: An almond shape can be given to those nails that have an average or slightly longer than average length of the free edge. This manicure will not work on short nails! You will have a rounded triangle, but no almonds.
The free edge should be at least equal to the middle of the nail bed or at least 5 mm. In this case, you will get a beautiful, elegant and sophisticated almond manicure, which will make your hands feminine and elongated.
Consider the length of the free edge
- The almond manicure itself is similar to almond kernels - rounded at the base of the nail and a narrowed but smooth edge of the nail plate.
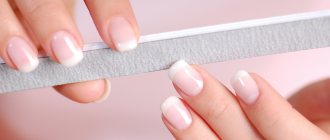
- For work we need a file from 180 grit! If you are working with natural nails. For artificial materials, we take a higher abrasiveness - from 100 grit.
- We hold the file in the “lock” position: on one side you place all 4 fingers, and on the other - your thumb.
- First of all, find the center of the nail! Sometimes the upper phalanges or the nail itself grows slightly at an angle, to the side. You can’t leave it like that, especially when creating an almond manicure. To do this, we need to find out the center of the finger itself, from the base. We place the edge of the file in the middle of the finger and find the center on the nail plate.
Finding the center
- For convenience, we mark a small point - this is the center, our landmark. Of course, you are doing this only for illustrative purposes while you are learning. During the cutting process it will be removed. And in the future you will be able to see the middle of the axis by eye.
During training, you can put a dot with a marker
- After which we look at the client's nails. But we do this from the position as a person will see them on himself - that is, we bend the arm at the elbow, turn it over and look at the back of the hand. We find the shortest nail among other fingers!
We take into account the length of each nail or possible flaws
- If the nails are all of the same minimum length, then we make a reference point to the longest nail bed. First we cut the length on all fingers!
Important rule: The middle, index and ring fingers must be the same length! Therefore, it is worth starting to work with them. Especially with an almond-shaped manicure, the little finger, but also with others, can be literally 1 mm shorter. But on the big one, on the contrary, it’s 1 mm longer!
Remember two important rules when forming any shape:
- We make smooth and long movements with our hands! The shorter your movements, the more uneven the edge of the nail will be.
- We do not go to the nail platinum growth points! We work from them, diagonally, under the nail. We take the file into the void, and not onto the nail!
First we cut the sides, and then we cut out the shape!
Right
Wrong
When you file the corners to make almond edges:
- We make long, smooth movements, bringing the file to the center of the nail from the growth points, thereby forming a smooth almond tip. We do this with movements in two directions, without going into the area of the nail plate.
- As a little tip: Your joint needs to work wide to create long movements. Imagine that you are playing the violin. Both the elbow and even the shoulder joint should be involved in the work.
We work not only with the hand, but with the whole joint!
- It is strictly forbidden to lift the file upward, bring it directly to the base of the nail, or, even worse, reach the cuticle. We move the nail file diagonally, without touching the growing point!
- At the same time, hold the file at an angle of 45°. As a guide, the side of the file, the end, should be looking at you. We form our smooth angles.
Movements are smooth, sliding
Sharp, strong movements or movements that extend to the base of the nail are not permissible!
- When we form the lower parallel, we put a file under the nail! We work from the growth point!
- As a little advice: If you need to level the plate, move the center point by carefully cutting off the side walls. We work smoothly and slowly on the side where the nail will be displaced so as not to saw through.
We put it strictly under the nail!
First we saw the fingers on the left hand, then on the right hand!
- We also don't buff up and down or side to side. Your movements should be sliding from the base of the nail growth and smoothly move towards the free edge.
How to work with a buff!
What do these nails look like?
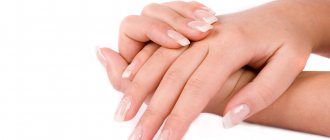
Many people believe that almond and oval shapes are the same thing, but this is far from true. Almond-shaped, slightly pointed at the end. Outwardly, it really resembles an almond, which is why it got its name. You can make it any length, the main thing is that you feel comfortable.
You can do any work with your marigolds without fear of damaging them. Of course, if this is hard work, then there is a high probability that the nails will break quickly due to the pointed tips.
How to create an almond shape on short nails - can you use soft almonds?
If your nails are not long enough and you don’t want to resort to extensions, but you really love almond-shaped nails, then you can use a softer version.
Important: To create almond nails on short nails, the required length of the free edge must be at least 5 mm.
We will form a soft almond We
also start by finding the center point of our nail, focusing on the finger itself!
Measuring the center
We begin to form this shape a little differently - your movements should be long, but the file should lie at an angle of 45° under the nail. There we round off the free edge. But we work without fanaticism!
Under the nail!
After this we move on to forming the side arch. As in the case of long nails, soft almonds eliminate undercuts immediately from the ingrowth point. We're backing down a bit! Forming a smooth arc from the side, we look at the end of the file.
After this we sharpen our nose. With sliding, rocking movements we soften our tip. Our hand passes through the silhouette of a boat. After all, we repeat, all the lines are soft and smooth.
Forming the nose of the free edge
Now we cut down the lower parallels. We place the file under the nail and smoothly move it towards the center.
Under the nail
Checking the evenness of the cut.
Smooth
Let's check the rest of the nails.
We check
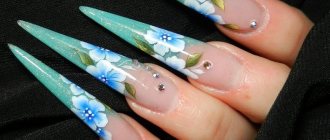
Almond shaped nail extensions with gel
Extended almond-shaped nails have advantages over natural ones: they do not break off, do not flake, the manicure lasts up to three to four weeks, and is insensitive to water and the aggressive effects of household chemicals.
Almond-shaped nail extensions today can be done not only in the salon. Many girls do the procedure at home. Almonds do not belong to complex configurations; in order to form ideal outlines you need to have a sense of proportion and good coordination. In the case of short nails, creating the desired contour will not take much time.
All stages of almond nail extension are presented in the video.
Any type of design can be made on artificial nail plates, since gel technologies require combination with all types of decor.
In order to simulate gel artificial nails you will need:
- the main consumable is the foundation gel;
- stencils for creating an artificial plate;
- base coats: base and finish;
- files and buffs;
- orange stick;
- tweezers;
- brushes;
- gel polishes of different colors;
- composition for removing the sticky layer;
- decorative elements: ribbons, stones, rhinestones, slider stickers, etc.;
- ultraviolet lamp for drying.
Extended almond shaped nails – pictured below.
Who should choose almond-shaped nails and who suits almonds?
- Of course, when choosing a manicure, consider the shape of the cuticle. Each of us has our own, but the main types are distinguished: square, circle and triangle. Almonds in this matter are more classified as oval, so they occupy a universal place and fit almost any shape.
- Almonds are also , taking into account the characteristics of the fingers. It will make wide fingers thinner and short fingers longer. But still, a narrow nail plate and a short nail bed are more suitable for almond manicure.
- It is also important to feel the balance of the ratio here - if you have a small nail bed, but your fingers are plump and short, then almonds will only attract attention even more due to the asymmetrical ratio. It is worth paying attention to a soft square or oval (depending on the shape of the cuticle). Girls with long and narrow fingers are lucky in this regard - almonds, like any other shape, will look great!
Almonds work well to lengthen slightly plump fingers with a nail plate of medium length and width!
- If you want to create an almond shape, also consider the length of the free edge! Almond works best on medium to long nails to really create a lengthening effect. If you have wide fingers, then short almonds are contraindicated for you, since they will fill out the phalanges even more. It’s better to make a temporary oval - it stretches any nail shape!
- But the most important thing was the client’s choice! If you have a soul for this form, then it is difficult to fall in love with another form only on the advice of another person. Give yourself a manicure that suits your shape and your fingers. If you don’t like it, go back to your favorite form.
The almond form is considered one of the most practical forms - it is practically not afraid of chips and damage. Although it still requires careful treatment, since in terms of practicality it is still slightly inferior to the oval. But with such nails, your fingers will always be a modest object of attention! After all, almond-shaped manicure can be considered a classic, with which your nails will always look feminine and gentle. Perhaps that is why many women choose almonds for manicure.
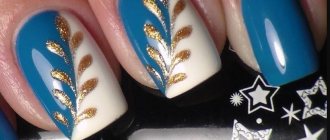
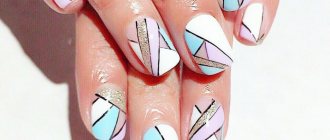
Which design is best for short almond-shaped nails?
For the short manicure in question, nail art experts recommend several types of designs that will highlight the beauty of the nails, eliminating controversial issues, if any. The following types of decor are preferred:
- Stamping. Stencils with a stamp allow you to make an image of any complexity. Fine lines and small patterns go perfectly with short nails.
- Slider stickers. They do not require special skill and fit well into any design.
- Small decorative elements: bouillons, Kristal Pixie crystals, rhinestones.
- A drawing made using hand-made techniques should not be too elaborate or detailed. It is recommended to give preference to minimalist geometric lines and simple schematic pictures.
- Decorative shiny ribbons along a short nail or diagonally.
- Deep design is the selection of a three-dimensional negative (blank) field of a certain contour: a heart, a butterfly, a flower, a geometric figure.
- A single-color coating is an all-time classic. It is better to opt for dark colors or red varnish.
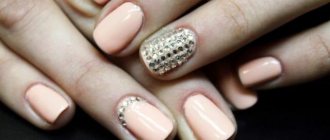
Some types of the described manicure are presented in the photo below.
Choosing the ideal shape
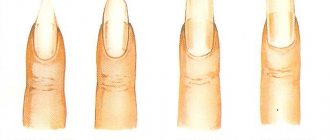
What forms are there?
Cosmetologists distinguish six main types of nail design, in particular:
- almond-shaped looks very feminine, allows you to make your fingers look more delicate and thin, but this design is not the best option for super-long nails;
- the sharp almond-shaped one is not the most convenient way for everyday wear, but is popular from time to time;
- rounded is considered universal, very good for people with weak and unhealthy nails, on such nails any shade of varnish will look advantageous, red varnish will add chic and luxury, and a French manicure will add sophistication and splendor;
- square is an ideal option for long and medium nails, the nails have a square shape, such a manicure requires excessively careful care;
- oval classic option, nails look beautiful and are minimally susceptible to damage;
- soft square is an excellent option for lovers of square and rounded nails at the same time, nails are designed in the form of squares, their edges are slightly rounded with a nail file, the “soft square” design is an excellent way to avoid the appearance of microcracks at the corners of the nails.
How to choose the right shape for your hands
The appearance of the hands, first of all, depends on the design of the fingers and manicure. To select the most suitable configuration, you need
spend a lot of time experimenting.
Ideally, try all the main nail variations
.
The basic rule to follow when choosing a form is:
- finger length;
- finger shape;
- damage to the hands (for example, calluses);
- type of activity and employment;
- previous injuries;
- type of hands;
- condition and type of nail bed;
- natural shape of the nail plate.
But you shouldn’t rely “blindly” on fashion trends. The configuration may be fashionable, but completely unsuitable for the person. That is why the shape of the nail plate must be selected individually. Fashion trends should not be decisive in this matter.
- On the eve of a big holiday where everyone will relax, a real lady should look impeccable, but in compliance with traditions, our article about DIY New Year's manicure will help her with this.
- If you are looking for new products in the field of manicure, consider the square shape of your nails as an option; you will learn how to make them elegant and beautiful in our article. Secrets and tips are also waiting for you.
Design for almond-shaped manicure
How to make an almond shape of nails seems to be clear, but it is also important to choose the right design. Almonds are now considered a classic, but it’s easy to make a manicure look vulgar. It is advisable to choose French, pastel or nude shades if design is intended. You can supplement the color coating with stamping, stickers, sliders, small rhinestones and bouillons.
To read: Terbinafine ointment: 1 remedy for many problems
When choosing a design, you should be careful, as it is easy to make a manicure too provocative; it is better to study several photos. Watercolor painting, which looks good on long and short nails, is gaining popularity. You can learn beautiful drawings with video tutorials.
Shiny tapes glued vertically or horizontally will help to visually lengthen the plate. By refusing rhinestones, drawings, decor, it is permissible to make the coating with rich or dark varnishes. The modern almond shape will look great with a matte top.
Video tutorial – “How to make square nails”
The work on creating a manicure is quite painstaking, and in order to somehow optimize this process, each master, based on long searches, trial and error, eventually creates his own individual style of execution. Naturally, creating the “square” shape contains unshakable rules, but each master has his own techniques and subtleties of its creation. Especially for those who are trying to master the art of creating a “square” shape, “Ideal Manicure” has prepared a training video that will help consolidate the acquired knowledge in a visual form.
Watch, study, and then put into practice. Perhaps, over time, you will create your own, different from the rest, technique for creating beautiful nails, but for now, a video tutorial on how to properly file square-shaped nails.
Perfect design
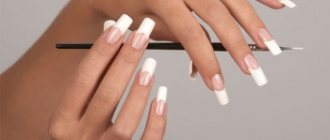
French on almond-shaped nails
French is one of the most popular and current nail design options. It is suitable for all occasions, and this is its main feature.
French on almond-shaped nails is considered the most common type of manicure for this configuration.
(as nail art masters say, “there’s plenty of room to turn around”), it can effectively emphasize the “smile line” and focus attention on the refined appearance of the free nail edge. Thus, visually your fingers will look longer, more feminine and graceful.
This manicure can be varied with different decorations, for example, delicate patterns or stones. The result is a chic nail art for a party or special event.
For office work, it is best to do a manicure in beige and white tones.
For relaxation, richer and brighter shades are suitable.
Almond-sea theme
In recent years, marine themes have been trending.
To make almond-shaped nails in a nautical style, you will need:
- top and basic product;
- thin brush;
- self-adhesive special strips for manicure in white shade;
- matte varnish without shine or glossy dark blue varnish;
- red varnish
The technology is as follows:
- The base is applied to the nail plates and dried.
- They are painted blue and dried thoroughly.
- Two white stripes are glued across them.
- On each nail plate, in the corner at the top, a small heart is drawn with a thin brush with red varnish.
- The final touch is to open the nail plate with a protective coating for fixation.
The most effective design options
An interesting manicure option for almond-shaped nails is volumetric sculpting and aquarium design. It is considered a great idea for special occasions, which is why brides and graduates love this manicure.
You can choose a plain design or a combination of bright colors with stickers, rhinestones and lace. Also, for long almond-shaped nails, we can recommend a moon manicure, when the base of the nail bed is highlighted with rhinestones, a contrasting color or sparkles. The fingers look very original.
A woman, choosing an almond-shaped nail shape, definitely gives preference to a feminine and elegant manicure, monitors the beauty of her hands and tries in every possible way to emphasize the elegance of her brushes. Fingers with almond-shaped nails always look aristocratic and noble.