How to apply marmalade for nails: basic rules
The application technique is quite simple - below we will discuss nail designs with marmalade step by step. The procedure includes several main steps:
- Get a manicure - process the cuticle, shape, polish and level the nail plate with a buff.
- Treat your nails with a degreaser, apply a base, dry for 1 minute in an LED lamp, 2 minutes in a UV lamp.
- Apply the selected color shade and finishing coat - each layer is thoroughly dried in a lamp.
- Without removing the sticky layer, pour colored sand, rub it into the nail plate, and remove excess material with a brush.
- Cover your nails with topcoat and dry for 2 minutes in a UV lamp (1 minute in an LED).
It is important not only to understand how to apply marmalade for nail design, but also to take into account an important nuance, which is the choice of colors. When choosing a shade, you need to take into account that in the dry version, sand looks slightly different than when applied to the nail plate.
Design
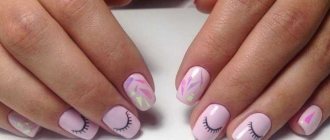
There are many ways to create a “sweet” manicure. This design can be applied to all or just one or two plates. Purple and pink backgrounds work well for marmalade patterns. “Marmalade” ombre and French look especially chic. To complement this manicure with original notes, experts recommend using the following decorative elements.
- Sugar candies.
They are presented on the market in a huge assortment, so you can choose melange, neon and plain elements for decoration. - Acrylic powder with fine glitter.
It allows you to create an interesting “sweet” surface. To decorate with acrylic powder, the nails are covered with a base of several layers of colored varnish and their base is polymerized in a UV lamp, after which they are fixed with a topcoat. The patterns are effective if acrylic sprinkles are applied using a pusher. - Jelly beans.
Such decorative elements are considered universal because they are suitable for creating a manicure at any time of the year. Jelly beans look especially chic when creating a New Year's manicure. In summer and spring, it is recommended to decorate nails with multi-colored details in light shades. They fill the image with tenderness and style.
- Melange.
This is a special material consisting of small particles that have a multi-color effect. - Confetti.
They are applied to nails in the same way as acrylic powder or melange. In this case, as a background it is necessary to select a colored varnish that would go well with sparkles. To prevent the “marmalade” confetti manicure from having a too rough surface, after drying the plates, sanding should be done with a buff. Confetti is extremely popular to achieve a “marmalade gradient” effect. To do this, sprinkle sparkles of a light shade on one part of the nail, and a darker one on the second. - Sugar varnish.
After complete drying, this material creates a rough “marmalade” surface of different colors. This design option will adequately decorate both summer and winter manicures.
Marmalade nail art comes in a huge variety of designs, so to create it you need to constantly experiment with texture and color scheme. For an everyday look, it is best to choose classic shades, and a festive manicure can be diluted with brighter notes. The following types of “sweet” decor are in fashion this and next season.
- Ombre.
To beautifully design your nails with this effect, you must first make a gradient, then decorate with acrylic powder. This design will look simple, stylish and tasteful. In addition, you can use a variety of combinations of bright colors in the decor. - Marmalade hole.
Lunar manicure is always popular, but if you sprinkle the traced moon with marmalade melange, you will get a chic look. An interesting solution would be to sprinkle the nail plate, in which the “moon” will remain untouched. The edges of the smile can be additionally decorated with rhinestones.
- French.
Despite the fact that French manicure is classic, recently many stylists prefer to replace futuristic “smiles” with semicircular shapes sprinkled with “sweet” sand. This nail art is well suited for a romantic look and is very popular when decorating a manicure for brides. - Confectionery decor.
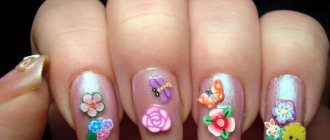
Since marmalade is considered a friendly and soft finish, it can be combined with various design techniques. For example, small pictures of animals, cakes or flowers will look great on sugar sprinkles. It is allowed to use hand-painted decoration, depict geometry and decorate with rhinestones.
- Matte manicure.
To create “marmalade” nails, it is not necessary to use a glossy background. If you replace it with a light matte finish, you get an interesting combination in the form of a “crumbly” dessert and cotton candy. Since contrasting colors are not always suitable for everyday looks, it is recommended to replace them with dark shades. An interesting choice for “marmalade” nail art would be light green, gray, black, red and purple. In the coming season, the main trend will be a rainbow combination, in which the “sugar” manicure gets more sweetness and brightness.
To learn how to make a high-quality marmalade manicure, watch the video.
How to make marmalade on your nails with a “sugar” manicure effect
How to make marmalade on your nails to get a voluminous texture? In this case, a different method of applying velvet sand is used. You need to completely complete the manicure, remove the sticky layer, and perform the following steps:
- Apply base coat to the nail plate.
- Cover with marmalade, carefully spreading it over the nail.
- Dry in a UV lamp for 2 minutes, remove excess with a brush - no final coating required.
It is important to carry out the marmalade design on nails according to the steps described above - accuracy in work and strict adherence to technology will help you get an impressive result. You need to remove marmalade just like gel polish - for this purpose, a special product is used, which is applied to a cotton swab and fixed on the nail with foil. After the required time, all that remains is to remove the remaining coating.
Photo gallery of bright and juicy nail art
A manicure using a special melange sprinkle turns out unusual, bright and very stylish. By using your imagination, you can create different designs every time. Melange can be applied to just one nail to complement the design or to all of them at once for maximum saturation. Nail design can be complemented with rhinestones, painting and other decorative elements. After looking at the photo, you will understand why marmalade nails have become so popular.
This beautiful manicure can be done using melange for nail design. This will take you a minimum of time and effort, and the result will certainly exceed all expectations. We highly recommend that you learn how to make a beautiful matte geometric manicure using marmalade. You will find a detailed tutorial on how to perform this nail art in the final video.
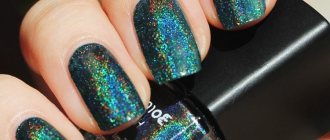
Marmalade for nail design is a spectacular decor that combines the advantages of broths, sparkles and velvet sand. Crystal-adorned marigolds are like that childhood favorite, generously sprinkled with sugar.
How to use marmalade for nail design: important nuances
To figure out how to properly apply marmalade on your nails, you should use professional secrets that will be useful to both beginners and experienced professionals. Namely:
- You need to apply the topcoat with a separate brush, thoroughly cleaning it before each immersion in a bottle of topcoat - for this purpose, you should moisten a lint-free cloth with gel polish remover and keep it handy. Otherwise, shining particles will get into the top, and it will be damaged.
- The question often arises about how to make marmalade on nails, creating beautiful patterns. To do this, you need to perform a classic manicure, remove the sticky layer, and then apply the selected design with a thin brush. All that remains is to cover it with sand crystals and dry it in a lamp.
- It is better to use a white shade as a basis for any drawings - it does not change the color of the marmalade.
Tips on how to apply marmalade for nails will help you understand the nuances of the procedure - and then the first time you will be able to create a beautiful manicure with an unusual texture.
Marmalade manicure
5 (100%) 3 votes
If when working with ordinary acrylic powder the design usually turns out to be velvety-matte, then velvet sand allows you to give your manicure the appearance of something delicious, sprinkled with glittering sugar. Its texture is somewhat larger, so it may feel unusual and even excessively rough on the nails. However, the effect is worth it.
The technology that we will talk about today is actively used in combination with gel polishes. In principle, velvet sand will also stick to regular varnish, but no one can guarantee the good durability of such a coating.
The author of the lesson is master Tatyana (Tatiana Bugriy channel on YouTube). Her videos are very detailed and talk about various interesting schemes for working with gel polishes, new materials in the nail industry and other interesting things. On Manikyr.ru, the lesson is presented in the format of a short but detailed text instruction with pictures, especially for those who do not like learning from videos.
To work you will need:
- Lamp for drying gel polishes;
- Base for gel polish;
- Gel polish for background;
- White gel polish for patterns;
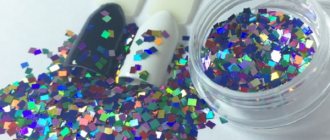
- Velvet sand in several shades with sparkles;
- Glossy or matte gel polish top;
- Thin brush.
So, let's start making marmalade manicure at home!
Step 1
Without careful preparation of nails for painting, especially painting with gel polishes, not a single design will stick on the nails. You've probably encountered a situation where the color coating chipped off on the second or third day. So, most likely, it is not the manufacturer who is to blame, but a violation of technology.
First of all, we deal with the shape and length of the nails. They need to be made absolutely identical. Next we take on the cuticle. Before painting with gel polish, you cannot steam it in water (your nails will absorb too much liquid), so you will have to use special softening agents.
We buff the prepared nail plates just a little, removing shine, to ensure better adhesion to the base. Then we thoroughly degrease, especially along the skin and at the very ends.
Apply a thin layer of transparent gel polish base (sealing the nail sections with it), and immediately dry it under the lamp.
Step 2
We use any shade we like as a background. It all depends on the chosen style of clothing and the tones of the future pattern (velvet sand). Of course, black and white backgrounds are ideal in this regard, because any colors go well with them. But all this is a matter of taste.
So, apply the background gel polish in one layer and dry it under a lamp. If necessary, repeat this action. Cover the finished background with a top coat, polymerize it and remove the sticky layer.
Marmalade manicure Step 2
Step 3
Draw a pattern on the background with a thin brush. It can be anything, but floral motifs are especially relevant now.
Marmalade manicure Step 3
It is best to paint with white (except for those cases when transparent velvet sand is chosen for the design, then the opposite is true). It does not interrupt the native shade of velvet sand. Actually, even on a white background you can paint with white, achieving the desired effect.
For the design with colored tints, which is shown in the lesson, it makes sense to fill the entire surface of the nail with a pattern, but if you want to make a monochromatic accent, a couple of small elements will be enough.
Attention, DO NOT DRY YET!!!
Step 3-2
Sprinkle the pattern with colored sand. This should be done in parts, right above the jar, immediately shaking off the excess. A soft, beautiful gradient is automatically obtained. Now we dry the finished pattern thoroughly under the lamp, and shake off the excess with a stiff brush.
Step 3-3
And now, the marmalade manicure is ready!
Marmalade manicure is ready!
This is useful to know
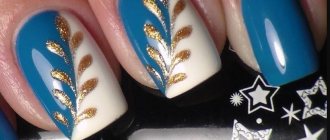
Nail design with marmalade: photo
“Sugar” or “marmalade” manicure is a spectacular idea. Sand looks best in combination with bright, rich shades: red, purple, blue. Below are photos of nail designs with marmalade that will help you appreciate the beauty and originality of this design.
Return to list of publications
04/10/2017 Instructions, design, marmalade