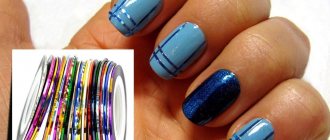
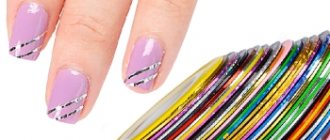
What is nail design tape
Manicure tape, scotch tape, self-adhesive are thin strips of paper, silicone or foil, 1 to 3 mm wide, intended for nail design. A manicure with ribbons is one of the most versatile design options, which is appropriate at any time of the year and never goes out of style.
Types of tapes for nail design are determined by their design:
- holographic – metallized thin strips with a foil effect and shimmer in the light;
- shiny or shimmering - more dense, covered with a mound of sparkles;
- for metal – gold, silver or copper color;
- plain - white, black and colored stripes without additional effects.
White stripes are most often used to create designs where it is necessary to temporarily cover some areas of the nail plate, and all steel colors may well become a full-fledged part of the design.
There are also two functional varieties:
- straight. Regular strips, which allow you to create only a straight line;
- flexible or bendable . Most often made on a silicone basis. Due to their elasticity, they are used to create lines of different shapes - waves, sharp bends, 3D effect.
They are produced in rolls of 10-30 meters, as well as in the form of stickers - on a paper base with lines printed on it.
Advantages of tapes for nail design:
- low price . A roll of 20 meters costs from 30 to 150 rubles, and this despite the fact that one manicure will take you a maximum of 10-15 cm.
- ease of use . No specific skills are needed to apply such a design; in addition, the design is created quickly;
- relevance. They are appropriate for any manicure - be it a wedding or an office one, and also look harmonious at any time of the year;
- versatility. Can be used on both gel polish and regular polish.
There are no flaws found in this design accessory.
Benefits of using tape
The main advantage of design tape is the huge selection of shapes, colors, widths, and thicknesses.
And:
- The price of the tape is low, you can buy at least a pack of different tapes at once;
- Easy to use, even an inexperienced person can handle its use;
- Creates a beautiful, sophisticated design on the nails;
- It may be stored for a long time - without using it, it takes up little space;
- Retains its appearance for a long time;
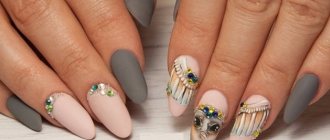
Nail design with ribbon for short and long nails. Photos, ideas with rhinestones, tape. Master class: how to do a manicure with gel polish - Helps in creating straight lines if you have difficulty drawing them on your nails.
Working with such a design, there are many more advantages that every woman will highlight for herself.
Creating a nail design with tape step by step
If the ribbon will be used as an independent decoration, prepare:
- tools for hygienic manicure, depending on preferences. This could be a machine and a set of cutters, nippers and scissors, a remover and an orange stick or a pusher;
- base and top coat. It is better to choose a special top for securing the design, as it is thicker and more elastic and allows you to preserve the design until correction without chips or cracks;
- colored gel polish;
- nail scissors;
- manicure tape of the desired color and texture;
- tweezers.
At the preparatory stage, do your usual manicure - remove the cuticle, treat the side ridges, file the shape, lightly walk over the nail plate with a buff.
- Apply a thin layer of base coat and dry in a lamp for 30 to 120 seconds, depending on the type of device;
- Apply colored gel polish in 1 or 2 layers to the dried base. If 2 layers are needed, each of them needs to be dried;
- Carefully cut the desired piece of manicure tape. You can place it horizontally, vertically, diagonally, in general - whatever you like;
- Place the strip on your nail. It is convenient to do this with tweezers, since the strips are thin. When using horizontally and vertically, it is recommended to make a small indentation from the cuticle or side ridges, and also make sure that the strip does not protrude beyond the free edge. If you do not adhere to this recommendation, then there is a high risk of accidentally catching and peeling off the strip, not only in the process of creating the design, but also after completing the manicure;
- Cover the resulting design with a top coat, maybe even in 2 thin layers, and dry it in a lamp. Don’t forget to fix the end of the nail plate with the finishing coat. If necessary, remove the sticky layer.
How to apply tape to varnish:
- Do a manicure, file the shape, prepare the nail;
- Apply a base under the varnish - it makes the coating smoother and also prevents the pigment from the varnish from being absorbed into the nail and staining it;
- Cover your nails with 1-2 coats of color. A two-coat application is often needed for pigmented colors to achieve a uniform color;
- Wait until the varnish is completely dry. This takes from 5 to 20 minutes, depending on the thickness and number of layers and the characteristics of the varnish itself;
- Cut off the desired fragment and transfer the strip to the nail using tweezers;
- Cover the design with a top coat of varnish and wait for it to dry completely.
As for the flexible tape, the procedure for using it on nail polish and gel polish is no different from the usual one. However, it can be placed not only directly. For example, along the perimeter of the nail with a smooth rounding in the cuticle area or with the formation of a bend along the entire nail plate.
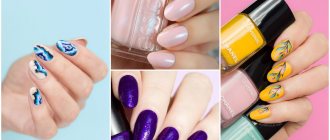
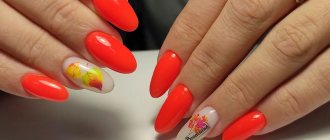
Geometric designs with ribbons
The most beautiful manicure using ribbons is creating geometric shapes for nail designs - easy and simple.
1st option – “diamonds”:
- Cover your nails with blue varnish and dry;
- Glue the tapes obliquely to one side of the nail, and then in the opposite direction on top of the first tapes;
- Using a cosmetic sponge, lightly apply blue or white varnish over the ribbons;
- Dry your nails and remove the tapes, first those that were glued with the last layer;
- It turns out on the nails - diamonds. Decorate the nail with rhinestones and beads.
If you want to make a large rhombus, then you will need 4 ribbons. 2 are glued so that a triangle is formed on the edge of the nail and 2 more so that a sharp triangle is formed at the cuticle.
Next, you can cover the entire nail with a different color and remove the tapes or paint over the resulting diamond in the center of the nail. If you leave the diamond in the form of ribbons, then the edges must be trimmed so that they fit tightly around the nail and secured with clear varnish.
2nd manicure option – “spider”:
- Apply golden varnish to the nails and dry;
- Cross the tape with glue so that the intersection point of the cross is in the center of the nail;
- We glue the tape at an angle on 4 sides of the nail, so that the angle faces the center of the nail;
- Apply black varnish on top, dry it and remove the tapes, first the corner ones, then the cross;
- Apply clear varnish on top and dry.
This option is possible in various matching tones; you can use Goethe’s “modern color wheel” to choose matching tones.
3rd option of geometric shapes – “multi-colored triangles”:
- Apply beige or pale pink varnish, preferably to match the skin tone;
- On the dried varnish we glue 3 tapes diagonally from the bottom of the nail to its outer corner, parallel to each other, in the same way, glue 3 more tapes in the opposite direction;
- After applying the tapes, triangles are formed on the nail, which are painted with multi-colored varnishes;
- Dry the nail and remove the tape, apply colorless varnish on top.
4th option:
- Cover your nails with pink polish and dry;
- Apply 2 tapes from the center of the edge of the nail, diagonally to the cuticle;
- Glue two tapes so that it separates the outer edge of the nail;
- We take 2 more tapes, one edge, each of the tapes should be glued inside the first triangle closer to the tape that separates the edge of the nail;
- 2 inner ribbons must intersect - with a cross, so that a rhombus is formed between the 2 corners (external and internal);
- After applying the tapes, paint the nail with a varnish of a different color from the main one, for example: coffee color and dry it;
- Remove the tapes and apply sealant.
Don't miss the most popular article in the section: How to extend nails with gel polish. Nail extension instructions for beginners. Photo.
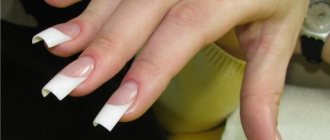
Manicure tape as a template
Manicure tape is used as a template to temporarily cover up parts of the nail plate and create a two-tone design. This option is suitable for beginners who have not yet mastered nail painting and have problems drawing straight stripes.
Prepare everything the same as for a regular manicure:
- manicure kit to treat the cuticle, free edge, side rollers, and the nail itself;
- 2 colors of gel polish, top and base;
- tweezers and scissors;
- Scotch tape for nails. Here you can take a regular white one, since in the end no one will see it anyway. RocheNail has one with a width of 1 mm.
Perform your usual manicure – hardware, combined, file, edged.
- Apply the base and dry in a lamp in accordance with the instructions for the device;
- Cover your nails with colored gel polish in 1 layer. Dry;
- Cut the tape into the required fragments and cover those places on the plate that should subsequently remain the background color. When gluing strips, be sure to leave protrusions for gripping so that you can easily remove them later;
- Apply contrasting gel polish to the pasted strips in an even, thin layer;
- Gently grab the protruding edges of the strip with tweezers and remove them from the plate with a confident movement. It is important here that the top layer of gel polish is as thin as possible, otherwise the edges of the strips will turn out torn;
- Dry the gel polish, cover the design with a top coat and dry again.
When working with gel polish, the order will be exactly the same - base for varnish, color, stripes, color. The only difference is that it is recommended to remove strips from slightly dried varnish. Don't forget the sealer at the end.
Features and Benefits
It is important to note that ordinary stationery tape will not work for us. It leaves a sticky residue and can even tear off a piece of enamel.
If you don’t have anything suitable at hand, stick it several times to the back of your hand. This will remove excess stickiness.
In general, when decorating the nail plate in this way, masters use special adhesive tape.
The main advantage of this approach is the availability of materials and ease of implementation. Using this device, you can decorate the plate with several colors, creating a clear border between them. When working, the shades will not spread or mix if you separate them with thin sticky strips. It is very difficult to achieve this effect manually.
Trends 2022 offer the following nail art options, which can be created using adhesive tape:
- French;
- mosaic;
- geometric patterns;
- stars;
- chess field;
- multi-colored stripes located in different directions.
You can come up with other variations, it all depends on the imagination of the master.
There are two types of tape: colored and transparent. The first is used as an auxiliary material; after applying and drying the varnishes, it is completely removed from the plate. The second acts as an independent decor.
Design ribbon manufacturers
VogueNails
The manufacturer offers manicurists, their clients and simply lovers of beautiful designs several varieties of silicone strips for manicure. There are colored, white, and metallized strips on a paper backing. Thanks to the elasticity of the material, VogueNails strips can be formed into curves and laid out in waves.
One set contains strips of different thicknesses to create new designs every time.
Roche Nail
Here the tapes are presented in rolls. Their thickness is different - from 1 to 3 mm, while the length is the same - 20 meters. Roche Nails has options with a holographic effect, white and black, colored, with glitter, as well as with the effect of precious metals - gold and silver.
IRISK
IRISK offers flexible manicure strips that can be laid out in different patterns. The strips are made of silicone, so they can easily take the desired direction. There are gold and silver, colored and gradient.
In addition to flexible ones, there are also regular, straight ones, but they are called self-adhesive thread IRISK. Adhesive-based strips with different colors and holographic effects are available in rolls. There are 14 different options in total.
AliExpress
On Aliexpress, dozens of different sellers offer manicure tapes. There are stripes for every taste, and even those that are not particularly common among Russian manufacturers. For example, wavy stripes on a backing.
There are also classic options in a roll. A large number of sets of 5, 110, 15 rolls with different effects.
For classic designs, gold and silver stripes of varying thicknesses are available. And flexible nail tapes to form different curves and directions.
What colors can be used for a manicure with stripes in 2022?
This year, nail designers are offering fashionistas unexpected solutions, richly bright and, conversely, soft pastel compositions. Ladies can choose individual, favorite colors or create unusual multi-colored combinations on their nails.
Nude tones
The delicate, flesh-colored palette is an excellent choice for every day, for the office or school. Also, it is preferred by lovers of universal designs that go with all things in the wardrobe. It's easy to transform a subdued nude base into a festive look: just add a little sparkle or pop of color.
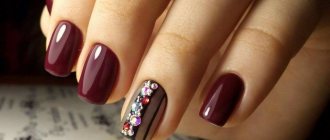
Burgundy
Chic burgundy is the color of kings. Unlike bright red shades, it does not blind, but warms with its warmth and exquisite tints. This is the best option for confident, elegant women. The burgundy color scheme can be combined with gold, silver and colored sparkles, foil, and rhinestones.
Matte finish
The velvety texture gives any shade extraordinary depth and expressiveness. But, most impressively, the matte top looks on dark, rich bases - malachite, dark blue, purple, graphite or black, chocolate, burgundy. The trend of the season is glossy stripes on a matte background. They highlight the “smile” line or draw figures in arbitrary directions.
Black
Depending on the chosen combination of colors and the main background, this design can be very strict or frivolously multi-colored. The main thing is not to limit creative impulses and desires.
Pink
Depending on the saturation and the chosen shade, pink can be:
- weightlessly tender, romantic;
- luxurious, catchy;
- daring, incredibly bright.
The pink palette is organically combined with lush greenery, floral patterns, and minimalist geometry.
White
A universal solution for every day and an excellent choice for a wedding, if you complement the snow-white background with gold or silver ribbons and crystals. It harmonizes perfectly with all colors, without exception. “Friends” with shiny decorations and all types of images, from strict or romantic minimalism, to luxurious buds or entire paintings.
Red
A girl with fiery scarlet or deep red nails is always the center of attention. This is the color of life and self-confidence, temperamental, full of energy. There are a lot of design options:
- lines on a white, black or neutral base;
- gold or silver on red;
- combination with “negative space”;
- combination with other colors, patterns, rhinestones.
The red color scheme is self-sufficient, it is associated with the holiday, and helps to always be in good shape.
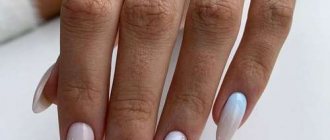
Light blue, blue, turquoise
The azure palette vividly recalls the sky and sea expanses. And stripes are firmly associated with the profession of a sailor. It is not surprising that these very tones became the basis for the “marine” design beloved by many. It is complemented with shells, drawings of anchors, ships, and fish. However, you can simply apply a gorgeous turquoise shade to your nails by adding random gold or silver foil. Sequins or rhinestones will not be superfluous, especially for a festive or vacation look.
Typical installation errors
It is quite difficult to install a diode strip incorrectly, however, there are such unconventional mounting methods that are best avoided:
- Fixation using a construction stapler. Undoubtedly, this is a very fast method and quite reliable, but one wrong move and your tape will become unusable;
- It is also not recommended to use hot melt glue. After hardening, it will serve as a layer that does not remove, but rather accumulates heat. The tape may overheat;
- Often, when peeling off the protective tape from the adhesive layer, places where conductive paths pass are exposed. If you stick a tape with such an unprotected place on an aluminum profile, a short circuit and burnout of the device will inevitably occur. You must first stick a small piece of electrical tape onto the profile in the place where the tracks come into contact with its surface and only then continue installation;
- Do not use cable ducts not intended for this purpose to lay the tape. She'll just overheat.
The article was written for the site.
Tags:Lighting systems