This lesson is designed for beginner nail artists who learn different nail design techniques at home. The topic of the master class is how to do nail stamping correctly. I will tell you a few nuances that will help you print a quality design on gel polish. Let's look at two techniques at once: stamping with a special varnish and stamping with gel paint. Let's start with the classic technique.
How to do classic stamping on gel polish: step by step photos
Traditional stamping requires a special varnish that dries in air, as well as a plate and stamp for transferring the image. Before work, you need to thoroughly degrease the plate and stamp surface using Nail Cleanser.
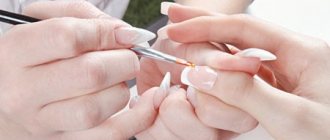
Step 1 – Nails need to be prepared and gel polish applied. Prepare everything you need right away so that all the tools and materials are at hand. You need to work quickly. Next, using step-by-step photos, I will try to show how to use stamping varnish.
Step 2 – So, how to stamp your nails. Apply stamping varnish to the plate. It is enough to paint over part of the drawing.
In this MK I used budget KONAD varnish. In winter they can work comfortably if everything is done quickly. In summer this varnish dries very quickly. This is his peculiarity. There is a strong smell, similar to acetone, so I do not recommend it for allergy sufferers.
Next, use a scraper or plastic card to very quickly run across the plate to remove excess varnish and fill in the empty part of the image.
Step 3 – Take the stamp, place it on the plate and apply light pressure to imprint the ink onto it. Quickly check the quality of the print.
Step 4 – Using the fingers of your left hand, pinch and push away the side ridges on the client’s finger, transfer the image onto the nail with light pressure. If the image is small, then the print can be made in one downward-upward motion. If the image is large, then the impression should be made by rolling from one side of the nail to the other.
The main answer to the question: “How to do stamping correctly”? Fast! If your ink prints poorly, it means:
- you do not do all the manipulations quickly enough;
- you have not sufficiently degreased the plate and have not completely removed any remaining varnish from the previous work;
- the room is too hot or windy;
- your varnish is not of high enough quality.
Stamping is good for making designs both in salons and at home. It greatly facilitates the work of a master who does not know painting techniques. Also, the use of stamping speeds up the work of the master many times over. There are so many different plates on sale now that you can choose designs to suit any design style or season.
Drawings in the form of prints can be made not only with the help of special varnishes. Masters who do not yet have sufficient speed and confident hand placement can try stamping with paint. It is thick and does not dry out in seconds, unlike varnish. Next, I will show you step-by-step execution of stamping with gel paint.
Stamping kits
Tools for traditional typing
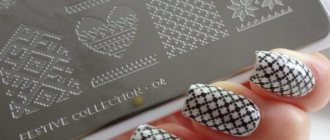
- metal plates , one or more, on which designs are engraved. Such plates have the shape of a circle or rectangle. One disk usually contains several patterns. Plates can also be purchased separately;
- stamp , with which the pattern is transferred from the plate to the nail;
- scraper - a scraper that is used to remove excess varnish from a plate. This is necessary to create a clear drawing.
Some manufacturers include paints for creating images in kits. If they are not included in the set, you will need to purchase them in addition.
For an overview of the stamping kit from the popular AliExpress site, watch the video.
Aids
- top coating;
- colored varnish for the background;
- fixative;
- nail polish remover.
Before you begin your manicure, you need to choose the right combination of colors so that the pattern stands out against the background of the base coat.
One of the popular companies that produce stamping kits is Konad.
Their kits contain 5-7 discs with interesting patterns, a scraper and a handy stamp.
The box also contains three polishes - white, black and a glitter fixer.
Learn more about Konad stamping in the video tutorial.
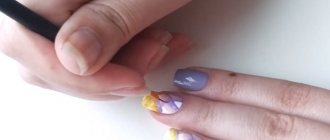
How to do color stamping at home using thick gel paint
As a rule, stamping paints indicate their purpose, but for design you can also use paint for Chinese painting, as well as regular very thick gel paint for applying designs on nails. Below, using an example, I will show how to make a print in two colors. It is also called ombre or gradient stamping. In my opinion, this technique only vaguely resembles a gradient, but it looks quite interesting. The main thing is to choose shades that are similar in tone and not too contrasting.
Step 1 – Manicure all your nails in advance, cover them with top coat, except those that will be stamped. I think gradient stamping looks best on a white background.
Advice for beginners
To work with gel paints, it is more convenient to use a transparent stamp with a silicone pad. In order for the paint to transfer better to the stamp, it must be prepared as follows: remove the gloss from the new stamp with a soft buff, give the surface a slight roughness, use a napkin soaked in Nail Prep and remove dust.
When you have prepared the stamp, degrease the design on the stamping plate that you want to transfer and let it dry for a couple of seconds.
Step 2 – Apply two colors of gel paint at once to the selected design.
Step 3 – Take a scraper and run it over the plate 1-2 times to remove any excess paint.
Step 4 – Since my silicone stamp is small, and I want to cover the surface of the tip as much as possible with the design, I took a rubber stamp from Konad. There is no need to buff it, since the surface is quite sticky and picks up paint well. But due to its opacity, it is difficult for beginners to work with it. It is not clear how and where the drawing will be transferred. But it is moderately elastic and the gel paint blurs less when transferred.
The big advantage of stamping with gel paint is that you can aim and hold the stamp for as long as you like before transferring the design. Gel paint does not dry in air, but dries in a lamp. But there is also a significant disadvantage. If your gel ink is not very thick and you press harder on the stamp, the print will blur.
Step 5 – There is one difference between how to stamp nails with polish and gel paint. When you transfer the “varnish” design, you need to press lightly on the stamp. When you transfer gel paint, the pressure should be minimal, otherwise the material will be smeared over the surface. We transfer it in one easy movement without pressure, not forgetting to pinch and slightly pull the side rollers.
My tip is quite large and the stamp did not allow me to print the image on the very edge. But the essence of working with gradient stamping should be clear.
Other stamping design options
In addition to special varnish and thick gel paint, when working with stamping, some artists manage to use ordinary varnish, standard colored gel polish and a thick rubber base. Also, foil and rubbing are used as additional decoration. Similar stamping can be done at home. The step-by-step photos below show simple examples of a simple design, the creation of which uses stamping.
Preparing the workplace for stamping
You will need a standard manicure set to tidy up your nails and prepare them for a manicure - scissors or clippers, glass files for correction, buffer and polisher, cuticle pusher. Prepare liquids - for removing nail polish or gel polish, degreasing, disinfecting nails, base and top.
Directly for stamping:
- Plates are a reusable round or rectangular metal stencil that can be engraved with 4 to 42 patterns and designs. The new plates are covered with a protective film on top, which must be carefully removed before designing. In order for the drawing to be clear, the engraving must be of good quality and of sufficient depth.
- Scraper is a scraper for evenly distributing paint over a disk. Made of plastic in the form of a thin plate. Can be with or without a handle. Some nail technicians successfully replace this tool with a plastic card, but we do not recommend this (especially for beginners). It is also better not to use metal scrapers. They leave scratches on the stamping plate and ruin it.
- Stamp for reprinting a pattern on a nail. It looks like a silicone or rubber pad on the handle. Can be round or rectangular, large, medium or small. The choice of shape and size depends on the design and your nail. For small designs and short nails, a small stamp will do. For large designs on long nails, use a rectangular or large round tool. The larger the working surface, the more elements of the pattern will be imprinted on the nail plate.
Which stamp is better, silicone or rubber? The one that is more convenient for you to work with is better. Therefore, we suggest trying both options. Rubber stamps are more rigid than silicone stamps. They make it more difficult to apply patterns to the corners of the nail plate. The imprinting technique is rolling from one edge to the other, with reverse movements. There is no need to roll soft silicone, otherwise all the lines will be unclear. It is simply pressed tightly to the nail with stamping movements.
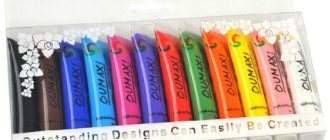
- Stamping paints. The main selection criteria are rich pigment, thick consistency, good coverage in one layer. If these rules are not followed, the design will not be printed, it will blur and flow.
For design, acrylic, gel paint and ordinary varnishes are usually used. Paints and varnishes give a bright, clear print. The disadvantage of acrylic paint is that it dries quickly. Therefore, it is inconvenient for beginners to work with it; they need to hurry during the manicure process. Regular varnish should not be shiny; mother-of-pearl and large glitter do not print well on nails. It is better to take a matte, thick one. It should stretch slightly behind the brush. A good design is obtained with holography or a metallic effect, with fine dust.
You can also stamp your nails with gel polish or shellac, but this is not a very good option for stamping design. They do not dry in the air, which is more convenient for beginners. You need to choose thick coatings with sufficient pigmentation so that the drawing does not turn out pale. After all, gel polish cannot be applied twice when stamping. In addition, if the gel polish is not viscous in consistency, it must be dried a little in a lamp directly on the stamp before applying it to the nail. The meaning of a quick manicure is lost. But after applying the ornament, the sticky layer can be sprinkled with glitter, powder or other decor and diversify the design.
For home manicure, we do not recommend large-volume bottles, since the material consumption is small - 5 ml of one color will last you a long time.
All these items are sold as a set or individually. Until you get the hang of it, try making designs with special stamping paints and professional tools. This is the only way you can get the desired result.
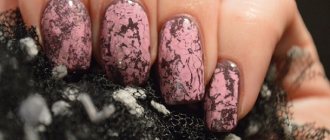
How to make shiny stamping with your own hands using foil
For this technique you need to use a material with good residual tack. Usually this is a gel paint or rubber base. The substrate, on the contrary, should not have a sticky layer so that the foil is printed only on the design. For this stamping technique, it is better to use casting foil. To ensure everything works out for you, check on the tip how the foil is printed on the material you are going to use for stamping.
Before working with regular gel polish, gel paint or base, you need to prepare a stamp. Namely, go over it with a buff, give it a slight roughness, remove dust and clean it with a cleaner. The photo below shows what a prepared stamp should look like if you want to stamp with other materials rather than special varnishes.
For testing, I took paint from Patrisa Nail, which is intended for stamping and Chinese painting. It is thick and very pigmented. You don't need to apply a lot of it to the plate.
I had in stock a ready-made tip coated with gray gel polish and a thin layer of non-sticky topcoat.
For the design, I used old Born Pretty plates, which I ordered from Aliexpress a few years ago. I can't say they are very good, but overall they are workable. The main thing is to clean them thoroughly after each use.
Step 1 – Apply a small amount of paint to the edge of the selected design.
Step 2 – Next, I ran the scraper across the plate a couple of times. Both times you need to move in the same direction so that the paint does not smear on the plate.
Step 3 – Next I transferred the drawing.
Step 4 – This is the print I got. The paint hasn't run, but there are some small gaps. If there are only a few of them, you can retouch them with a thin brush. If there is a lot, then it is better to redo it. Possible causes of bald spots when stamping with gel paint: a poorly cleaned plate, poor-quality varnish, insufficient pressure on the stamp while removing paint from the plate, too deep engraving on the plate. In another MK I will show you stamping with Vogue Nail gel paint and compare these two products.
Step 5 – Before applying the foil, I dried the gel paint in a lamp. Next, I degreased a piece of transfer foil, waited for the clinser to evaporate, and printed the foil onto the design. Then I covered it with a final layer of glossy topcoat.
The result is a brilliant print.
Reverse stamping with gel polish
This technique is not as complicated as it seems, but the effect it produces is amazing. First you need to prepare your nails and apply a base coat, which should dry well. After this, gel polish is applied in two layers, and each of them is thoroughly dried. Gel paint of the desired shade is applied to the plate pattern you like and, after processing the stencil, it is transferred to the stamp with a scraper.
The details of the drawing are additionally painted with bright colors, which is done using a brush for Chinese painting. Cover the design with topcoat and place the stamp in a UV lamp for a few seconds. Then you need to carefully remove the design from the pad with tweezers and transfer it to the nail. Next, treat with a top coat and dry in a lamp.
How to do stamping using rubbing
Another technique that allows you to quickly create shiny designs on your nails. You can use any rub. I tried the rose gold color from Patrisa Nail. I did the stamping itself with gel paint, which I used in the previous MK.
Step 1 – I applied a dark burgundy shade to the tip and covered it with a thin layer of top coat. Since the area of the tip is large and not comparable to a natural nail, I applied gel polish only to part of it.
Step 2 – To ensure that the rub only imprints on the design, I lightly buffed the entire surface.
Step 3 – Next, I removed the dust from the sawdust.
Step 4 – I applied a small amount of rub onto the clear stamp.
Step 5 – Selected a design and filled it with gel paint.
Step 6 – I stamped the gel ink onto the stamp on top of the rub.
Step 7 – Made an impression on the nail.
Step 8 – With a light movement of the brush, I shook off the excess rubbing.
Step 9 – Covered the entire tips with topcoat.
Now you know how to use stepping yourself and how to correctly and quickly create beautiful designs on your nails with any prints and designs. If you have any questions about stamping, please leave them in the comments below. Share your experience and what stamping materials you like best. Your feedback will be very useful for beginners.
Stamping with regular varnish step by step
- Prepare for the procedure: wash your hands with soap so that not the slightest dirt or greasy stains remain on them. Dry your skin or pat dry with a towel. Remember that useful procedures for strengthening nails using beneficial oils are best carried out at least a day before decorating the plates. After this time, the nails will absorb all the beneficial natural oils and will not be greasy. Accordingly, the decorative base will stick better!
- Degrease the surface of the nails and apply a base.
- Paint your nails with the basic background polish and allow time to dry completely! This is important in stamping! Only on a dry surface can beautiful drawings be obtained. Otherwise, the base will cling to the stamp, creating wrinkles and unnecessary clumps.
- If you have just bought discs with pictures, then remove a thin film from their surface.
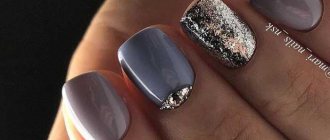
- Choose a varnish to apply the images, make sure it is thick enough. When using specialized varnishes from the set, this need disappears. When choosing colors, make sure that the designs contrast with the base. The entire design must match the style and color of the clothing. To make your manicure look modern and fashionable, use trendy colors of 2022.
- We coat the stencil selected on the disk with varnish.
- Without delay, remove all excess with a scraper. The varnish remains only in the recesses. It is recommended to hold the scraper at an angle of 45 degrees. You can adjust the pressure during training. Pressing too hard can remove the varnish from the indentations as well, leaving you with a design with broken lines and shapes. But too soft a pressure will not be able to remove all the excess varnish from the surface, and the images will turn out blurry. We do everything without delay so that the varnish does not have time to dry, otherwise all efforts will be in vain.
- We make sure that the image is completely imprinted on the rubber surface. If you see extra stains of varnish on it or the pattern turns out unclear, then it is better to wipe it off from the surface of the stamp with a napkin moistened with acetone and repeat the previous three steps from the beginning. We will give more advice on execution techniques in the continuation of the article.
- Determine the place on the nail where the design should be. Press the stamp with the printed pattern onto the nail. We do this with rolling movements from one side roller to the other.
- There is nothing to worry about if the varnish is imprinted on the skin. If the drawing is large, then such minor troubles cannot be avoided. Just gently remove it with a cotton swab. There is also a more convenient innovative tool - liquid tape, which is also called the “pink thing”. This discovery by nail service specialists will greatly simplify stamping design and save time. The liquid product is applied to the skin around the nail and thickens in a matter of seconds, creating a soft film. When applying a large design with a stamp, some lines extend beyond the boundaries of the nail plate, remaining on the soft tape. After the varnish has dried, the film can be easily lifted with tweezers and removed from the skin along with the pattern particles. Extraordinarily convenient!
- Thoroughly clean the disc and stamp from any remaining varnish with acetone.
- In just a few moments, the drawing will dry, and it will be possible to cover it with a fixative. Don't make unnecessary movements. Apply the top coat in one or two strokes so as not to spoil the design. Spread a drop of finish over the surface without pressing the brush to the nail.
It is necessary to make stamping patterns on each finger separately. To decorate other nails, follow steps 6-12 of the instructions.
If you still have questions about the stamping technique, watch the video tutorial.