Today, it is rare for any young lady to choose a laconic nail design; most prefer to have their fingers decorated with some kind of design. Some people focus on accenting 1-2 nails, while others decorate everything at once. This work is quite delicate and requires a certain level of skill, and therefore many people use ready-made decals - sliders.
Slider design is difficult to distinguish from the work of a professional manicurist
So, our next review will be devoted to the question of how to make a slider design for nails.
Features of slider design
Before you begin to consider the procedure for using nail sliders, you should understand the concept of a design slider and its advantages.
So many people confuse slider design with a similar nail design option - photo design. Therefore, first it is worth understanding in detail what their differences are.
Set of sliders
So, both sliders and photo stickers are ready-made designs designed for decorating nails. The main difference lies in the nature of application and fastening. This is how photo stickers are attached to the surface of the nail due to a sticky layer, which is applied in a thin layer to the underside of the design.
This type of decor has many disadvantages: they are difficult to straighten on the nail plate, if they are accidentally bent and the edges stick to each other, then the sticker is already damaged, besides, they do not stick well, come off, curl, and air chambers often form under them. In addition, photo stickers are quite bulky, which makes it quite difficult to align the borders of the sizing, and excessive volume in the area where the sticker is located treacherously emphasizes the “original” work.
All drawings are highly accurate
Nail sliders are stickers with a pattern on a film base. The design peels off from the backing as a result of contact with water and is then transferred to the nails, which is why sliders are sometimes also called aqua stickers. Adhesion to the surface of the nail occurs due to water, which allows the slider to take the shape of the nail. After the moisture evaporates, the sticker adheres quite tightly to the plate. The sliders are very thin, and the boundaries of their passage are completely invisible. They are easily fixed, do not fold, and are easy to correct if they are incorrectly positioned.
Why sliders can peel or peel quickly
How to use a slider design for nails so that it does not peel off or peel off quickly? There are two main reasons that lead to such unpleasant phenomena: violation of technology or poor quality material. To avoid peeling, when applying the sticker, carefully walk over its surface with a cotton swab, leveling and removing any irregularities. It is better to glue the decal onto the dried second layer of varnish.
Sliders peel off or peel off quickly in cases where they are not covered with topcoat or clear varnish. The durability of the decal is affected by the base film, elasticity, thickness of the sticker and how well the base is dried. Fulfilling the last condition helps to securely fix the slider and eliminate the option when the picture starts to “crawl”.
- Antibiotic Augmentin - for children and adults. How to take the antibiotic Augmentin for treatment, video
- Buckwheat in the oven: recipes with photos
- X-ray of the sinuses
Benefits of using nail sliders
Sliders have many advantages over regular nail painting, and even professionals often use ready-made drawings in their work, but for beginners and for those young ladies who do their own manicures, sliders are a real salvation. Let's figure out what is the secret of their popularity^
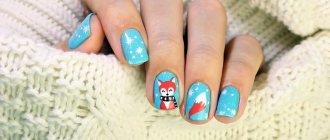
“Predatory” print is the most effective version of slider design
- Aesthetics. Sliders guarantee a clear, symmetrical design that does not need to be corrected or adjusted.
- Wide choice of designs. There is no need to think about the decor option in advance. You just need to choose a suitable design from a wide variety.
- Ease of use. Using sliders does not require any special skills. The scheme of working with them is clear even to beginners.
- Availability. The price of sliders is quite affordable, and they can be found in any store.
- Persistence. The design with sliders applied to gel polish is no different from a regular gel manicure, both in durability and longevity.
- Execution speed. Manicure using sliders significantly speeds up the decorating process.
Interesting
If you decide to decorate your nails using sliders, but later change your mind, then you can easily change the design by simply covering the old pattern with a new sticker, which is then also fixed in the lamp. However, you should not do this more than once, otherwise you will get excessively thick nail plates.
How long should it last?
Slider design for nails: how to use with gel polish and how long it should last on such a coating - there is a clear answer to this question. The sticker will easily last 2-3 weeks, which is enough for most women. Usually, it is after 3 weeks that the manicure has to be renewed, since the nail plate grows strongly and the cuticle needs care.
On regular varnish, the slider will last up to 5 days. If you want to extend the wear period, you can additionally apply a fixative every other day.
How to use slider design for nails: main types and their features
Sliders are not new in nail design, but, nevertheless, not everyone knows about their existence. In addition, they have several variations. What types of aqua stickers are used on nails under gel polish and photos of decor options are presented below.
Based on the nature of filling the nail field, sliders are divided into two types:
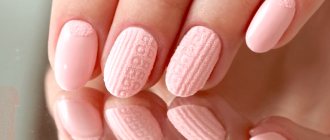
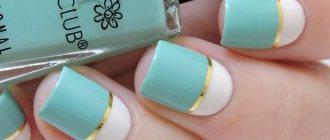
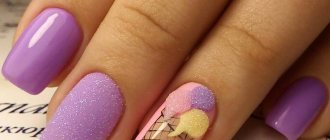
- Applications. This type of slider fills part of the nail. As a rule, they are used to accent one or two nails. In this case, a bright varnish is used, contrasting with the selected pattern. Also, applicative aqua stickers are convenient when performing a French manicure. Ideal option for doing it yourself. The lace jacket looks especially impressive.
Applicative slider design
Applicative slider design: variation of lace jacket
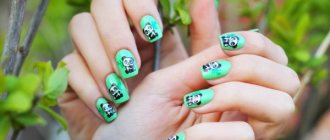
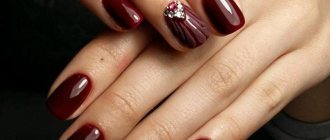
- Continuous coverage. Stickers cover the entire surface of the nail. In this case, there are two options for using stickers - to cover all the nails with the design, or to focus on 1-2 nails. In the case of a continuous design of the nail field, white varnish is used as a base, or the sticker is applied to a transparent base.
Focus on one nail
Ready-made nail slider stencils
Based on the visual effect, the following types of skinners are distinguished:
- 3D sliders. In turn, they are divided into two options:
– a regular drawing with a three-dimensional image effect. As a rule, it is a high-definition image and involves continuous coverage of the nail plate. The nature of the work is the same as with sliders that completely cover the nail.
Sliders with 3D effect
– sliders that have a special pattern, on top of which gel polish is applied pointwise, as if imitating volume.
Volume sliders
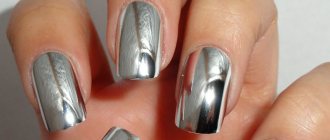
- Metalized or foil sliders (glossy or matte). They can either completely fill the nail field or occupy only part of its space. In the latter version, metallized sliders appear in the form of a jacket.
Metallized slider design with continuous filling of the nail field
Metallized slider design: original French
Each of these types of sliders has its own characteristics of application to nails, which ones we will consider below.
Important
When applying sliders, you must follow the rules of deviation from boundaries. So near the nail bed the indentation should be at least 3 mm, at the edges at the tip at least 1 mm.
How to cut a slider design exactly along the nail?
To ensure that the slider fits perfectly in the shape and size of your nail, you need to:
- have a very accurate eye
- cut out the design with a reserve, and after applying it to the nails, adjust it to their size
Adjusting the sticker to the shape and length of the nail.
- If the slider is glued to the entire nail, you need to leave small edges from the cuticle and side ridges. Then the drawing will last longer
- If your eye fails, it is recommended to cut the stickers a little wider and longer than the nails, and after the topcoat has dried, remove the excess using an orange stick or a router
You can adjust the slider to the desired size and length already on the nail.
IMPORTANT: Figuratively cut stickers, which were originally intended to be glued to the entire nail plate, look very beautiful. The design is truly unique
Beautiful slider design.
How to glue sliders on nails
The slider nail design scheme is extremely simple and in general terms has the same technology for all design options, with the exception of a number of nuances.
Before you start decorating your nails with sliders, you need to prepare the tools and material: a small reservoir of water, scissors, tweezers, a soft pusher or a cotton swab.
Slider design kit
Now let’s look at each option for applying sliders.
How to glue applicative stickers on gel polish
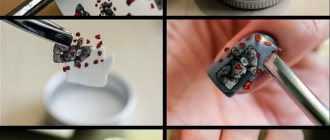
Everything is simple here. The necessary drawings are prepared in advance, which are immersed in water with tweezers for 20 - 30 seconds. Then the design is carefully moved from the substrate and transferred to nails that have already been painted in two layers of gel polish. In this case, it is not necessary to remove the sticky layer, this way the stickers are fixed better. Then the drawing is carefully distributed over the surface of the nail with your fingers or using a cotton swab or soft pusher. The drawing can be moved while the moisture has not yet evaporated. Then carefully walk over the entire surface of the drawing so that there are no bubbles left under the film. After the decor is fixed, a top coat is applied to the surface, which is then baked in a lamp.
The procedure for decorating nails with a slider design: cutting out a suitable element
The procedure for decorating nails with a slider design: immersing the workpiece in water
The procedure for decorating nails with a slider design: applying a design to the nail surface
The procedure for decorating nails with a slider design: applying a top coat
Technology of continuous coating of nails with sliders
In this case, you need to independently cut the slider sections that fit the size of your nail. Then, as in the case of applicative stickers, the prepared patterns are placed in water, and after the pattern leaves the backing, the pattern is applied to the nails. In this case, as noted earlier, the nails that will be decorated, depending on the design, are coated with white or contrasting slider colored varnish (base), or only a colorless base coat is applied. The sticky layer also does not need to be removed. The pattern is carefully distributed over the entire surface of the nail, retreating some distance from the side ridges and the nail bed. The slider is bent at the tip of the nail and then carefully filed off using a nail file, leaving a small gap. At the final stage, a base coat is applied, which is best applied in two layers (base and top). In this case, you should pay great attention to the end parts of the nail. Then the entire result is recorded in a UF lamp.
Scheme for performing a manicure with a slider design
Features of nail design with metallic sliders
It is no different from the two previous options, depending on how the nail field is designed - partially or completely - the appropriate method is taken as the basis. The only thing is that you should place the decor very carefully so as not to accidentally damage the paint.
Nail design with 3D sliders
The technology is similar to the continuous coating of nails with sliders, only sliders with a 3D pattern are used as decoration.
The most difficult option for decorating nails with sliders in 3D format is creating a three-dimensional design. In this case, the entire procedure is performed according to the same scheme as with conventional sliders, but after applying the top coat, gel polish is applied pointwise to the nail surface, simulating volume. A more detailed technology for creating a volumetric slider design for nails and how to use it correctly in practice is presented in the video:
How to stick a slider design on gel polish: general rules
The slider design can be used to decorate your nails with regular polish. The technology is still the same, except for the need to polymerize the layers in a lamp. This design can last up to a week, but it is not as advantageous as in the case of gel polish. Firstly, no matter how tightly you secure the slider with the finish, its edges will still stand out clearly through the layer of varnish. Secondly, the top coat of regular varnish lacks the glossy shine that the top coat of gel polish has. In addition, gel manicure is more durable, so a correctly executed slider design will delight you until the time comes to update it.
Photo from the site: lakodom.ru
To extend the life of such a manicure, you need to adhere to a number of rules on how to make a slider design for gel polish:
The base layer under the sliders should be applied very thinly to avoid very voluminous nails.
- It is enough to apply the colored layer under the sticker once, again to avoid excess volume.
- The top layer, on the contrary, is applied quite thickly, but in moderation. On nails where sliders are applied, it is advisable to apply two layers of top coat.
- If the sliders occupy a large area of the nail field, it is important to leave a small space along the edges of the nail (near the base and in the area of the side ridges), and be sure to secure the ends with a top coat. If you ignore this rule, then the slider along with the top coat will simply fall off the base layer, because there will be no proper adhesion.
- Excess pieces of the slider should be removed at the stage of applying the sticker to the nail. It is impossible to file down unnecessary residues after fixing. This will compromise the integrity of the manicure and soon it will simply peel off along with the slider.
- It is important to carefully attach the slider to the nail so that there are no air pockets or creases under the design. Otherwise, the manicure will look sloppy.
Creation
Preparing nails for gel polish coating. First, you need to treat each nail separately. We clean the cuticle and remove the gloss from the plate. Next, we remove delamination, damage and other defects from the surface of the nail. Using a file, we give the nail plates the desired shape. Finally, be sure to wipe your nails with a special degreasing liquid.
Apply gel polish to nails. For better adhesion of the coating to the nail, it is necessary to use a base in 1 layer. It, in turn, needs to be fixed under the lamp for one minute. In this case, we will not remove the sticky layer. If you like a more saturated color, you need to coat the plate twice with gel polish. In this case, each layer must dry in the lamp.
Watch how to glue sliders onto gel polish in the video, you can see the technique of this procedure. The sticker must be cut exactly to the size of the nail plate. Then lower it into a container with warm water, remove excess moisture with a napkin and release the film with the pattern from the base. Now we apply the design to the nail coated with gel polish.
We decorate the film with the pattern with a finishing layer and dry it in a lamp for two minutes. The sticky layer of the coating must be treated with alcohol, and the skin should be lubricated with a special oil designed to soften the cuticle.
It is worth noting that creating a slider design yourself is not very convenient. In the salon, the necessary tools and various cosmetics for the procedure are always at hand.
How to use metallic sliders
This type of sticker differs from ordinary ones in that it has a metallic sheen, i.e. the film is made in such a way as to create just such an effect. They are glued both to a gel polish base and to a regular base, just like other water-type sliders.
They look very beautiful, last a long time on the nail and can be easily removed if necessary.
The algorithm for placing such stickers is as follows:
- We take a suitable plate with tweezers and lower it into water;
- gently apply to the surface of the nail;
- smooth it out with a cotton swab so that there are no wrinkles or bubbles left.
There are other ways to add a metallic shine to the surface of the nail, but the one offered with the help of a slider is the most successful and convenient.