Manicure not only gives a woman’s hands a well-groomed look and attracts attention. It also reflects the personality and character of its owner. That is why many women prefer to cover their nails not just with plain gel polish, but to add all kinds of designs.
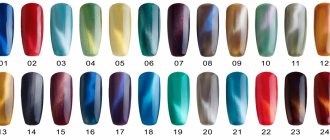
One of the easiest ways to diversify and add zest to your manicure is to use magnetic gel polish with a “Cat Eye” effect. Such gel polishes are presented in a wide color palette, there is nothing complicated in their application, which is why “Cat Eye” has been especially popular among the fair sex for several years.
In today’s article we will look at what is the main feature of “Cat Eye” gel polish, and how is it achieved? How and with what to apply it? And is it possible to do this at home?
What gel polish is needed for “Cat Eye”?
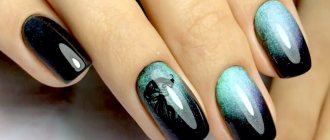
This gel polish got its name because it imitates the effect of the “Cat's Eye” stone (another name: chrysoberyl). It features a stunning flare of light that moves across the surface when viewed from different angles. Magnetic gel polishes contain tiny metal particles. But particles alone are not enough to achieve this effect. To do this, you need to use a special magnet, under the influence of which the particles begin to gather into a unique pattern.
By the way, with the help of a magnet you can create not only an ordinary light strip, but a wide variety of patterns: stars, waves, spheres, etc.
BUT REMEMBER! It is impossible to achieve the “Cat's Eye” effect without a special magnet!
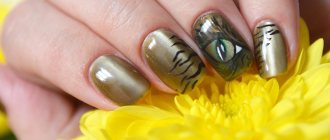
Just a few years ago, when creating an effect, a highlight of one leading color could be traced. But the nail industry does not stand still, so manufacturers delight us with “Cat Eye” gel polishes, which combine several highlights of different shades. When exposed to a magnet, we get an incredible chameleon effect.
What kind of magnet is needed for the “Cat's Eye”? Types of magnets
It is the magnet that determines what kind of pattern you will end up with on your nails.
Today, there are a wide variety of magnet options on store shelves. Among them the following main types can be distinguished:
- rectangular;
- round;
- magnetic pens.
Let's take a closer look at each type.
Rectangular
Using a rectangular magnet (bar), you can create simple but interesting effects:
- a straight line that can be made in any part of the nail: on the side, in the center and even diagonally. It all depends on your preferences;
- French: to do this you need to attach a magnet to the edge of the nail;
- reverse French: in this case, the magnet should be applied not to the edge of the nail, but to its base. As a result, we will get a hole.
There are bar magnets with patterns, which makes it easier to create complex designs.
However, if you do not have such a magnet, but have 2 ordinary bars, then you can easily create interesting patterns, for example:
- zigzag. To do this, 2 magnets need to be turned towards each other so that resistance is created and placed on opposite edges perpendicular to the nail. With this arrangement, you should get a smooth zigzag;
- star. To do this, on the contrary, you need to connect 2 magnets and place the connection point in the center of the nail plate.
NOTE! There are magnets with and without a handle. For beginners, the option with a handle is more convenient!
Round
Using a round magnet you can create not only a circle, but also smoother lines.
By the way, there are 2-in-1 magnets: there is a rectangular magnet at one end and a round one at the other.
Magnetic pens
Using magnetic pens you can create thin and neat lines. The pen must be held perpendicular to the nail plate and worked slowly to ensure that the drawing is clear. Such pens can be point-shaped, with several points at the end and even a ball.
With a magnetic pen you can create a lot of interesting designs, such as floral motifs. To do this, you need to draw round spirals with a pen in different parts of the nail. As a result, we will get drawings that look like roses. And with the help of a magnetic pen with balls at the end, you can create such complex patterns as, for example, “snake skin”.
Design ideas
A manicure with complex tints looks original, but sometimes you want to make it even more beautiful.
Design ideas for manicure with Cat's Eye gel polish are varied:
- Simple design, applying a white monogram to the ring finger; slider sticker or drawing.
- Another simple option is that the texture of the coating on one finger is different from the rest. Example: the base coat is glossy, and a matte topcoat is applied to the ring fingers.
- For a festive manicure, you can use rhinestones and small beads. They are glued at the last stage onto the finished coating.
- Stickers in the form of a gold or silver mesh. But it’s better to do this decor on 1-2 fingers, otherwise the manicure will be too overloaded.
- The “droplet” design option looks interesting. Drops are applied to the finished, already dried coating and the nails are additionally dried under a lamp. Instead of drops, you can apply a topcoat in the form of an ornament - you will get a design with a relief pattern.
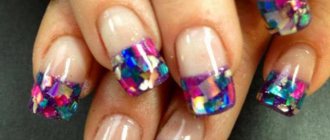
- The design of nails with mosaics looks very unusual. You can buy mosaic elements at a manicure supply store or make your own by cutting foil into small pieces. Then a mosaic is laid out from these small pieces on 1 or 2 nails.
There are other ways to design. The choice depends on the wishes of the girl herself and the capabilities of the manicurist.
For short nails
Apply Cat's Eye gel polish and short nails. It looks beautiful if the conditions are met: the coating is applied according to the rules, and the nails and cuticles themselves are carefully processed.
On short nails, monochromatic coatings in rich shades look great. Rhinestones, crystals, and sequins are suitable for decorating a finished coating. But you should not take elements that are too large, they will look bulky.
On short nails you can perform a classic French or moon manicure. The “Cat’s Eye” manicure, complemented with drawings, looks good. But it is better to draw simple patterns, and place the design itself not over the entire area of the nail, but at the base or side. You can use sliders, but the stickers should not be too large. Glitter lovers can use glitter to decorate their nails.
The Cat Eye manicure is unusual and attractive, and additional decorations make it even more chic.
How to do a cat eye manicure?
Before applying magnetic gel polish, you should spend a little time and do a manicure: treat the cuticles, give your nails a neat shape.
After the manicure, you can begin preparing the nail plate for the coating and, in fact, the coating itself.
What materials will be needed?
- buff
; - brush or brush for removing dust
; - lint-free wipes
; - 2 in 1 liquid: degreaser and stick remover
; - dehydrator (nail prep, bonder)
; - primer
; - base coat
; - gel polish “Cat's eye”
; - magnet
; - top coat ( with
or
without a sticky layer
); - lamp for polymerization of gel polish
.
Buff mini 100/180 White Monami 50 pcs
Small pink manicure brush IRISK
Super-absorbent lint-free wipes (4x6 cm) white 01 IRISK 600 pcs
Degreasing and lubricant remover with pump Eurocleanser Lux E.MiLac 200 ml
Nail dehydrant “Dry nail” Nayada 25 ml
Acid-free primer NeoNail 10 ml
Strong KLIO base 16 ml
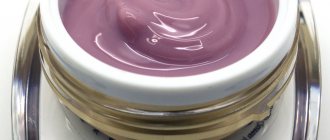
Gel polish cat's eye 7009 Distant Galaxy Nail Passion 10 ml
Magnet "Cat's Eye" Dance Legend
Sticky Top by Mystique 15 ml
Top without a sticky layer Gloss (No wipe elastic Top) by Mystique 15 ml
UV/LED Perfect Lamp 5 48 W ParisNail
How to apply gel polish? Step-by-step technique
- We treat the surface of the nail plate with a buff to lift the scales of the nail plate and improve adhesion.
- Remove dust with a special brush.
- Apply degreaser to a lint-free cloth and wipe your nails.
- Apply a base coat to the surface of the nail. Dry it in a lamp. We do not remove the sticky layer.
- Apply a layer of gel polish.
- We bring the magnet as close to the nail plate as possible. Create the desired drawing.
- Dry the gel polish in a lamp. We do not remove the sticky layer.
- Apply top coat. Dry it in a lamp.
- If you are using a top coat with a sticky layer, then moisten a lint-free napkin with a sticky layer remover and wipe your nails with it.
If you have an oily or damp nail plate, then apply a dehydrator to the entire surface of the nail and air dry for a minute. Then you need to apply primer to the free edge (tip) of the nail. The free edge is one of the most vulnerable places, and thanks to the primer, the adhesion between the nail plate and the artificial material improves, which contributes to longer wear of the coating. We also air dry the primer for one minute.
Now let's move on to the most interesting stage - applying Cat's Eye gel polish.
TIP: if desired, you can use black (or dark) gel polish as a base for the “Cat Eye”. This way the pattern will be more pronounced and clear. A layer of dark gel polish must be dried in a lamp.
TIP: metal particles contained in magnetic gel polish can settle to the bottom of the bottle over time. In order to “wake them up”, before use, you need to shake the bottle by rolling it in your palms. We discussed why you shouldn’t shake gel polish in the article “How to choose gel polish for home use?”
Here are a few more professional subtleties on using magnetic gel polish:
- do not store the magnet too close to the bottle of gel polish - metal particles may become demagnetized;
- If the drawing doesn’t turn out the way you intended, don’t be upset! It can be immediately changed with a magnet on the undried coating. After polymerization in a lamp, it will be impossible to change the pattern;
- The magnet should be kept as close to the coating as possible, at a distance of 2-5 millimeters from the nail plate. But be careful! If you bring the magnet closer, you can touch the coating and damage it;
- to get a high-quality result, take your time, work with each nail in turn;
- try applying the magnet vertically, horizontally and diagonally. Each time you will get a different option. With experience you can create very interesting patterns.
Description
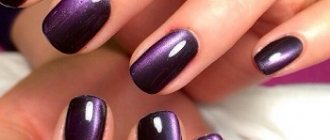
Cat's Eye gel polish is popular among lovers of beautiful manicures. This is a material with a dense consistency. It gives a durable and original coating with iridescent color transitions and shine.
Shine is the result of the presence of magnetized metal microparticles in the varnish. Immediately after applying the product, a magnet is brought to it, and the particles are attracted, lining up in a pattern. By moving the magnet, you can achieve interesting effects.
At home, it is unlikely that you will be able to achieve shimmer and shine that is the same on all nails and looks neat. It's better to go to a salon.
What should you not do after applying gel polish?
In order for the coating to be worn for the entire prescribed period without chipping or peeling, you must follow some rules:
- During the first 24 hours after applying gel polish, avoid prolonged water procedures. For example, taking a hot bath or visiting the pool. Also, during the first 24 hours it is necessary to refrain from paraffin therapy and visiting the sauna, bathhouse;
- do not pick the nail plate;
- it is necessary to avoid mechanical damage: knocking with nails, opening jars with them, etc.;
- Household work with chemicals or detergents must be done with household gloves, since the aggressive components in these products can damage the coating. By the way, this particular rule will help not only preserve your manicure, but also the beauty and youth of your hand skin.
Advantages
Like other gel polishes, “Cat's Eye” shellac is durable and retains shine and color saturation until the end of wear. The advantages of this particular material:
- Thick texture. After application, the varnish does not spread, which ensures easy application and reduces the time for performing a manicure.
- Spectacular shimmers, color changes in the light. No additional design required.
- Many options for execution. The pattern is created by moving a magnetic pen.
- If desired, the coating can be additionally decorated with painting or rhinestones.
There are practically no downsides to the coating, although it is not suitable for everyone. It is not recommended to apply the gel if your nails are affected by fungus or if you are prone to allergies. First you need to get rid of the problem, and only then go to the nail salon.
How else can you create the “Cat Eye” effect?
This effect can be created not only with the help of a special gel polish. You can use cat eye pigments.
This option helps to diversify the designs with gel polishes that you already have. With the help of pigment and a magnet, you can add a stunning effect to your manicure at any time and give your manicure a special twist.
How to use pigment?
To do this, you need to mix it with a small amount of gel polish, gel paint or top coat, and then apply it like a regular “Cat Eye” gel polish on the nail plate.
Experienced masters apply the “Cat's Eye” pigment directly to the undried layer of gel polish on the nail plate, mix it with a thin brush, and then create the desired pattern with a magnet. This option saves time and allows you to combine several pigment options in different parts of the nail plate.
Thanks to gel polishes and pigments with the “Cat Eye” effect and imagination, you get a manicure with an interesting design! Don't be afraid to experiment! Create unique patterns and show your individuality!