The new generation of gel polishes are reluctant to dissolve with special liquids, and therefore many people have the desire to cut off the coating. Performing this procedure is not always pleasant due to the sensations transmitted by coarse abrasive files. In addition, you can injure the delicate skin near the cuticle or accidentally saw through the side roller. And files with finer abrasiveness can cause such friction that it becomes hot. And it will take a lot of time to remove the gel with such a tool. It is much more convenient to do this with a special cutter.
There is a special ceramic nozzle for the manicure machine, which ensures gentle removal of material and does not heat up. This is an expensive thing, its price ranges from 600 to 1000 rubles, depending on the manufacturer. But you will still need to buy additional equipment for it.
What is the name of the device that removes gel polish?
All manicure devices are divided into two large groups: professional and amateur. They differ in power: professional ones are powered from the mains and have a power of 45 W, amateur ones are powered by batteries and have a power of 18 W. At the same time, the rotation speed of the cutter can be the same and reach 25,000 revolutions per second.
While all professional models have standard attachments and a large selection for various operations, the same cannot be said about household appliances. You can only buy a new cutter to replace a broken one with a professional one. Unfortunately, for this reason they often stop using household manicure machines.
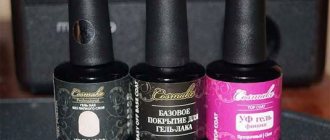
In a store, a gel polish remover can be called differently: cutter, milling cutter, machine, drill. The essence does not change from this. For productive and fast work, you need a power of at least 30 W, but 60 W is better. This will come in handy if you eventually want to do a hardware pedicure. A set of professional cutters must include a ceramic nozzle, a reverse function and a speed switch relay. A foot pedal will make the work much easier and free your hands.
Ceramic cutter
To remove gel polish with a machine, only a special cutter is suitable. It must be made of ceramic, have corncob-shaped notches and be of high quality. When working with such a tool, heat transfer is minimized and the risk of burns is eliminated.
To avoid buying a fake, you can focus on the price: good cutters cost about 10-15 dollars. Many companies produce such attachments, but it is better to choose those that produce professional devices.
Safety instructions
Before removing gel polish with the device, you should read the instructions:
- Before turning on the device, a visual inspection is carried out to ensure timely detection of damage. If they are present, the device cannot be turned on.
- You should insert the nozzle all the way, only then turn on the device.
- Periodically during operation, turn off the power and cool the device. Failure to comply with this requirement will result in overload and damage to the device.
- If unusual vibration occurs, turn off the device and call a repair technician.
- Do not operate the device in high humidity or with wet hands.
- Avoid heating the electrical wire from a radiator or direct sunlight.
- Contact of the device with chemical compounds should be avoided.
During operation, you have to change attachments. This should be done with the power off.
Rules for working with the device
When operating the device, certain rules must be followed to avoid injury. You need to familiarize yourself with them before removing gel polish with the device:
- The rotation speed is set on the control panel. To do this, use the regulator, smoothly switching it.
- During operation, the rotation of the cutter is controlled by a pedal. By pressing it all the way, the speed set on the relay is achieved. To reduce it, you can ease the pressure on the pedal or switch the relay.
- The direction of rotation should be changed in three stages:
- Take your foot off the pedal.
- Wait until the rotation stops completely.
- Switch direction of rotation.
During operation, the rods of the nozzles may become damaged (rust, dirt). Continued use of them leads to wear of the motor bearings.
The device should be stored with the rod inserted and should not be turned on without the attachment.
Don't forget about safety rules!
Following a few simple rules completely eliminates the possibility of injury during hardware removal of gel polish from nails:
- Before starting work, it is necessary to inspect the device; if there is damage, it is prohibited to turn it on;
- the nozzle is inserted all the way and only when the device is turned off;
- the master’s elbow must be on the table in a position that excludes uncontrolled movements;
- The cutter can rotate both to the right and to the left. To prevent it from slipping off the nail unexpectedly, the artist’s movements should always be synchronous with the direction of travel of the working nozzle;
- when trying to reach inconvenient places, you do not need to turn the cutter too much, it is better to do this with your finger;
- when removing varnish, you cannot use a cutter designed for applying it;
- unusual vibration is a reason to turn off the device and call a repairman;
- Do not operate the router with wet hands or in high humidity;
- store the device with the rod inserted;
- switching on without a nozzle is excluded;
- Changing attachments should be done with the device turned off.
This is interesting: Form is important because
Instructions for removing gel polish
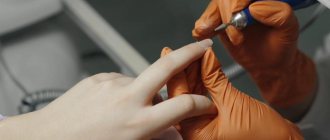
Before removing gel polish with the device, check its condition, set it to low speed, connect the pedal and insert the ceramic nozzle into the clamp. The working elbow should lie on the table - this will prevent overexertion of the arm and, as a result, careless erroneous movements.
- Work begins from right to left from one finger to the other. The cutter should not be turned too far to reach awkward places. Turn your finger.
- They work with the middle part of the cutter, making movements from top to bottom. The direction of rotation at this moment should coincide with the movement of the hand.
- They don't stop at one point on the nail; the cutter moves all the time. No effort should be made.
- Having removed the material from the center of the nail, move on to the side parts. They bend the roller and remove the coating, slightly tilting the cutter so that it works with the upper part - there are finer notches there.
The video shows how to properly remove gel polish with the machine. If operations are always performed in the same sequence, there is less chance of injury to both the technician and his client.
Removing shellac with a solvent: pros and cons
It is extremely difficult to say anything unambiguous about the solvent. Despite the fact that most fashionistas fall into a state of nervous trembling at the suggestion of cutting off shellac, the majority of craftsmen still prefer filing away. This attitude towards removers is due to their effect on the skin and nail plate.
Any solvent, even the highest quality one, contains acetone; nothing else will simply dissolve the varnish. What do you need to know about acetone? This is a powerful degreaser that, when exposed to the skin and nails, dries them out, which negatively affects not only the appearance of the hands and nails, but also significantly damages the structure of the nail plate, which becomes brittle and begins to peel. Acetone vapors are not harmless to the body; they can negatively affect the respiratory tract, causing irritation of the mucous membranes or even poisoning.
However, for several decades, acetone was indispensable for use in removing conventional varnishes, and no danger from its use stopped fashionistas, since there was simply no alternative.
After the shellac softening procedure, a good master will definitely use products to restore and strengthen the nail. Their use will help restore moisture lost during the process of removing gel polish and nourish the nail plate with restorative elements.
Advice from professionals
Experienced craftsmen point out the intricacies of the process. Of course, to learn how to work quickly and efficiently, it is not enough to simply understand how to remove gel polish with a machine. It takes practice. Here are some tips to help beginners:
- To avoid overheating of the nail plate, perform stroking movements with a cutter. It either approaches the nail or moves away from it.
- If any area overheats, you should move to another nail, and then return to the first.
- Movements of the hand with the device running should only be in the direction of rotation, otherwise the cutter will come off the nail and may cause injury.
- The cutters are similar, and it is easy for a beginner to confuse them. Keep the ceramic bur separately.
- Daily cleaning of the device with a brush and wiping with a soft cloth will maintain its functionality.
How to remove shellac using solvents?
Solvents that are used in salons to remove shellac are called removers. They are produced by manufacturers of shellac itself, so a solvent of the same brand as the gel polish will be most effective.
You may be interested in: Manicure tongs: description, characteristics, photos and selection tips
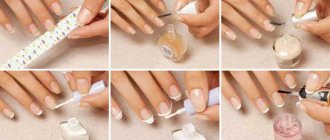
How to remove shellac from nails in a salon? The master one by one applies prepared “compresses” to the fingers of cleanly washed and dried hands. This “compress” is a cotton pad, sponge or something similar (it all depends on the salon and the specialist), soaked in a special solvent. The impregnated material is usually attached to a sticky base, like a patch, so that the sponge soaked in solvent tightly covers the nail plate during the softening process, the duration of which also depends on the manufacturer and quality of the remover and can vary from 10 to 20 minutes.
After the time required for soaking the gel polish has passed, the master releases his fingers one by one and removes the layer of shellac with a special spatula. The softened coating, which looks like pieces of film, comes off the nail quite easily.
Some salons, keeping pace with the fashion industry, provide the opportunity to get rid of old manicure much faster due to the absence of the procedure for preparing “compresses”. Today there are ready-made impregnations. They are small bags, inside of which there is a prepared removal napkin. All you have to do is open the bag and dip your shellac-coated nail into it. This innovation is the brainchild of Chinese manufacturers, but some European companies were not slow to adopt similar experience.
It is quite rare to remove shellac in a salon using a remover method. Because there is a way that takes significantly less time.
Disinfection and sterilization
A gel polish remover can become a breeding ground for infections if sterilization is neglected. Salons use glasperlene sterilizers or dry-heat ovens. At home, you can use the method of soaking the removable parts of the device in a disinfectant solution, which can be purchased at a specialized medical store. Instructions and exposure time are indicated on the packaging.
The instrument, cleaned and rinsed under running water, is wiped and placed in a craft bag. Then preheat the oven to 180 degrees and place the craft bag in it for fifteen minutes. Store the instrument without removing it. It remains sterile for thirty days.
How long does the procedure take?
So, how long does it take to remove shellac in a salon? This procedure is much faster than application. Especially provided that it is performed by an experienced master.
But here everything depends on the chosen method.
Removing shellac coating with a remover will take from 20 to 40 minutes. It all depends on the chosen solvent - some soak shellac in 15 minutes, some compositions require half an hour. Plus, by this time, the master’s work itself, removing shellac from the nail, will take no more than 10 minutes.
Hardware removal of shellac is much faster. It will take no more than 15 minutes to cut off the coating with a cutter and polish the nails with a buff.
How to avoid damaging your nails
Many people are concerned about the question: how to remove gel polish from nails with a device and not damage them? While the cutter is working, the gel polish is removed from the nail layer by layer. First, the top coat is removed, then the color layer, leaving the base coat. In some cases it is also removed, but this happens extremely rarely.
The artist focuses on the base coat, which usually has a slightly matte, transparent appearance. This layer signals that it is time to stop removing material. If you still need to remove it from the nails, this can be done with a file and a buff, or, if the material is soluble, using an acetone-containing liquid.
The most dangerous place where marks from a cutter can remain is the cuticle area. The nail here is weaker, and even one careless movement can leave a mark, which will then take a long time to grow back. Therefore, some people prefer to work near the cuticle with the upper part of the cutter, where the cuts are very small.
How to remove shellac by filing?
To remove shellac by filing, the same device is used as for hardware manicure. The only difference is the use of cutters of different types.
The operating principle of the shellac remover is extremely simple. The cutter, which has special notches, rotates at a very high speed and literally cuts off the gel polish from the nail.
This procedure can be done with a regular file (masters in some salons still practice this method), but using a cutter significantly reduces the time spent on the process and also makes it much more comfortable.
So how do you remove shellac from nails using a machine in a salon? The most important thing in this procedure is that only a qualified master with good equipment will perform his task efficiently and painlessly. Shellac is removed from the nail with short stroking touches using a cutter. If the contact is prolonged, then both the cutter and, accordingly, the nail will heat up, which will lead to discomfort.
The work of the device on the nail ends when only the base layer remains of the coating. This layer is removed from the nail not with a milling cutter, but with a soft buff. This protects the nail not only from sawing, but also practically does not injure the nail plate.
Where to start for a home handyman
When purchasing a kit for applying gel polish, you should also purchase a device for removing it. Often the cost of the device and the cutters for it exceeds all other materials and equipment. But it is important to remember: the purchase is made once, and it is very difficult to do without the device.
There are professional courses that introduce the basics of operating the device. At major exhibitions dedicated to beauty salons, famous professionals provide free consultations. It is better to acquire knowledge before starting work. This applies to working with the device, coating and various designs.
Then for a beginner there will be no difficulties with how to remove gel polish with a machine at home.
How to remove extended nails - hardware technique
The hardware method allows you to remove extended nails as quickly as possible and with minimal consequences. A carbide cutter or ceramic is suitable for this purpose. You need to cut at high speeds.
MASTER'S ADVICE
| Golman Polina, Manicurist. Experience 6 years. | If the coating is hard and thick, we take a cutter with more abrasiveness. This is a tool with a black or green notch. We cut off the main thickness. Next, you can change the cutter, take one with a red notch. |
You cannot hold the device in one place for a long time: you will experience unpleasant sensations or damage the natural nail plate.
Filing begins from the middle of the nail. You need to work with smooth movements, without excessive pressure. First, the color is removed: from the center to the sides. You need to carefully approach the cuticle, guiding the cutter perpendicularly with the tip.
Excess length can be removed with nail scissors, nippers or a cutter, directing it at 45 degrees. The disadvantage of using the device is the unpleasant and loud sound that is produced when the nail comes into contact with the cutter.
Next, see the step-by-step instructions with infographics, which describe in detail each step of the wizard.
How to remove gel polish from extended nails?
Since the coating on extended nails is thick and quite durable, it is not possible to remove it by soaking. Sometimes only correction is required and there is no need to remove the polygel or gel. In this case, only the colored gel polish is removed from the surface. The only way to remove gel polish from extended nails is to file the coating down to an artificial finish. This procedure is again performed by a specialist using a machine in the salon, or at home manually using a file.
When working with a manicure machine with a cutter, each finger takes 2-3 minutes, and without a machine it takes about 5-7 minutes per finger. To work manually you need the following tools:
- files of different abrasiveness;
- a brush or brush for brushing off dust (do not neglect this tool);
- polishing buff (it will help make the final polishing touches);
- clinser;
- cotton pads, or better yet, lint-free wipes.
Here's how the procedure is performed:
- The top and first layer of colored gel polish are removed with a file with a hardness of 80-100 grit. Dust is brushed off with a brush.
- When a significant part of the colored coating has already been sawed off, the remains are removed with a softer file. The pressure needs to be reduced. Don't forget to brush off the dust periodically.
- Remaining dust is carefully removed with a cleaner.
The process is not difficult, but annoying. It takes a lot of patience to treat all the nails.