What is shellac, its advantages
Shellac is the name of the most popular product from CND. It was this brand that was the first to invent a semi-liquid but durable coating for manicure. It combines regular polish and gel. The composition was kept secret for a long time; the company mentioned only natural resins. Later, different gel polishes appeared on the market; the name of a specific product became a household name.
Shellac is often called ordinary gel polishes or the manicure itself in which they were used. Some brands, for example BLUESKY, even put the “Shellac” mark on the packaging, but the composition does not match the original CND.
The main advantage is that for strength, you do not need to cut off the nail plate or replace it with another material. Even without this, the material merges with the natural nail. The manicure looks natural, without thick and high bumps.
Durability
The durability of shellac is on average two weeks, but often it increases to 20-25 days. If you follow the technology, carefully apply it, and use high-quality materials, no cracks, chips, or peelings should appear during this time. By the end of wearing, the top layer may fade only slightly, and small scratches will appear on it over time.
Advantages and disadvantages
Shellac has many advantages; the material is comfortable to apply and wear.
pros:
- suitable for nails of different lengths and thicknesses;
- you can give any shape to the tips;
- gives scope for designs;
- coating does not require much time, 2 - 3 hours is enough;
- convenient to use;
- worn 14 - 20 days;
- rich palette of shades;
- makes thin nails thicker, increases strength;
- The product in the bottle does not dry out and does not deteriorate.
The disadvantages include the cost. This type of coating cannot be called budget; shellac is much more expensive than gel polish. In recent years, many alternatives have appeared from domestic, American, and Chinese manufacturers at prices 3 to 5 times lower.
Shellac – what is it, how does it differ from other decorative cosmetics
Shellac is a unique nail care product that was invented and patented by CND (Creative Nail Design) in 2010. This drug is a kind of hybrid or intermediate between classic polish and gel polish. At that time, Shellac made a splash in the world of the nail industry and immediately gained great popularity. The drug became an excellent alternative to classic varnishes, which stayed on the nails for two to three days.
There is an opinion that preparations labeled Shellac contain an organic polymer of the same name, used in the production of industrial varnishes, insulating materials, and in the furniture and footwear industries. However, this is not true; if you study the packaging of such a varnish and look at the composition, you will not be able to find any mention of shellac resin in it.
It is not appropriate to compare shellac and regular classic nail polish, since these are completely different cosmetics. The varnish hardens in the air, and a product called Shellac dries under the influence of UV rays.
But there are common features between shellac and gel polish, since nail art using these products will require a drying lamp. There are fundamental differences between these drugs:
- Gel polish is more viscous than Shellac. Therefore, the first remedy can be used to correct the shape and length of nails (including extensions). And the second product is simply a very durable decorative coating.
- Shellac can be removed using a special liquid. And gel polish can only be removed mechanically (by filing).
- Shellac is not often, but it is still necessary to completely wash off and do nail art again. And the gel can be applied rarely and worn on the nails for any time, with periodic correction of the coating.
- Today, the original shellac is a product of the already mentioned SND brand. However, this term has become a household word; it is also included in the names of products from other companies. For example, on sale you can find cosmetics for nail art Shellac Bluesky, AllShellac Premier.
Is it worth applying shellac – the advantages of the product as a decorative coating for nail art
Experts note that a product such as shellac has many advantages over other manicure preparations:
- Full color saturation. If you apply the varnish, its shade fully corresponds to what is stated on the label.
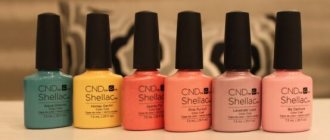
- A very large assortment of colors and shades of shellac, a varied palette of colors, which is worked on by high-class designers. If you plan to apply this product, you have over 250 options to choose from. Moreover, varnishes can be applied solo or mixed, obtaining unusual secondary and tertiary colors.
- Soft and comfortable texture. Shellac is very easy to apply, it does not smear and lies smoothly on the surface. It does not weigh down the nail plates and is comfortable to “wear.” Due to the fact that shellac contains a large number of oligomers, it does not evaporate or dry out, even if the process of performing nail art is delayed. Shellac hardens only during polymerization with the participation of ultraviolet radiation, forming a hard and durable film on the surface.
- Versatility of use. Shellac can be applied to create a one-color manicure. Or use this tool to create original drawings of any degree of complexity, to bring unique designs to life.
- Increased durability of the coating. Shellac can be applied once every two or even three weeks, as it is resistant to chemical and mechanical influences. You can safely and without restrictions do housework, take baths, visit the beach and swim in reservoirs. The coating will not fade in the sun, peel, wear off or chip; it will remain the same as immediately after application. Manicure and pedicure always have a neat, well-groomed appearance, and a woman does not need frequent nail care. However, experts note that shellac can stay on nails for less time than expected. This may be due to the unsatisfactory condition of the nail plates, lame technique and insufficient skill in performing nail art, poor quality of the material that can be applied in salons with a dubious reputation, and frequent hand contact with chemicals.
- If you apply shellac in a thin layer, as recommended by the manufacturer, then you can use the product quite economically. The volume of one standard bottle of varnish from the SND company is 7.3 milliliters. Nail art masters assure that this amount of product will be enough for 15 or even 20 procedures. That is, for 5-6 months, which will allow you to save money even with a fairly high cost of cosmetics.
- There is no persistent unpleasant odor while you apply shellac, which makes the procedure comfortable.
- The time during which you will have to apply the decorative coating is only 30-40 minutes. This makes it possible to make long-lasting nail art in a salon or nail bar, even during your lunch break at work. At the same time, immediately after the procedure, you have the opportunity to begin your daily activities without fear of touching and smearing the decorative coating that has not completely dried, as was the case with traditional varnishes.
- If you apply shellac, it will not interfere with the natural growth of the nail plate. The drug has a safe composition, there are no formaldehydes, toluene, dibutyl phthalate and other harmful components. Thanks to this, the manufacturer was able to declare the shellac composition as “7 Free”. The drug does not cause allergic reactions or other complications. Some experts claim that shellac protects fabrics from the negative effects of external factors, which helps improve their condition and structure.
- Shellac can be applied without any age or health restrictions. Even high school students use this product to give their nails a neat and well-groomed look. There are no restrictions on the use of shellac for expectant mothers and breastfeeding women. Shellac allows women of any profession and status to always look well-groomed, stylish, with a minimum of effort and spending a minimum of time.
- You can apply shellac regularly. As soon as the outdated coating is removed, you can do a new manicure (but experts still recommend taking a short break of a few days or a week).
- You can apply and wash off shellac not only in a beauty salon, but also at home. This allows you to save on hand care.
If you have previously used acrylic extensions or modeling gel, then you will note another advantage of shellac - the price of this decorative cosmetics product for nail art. Compared to the price of other permanent nail art preparations, applying shellac is cheaper.
Differences between shellac and other coatings
Gel polish, shellac, gel - all these are nail coatings that allow you to get a durable manicure for several weeks without changing color or needing correction.
The main difference between shellac and other materials is the natural resin in its composition, mixed with regular varnish. Similar products from other companies may contain toluenes, formaldehydes and other harmful substances.
There are not many differences between gel polish and shellac. They are very similar in appearance, the technique is identical, but in rare cases a primer is not used under shellac. He should hold up well without it. These materials have more differences with gel. They have different consistencies, application technologies, the gel is not so pliable and requires skill and filing.
Coating properties comparison table
| Shellac | Gel polish | Gel | |
| Package | Bottle with brush | Bottle with brush | Jar with screw cap |
| Consistency | Liquid | Liquid | Thick |
| Application | Brush | Brush | Spatula and brush |
| Nail after drying | Elastic | Elastic | Solid |
| Palette | Rich | Rich | Rich |
| Design | Available | Available | Available |
| Removal | Soaking, filing | Soaking, filing | Mostly sawing |
Shellac or gel
The best thing is that it lasts longer and is more comfortable to wear. Some girls are completely satisfied with shellac; the manicure wears well, looks natural, and the coating allows it to grow to any length. But some nails don’t like it and reject it. Even the masters can’t explain it, they just say “it’s not suitable for everyone.” No matter who makes the coating, the material begins to chip and peel off. In this case, it is better to choose a gel. It will also be a salvation for very thin, bendable nails, since after polymerization it becomes hard.
Shellac or gel polish
They are very similar in appearance and properties. These materials have virtually no differences in technology. If you learn how to use shellac, you can easily try gel polish. It's difficult to determine which is better. In terms of price, prevalence, and availability, they are ahead of gel polishes. Durability depends on various factors. In terms of composition, shellac has the advantage; it contains less chemicals and dangerous compounds.
Which is more harmful?
For natural nails, incorrect technique, cuts, and sloppy removal are more harmful. With careful work and following all the rules, natural nails become thicker, grow well, and do not require rest, which is talked about so much. Good masters have clients who have beautiful manicures for several years without interruption.
If you approach manicure correctly, the worst thing that can happen is an allergy. If she only uses shellac, then it is better to choose gel or gel polish and vice versa.
Health hazards of gel polish and its components
Allergy to manicure: how to determine the cause, remove symptoms and how to replace gel polish
The most common myth about long-term coating is that it prevents your nails from breathing. But nails don't need oxygen.
What you need to apply shellac at home
To be able to apply the products yourself, without visiting a beauty salon or a private specialist, you need to purchase the following kit:
- Everything you need for hygienic or decorative manicure. These are scissors, files, accessories for removing cuticles, etc.
- Varnishes labeled “Shellac” that you intend to apply. You can select the required colors in the catalog of any online store of manicure products. But it’s still better to “try on” the shades of varnishes in person. In regular stores there are special palettes that allow you to apply an artificial nail covered with a certain color of varnish to your fingers and see if this option suits you.
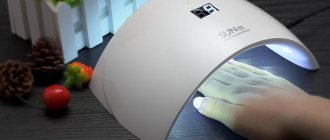
- Special LED lamp (fluorescent, LED, CCFL ultraviolet lamp). No matter how much it costs, the purchase is necessary; without it, applying Shellac is useless. Cheaper items can be found on the websites of large online stores. It is advisable to buy a device that emits UV waves in a wide range - from 270 to 400 nm. This will allow you to work with any shellacs and gel polishes from different manufacturers.
- A product for removing shellac from nails, as well as several nail files with varying degrees of abrasiveness, and a set of orange sticks.
- Lint-free wipes and degreaser to treat the last layer.
- A variety of additional tools for the designs you plan to create. These can be rhinestones, glitters, powders.
- Since manicure needs to be applied in good lighting, you need to take care of purchasing not only an LED lamp, but also a tabletop fluorescent lighting fixture.
Performing a manicure with shellac
Unlike thick gels, shellac is easy to make yourself at home. If a girl knows how to paint her nails with regular polish, then there will be no problems with long-term coatings. On the contrary, sometimes they are easier to work with. The main thing is to master the technique and acquire everything you need.
Materials, means
The starter kit for coating consists of several products, they will be used every time, only the colored shellac is changed.
What do you need:
- Klinser, degreasing agent. A liquid that will remove moisture and grease.
- Primer. Provides durability and prevents detachment. Sometimes they do it without it, but it is advisable to use it for wet nails and sweaty hands.
- Base. A layer between the nail and the color coating. Ideally, the original from CND is used. A less expensive version of the Kodi base, but you can also use TNL, InGarden.
- Colored shellac. He sets the shades, participates in the design, you can choose to your taste.
- Top or topcoat. The finishing touch, which provides shine, adhesion of layers, protects nails from deformation. We use a brand of base coat (TNL, InGarden, CND).
You will also need consumables: nail files, buff, lint-free napkins, possibly additional brushes for decoration and drawing cuticle lines. You can't do a manicure without a lamp.
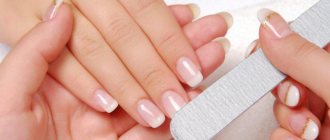
Treatment of the nail plate
Shellac requires nail preparation, everything depends on it: durability, accuracy, perception. The plate needs to be cleaned not only of old varnish, but also to remove as much as possible the entire cuticle, thin films of pterygium, and clean out the holes. It is not recommended to do a wet manicure by soaking the cuticle in water; wet nails are less durable.
Step-by-step nail preparation:
- We clean the nails of old varnish or coating.
- We file the ends and shape the free edge. If necessary, remove the length.
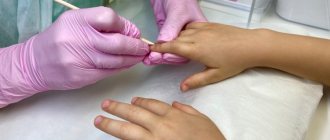
- Apply a softening agent to the cuticle, wait a few minutes, remove the skin with an orange stick or pusher, or trim with tweezers.
- We clean the nail from the pterygium at the base, paying attention to the holes, otherwise the varnish will peel off.
After preparation, hands should be washed with soap and dried. If wounds appear when removing the cuticle, immediately treat with chlorhexidine.
No cream or oil can be used before coating with shellac; fatty compounds will cause detachments.
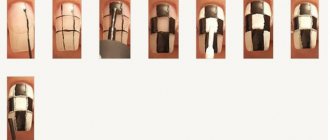
Step-by-step execution technique
You can do a trim manicure, remove the remnants of the previous polish in one day, and start shellac later, but usually masters do everything at once.
How to make shellac:
- We polish the cleaned nails with a buff. Unlike other coatings, this does not require cutting. Just slightly remove the top shiny layer to a matte state, do not overdo it.
- We wet the napkin in the cleanser, wipe all the nails, do it carefully, especially at the cuticle.
- Now open the primer, process all the tips, ends, edges so that the material adheres firmly to them.
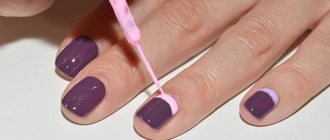
- Apply the base coat. The first layer is the most important. Lubricate thinly, using rubbing movements. We don’t put too much on the brush so that streaks don’t form; we work on the ends, ends, and seal. Dry in the lamp for a minute.
- The second layer of base can be made a little thicker. It is used to level the plate and hide defects. Dry it.
- Now we apply colored shellac, also in thin layers, seal it for the first time, then you don’t have to do this. Usually two layers are done, each time drying in a lamp, but sometimes the color does not overlap well, in which case additional layers can be applied.
- After drying the colored shellac and applying the design, it’s time for the topcoat. It can be applied thicker, there will be one layer. You need to carefully cover the entire surface, leaving nothing behind. With top coat, dry your nails a little longer.
- We wet the napkin in the cleaner and remove the sticky layer that forms on the surface after drying.
If you have a small lamp, then you should not do a manicure on 5 fingers at once, it is better to cover 4 on one hand, 4 on the other, and then work on the remaining thumbs.
Sequence of nail art - how to apply shellac
The procedure for performing a manicure does not pose any particular difficulties; over time, you will learn how to apply shellac quickly and efficiently:
- The first stage is preparatory
. Nails are cleaned, their shape and length are adjusted, and the cuticle is removed. It is important to pay attention to the thorough removal of the cuticle, since if persistent varnish gets on it, the coating will most likely peel off and crack very quickly. To prevent this, you can use Cuticle Eraser from CND or another similar product. A more economical way to remove cuticles is to use a trim manicure. To polish the nail plate, which is performed several times a month, a buff is used. Then the nails need to be cleaned of dust and treated with an antiseptic. To degrease the surface, special compounds are also used; dehydrate can be used to remove excess moisture.
- Nails are coated with a special manicure primer
. Using a primer helps protect nails, improve adhesion (adhesion) of the coating to the surface, and increase the durability of the manicure.
- Applying the base
, preferably on a rubber base. Nail art specialists who believe that in a manicure you need to use products from the same company that are ideally combined with each other, recommend using Base Coat from CND. But you can replace this drug with another similar product, for example, the base from Color Couture Entity One, which has healing properties, strengthens tissue, and additionally protects nails from the negative effects of pigments. The layer of the drug should be as thin as possible. Drying under a lamp and fixing under a lamp at this stage is mandatory.
- Now you need to apply the first layer of decorative coating
. This layer must be dried, it should also be as thin as possible. Polymerization (hardening) of shellac begins using a drying lamp. Many women are interested in how long to keep their hands under the lamp. The drying time of the product depends on several factors - the type of lamp, the length of the emitted waves, the chemical composition of the varnish, and the thickness of the coating layer. The rate of polymerization may even depend on the distance between the light source and the nails. Also, its color plays an important role in the drying process of the drug. For example, Shellac with a high degree of pigmentation takes longer to harden than those that have less intense color. This means that black or red shellac will take longer to harden than, for example, white or beige. The average drying time for the coating is 30-60 seconds under an LED lamp and 2-8 minutes under a CCFL lamp.
- It is necessary to consistently apply the required number of layers of shellac
, each of which is dried under a lamp. Depending on the type of product, density and intensity of pigmentation, it may be necessary to perform from two to five layers. After the last layer is done, a special preparation must be applied to the nails. This product has degreasing properties; it removes the sticky dispersion layer that forms on the surface of the film. Experts recommend using a clinser for this purpose. But, as a last resort, 99% isopropyl alcohol will do.
- Need to apply sealer
, which is a top coat for shellac. In this case, this is a layer that may be thicker than the main ones. To create a finish, you can use a product from the line of cosmetics from the CND brand - Top Coat.
- Experts advise in the first few days after a manicure using shellac avoid prolonged water procedures
. This recommendation is justified by the fact that the final hardening of shellac continues for another two days after the nail art procedure.
- After use, the shellac bottle must be tightly closed.
and store exclusively in a dark place. The fact is that sunlight also contains ultraviolet waves. Of course, polymerization of the product under the influence of ordinary light takes a very long time, but it can curl and change its texture and properties.
Chips and detachments
Most of all, women are interested in how long shellac lasts and whether it lasts longer than other gel polish. It is durability that influences the choice of material. And here’s the absurdity: once a manicure lasts for three weeks, but with another shellac it’s impossible to last more than 5-10 days. Sometimes chips and detachments begin to appear earlier. In rare cases, the reason is the quality of the material itself, more often it is a violation of technology.
Why there are chips on the tips:
- A clinser or primer was not used, or it was done incorrectly, leaving untreated areas.
- Thick layers are applied that simply do not have time to dry properly, or a weak lamp is used. There is no need to take 12-24 W, although, according to sellers, it is ideal.
- The ends of the nail are not sealed, it is important to do this. If you can’t work on all the corners and edges, you can use a separate thin brush for the base and shellac.
- The ends were sealed too much. You only need to apply one layer of base, color coating and top coat. If you cover the edge with each layer, a thick roller will form on it, which will definitely chip.
- Thin nails. Even under the coating, the ends bend strongly, small cracks appear, and the free edge breaks off.
Sometimes chips at the very tips occur under heavy load. For example, a girl types a lot on the keyboard and does it with her nails. As a result, the top coating wears off, small cracks appear, and the coating chips.
Why detachments happen:
- The cuticle is poorly processed; pterygium remains along the edges of the nail, which does not provide a strong grip.
- The plate is not prepared. The surface needs to be sanded thoroughly to remove all gloss. Pay attention to your buffs and files, maybe it's time to update?
- The materials do not dry out. Here the problem can be found in the thickness of the layers or in the operation of the lamp.
- Sloppy application with streaks. As a result, after 2-3 days, the filled areas lag behind the skin, rise, peel off, and pull the rest of the nail area with them.
No matter how durable and expensive the coating material is, it is important to take care of it. You should not open jars with your nails, scrape or scratch anything. Housework, especially when coming into contact with household chemicals, should be done with gloves.
Cons of shellac and gel polish
- • higher cost compared to conventional varnish;
- • the need to have a number of auxiliary fluids and a lamp;
- • a certain skill is required for proper application;
- • if nails grow quickly, you will have to renew the decorative coating more often;
- • in case of diseases of the nail plate, the shellac procedure is contraindicated (as is the use of varnish).
In general, the use of gel polish, even over a long period, will not cause any significant harm to the nail plates. But for this to actually be the case, the choice of a quality product and the correct removal technique are of great importance (you can read about how to remove gel polish at home in our previous article).
How often can you do shellac? If the decorative product is safe, has a proven composition and does not raise doubts about its quality, if it is applied and removed using the correct technology, then the coating can be renewed with the necessary and recommended regularity. It’s enough just to monitor the condition of your nails and focus on their needs.
How to remove shellac
The most common myth is that durable coatings spoil natural nails. In fact, it is not the materials themselves that are harmful to manicure, but the lack of professionalism and non-compliance with technique. Most often, nails deteriorate after improper removal. Do not scrape, pull, rip off or bite off your manicure. Along with the shellac, a layer of the natural nail may “go away.” Lumps and pits will appear on it, rough scales will rise, and the plate will become thinner.
Removing the coating by soaking
The easiest way that even a beginner can handle. To facilitate the procedure, you can use special caps or clothespins. Additionally, you will need cotton pads, cut into pieces slightly larger than the nail plate. For soaking we use a special solvent, also known as a remover. The brand TNL, Severina and others are suitable.
Soaking caps
How to remove shellac correctly:
- Take a coarse file and lightly go over all the nails, removing the top top coat. You don’t have to do this, but the soaking will take longer, so it’s better to take a minute.
- Lubricate the area around the nail with oil or cream. This is an optional step, many instructions don’t even have it, but this way we will protect the skin of our fingers and the solvent will not sting.
- We wet pieces of cotton pads in a special product. We soak it well, but the drops should not flow off. Apply to the nail.
- We put on a cap or clothespin to secure it. If there is nothing, then you can wrap the tip of your finger in foil. We wait until the shellac becomes limp. It will crack and swell.
- Take a pusher or an orange stick and scrape off the coating. We move from the base of the nail to the edge.
If not all of the coating is removed the first time, you can reapply the cotton wool and soak it a little more. It is more convenient to simply go through small pieces with a file.
On sale you can find special bags of solvent into which you stick your fingertips. Judging by numerous reviews, they are not very comfortable, the substance spoils the skin, flows under the cuticle, and stings. It is better to apply the cut-out napkins directly to the nail plate.
Coating remover - how to choose and use
Removing the coating by cutting
The soaking agent is chemical, it often stings the skin, has an unpleasant odor, and with prolonged contact it thins the nail plate. Therefore, more and more craftsmen prefer sawing. It can also be practiced at home.
What can you cut down with:
- machine with a cutter;
- ordinary files.
Filing with a device requires skill and caution; it is easy to file through your nail.
What is hardware manicure, features of its implementation
Working with regular saws takes a lot of time. Therefore, it is recommended to use several pieces, first with a coarse abrasive for artificial nails, then switch to soft files for a natural plate, and finish the job with a buffer.
How to remove shellac from the surface of nail plates
Shellac is removed from nails using a special acetone-based solution. The company employees who developed the formula of the drug did not want to scare away clients and manicurists, so the fact that Shellac remover contains acetone, which is relatively harmful to nails, is not advertised.
The procedure for removing stubborn varnish is simple:
- Wash your hands thoroughly.
- Prepare ten adhesive-based sponges, which are designed specifically for gentle removal of shellac. Instead of sponges, you can use cotton pads (cotton wool) and foil. Or cotton pads and special nail pads for additional fixation.
- Soak the discs with a special solvent. It is optimal to use products from the CND company, which are called Product Remover or other products with similar properties.
- Wrap the sponges around the nails and fingertips so that the part soaked in the solvent comes into contact only with the nail plate and is fixed with a sticky surface. Leave the sponges on your nails for 10 minutes.
- After removing the solvent-soaked bandages, you need to clean your nails of large polish residues using an orange stick, which is not so hard as to harm the tissues of your hands.
- If there are slight shellac residues on your nails, remove them by wiping the contaminated surfaces with a cotton pad soaked in solvent.
- Wash your hands, treat cuticles and nails with caring oil. After some time, you need to apply a moisturizing or restoring cream to your hands.
- What to do if you don’t have a special solution at hand to remove durable decorative coating? Experts advise going to a beauty salon where you can have your manicure corrected or completely wash off your shellac. Another option is to use standard acetone-containing solvents. You just need to take into account that it will take a lot of time to dissolve the dense film of the polymer coating.
- Is it possible to remove shellac using hardware? Manicurists say that this is possible, but it is not advisable to carry out such a procedure. Due to the peculiarities of the composition, the cutter gets stuck in the material, and the effectiveness of the procedure is low. In addition, using mechanical methods to remove the coating is dangerous for nails. There is a high probability of sawing through the nail plate, since the coating layer is not thick enough and it itself is fragile. Hardware manicure removal is more suitable if a thicker gel polish was used. However, you can use manual mechanical action and files with an abrasive coating. At least in order to remove the bulk of the polymer material from the nails.
Manicurists strongly advise against using this method of manicure removal, such as an acetone bath. If you use this particular method, you can damage not only your nails, but also the skin of your fingers.
Subtleties and secrets of shellac manicure
The technique of applying shellac, unlike gel or extensions, is much easier. But the polished nails just give themselves away. A home manicure can often be seen a mile away, and it does not decorate your fingers. There are secrets that can not only improve the appearance of your nails, but also increase the durability of the coating.
Main nuances:
- All basic materials must be from the same manufacturer to avoid detachments.
- The plate must not only be carefully processed, freed from the cuticle and pterygium, but also leveled.
- You should not touch your nails with your fingers from the moment the plate is degreased. Our skin has a lot of oil on it, which will affect its staying power.
- You should not choose a cheap low-power lamp; it is wiser to immediately purchase a device from 36 W.
- It is better to apply more thin layers, but let them dry normally.
- There is no need to skimp on napkins; it is advisable to purchase special lint-free consumables. Otherwise, small fluffs and threads will ruin the entire manicure, and you won’t get perfect highlights.
- If the nails are initially crooked or lumpy, then you need to level them out; usually a base is used for this, but you can also use acrylic powder.
Since the coating is done for several weeks, there is no need to rush, you need to allocate 2-3 hours for the procedure, choose a suitable place, light, remove distractions that often walk by, run, make noise and ask something. It’s better to do one thorough manicure in three hours than to do it in an hour and then have to redo it.
How to extend the shelf life of a shellac manicure
When asking such a question as extending the period of wearing shellac on nails, you need to remember the growth rate of the nail plates. The average person's fingernails grow at a rate of 1-2 millimeters per week. Toenails grow more slowly, growing approximately 0.25-1 millimeter in seven days. It is clear that within a week after the last treatment of the nails and application of the decorative coating, a new area near the cuticle, not painted over with varnish, will appear. It will not look aesthetically pleasing. Therefore, there is no particular need for shellac to last longer than a few weeks at a time. However, there will be little joy in the fact that the coating cracks or peels before the natural need comes and the time to change it comes. Therefore, you can take preventive measures to prevent damage to the integrity of the dense decorative film on the nails:
- Avoid contact of nails with any type of harsh solvents.
- Avoid changes in external temperatures (thermal effects of the hot-cold type).
- Do not test nails and decorative coating for strength. That is, do not scratch or remove hard substances from surfaces unless absolutely necessary.
- Wash dishes, floors, do laundry and perform all other house cleaning activities using rubber gloves, periodically cleaning and airing your hands. The same applies to gardening or other household work.
In principle, no special care is required for a manicure made using shellac. Just protect your nails and hand skin using standard methods, that will be enough.
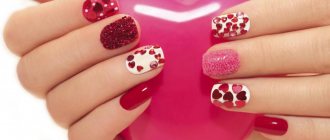
Popular types of nail decoration
It’s already clear what a shellac manicure is, but not every girl is satisfied with plain-colored nails. It is the durable coatings that allow you to create a wide variety of designs. To feel like a nail artist, you don’t even need to know how to draw.
Popular types of decoration:
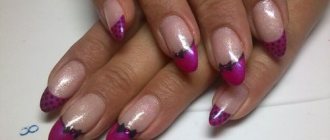
- Lunar manicure, French. It’s convenient to do it using stencils, but you can paint over the smile line with a thin brush.
- Gradients. They give enormous scope for imagination; you can come up with a variety of shade combinations.
- Stickers. A simple, convenient, cheap way to decorate your nails with flowers, animals, hieroglyphs and any other pictures.
- Rhinestones, broths, stones. They are used for convex decor, do not require any glue, and are “settled” on the top coat, sometimes on the base.
- Stamping. It is a plate with patterns applied; you can choose your own shades and shapes.
Overview of stamping technology
What is manicure, its types and popular nail design options
There are many options, the main thing is not to go to great lengths, the abundance of rhinestones, bouillons, kamifubuki and stickers looks cheap. You need to know when to stop and don’t forget about the appropriateness of such a manicure at work or in an educational institution.