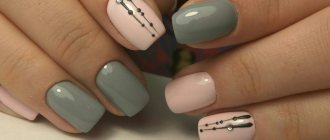
Gel polish correction without removal is a manicure update without removing the old coating. It is performed after 2-4 weeks, when the nails have grown sufficiently. Cover only the natural part of the plates, first filing the border of the flower bed. Then proceed in the same way as with a complete manicure update, using sequentially a cuticle remover, degreaser, primer, base, the same or a different gel polish and top coat.
You can make a correction by partially removing the coating. Use a file to grind it down to the base and cover it with a new color. Or they decorate the overgrown part of the nails with rhinestones, foil, and sparkles. The broken plate is replenished with gel, and in case of small cracks, the entire coating on it is simply renewed.
Correction of gel polish without removing color
Correcting gel polish without removing the color saves time, as it is faster than a complete design update:
- First the cuticle is treated. You can remove the excess with a hardware cutter, then with nippers, and if you don’t have a device, with a remover and an orange stick. If the stratum corneum is small, it is simply moved using a softening agent and a pusher.
- The gel polish at the border with the regrown area of the nail needs to be filed down. This way, the convex transition line is removed - a step that will interfere with making the updated coating smooth and natural.
- The buff is passed over the entire surface of the plates. This is necessary to remove the glossy sheen, that is, better adhesion to the fresh layer of coating.
- After filing, the surfaces of the nail plates are wiped with a degreaser. All debris is thoroughly cleaned from the sinuses and removed from the skin.
- Apply primer to the regrown parts of the nails. This is done with a semi-dry brush. And you need to wait a few seconds for the liquid to dry in the air.
- The next product is the base. It is taken in a small amount and applied to the middle of the nail or to the entire nail, directly over the remaining layer of gel polish. The base is polymerized.
- Paint your nails with gel polish of the same color over the entire surface or to the middle, free edge. The choice depends on the design and thickness of the previous coating. But the renewed surface should be smooth.
- The layer is dried. And you can cover your nails with gel polish again for color density and polymerize again.
- Apply the finish to each plate entirely. Dry the last layer in a lamp.
With this method, you can reduce the length of your nails using a file or a hardware router. This is done at the very beginning, even before working with the cuticle. But there is a danger of compromising the integrity of the coating on the tips. Therefore, it will be necessary to apply a fresh layer of gel polish to the entire surface of the nails, including the free edge.
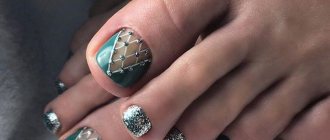
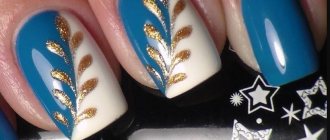
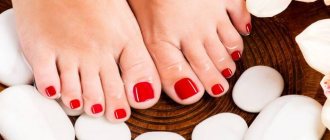
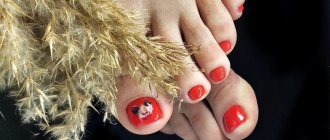
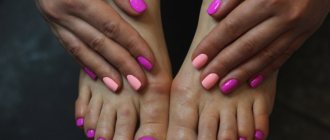
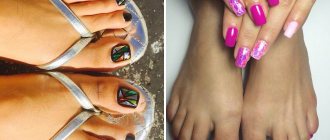
Interesting designs with gel polish on legs
Fashionable design options for gel polish on legs are:
- French. The classic one with a white free edge is popular. But the main color is opaque pink. Basic blue gel polish and white for a “smile” are also in fashion when doing French.
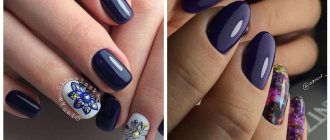
- Bright monochromatic. They use a matte or glossy finish, both of which look very beautiful. The rich color is complemented with rhinestones. But they are not glued to the most noticeable thumbnail, but to the one nearby, and along the cuticle.
- With drawings. Hand painting is done on the largest nail. If it is a slider, it is glued there. The latest trend for summer is whole fruit or slices. Funny silhouettes are also in fashion - black foot prints or cat paw prints. You can make different designs on the right and left legs.
- Gradient. The classic vertical one is done on the thumb. And the rest of the nails are painted in the same colors, but entirely. For example, if lilac and yellow are used for the thumb, then on the next finger the plate is covered only with the first, then with the second, etc.
- With sparkles. They decorate the entire nail of the second finger. For the rest, use a bright color and a matte top. You can highlight the holes with sparkles.
- A combination of three shades of gel polish, one of them is light. They cover the nail on the thumb. And the second and third colors are used to make the design - leaves, twigs, flowers, etc.
- Stripes. They are made of different lengths, vertical or horizontal and drawn on the thumb in three or four similar shades (pink, lemon, beige or red, fuchsia, burgundy). For the remaining nails, use one of the same colors, covering the plates completely.
- In white. They make a monochromatic manicure or an ornament from small details. In the second case, you can draw it not only on the thumb. Or they make drawings of insects (ladybugs, flies, multi-colored butterflies) on a snow-white background.
- With kamifubuki. For the thumb, you can take different sizes and shapes. For the rest - small stars and circles. The background can be made pastel or bright - as desired.
- With negative space. It can be played up in different ways - with silver sparkles and a cool shade of the base color, with foil stripes, with bright colors of gel polish.
How to correct gel polish with color change
It is also possible to correct gel polish by updating the main shade of the coating:
- First, reduce the length of the nails using a file or milling cutter. You can change the shape if you wish. At the same stage, rough skin around the corners of the nails and side ridges are treated.
- Then remove the color coating to the base. It is permissible to preserve its layer and, if possible, leave it even. Use a file with an abrasiveness of 100-180 grit or a hardware router.
- They work with the cuticle. It is lifted using a pusher, softened with a remover and cut with scissors. If the stratum corneum has not grown enough, it is moved away with an orange stick.
- Apply primer to the regrown part of the nails. You need to let it air dry.
- Use another thin layer of base. It is needed to level the surface. The product is polymerized.
- Apply 2 layers of gel polish. Each one needs to be dried in a lamp.
- Use a finishing coat. It is also polymerized.
This method is possible if there are no peeling marks on the old base coat. They can be seen by swollen places or material raised above the surface of the nail, under which there are voids.
If a problem is detected, you will have to remove the entire coating completely. To do this, after removing the top with a rough file, use a special liquid. It is applied to pieces of cotton pads, placed on the nails and wrapped with foil on the fingertips. Silicone caps can be used for the same purpose.
After 10-15 minutes of exposure, the remaining coating is removed with an orange stick and the manicure is performed as usual:
- Correct the length and shape of nails.
- Treat the cuticle.
- Grind the surfaces of the plates with a buff.
- Wipe them and the skin with a degreaser.
- Primer is applied.
- Use a base with leveling, dry under UV or LED radiation.
- Apply gel polish in 2 layers, both are polymerized.
- Cover with finish and dry.
Classification
Depending on the condition of the coating, two types of correction can be distinguished:
- No nail polish remover. This option is suitable for girls whose nails grow very quickly. Those. The coating is still intact, without chips or damage, but there is already noticeably grown space that is not covered with varnish, and the manicure looks untidy. The coating remains on the nail plate, and the essence of the correction work is to fill the resulting “void” with an additional layer of varnish;
- Full correction with changing the color of the coating. This option is chosen by ladies who do not want to wear the same shade and pattern on their nails for a long time. The gel polish is removed and the coating is reapplied.
Preparing for nail correction
Which nail correction option to choose is up to you to decide. But before you make a final decision, it’s worth knowing the pros and cons of both options:
- The main advantage of correction without removing nail polish is considered to be time saving. This factor is most important for young mothers and busy women, for whom every minute counts. The cost of such work is not high. The disadvantages include the fact that the design and color of the coating remains unchanged;
- A complete change will ensure that you don't get tired of your manicure because you'll be updating it periodically. You can change not only the color of the polish, but also the shape of the nail, as well as the design. The disadvantages include the high price tag and duration.
Correction at home is available if you have the necessary tools and skills.
Nail correction without removing polish
Another interesting option for manicure correction with gel polish
Manicure correction with gel polish can be done by changing the design, but without removing the previous coating. In all cases, the cuticle is first processed, that is, it is cut or moved. Then you can use the following tools:
- Gel polish of a different color for the regrown part of the nail. You need to file down the “step” between it and the old coating, degrease it, and coat the open area with primer. After it dries, a base is applied to this area and polymerized. And then they paint it with gel polish. After drying it and covering the entire surface of the nail with top coat, you get a reverse French manicure. It is necessary that the border with the shade is even, otherwise it will have to be covered with some kind of decor.
- Rhinestones. Here, too, the transition between the natural plate and the coating is smoothed using a file, and the surface is degreased. Glue or a thick base is used as a fixative. In the second case, rhinestones are placed on a coated surface and polymerized in a lamp. Apply a topcoat around the stones and dry it.
- Glitter. You can tightly cover the entire strip of the regrown nail with them or stretch it with glitter. Prepare the surface as in previous cases.
- Strips of flexible foil or display material. Here, too, you should cover the entire natural part of the nails. The color of the foil is matched to the shade of the gel polish.
- Acrylic powder with decorative properties. You can take a colored or neon one with glitter, pour it onto a damp base layer and dry it. And then use a brush to get rid of excess grains and cover everything with top coat.
Main mistakes
Beginning masters often violate pedicure technology. Because of this, the gel polish quickly begins to peel off. Most often, people forget to treat the nail plate with a buff or apply a degreaser. Another common mistake is using a thick layer of gel polish. It must be distributed evenly. A thick layer does not dry well and often forms uneven surfaces.
Important! Do not shake the bottle of cosmetic product, otherwise the risk of small bubbles will increase. Sometimes beginners do not seal the nail from the end. This threatens the formation of chips. It is also prohibited to remove the sticky layer from the colored coating.
To properly do a pedicure at home, we recommend watching a training video.
How to correct nails after gel polish
Correction of nails after gel polish may be necessary if one or more are cracked on the free edge, but you want to maintain the length. It's done like this:
- The entire coating is removed by first cutting off the top, then soaking it and removing its remains with an orange stick.
- Treat the cuticle and skin around the nails.
- If possible, carefully file them down, but so as not to enlarge the cracks on the free edge.
- Degrease and clean the work area with a special product.
- Apply ultrabond and allow it to air dry.
- Apply the base with leveling and polymerize.
- Make 2 layers of color coating, each one is dried in a lamp.
- A finishing agent is used and polymerized.
A coating consisting of 4 layers can maintain the integrity of the nails if there are small cracks on the free edge. For greater reliability, at the 6th stage, you can use acrylic powder on the wet base. Sprinkle it with a spatula, or dip your finger into the powder several times. And only after this should the coating be dried. And the flower garden is applied after shaking off excess powder with a brush.
Larger cracks or broken corners are corrected with polygel or extension gel. One of the products is applied to the defect after drying a thin layer of base, kneaded with a brush slightly moistened with a cleanser. Then it is smoothed so that the surface acquires a natural texture. After drying in the lamp, the shape is adjusted with a file. Then continue coating application as usual.
Watch the video on how to correct nails after gel polish:
Which gel polish lasts best on toenails?
For toenails, nail technicians prefer CND gel polish. It applies thinly but does not smear. There are different colors, quite dense, the pigment in which is distributed evenly. Vogue, PNB, UNO, TNL products are also suitable for pedicure.
The pigmentation of gel polishes is a particularly important property when performing a pedicure. If the color is dense, you can apply it in one layer, which is a big plus for toenails. It’s good when the product is of medium thickness.
A texture that is too steep can cause the gel polish to apply thickly or unevenly. And it is physically difficult to apply it to small toenails. And too liquid gel polish spreads, and in one layer it can become bald.
Gel polish correction at home: what tools are needed
Correction of gel polish at home is performed using:
- manicure files with abrasiveness 100-180 and 240 grit;
- pusher and orange stick;
- scissors or cuticle nippers;
- remover;
- buff and brushes;
- degreaser and primer;
- base, gel polish of the desired shade and top;
- lamps for coating polymerization;
- lint-free wipes.
To paint the overgrown part of the nails, some people require a thin brush, but you can get by with the one that comes in the bottle. If your manicure is refreshed with the help of decorative elements (glitter, rhinestones, foil, etc.), you need to stock up on them too. After completing the procedure, it is useful to apply a little oil to the cuticle and rub.
Necessary tools for correction
- abrasive files of varying degrees of hardness;
- buff;
- base coat;
- gel polish;
- top;
- foil;
- gel polish remover;
- pusher;
- orange sticks;
- lint-free wipes;
- UV or Led lamp;
- cuticle oil;
- brush for removing dust.
Advantages and disadvantages of correcting grown-out gel polish without removing it
Correcting overgrown gel polish without removing it has many advantages:
- makes a 2-3 week old design fresh, making your nails look neater;
- saves time and money, as well as materials;
- allows you to “get your hands on” in applying a flower bed near the cuticle;
- protects nails from additional exposure to liquid for dissolving gel polish or cutters, which can injure them;
- makes it possible to grow the desired length;
- coating defects are quickly corrected;
- there are conditions for the manifestation of imagination in the search for a new design.
Some girls still prefer to completely renew their manicure, since the method of correction without removal is not without its drawbacks:
- it may turn out that there is too much material on the free edge, which increases the risk of breakage;
- It’s not always possible to do everything neatly and beautifully; surfaces may look “pot-bellied” or uneven, with flower bed overhangs;
- the old coating still wears out, that is, there is a greater risk of peeling and chipping;
- under the peeled layer, if the defect is not immediately noticed, an infection may develop;
- The color of gel polish gets boring when worn for a long time.
Features of gel polish on legs
Gel polish on the legs is done and worn a little differently than a manicure:
- nails cannot be long, they are cut and filed, if not to “zero”, then still quite short;
- decor is used more modestly than for hands, since there is a higher chance that it will get in the way and come off faster;
- leveling with a base is not done during pedicure;
- over-wearing the coating is even more dangerous than with a manicure, especially during the season of closed shoes;
- design can be varied;
- Finger separators should be used when applying the coating, otherwise it may smear.
Material advantages
A pedicure with a polymerizing coating has several advantages:
- the design can be made much more interesting than with regular varnish;
- it lasts longer, maintaining pristine freshness;
- it is not hampered by exposure to sea water or chlorine in the pool;
- feet look well-groomed for 2-3 weeks without additional effort.
Is it possible to refinish the coating with regular varnish?
You can also renew the coating with regular varnish; you can choose the exact color or, conversely, use a different shade to create an original design. It will be easier, cheaper and faster.
To ensure that the thickness of the layer at the base of the nails matches the rest of the space, apply a base for regular polish, then a flower bed and a top coat. It is necessary to strive to ensure that these products are applied only to the regrown part of the plates. Otherwise, regular varnish will quickly chip.
But when updating your manicure this way, you need to consider two points:
- a product that dries in air will still differ in texture and appearance from gel polish, sometimes this is very noticeable;
- it does not last as long as a polymerizing coating, a maximum of a week.
Correction methods
As gel polish grows out, an empty space appears at the base of the nail plate that needs to be filled. At this moment, the manicure looks absolutely unattractive and sloppy. Therefore, professional masters identify several methods that will help disguise overgrown nails with gel polish:
- correction of the entire surface;
- a certain area of the plate without removing the old coating;
- use of various means for decoration.
This way you can improve the appearance of your manicure when your nails have grown out. Gel polish can be used both at home and in professional beauty salons. The procedure for applying and correcting the coating is quite simple if you follow all the recommendations and have the necessary equipment available.
How often to correct gel polish
Correction should be done so often that the nails look neat, that is, every 2-4 weeks. It depends on the speed of their growth, it is different for everyone. If the hole is visible by 2-2.5 mm or completely, the overall appearance of the hands looks sloppy. And with strong growth of the free edge on which there is material, the architecture of the nails is disrupted. This area is overloaded, and there is a high risk of a crack or part of the plate breaking off.
If correction is needed precisely because of the formation of recent defects, it should be eliminated as soon as possible. Otherwise the problem may get worse. For example, a crack will extend beyond the free edge, and this is not only unsightly, but also painful.
Correction also includes caring for the cuticle and side ridges. If burrs, irregularities, or defects appear on them, you should get rid of them using scissors or a special file that grinds the skin. These problems can be avoided by regular use of emollient oil. When the cuticle grows, it is not necessary to cut off every millimeter. It is enough to regularly push it away with an orange stick.
If your nails grow quickly, so that you don’t have to correct them too often, you can cover them with shades of gel polish that are close to the natural color. Or use a camouflage base. You can put off the need for a design update if you do a manicure with negative space in the hole area.
How safe is it for nails?
A nail pedicure is as safe as a manicure if certain conditions are met:
- coat only healthy plates;
- when preparing them, work carefully, do not press too hard with a cutter or hand tools, and do not go deep under the cuticle;
- use high-quality products - varnishes, bases, tops, etc.;
- sterilize instruments or buy disposable ones;
- Do not wear tight shoes, and if you have problem feet and nails, leave the design with gel polish until summer.
There is another important nuance - when performing a pedicure, they do not use a base for leveling. Otherwise, there will be too much material on the nail plates, which will lead to damage. Masters often use single-phase gel polishes for pedicures so that the layer on the nails is thinner. You should also not overload them with an abundance of other components - powder, gels, tops.
It is better to attach voluminous decor (rhinestones, modeling) closer to the base rather than to the ends. Otherwise it will quickly fall off. In the meantime, it will be worn and may cause discomfort.
French gel nail correction
How to correct gel nails if they have a French design applied on them? This can be done either manually or using hardware. In any case, this procedure is the most labor-intensive and, as a result, the most expensive. This is due to the need to maintain a smile, especially if the natural nail is visible under the gel.
Correction of French gel nails is done in this order:
- Disinfectant is used.
- All defective areas of the gel coating are removed, after which the dust is removed with a brush.
- Nails are degreased and covered with primer.
- Using a transparent modeling gel, the edge of the nail is raised, which must then be dried in a UV lamp and the sticky layer removed.
- The camouflage gel is used to form the area of the nails, which are polymerized again (2 minutes).
- Stress zones are crimped, secured with a clothespin, and the hands are again sent to dry (1 minute).
- After the sticky layer is removed, the edges and surface of the nails are processed with a nail file. Again, the dust is removed with a brush.
- This step is the most important - a smile is formed with white gel, after which polymerization is required for 4 minutes.
- Now the nails are given their final shape, after which unnecessary dust is removed, and the surface is degreased and coated with primer again.
- A fixing agent is applied (from the outside and inside) and polymerization is carried out for two minutes.
Complex correction
Complex nail correction with gel is carried out in cases where the time from extension to correction is more than 4 weeks. As a rule, at this time there are definitely breakages, and the material has already moved to the middle of the natural nail. This correction almost corresponds to full nail extensions. In the process of complex correction, the master cuts all the material down to the substrate. Then the gel completely creates a new nail, taking into account all proportions.
During complex corrections, an aquarium design or French manicure is often performed or restored. It is important to correct the reverse side of the nail as well. Be sure to cut out any irregularities or detachments using a router, and create a new arch.
Materials and equipment
For gel correction, the following consumables and equipment are required:
1. Gel. The wizard selects a 3- or 1-phase system. You will need a base gel, a transparent gel to create a base, a camouflage gel, and a white gel for a jacket.
2. Degreaser.
3. Primer. Acid or acid-free. Designed to create good adhesion of the gel to the natural nail plate.
4. Gel topcoat. Designed to create a protective layer and add shine to finished nails.
5. Liquid for removing dispersed (sticky) layer on the surface of the gel coating.
6. Paper forms.
7. Brush for gel nail extensions.
8. UV lamp with a power of at least 36 W.
9. A router or a set of files of different abrasiveness (from 100 to 240 grit).
Each correction differs in the complexity of execution, the amount of consumables spent and time. Simple nail correction with gel is the most common. Technically it is basic.
A simple correction is always planned in advance and carried out after 3-4 weeks. In its process, the material is laid out only in the area of the regrown nail and the side ridges. The instructions below will tell you how to correct your nails with gel in 1 hour. The procedure is simple, but requires patience.
When is it necessary to correct gel nails?
No matter how professional the master who applied gel polish on nails is, the client very soon has to visit him again. There may be several reasons for this, we will highlight the most important ones:
- The nail has grown. Ideally, correction of gel nails is done once every 3-4 weeks. Of course, the procedure can be postponed for a long time, because the drawing is beautiful or there is no time. But to be honest, these pens are becoming less and less beautiful every day. You can see the untreated nail plate, which at first girls can try to cover with regular polish. In addition, the longer the nail, the more likely it is to become a victim of chips or cracks.
- Physical pressure or blows. Gradually, girls get used to the new state of their nails and stop being careful with them. Sometimes it happens that the hand touches a hard object, or even worse, the client can get her finger pinched by the door. In any of these cases, the appearance of the nails deteriorates and correction of gel nails is necessary.
- Cracks. Inadequate quality of the applied gel polish or its incorrect application sometimes lead to the appearance of small or large cracks. The situation can also be corrected by correction, which becomes more complicated only if your own nail is also cracked.
- The coating is peeling off. The reasons may be the same as when cracks appear, but if this is not the first time, it is worth understanding the problem. Peeling manifests itself in the form of lifting of the coating on the sides and can reach one or one and a half millimeters.
Sometimes the problem of peeling occurs after treating nails with a worn-out file, which does not fully perform its function.
How to correct extended nails
If you do not want to contact a specialist, and you are confident in your abilities, then you can restore your manicure yourself at home. You will definitely need to order or buy in the online store all the necessary materials and tools. Nail correction at home is justified from a financial point of view if you do it regularly. The main advantages of this solution are that you can make corrections whenever you want and help your friends.
Those who are interested in how to correct nails should first watch the lesson or read the step-by-step instructions with photos so as not to spoil the manicure. In addition to modeling material, you will need to purchase a UV lamp. To simplify the process, you can buy a manicure machine, the only drawback is that you need to learn how to use it and understand the sets of attachments. You don’t have to buy the most powerful router; you definitely don’t need a professional one. Its cost is relatively low, and you will use it for a long time.
- Gardenia care at home
- Vitamin P - what foods contain rutin
- Zucchini pie: recipes
Correction of extended nails with gel
This is one of the material options that is used for extensions and modeling. Correction of gel nails involves the use of specific materials that you will have to purchase yourself. For the procedure you need to have:
- degreaser;
- gel;
- modeling gel;
- liquid for removing the sticky layer;
- acid-free primer;
- antiseptic;
- cuticle oil.
This is the most minimal set for correcting extended nails with gel. If you used a single-phase gel for the first time, you can use it for correction. In the case of a three-phase procedure, any system is suitable. Next, you need to have a minimum set of tools that will help you do everything easily and quickly:
- lint-free wipes;
- buff for polishing nails;
- Ultraviolet lamp
- pusher or orange sticks;
- brushes for modeling nails with gel;
- gel files, suitable for 150/180 and 100/100 grit.
- nail clippers for cutting cuticles or blades;
- artificial nail clippers.
Below is a step-by-step description of how to correct gel-based nails. It is very similar to the procedure when working with acrylic. The instructions consist of the following steps:
- Degrease, disinfect hands, tools, remove varnish and paint from the plate (it is better to use products without acetone).
- Use an orange stick to lift the cuticle.
- Using a nail file, correct the shape, first file off those parts of the gel that have begun to lag behind. Then, in the place where the old coating begins at the cuticle, remove all the gel, you should get an imperceptible transition to the natural nail.
- Treat the surface with primer so that the infection does not get under the nail, remove excess with a towel.
- The smooth part of the regrown plate is cut off using a buff. Next, the hole is immediately filled with gel and dried with a UV lamp.
- When the material dries, you need to remove the sticky layer and form the correct shape. Use a file to immediately correct any unevenness, if any. The base layer of gel is applied evenly over all parts of the plate. A little more material is needed for the stress zone (just above the middle of the nail), but do not overdo it. Then dry the material again in a UV lamp.
- Then you need to correct the shape, smooth out defects and unevenness using a nail file. Be careful not to accidentally wear off the base layer to the old coating.
- Remove dust regularly with a brush.
- Before applying the finish, you need to make the desired design (drawing, French).
- Next, apply the finishing coat in one layer and dry under a lamp. To make it smoother, then apply a buff.
- You need to treat the side rollers and cuticles with nourishing oil (rub in like a cream).
Correction of acrylic nails
This type of artificial material is very popular among girls. Correction of nails with acrylic is carried out according to a similar algorithm, as with the option described above. To ensure everything works out correctly, you can use the instructions described below:
- Treat your hands and work surface with a disinfectant.
- Remove the varnish layer with a non-acetone product.
- Treat cuticles with a softening agent. After 2 minutes, use a wooden stick/spatula to remove the pterygium from the natural plate.
- Remove any remaining product using a lint-free cloth. File down the free edge with a nail file and set the desired shape. It is necessary to cut down 2/3 of the thickness of the material.
- Remove shine from the natural nail for better adhesion of the plate to the acrylic.
- Treat the peeling areas with a fine-grain nail file.
- Next, you need to treat the part where there is no acrylic using a degreaser.
- Treat the nail plate with a primer, which connects the keratin of the natural part with the artificial material.
- Run the simulation. Make sure that the acrylic is applied evenly over the entire area and does not penetrate the skin or into the lateral sinuses. Extension brushes should only be made of natural bristles; do not press too hard when applying.
- Then place your hands under a UV lamp for 2.5 minutes.
- Apply special oil to the cuticle.
Nail correction with shellac
This is a new type of coating that is easier to apply and lasts as long as gel/acrylic ones. Nail correction with shellac is carried out in two ways: with or without complete removal. To carry out the procedure, a standard set of instruments is used. Correction of gel polish is carried out according to the following instructions:
- It is recommended to treat nails that are too dry using a special activator. it consists of essential oils and water, apply it to the sides and keep for 5 minutes.
- Use a pusher to pick up the shellac polish. Carefully remove the coating; this is easier to do using the same activator.
- Using a nail file, give the regrown edge the required shape.
- Next, get a manicure or use a special gel to soften the cuticle and push it back.
- Clean the plate with a nail polisher until a shine appears. This step cannot be skipped; then it will be easier to remove the layer if necessary.
- Degrease the surface.
- Coat the substance that replaces the base and finish, dry it under a lamp.
- Select a shade of shellac, apply one layer to the surface, and dry.
- Then another layer, and again you need to dry it.
- Apply finishing coat last and let dry.
- Apply cuticle repair serum.
Nail correction using tips
This procedure is similar in its algorithm to working with gel extensions. Restoring sealing, updating the coating, replenishing modeling materials, giving an aesthetic appearance - all this is the correction of nails using tips. Below is an algorithm for acrylic technology:
- Saw off the overgrown tips with a reversible nozzle and process to a thin substrate.
- File the surface of the nail with a 180 grit file, smooth out the transition from the tip to its own plate.
- Use a spatula to push back the cuticle.
- Use a diamond attachment to perform a hardware manicure.
- Degrease, disinfect the nail, wipe with a napkin (dry).
- Apply a small amount of acid-free primer at the base of the tip.
- Lengthen the nail bed with camouflage acrylic and shape using a brush.
- Model the cuticle growth area and apex with matte, one-time powder.
- Next, you should compress the stress area.
- Use a clothespin to secure the clamp.
- Model the free edge of the nail with white acrylic. You can put it on two tips at once.
- Form the free edges with the base of a thick brush.
- Use the drum attachment (reversible) to file the tip of the nail.
- Treat the inner, longitudinal arch in the same way.
- File the cuticle and apex area with the “corn” attachment.
- Use a 100 grit file to file down the nail plates.
- Sand the inner arch of the nail using the reverse corn attachment.
- Use a carbide tip to treat the hyponychium area (where the inside of the nail comes into contact with the skin).
- Treat the outer and side parts with a 100 grit file and remove dust.
- Coat the inside of the loose tips with finishing gel without sticky salt.
- Cover the outside with gel too.
- Keep your hands under the UV lamp for 2 minutes.
Peculiarities
Unlike a classic pedicure with regular varnish, which our mothers did, a pedicure with shellac or gel polish allows you to maintain color and shine, does not peel off or peel off (if applied correctly). This is a real lifesaver for a vacation where there is sea water and sand, for a swimming pool where the water is chlorine, and for many other cases.
Pedicure with gel polish
So, the result of the synthesis of polymers and conventional varnish in pedicure has the following undeniable advantages:
- Resistance to chips and scratches;
- Wear from 2 weeks;
- Shine thanks to a top that is resistant to external influences;
- Nails with shellac are stronger and less likely to break.
Types of correction
Based on the considered reasons that force the fair sex to visit a manicurist again and again, there are 3 main types of gel nail correction:
- mini-correction - most often it has to be done in the first week after applying the gel coating. The reason for this may be small cracks, chips or scratches that need to be removed and gel polish reapplied in their place;
- simple or medium - this can be a regular planned correction of gel nails, consisting of filing and varnishing the regrown part of the nail plate;
- complex or large - such a correction can be performed at any time, the cause may be serious damage to the coating (chips, large cracks, peeling, as well as nail breakage).
The latter type also includes correction of French gel nails, a more detailed description of the technique for performing which is given below.