What is airbrush
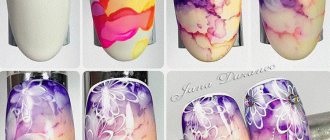
Airbrushing on nails is a relatively new direction of artistic painting, the design is transferred to the nail plate with 100% accuracy, the transitions between a light shade of varnish and a dark one are smooth and clear.
In this direction, some masters create masterpieces comparable to paintings by famous artists. Others depict a whole story on their nails, and some can transport the starry sky in all its deep beauty. Artistic painting is done with varnishes or paints, special stencils for airbrushing on nails are used to create beautiful designs. Perfection of lines and transitions is achieved thanks to a special airbrush device.
Advantages of airbrushing
The art of airbrushing is more than a century old, but it began to be used for applying designs to the surface of nails relatively recently. This technique is becoming increasingly popular because it has a number of undoubted advantages:
- Airbrush gives the artist more freedom in creativity - it can be used to create three-dimensional images, which is impossible with conventional painting.
- It significantly speeds up the drawing process.
- Paints dry quickly, so even painting complex images will not take much time.
- It is inexpensive - the necessary paints are cheaper than most analogues, and the necessary equipment, if used correctly, will last a long time and will pay for itself many times over.
- With the help of an airbrush, it is much easier for beginners to create many of the most popular designs, for example, French, gradient, ombre, openwork patterns.
Airbrush and its types
To create a stylish airbrush nail design, in addition to paints and varnishes, you need a special device - an airbrush. You need to buy a device for airbrush on nails carefully; not only achieving the desired results, but also the quality of the applied patterns depends on the right choice. There are a large number of different types of instruments, represented by two standards of action: simple and double.
A simple airbrush makes it possible to control only the flow of coloring matter and is convenient when working with ready-made stickers. The double-acting device makes it possible to control the amount of liquid and air supplied. Allows you to work not only with stencils, but also to make drawings yourself, changing the thickness of the line and its clarity.
You can choose a cheaper option for learning paint application skills or buy an expensive and high-quality Japanese tool for constant use. It is best to purchase an airbrush complete with a compressor, so as not to have to select a separate device later. The price category for the sets varies from 3,260 rubles to 30 thousand rubles. You can select a separate compressor, but you need to pay attention to the sound during operation, as well as the amount of air that can pass through the compressor per second.
The main distinguishing features of expensive and cheap tools intended for painting nails are:
- company manufacturer;
- the principle of spraying materials, can be external and internal;
- nozzle diameter;
- capacity;
- tank type;
- needle stroke;
- ability to change pressure;
- precision paint spraying.
The companies Jas, Sparmax and Iwata have proven themselves well. Jas are Chinese companies that produce relatively inexpensive equipment, intended in most cases for beginners and infrequent use. Sparmax is a manufacturer of instruments in Taiwan, the instruments are of an average price and quality level, suitable for constant use. Iwata is a Japanese company that supplies the world market with the highest quality equipment; it is used by professional craftsmen; with devices from this company you can be confident in the durability of the airbrush and the quality of the work it performs.
comparison table
The table below clearly shows the advantages of devices from each company.
| Name | Nozzle seal | Needle seal | Paint limiter | Tank capacity ml | Weight, gram | Nozzle diameter, mm | Price, rubles | Availability of compressor | Pressure limiter |
| Jas 1124 | No | No | Eat | 2 | 340 | 0,2 | 1500 | No | Eat |
| Aero - Pro 102 | Yes, rubber | Teflon | Eat | 2 | 450 | 0,2 | 6700 | No | No |
| Iwata CM-B2 | No | Teflon | Eat | 1,8 | 400 | 0,18 | 23000 | No | No |
When choosing an airbrush, you should understand that when working with cheap models, spraying the coloring material can be inaccurate and wasteful, parts of the tool can often fail, and the needle stroke is not adjustable, making it difficult to draw lines without stencils.
Working with an airbrush
Each equipment, for long and good service, needs special care and proper operation. To extend the life of the device you need to follow a few simple rules:
- Before you start painting, you need to fill a special tank with regular water, then press the start button and do a few sprays.
- Thanks to water, the remaining paint will be removed; only a few milliliters of liquid are needed.
- After checking, pour out the paint and wipe the bowl with a towel.
- Place a few drops of paint into the tank and close it with a lid.
- Point the tool at a sheet of paper and press the trigger several times.
- To adjust the paint supply, to increase the color density, you need to pull the release lever towards you.
- Point the device at the nail without stopping the device to create a pattern.
- In order to create thin lines, the airbrush needs to be brought as close to the nail plate as possible.
- Before each change of paint, the tank must be washed with a special solution.
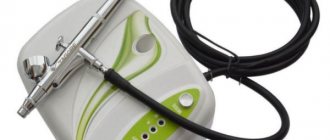
What is an airbrush for nails
This is a tool with which paint is applied to the nail surface without contact - it is sprayed under compressed air pressure.
The airbrush (more precisely, the airbrush kit) consists of three main modules:
- The airbrush itself is a tool that is a cross between a pistol and a fountain pen. A compact paint tank is attached to it on top or on the side.
- A compressor unit that supplies compressed air (the tool can be sold without a compressor, in which case the latter will have to be purchased separately);
- Hose for connecting the compressor to the sprayer.
The nail airbrush is sold unassembled, but it is not difficult to assemble, and instructions are included with each one. The assembly procedure is simple: you just need to connect the spray gun to the compressor using a hose and replace the paint tank (if it is detached).
There are two main types of airbrushes: simple or single action and the most “advanced” and more often used - double action.
Single action
In such an airbrush, the “trigger” only turns on the paint supply, but does not affect the air pressure. It is adjusted elsewhere, usually with a screw. If you use this type of sprayer, then when replacing paint you need to completely unscrew and then tighten the screw again.
With proper adjustment, it is not difficult to achieve the optimal dye to air ratio. As a result, immediately after applying the design, the coating becomes dry. This airbrush is ideal in cases where the design is drawn using stencils or a smooth transition of colors (gradient) is made.
Double action
In airbrushes of this type, working with the trigger (lever) is a little more difficult - it has two functions.
First, you pull the trigger and air begins to flow into the nozzle. In the second movement, you do not press, but pull the trigger back, as a result, paint begins to flow into the sprayer. The further you pull the lever, the larger quantities it flows. In order to change the paint, you need to pull the trigger all the way and the unnecessary residue will pour out.
Such airbrushes are used more often and not only in beauty salons. True, without sufficient experience, working with them is not so easy. But the result will certainly be worth the time spent on training and training. Once you get the hang of it, you will get clear images with precise rendering of all the details.
Typically, the device comes with cleaning brushes and pipettes. More expensive kits add solvents and device care products.
The price range for airbrushes is very wide. So, there are devices whose cost starts from 600 rubles. (they come without a compressor), and there are those that cost about $500. Inexpensive tools nowadays are often ordered from Aliexpress (they are ideal for beginner craftswomen), while professional ones are usually purchased for beauty salons.
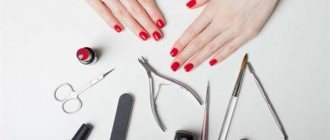
Tools for artistic painting
In order to start creating an airbrush manicure, you will need to have certain materials on hand. List of required tools:
- paint sprayer;
- compressor for air supply;
- special paints;
- base varnish;
- tassels;
- plastic tips, for training;
- rubber gloves, preferably thin ones;
- tweezers;
- sample drawings;
- a mat on which you can cut out an image;
- disposable towels.
Airbrush materials
In addition to the airbrush itself, you will need (or may need) the following materials and tools for work:
- airbrush paints;
- pipette for collecting dye;
- stencils;
- stickers;
- rhinestones;
- tweezers;
- buff;
- acid-free primer;
- sticky layer remover;
- top;
- device cleaner;
- tips for training.
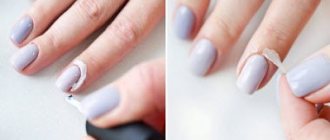
Step by step creation
Airbrushing on nails is the dream of most girls. However, there is sometimes not enough time to do such a manicure in salons, so the fair sex strives to create masterpieces at home. Having purchased all the necessary materials, it is very easy to learn how to paint with an airbrush.
Creating a simple design with a stencil:
- Wash the hands;
- Clean the nail plate from the previous varnish;
- Prepare your nails by doing a manicure;
- Sand;
- Degrease;
- Apply a colorless base;
- Select the color of the varnish;
- Apply the main shade;
- If it is gel polish, dry it under a UV lamp;
- Select a picture;
- Apply the stencil using tweezers;
- Choose a paint shade;
- Pour a few drops into the tank;
- Point the device to the side;
- Press the power button;
- View the quality of paint spraying;
- Move the device to the nail;
- Moving the nozzle further or closer, spray paint, changing the contrast;
- Turn off the device;
- Using tweezers, remove the stencil;
- The lines can be corrected with a thin brush;
- Cover the finished drawing with a fixative;
- Place your nails under a lamp to dry.
To create a more intricate and complex design, you can use several stencils and complement the design with glitter or rhinestones. If special stickers are not available, any lace fabric or mesh will do. You can do a manicure using only smooth transitions of different colors.
Expert advice
- If during spraying you do not see a stream of paint coming out of the airbrush nozzle, then everything is in order - the proportions of paint and air are correct! And if a stream is visible, the mixture is too wet.
- It is best to start by practicing on tips, a white sheet of paper - gradually working out the application technique, only then move directly to nail design.
- When painting, try to use the lightest colors first. This way you can add the next darker color faster with less cleaner.
- Before use, paint bottles must be shaken to avoid sediment. This especially applies to compositions such as “metallic”, “gold”, “silver”, etc.
If one color smoothly transitions into another and there is no visible border between them (that is, you already have a gradient!),
then it’s time for you to move on to the next, more complex stage - creating drawings using overlays and stencils.
Airbrush paints on nails
When working with an airbrush, it is best to use special paints. Airbrush paints on nails are sold both individually and in sets. There are several types of paints:
- Basic - applied to the substrate, creating the main background of the nail plate, used in ombre, for working with fabrics and prepared designs.
- Neon is a paint based on a phosphorescent pigment that charges under the influence of sunlight and begins to glow when it gets dark. For color stability, before applying paint, it is recommended to add a few drops of the base palette.
- Nude (see examples of photos of nude manicure) are the paints closest to natural colors. In the palette you can find rich colors of lime, mint or warm tones of cocoa and marsala. They are opaque, thanks to this it is possible to apply the shade to any other layer of paint.
- Mother-of-pearl – give the manicure a special look, thanks to the shimmer in the sun’s rays, the nails seem covered with fairy pollen.
When choosing paint, you should look at the grains and thickness of the substance. Good paint should be as thick as low-fat kefir, without grains or other unknown particles.
Low-quality paint liquids sometimes contain large particles that can clog the nozzle, after which the airbrush may spit or break.
The main components of the dye for airbrushing are: adhesive additives and water-based acrylic paints. Thanks to the additives, adhesion to the surface of the nail plate is enhanced, and a beautiful airbrush manicure lasts longer on the nails.
The price category of one bottle of paint varies from 100 to 200 rubles. The price depends on the manufacturer and the type of paint itself. In addition to special paints, you can use gel polishes, but before use they should be diluted with a special solution, bringing them to a more liquid state.
Step-by-step procedure
At first glance, airbrushing seems to be an incredibly simple procedure that even a beginner can handle, but the assumption is wrong. The result depends entirely on the professional skills and abilities of the master. The “Airbrush” technique consists of several stages:
- a background is created - paint is sprayed onto the surface of the nail plates;
- a drawing is applied - using a stencil or template and an airbrush, a picture is “born”;
- correction is carried out - to improve the image, the master uses a brush so that the picture sparkles with new colors, consisting of picturesque, expressive and colorful notes;
- accents are placed - to ensure the perfection of the canvas, the master decorates the manicure with sparkles, rhinestones, stones, threads, and other memorable accessories;
- a fixing compound is applied.
The painted picture on your nails is ready to see the world and captivate those around you with its extraordinary beauty!
Stencils
Blanks for creating original ornaments and beautiful designs. Stencils help create a masterpiece, even for those people who have absolutely no brush skills and do not know how to draw. Any stencils are suitable for airbrushing, both single-use and special templates for repeated application. Beginners often use disposable paper blanks; for professional use, reusable stencils are purchased.
Stencils are divided into five main groups:
- Vinyl – adhesive-based blanks that fit tightly to the nail plate, disposable.
- Paper - disposable stencils, made specifically for French, lunar design and other flights of fancy.
- Film - specially created for airbrushing, the film is translucent, allowing you to see the basic tone of the nail plate. The adhesive side does not damage the tone, and thanks to the water base, which does not dry out over time, the stencil can be reused many times.
- Metal - reusable templates made of thin metal that bends easily and is washed after design.
- Plastic and metal plates - used for stamping, do not have an adhesive base. Not suitable for airbrushing.
Airbrushing templates are often sold in small sheets containing six to 12 designs. Sometimes there are large sets of stencils in which up to 50 pieces of different kinds of images are available. The cost of stencils, on separate sheets, ranges from 60 to 100 rubles. The price threshold for sets can reach up to 1,500 rubles.
Where does a manicure begin?
Any manicure begins with the shape of the nail file. Some people like squares, others like almonds. Every fashionista eventually comes to her favorite shape. Any master will tell you that the choice of sawdust depends on many factors. And the main one is the shape and size of the nail bed. Everyone’s hands are different, and no matter how much you want to make a square on a short and wide nail plate, your fingers will turn into sapper blades. A competent master will always suggest the best option for filing your nails.
It is equally important to follow trends in nail art. For example, a stiletto sawdust and a long nail are bad manners in the fashion world. They have long evoked only one association: “chicken foot”, “eagle’s claws” or “old witch”, and hopelessly smack of “an unpaved collective farm”. Of course, if this is the New Year’s look, then it’s okay, but such nails are no longer suitable for everyday wear. Short and medium lengths are trending now. Sawdust: square, oval, squaw-oval, almond.
There are no special restrictions on colors, and in relation to design too. The only thing that stylists recommend is moderation in the use of stones, rhinestones and modeling.
Art Design Kits
Creating an airbrush manicure is a rather labor-intensive process, and selecting tools for a novice master can be quite tiring. For beginners, it is best to buy a special kit for airbrushing nails. There are several types of kits:
- Basic - which includes an airbrush device, a compressor and a hose. The average cost of a set is 3,500 rubles.
- Improved - this set may contain additional jars and stands for them, an airbrush cleaner, and a special pipette. The price category ranges from 4900 to 6500 rubles.
- Complete set - this set contains not only basic tools, but also paints and stencils. The cost of such a set is about 15 thousand rubles.
By purchasing sets you can save not only time on shopping trips, but also money. The cost of the set is much cheaper than buying the materials separately.
Technique for performing New Year's manicure with gel polish
To apply gel polish, prepare a set of devices:
- LED lamp or UV lamp for curing the varnish.
- The base coat is an undercoat for better adhesion.
- Top coat is the composition that is applied last.
- Gel polish of the desired color.
- Degreaser is a product for cleaning and treating the nail plate.
- Tools for nail processing.
- Decorative elements - apply decor if necessary.
Stages of working with gel polish:
- Nail preparation includes removing the previous coating, processing the plate with tools to give the desired shape, treating with a buffer, and degreasing. The technique is visible in the photograph.
- Applying a base layer followed by curing with a lamp.
- Applying the base coat of gel polish. The brush is led from the base of the nail to the cuticle. The first stroke is in the center, the other two are on the sides from the beginning of the plate to the edge.
- Then the “sealing” operation along the end of the nail. Drying with a UV lamp. If necessary, repeat the process with a different or the same color.
- Top coating. The technique is the same as for the main layer. Drying with a lamp.
- Degreasing with the composition, alcohol, ZhDSL without acetone. The sticky layer is removed.
- Treatment of cuticles and finger skin with cream.
Manicure ideas
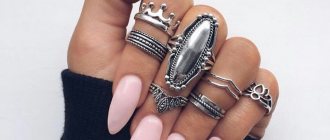
For young girls, it is best to use bright color shades of varnishes, with neon paints and stencils in the form of flowers or intricate patterns.
For those who want to emphasize their romance, you can use pink polish as a base, apply glitter powder on top, and finally paint the silhouette of a cat, angels or hearts on several nails with white paint.
Fashionistas are best suited to futuristic solutions that combine brightness, sophistication and an unusual arrangement of various designs.
For an everyday day, you can use light transitions of pastel shades of paint, complemented by drops of glitter or rhinestones. If desired, the manicure can be supplemented with an image of the zodiac sign on one nail.
For dreamy people, you can create a galaxy, starry sky, milky way on your nails, or zodiac constellations on each nail separately.
In spring, you should stick to rich green shades, with leaves or grass on each nail.
For the winter period, craftsmen recommend applying a colorless base, and using stencils and light paints to paint snowflakes. You can apply a fine mesh along the edge of the nail; this option will look more effective.
To lift your spirits, a rainbow manicure is best, combining bright colors with various geometric shapes, stripes or spots. You can complement it with sequins, rhinestones or glitter.
French manicure can be given luxury by using a delicate flower coming out from the side of the nail plate, for a delicate execution, you can make a pattern of several flowers on one nail. It is advisable to make drawings with light colors.
Design options
Using an airbrush, you can create a unique nail design that will fit into any look. The following options are considered the most popular:
French manicure or Baby Boomer
- done using sticky strips and (or) a gradient, best done on medium or long nails.
Ombre
- looks ideal on short nails, goes well with rhinestones, bouillons and other decorative elements.
Lunar with gradient
- suitable for any length, creates a feminine look, combined with glitter and sequins.
With stencil
- the easiest to implement, saves time, creates a neat and attractive design.
Small thematic images
- usually painted on one or two nails, the drawing technique is simple, suitable for any holiday or celebration.
Geometry plus gradient
— suitable for any nail length, creating clear lines and shapes.
Any, even the simplest nail design can be made unique by creating additional details using acrylic powder, rubbing, beads, broths, etc. Don’t be afraid to experiment!
Education
In order to learn how to use an airbrush and work with stencils, it is best to attend airbrush lessons on nails. There are various training programs which are divided into basic course; advanced and complete. The basic course can be completed in one day, mastering the skills of working with the apparatus, varnishes and paints. The full and advanced course will take several days to attend.
In the advanced course, you can learn how to create multi-level designs, combine several manicure designs, and use two airbrushes at once. The full course is needed for people who plan to teach people the art of artistic painting.
The price of training varies depending on the school and the city where classes are held. The average cost of one lesson is 2500 rubles. In most schools, you need to have tools and supplies for work.
New Year's design for long nails
There are such anatomical features of the hand when a large nail length is not a whim, but a necessity. For example, short fingers that need to be visually lengthened. Or a wide nail bed, which can easily turn into a “seed” if you make an almond shape. Then, of course, a longer length is recommended. But what scope for imagination! Anything is possible: a New Year's landscape, cute cartoons, beautiful monograms or chic inlay with stones.
The long length of the nail allows you to combine different design techniques. For example:
- Foil + spider web + rhinestones;
- Gradient of several colors + rubbing + artistic painting;
- Artistic painting + inlay with stones or rhinestones;
- Geometry + stripes + glitter + stones, rhinestones or bouillons;
- French + stamping,
- Airbrush;
- Printer design.
There are countless options! An undoubted advantage is that the design is not overloaded with decorative elements.
Gold manicure with design: better ideas in 2021-2022
If you are at a loss and don’t know which design option to suggest to the nail artist for implementation, we offer the most fashionable and current ideas.
French with gold
Who said that a classic design has to be exclusively sheer white or nude? The golden tip of the nail will not make the plate look heavy, and the classic clear polish will make the nail look longer and more sophisticated.
Lunar manicure in the style of gold precious metals
Lunar design is on the top nail art lists almost every season. This is not surprising - you can do it yourself, there are no strict rules. All that matters is the imagination of its owner or master.
We advise you not just to cover the holes with varnish in the shade of a precious metal, but to highlight them with the help of rhinestones and sparkles. but the base can be anything.
Metallic effect on nails
Nails that look like they're covered in liquid metal? This design is easy to implement. You will need rubbing powder, foil or gel polish of the appropriate tone. If you are planning a holiday, the coating can be applied to all nails. For an everyday manicure, it is worth highlighting just one or two fingers on your hand in this way.
Advice: when implementing an idea yourself, you should choose powder. It is easier to apply and the end result will definitely not disappoint you.
Golden transitions - ombre or gradient
Ombre or gradient is an assistant in creating any look - festive or everyday. In the first case, a contrasting color of varnish is chosen as a partner to gold - black, blue, red, bright white and others. For everyday design - nude, milky, pink and other tones.
You can make a smooth transition yourself. Glitter or special acrylic paint-varnish are perfect for this.
Tip: start from the hole of the plate, gradually applying glitter or varnish. Adjust the density of the coating, tapering it off towards the tip of the plate.
Golden geometry - shapes, stripes and dots
An excellent option when you need to create a spectacular and unpretentious decor. In addition, the geometry will help visually lengthen the plate.
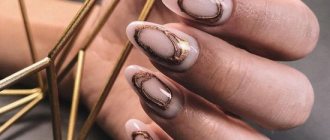
Lace patterns and openwork monograms with gold
This decor looks great on polishes that are considered the most fashionable this season. You can draw monograms and patterns yourself (with proper preparation), use a stencil, stamping or stickers.
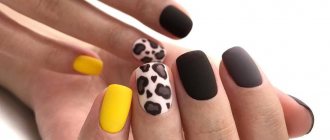
Matte gold on nails
We are accustomed to the bright shine of noble metal. What if you tone it down a little and make the finish matte? Then we will get a top nail design. For a matte finish, you can use a special varnish-paint or simply apply a matte top coat.
Gold rub with mirror effect
Mirror or holographic gold designs are most often seen on the nails of Hollywood celebrities this season. But it is accessible to every nail art lover. For a mirror design you will need powder or foil with the appropriate texture.
Gold stickers
The simplest and fastest gold manicure design. You can do it yourself, and the number of decals that are presented on the nail art market is simply beyond counting.
With gold leaf or foil
Foil and gold leaf (the thinnest sheets of metal imitating gold leaf) are the most common materials used for golden-style nail designs. It is not necessary to completely cover the plate with it. If desired, you can apply small pieces to the selected base and secure on top with a top coat.
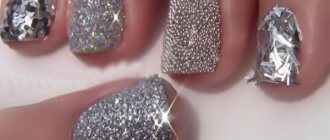
With sparkles or rhinestones
Glitter and rhinestones are a way to create a festive nail design or make everyday ones more fun. But don’t go overboard and apply too much decor. There is a great risk of making the design tasteless and heavy. It is better to highlight one or two fingers on your hand in this way. This will make the design balanced and appropriate.
Advice: be careful when gluing rhinestones to the tip of the plate. This may damage the edge and break the nail.
What do you need for nail art?
An airbrush is a “gun” or “pen” with a small container for paint. The kit includes a compressor as a pump and hoses that connect these devices. The principle of operation is to supply compressed air to the “gun”, which sprays paint onto the area of the nail plate.
A typical airbrush kit includes:
- hose, compressor, airbrush;
- tips for training;
- acrylic paints diluted with water;
- tweezers with sharp tips;
- stencils for painting;
- mask and gloves;
- paper towel;
- mat for cutting stencils.
Stencils are available in an assortment - with designs of lace, animals, floral motifs, geometric and abstract figures. Ordinary paper tape can turn into the embodiment of the master’s own artistic ideas.
Beautiful gradient manicure 2022
The popularity of gradient manicure not only does not lose ground, but also continues to gain momentum in 2022. Color transitions are still at the top of their popularity. The palette of shades is quite wide - from calm and unobtrusive to bright and bold. A completely unexpected trend awaits us in 2022. This is the effect of a damaged coating that could be observed on the models’ nails. This option is not suitable for scrupulous people, since at first glance it creates the feeling of an imperfect manicure. You've probably already heard about this fashion trend. The caviar effect on nails is achieved through beads, which can be of different colors or sizes. A spectacular volume is created that looks quite fresh.
Popular color combinations for 2021-2022
Nature has given us a huge variety of shades. For each, there is “her” shade and combination in the palette. At the same time, each season gives lovers of nail art “crown” colors and shades, without which fashionable nail design is simply unthinkable.
White with gold
The combination of white and gold is a tandem of purity and sophistication. As a rule, a white base is used in the design, and the decor is done in gold. The optimal manicure option is a golden French or moonlit manicure.
Red with gold
Bold bright color combination. This manicure will definitely attract attention.
Dark reds combine most effectively with a shade of noble metal:
- Bordeaux;
- cherry;
- Marsala;
- blood red.
There is a huge field for flight of fancy here - a red or golden base, highlighting the tip of the plate, the hole, applying a pattern - the design depends solely on the appropriateness of the manicure and the desires of the woman.
Beige and nude shades with gold
Gold is not necessarily used to complement contrasting bright colors. You can make your manicure more noticeable and sophisticated, but discreet, by combining gold with beige or delicate nude tones of varnish. Any manicure technique is suitable for design here.
Tip: to dilute a natural nude manicure, you should highlight one finger - cover it with gold foil, rubbing powder, or apply a design.
Pink with gold
This design option actually combines two shades of gold - the usual yellowish and noble pink. The first will be a good way to diversify your everyday manicure or make it more festive if necessary.
Black and gold
By combining the color in question with black, you can get a truly chic nail design. Gloomy black will be the perfect base for any type of decor. You can take any base - shiny gloss, matte field or flock coating.
Blue and gold manicure
The combination of deep blue and gold is a royal design. Choose dark shades of blue and your manicure will definitely attract all eyes. The coating can be anything - matte or glossy.
Burgundy manicure with gold
It is worth highlighting this shade of red separately. In combination with it, the gold design looks very elegant, expensive and stylish. Rubbing, foil, drawings, rhinestones are suitable for it.
Tip: glitter in this version should be used with caution (we’ll include kamifubuki here). There is a great risk of making tasteless and rustic nail art.
Blue shades with gold
A palette of heavenly shades combined with gold motifs will allow you to achieve a wide variety of effects:
- ultramarine and other bright colors - for summer and parties;
- dusty blue (and other pastel shades) - for everyday manicure;
- deeper muted ones - evening and formal design.
Green and gold
Natural shades of green in combination with gold are one of the best nail design options for the 2021-2022 season. Bright colors are pleasing to the eye and suitable for summer and spring. In winter, with the help of this tandem you can bring to life a New Year's nail design.
Tip: for everyday manicure, you should dilute this combination with another varnish - transparent, white.
Gold with silver
Two bright shades of metal can be combined in one nail design. This is especially true if you need a holiday manicure. It is important not to overload the nails, so use transparent, white, black or another color as a base.
Raspberry with gold
Another option for a juicy and amazingly beautiful color. The raspberry hue is brightness, berry summer and sun.
Beautiful French manicure 2022
An undisputed classic of the genre that has not lost its popularity over the years. Classic pastel and transparent shades have already begun to “give way” to brighter colors in past seasons. In 2022, this range is further expanded, with eye-catching color combinations being used. The contrast of matte and glossy varnish is also in fashion. French manicure 2022 becomes deeper, the smile line can extend more than the middle of the nail on the sides, of course, provided that the nails are long. This is also explained by the fashionable shape of nails in 2022 - oval or almond-shaped. On a transparent or pinkish base, stripes of black, burgundy, gold and silver, dark green or deep blue will look great in the amount of not only one, as nature intended, but also two or three. Bright, contrasting colors have also not been canceled. You can create nail art with soft greens and oranges, or even paint all your nails with combinations of different nail polishes. Also in the French design of 2022 there is some simplicity and carelessness, for example, the free edge is not drawn carefully, but is done with two movements of the brush in the direction from the edges to the middle of the nail. This is where fashionable sharp angles come from - another trend this year for your nails.
Latest articles about fashion and style
Manicure ideas 2022 photos
White manicure 2022 photo
Golden nail design 2017