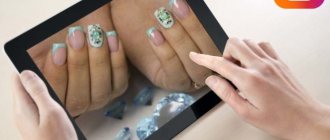
When a beautiful manicure appears on our nails, we have an irresistible desire to photograph it! And masters generally need to constantly replenish their portfolio and shoot their work on clients. But for some reason, photos often not only do not convey this unearthly beauty, but distort perception: nails on a phone or camera do not look attractive. Why is this happening and what to do? How to properly photograph a manicure for a master and a client? Let's find out in the article! We also talk about the main mistakes when photographing nails.
Why is it important to photograph your nails correctly?
Taking winning nail photos is very important because:
- beautiful works will help the artist attract new clients;
- with their help you can get a correct idea of the high quality of the master’s work;
- images will contribute to building the image and personal brand of the master;
- they will distinguish the master from his competitors;
- if you are not a nail artist, then beautiful photos of a manicure will add attractiveness to your social networks and serve as an indicator of your excellent taste;
- also beautiful photos often serve as a source of inspiration and new ideas for other users;
- As a bonus: once you learn how to take high-quality photographs, you can go further and become a professional photographer.
Portfolio: what beginners should know
A portfolio will help a manicure salon or nail artist:
- Demonstrate the level of work, attract attention. A portfolio is a business card;
- Get new clients;
- The style of photographs can appeal to the interests of different target audiences;
- Promote an account on a social network.
Therefore, the quality and style of photographs in your portfolio are very important.
To create a portfolio you will need:
- smartphone or camera;
- models for shooting;
- good lighting;
- good background, accessories;
- photo processing programs;
- the knowledge you will gain after reading.
Also decide where to place your portfolio: on social networks, on your own website or a specialized service, such as Portfoliobox. It is better to place it on all platforms available to you. Most often they use Instagram.
Selecting hand position
Are there win-win hand positions that will always look good on camera? Yes! Here is a list of them.
Raise your hands up
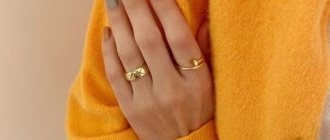
You can raise your hands up, interlace them elegantly and place them in the center of the frame. Decorate your fingers with massive jewelry and don't forget about bracelets!
Hands on face or chest
Bring your hands to your face or fold them across your chest and spread your fingers. In this case, it is better to opt for plain clothes in calm colors.
Interlace your fingers or place your hands side by side
Interlace your fingers beautifully, place them in the center of the frame and remove everything unnecessary from the background. Or repeat the classic pose with your hands relaxed next to each other or one on top of the other.
Spontaneity and dynamics
Photos that seem to be taken by chance look very advantageous: for example, in motion, with a hand straightening your hair or covering your mouth while laughing. You can also take pictures as if you were dancing: put your phone on a self-timer and perform smooth movements.
Love
Pictures look great when lovers hug or hold hands, with the emphasis on the girl’s fingers and, of course, her impeccable manicure. Another option: extend your hand with the engagement ring forward.
Technique for doing it at home
Manicure without coating (price 400–750 rubles) with the classic (edged) version is available at home. All tools are affordable and will last a long time.
Even a beginner can master this technique by sequentially performing the following steps:
- Lifting the cuticle.
- Opening and cleaning of the subcuticular space.
- Shape sawdust.
- Applying remover.
- Maceration.
- Deep cleaning of the pterygium.
- Removal of rough skin.
- Cuticle cut.
- Applying oil.
The mandatory sterilization step cannot be performed at home. Therefore, all instruments are used strictly individually, in order to maintain hygiene. Even the safest manicure can cause harm and injury. Excessive pressure, depth, pressure or angle of the instrument can damage the matrix and nail plate. Each stage has its own characteristics and requires a more detailed analysis.
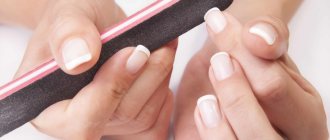
Removing old coating
Removing the old coating is a mandatory step and can be done in two ways: sawing and soaking.
The choice of method depends on the following factors:
- nail conditions;
- material rigidity;
- material thickness;
- available tools.
Soaking involves soaking the artificial surface with a liquid containing a solvent. Varnishes that dry in the open air are wiped with a cotton pad soaked in liquid. It is enough to apply it for 5-10 seconds. The service of coating nails with gel polish is very popular in salons.
When coating with leveling, a layer of base coat is applied under the color coating, forming the correct architecture of the nail. The thin layer and structure of the material allow a special liquid to saturate and soften it. You must first file the top coat and the end with a file for natural nails. This will reduce the soaking time to 15–20 minutes.
A cotton pad cut into several triangles is soaked in removing liquid. Each piece is attached to a nail using foil. The softened coating is scraped off with gentle movements from the surface of the nail. Residues are removed with a buff of soft abrasive. The material must be removed in the direction from the cuticle to the free edge.
When modeling nails, harder materials that cannot be soaked are used.
In this case, it is necessary to note the sawdust technique. For an experienced craftsman with a router and carbide cutters, the procedure will take no more than 20 minutes. To remove the coating at home, you will need a coarse abrasive file and a longer period of time.
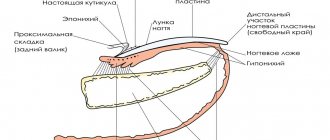
Cuticle treatment
First of all, the cuticle needs to be lifted. Light movements of a pusher or an orange stick push it towards the proximal fold. This stage makes it possible to open the subcuticular space, which will allow for a deeper cleaning of this area. Nail technicians recommend that beginners perform lifting in several passes, moving from the sinuses to the center of the nail. The resulting pocket must be cleaned of dry pterygium and adhesives adhering to the nail plate. To do this, short stroke movements are made along the cuticle line from the sinus to the center of the plate.
Before putting your hand into a bath of warm water (water temperature no more than 30–40 C°), modern manicurists apply a cuticle remover. This thick liquid is designed to soften the cuticle and make it easier to remove later. The water in the bath should not be hot, and the exposure time should not exceed 10-15 minutes. Otherwise, when cutting the cuticle, the border of keratinized and dry skin will be poorly visible. This increases the risk of injury.
Using the previously described technique for cleaning the pterygium, it is necessary to clean the subcuticular space and lateral sinuses. Moistened keratinized skin is removed from the lateral ridges and sinuses. To do this, use the selected type of cutting tool, positioning it parallel to the growth of the nail. Moving on to cutting the cuticle, you need to change the angle of the cutting blade. Its lower part is placed under the cuticle, and the instrument is turned across the growth of the nail.
After completing the treatment of all 10 nails and the manicure as a whole, it is recommended to apply vitamin oil to the cuticle area. The composition will moisturize the skin and cushions, extending the wear time.
In addition to processing the cuticle, an important point is to remove dirt under the free edge. Many beginners, trying to achieve the perfect manicure, aggressively clean out the hyponychia. This layer between the skin and nail is the body's protective reaction. It prevents bacteria from entering the subungual space. Mechanical damage to the hyponychium leads to increased growth. You can use a stiff bristled brush to clean this area.
Grinding
Sanding with a buff is used before soaking the skin and after it dries. After opening the subcuticular space and cleaning the dry pterygium, this area is processed with a grinder. The nail is cleaned with long movements (in one direction) from one side fold, along the cuticle line and to the other.
After drying, the sander is used before polishing. This stage allows you to smooth the edges of the cuts and visually smooth the surface of the skin around the nail. Sometimes manicurists use a natural nail file to polish dry, rough skin on the side ridges. For hyperkeratosis, stripping will reduce the treatment time for these areas.
Polishing
As a rule, the nail plate is covered with an artificial colored material, and then with a finishing material to add gloss. When performing a manicure without coating, the effect of shine and smoothness is achieved by polishing. A polisher is a device that is soft in structure and has a flexible base. Due to friction, its abrasiveness allows you to safely polish the natural nail plate.
Shaping your nails
A natural nail consists of flat, dry plates layered on top of each other. Its properties resemble a sponge. After being saturated with liquid, the scales rise. It becomes more loose, flexible and vulnerable.
By filing a wet nail, the abrasive of the file aggravates the splitting of the scales among themselves. After drying, the free edge may crumble and delaminate. It is for this reason that the filing of the natural nail plate is always carried out before moisturizing.
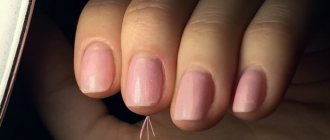
Manicure without coating: at the final stages you need to shape the nail, as in the photo.
The most practical to wear are the following forms:
- oval;
- round;
- squaw oval;
- soft square;
- almond.
Shapes such as a sharp square, stiletto, ballerina have sharp corners and can cause discomfort when worn.
Hydration and nutrition
Manufacturers of nail service products offer a wide range of different products for the care of natural nails. Before purchasing and using them, you need to understand the structure of the nail. The nail consists of onychoblasts - white cells that form at the root of the nail.
At the beginning of their journey, they are round in shape and filled with liquid. As you move along the plate, its shape becomes flatter and drier. Layers of dried and flattened onychoblasts stick together to create a nail. These cells can be called dead.
By forming onychoblasts, the matrix receives nutrition from the body. Therefore, to improve their quality, it is necessary to improve the overall condition of the power source.
To improve the condition of your nails, it is recommended:
- rejection of bad habits;
- healthy eating;
- healthy sleep;
- consumption of vitamins;
- playing sports.
A healthy body is a complete source of nutrition not only for the skin and nails, but also for all body systems. It is not possible to influence the nutrition of dead nail cells.
The closer they are to the free edge, the worse the connections between them. This is why the end of the nail often delaminates and breaks. The main task of various nail care products is to reduce the influence of the external environment on them and improve their visual condition.
Every day, nails are exposed to various factors:
- water;
- household chemicals;
- Sun rays;
- mechanical impact;
- aggressive environments.
Special oils penetrate between the nail scales and soften them. A moisturized nail has better flexibility and is less prone to breakage. A similar effect is achieved by various nail polishing pastes. After applying the composition to the plate, it is rubbed in with a polisher or a suede file. The composition heats up due to friction, and paraffin particles are distributed between the scales. Such sealing improves their adhesion, protecting them from the influence of moisture.
It’s hard to imagine a modern woman without a manicure. The abundance of artificial materials, techniques for their use, and a wide color palette of gel polishes for coating make it possible to realize the most daring ideas. The cost of such experiments may be a deterioration in the condition of the nails. This is why classic manicure techniques remain consistently popular.
Attributes and details for manicure photographs
There are also items that can decorate any photo and highlight a manicure!
Massive mug
It is advisable that it contains something very tasty: coffee or cocoa with marshmallows, ice cream... Grasp the cup - a beautiful shot is ready.
Fashionable clothes, accessories
Photos of girls holding a clutch or branded bag in their manicured fingers always look stylish. You can also accidentally touch the collar of your coat with your brush.
Materials used to make the manicure
Just grab the bottle of polish.
Face
Flirtatiously cover your eyes or mouth with a brush.
Decorations
Handle beads or clutch a stylish bracelet.
Features of shooting on your phone
In good lighting, the smartphone automatically takes good quality photos. But sometimes there is a “failure”, and unnecessary yellowness or darkness appears, or a lack of sharpness.
When filming with your phone camera, pay attention to the following recommendations:
- Instead of the standard camera, you can download other applications with more interesting color rendering. Popular programs for Android include Open Camera, HD Camera, Retrica, A Better Camera, and for iPhone – ProCamera, VSCO, Halide;
- The nails in the resulting picture should be in the center. To do this, use the crop mode. It looks like a sizing chart with a centering button. Touch this button to make the camera better focus on the desired area;
- Remove the matte gel polish coating from above, and remove the glossy and shiny coating at an angle to catch the glare;
- Do not use digital zoom, this will reduce image quality;
- It is better to refuse standard built-in filters if you want a high-quality and aesthetic photograph. You can always add effects, if needed, later, during processing.
Background for photo with manicure
Of course, the focus of the frame is on our hands with our beautiful manicure, but the background gives an additional mood to the photo, it’s also important not to make a mistake here! We have made for you a selection of the most successful “backstages”.
- White background: wall, whatman paper, etc. Minimalism and nothing superfluous.
- A small author’s abstraction: you can add strokes of watercolor or other paints to whatman paper.
- Wood or marble - elegant and beautiful. You don’t have to go to a village hut or a museum; you can buy a background at a photo store or even at a construction store (self-adhesive).
- Blanket: the cozier the better! Nature: water, grass, flowers, forest. This is always a good background.
Shooting with a camera
The quality of pictures is affected by 3 important camera settings:
- diaphragm;
- excerpt;
- photosensitivity.
The aperture is responsible for the flow of light entering the camera sensor. On the camera display, the aperture is indicated as follows: F/number. The lower the number after the letter F, the more open the aperture, which means the shallower the depth of field. This allows you to highlight your nails in the photo against a blurred background. If you don’t want a blurred background, increase the number indicating the aperture.
Shutter speed is the time required for light to hit the sensor. A long shutter speed is needed when photographing a subject in motion so that the photo does not turn out blurry. But in our case, we are shooting the hand in a fixed position, so it is better to keep the shutter speed short.
on the photosensitivity (ISO) . The lower the value of this parameter, the less noise there will be, and the picture will be of better quality. Typically, high light sensitivity is needed when shooting in a dimly lit area.
Changing one of these parameters usually automatically changes the others.
For photographing marigolds, the automatic “macro” mode is perfect, usually a button in the shape of a flower. This way you can convey the texture of the coating in the smallest detail in the photo. It also gives a soft background blur.
The advantage of the camera is that the lens automatically focuses on the object we need.
Basic rules for manicure photos on a smartphone
The smartphone is now the most popular “photo camera”, it is always at hand and the shooting quality of modern devices is excellent! There are some rules on how not to ruin a photo with a manicure:
- It is better for the subject to be photographed in the center. To do this, set the framing mode to grid;
- the most advantageous light is daylight;
- We advise you not to use a flash - it will make the frame either too white or yellow and certainly does not contribute to the natural transmission of light;
- missing props? Follow the rules of minimalism and remove all unnecessary objects from the frame;
- Be sure to wipe the camera glass before shooting; do not forget to moisturize the skin of your hands and cuticles with a special cream or oil before shooting.
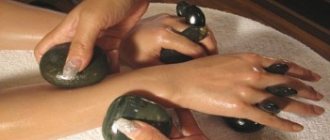
Benefits and recommendations
A manicure without coating (the price of which depends on the type chosen) is attractive because it saves time. The average time for performing a hygienic manicure is no more than 30 minutes, and methods with coating or modeling take at least an hour. Each of the previously listed types of manicure without the use of artificial materials has its pros and cons. Its selection depends on the individual characteristics of the nails, their condition, skin type, and the desired result.
A brief description of the types of procedures, techniques for performing them, and features are presented in the table:
| Type of manicure | Description | Required Tools |
| European | The process involves filing the shape of the nails, soaking them, removing the pterygium and glues. The cuticle moves towards the proximal ridge. |
|
| Saw | Performed on dry skin with a soft abrasive file. With its help, keratinized skin, cuticle, and adherent pterygium are cleaned. |
|
| Classic (edged) | Shaping is done on dry nails. After which the skin is soaked, the pterygium is removed, and the keratinized skin and cuticle are trimmed. |
|
| Hardware | It is performed with a special apparatus (milling cutter) and a set of cutters of various shapes and abrasives. |
|
| Combined | It involves removing the pterygium, processing the ridges, and lifting the cuticle with a device. The treated cuticle is cut using cutting instruments. |
|
European and file manicures are the most gentle and atraumatic. Performed without cutting instruments that require sterilization. They are suitable for thin, slow-growing cuticles and the absence of hyperkeratosis. To perform this you will need a minimum set of tools. The main disadvantage is the short wearing period of the manicure.
Manicure using the device is deeper, more durable and suitable for all skin types. However, in addition to the large list of necessary equipment and tools, it will require a lot of development and practice.
Otherwise, you can injure your skin and nails. This can lead to thinning, deformation and other irreversible consequences. The middle link is the classic edged manicure. It requires minimal skills in using manicure tools and can be done at home. Manicure wear period is 10–15 days. The main disadvantage is the need to use soaking. Frequent exposure to water is not suitable for weak and thin nails.
Photo rules for masters
It's one thing if you photograph your nails for yourself, but quite another if you're a nail artist and you need to take the best photos of your masterpieces for your portfolio.
- Do you sign your works? Make sure that the inscriptions are consistent across all photos: the same font, style, etc.
- It would be better if all your photos on social networks were in the same style.
- To do this, you can select a specific set of presets in a particular photo editor.
- Follow the trends: what accessories do photographers use for photography, what is popular?
- Doing a themed nail design? Why not choose a themed background? For example, a manicure with ice cream against a background of ice cream, etc. And be inspired by new beautiful photographs, constantly drawing ideas for gorgeous shots!
Required Tools
Almost every woman has the tools already listed earlier in the table, or some of them. Each of them has its own purpose, application and processing features.
What do you need:
- An orange stick, like a metal pusher, is designed to lift the cuticle and open the subcuticle pocket. It is made of wood and is disposable. It is considered safer for the nail when cleaning pterygium from the surface of the nail plate under the cuticle.
- The pusher is similar in functionality to an orange stick. A special feature of the tool is the ability to choose the shape and size of its spatula. Most often, there is a sharp, flat device on the opposite end of the pusher to clean out the sinuses.
- It is preferable to choose cuticle scissors with long thin blades, slightly rounded (anatomical) in shape. Depending on individual preferences, they can be replaced with tweezers. The sharpening of these tools should be as sharp as possible, so it is better to have a second copy for cutting nails and rough skin.
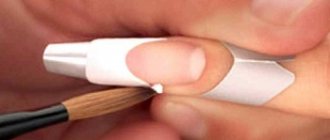
- Natural nails must be filed using soft abrasive files. Manufacturers of this product offer disposable full-fledged files on a soft base or replaceable files on an adhesive base. The files are attached with the sticky side to a special metal spatula.
The metal instruments used are subject to mandatory sterilization in a dry-heat oven.
Common mistakes when photographing nails
You need to know the enemy by sight! Let's identify the most common mistakes when photographing nails and try to avoid them:
- don't tense up - this applies to any pose you choose! The hands and fingers that look the worst are those that are “toned,” and besides, the veins are clearly visible on them, which obviously does not decorate the picture;
- do not press your hands too hard against the surface on which they lie; do not photograph your nails from the tips (tips towards the camera) - this can distort their shape;
- do not clutter the background: less is more;
- do not overuse filters: beautiful processing is great, but you should not change the colors;
- do not apply too much oil to the cuticle before shooting;
- maintain a normal distance between the camera and your nails: do not photograph too close or too far;
- as if spontaneous shots are great, but not when it’s unclear what the frame depicts. The manicured hand should be clearly visible.
We hope our review was helpful and you will create an amazing portfolio of your amazing work! We wish you beautiful manicures and photos.
You can also buy a package of webinars from the ParisNail school and upgrade not only your photography skills, but also your Instagram!
Features of manicure without coating
A manicure without coating, the price of which depends on the method of execution, is a set of nail care actions.
When performing any type of manicure, the master pursues certain goals:
- giving a well-groomed appearance;
- removal of pterygium;
- removal of keratinized skin and hangnails;
- cuticle treatment (removal in some techniques);
- correction of deficiencies;
- sawdust forms;
- plate restoration.
A manicure without a color coating or other artificial material is significantly cheaper.
Its price varies between 450-1500 rubles, and depends on many factors:
- method of execution;
- cost of tools/equipment;
- prestige of the salon;
- availability of care procedures;
- cost of care products (oils, vitamin complexes).
Fans of this procedure have the opportunity to choose a technique that meets their requirements.
Nail service experts distinguish the following main types of manicure:
- European;
- classical;
- sawing;
- hardware;
- combined.
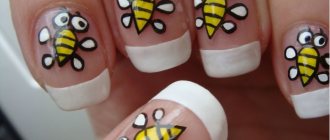
Fashionable manicure ideas for wide nails
Often girls, in fear of ruining the appearance of their nails, are afraid to place emphasis on wide nails, preferring a plain coating. Perhaps this is the right choice for boring everyday life. However, if you want to lift your spirits with careful hands, and also add thematic elements to your look, don't be afraid to experiment with design.
To make it easier for you to decide on the design, we offer you ideas for a fashionable manicure:
- Draw three vertical stripes of the same color, for example, pink. Stick or draw butterflies of different sizes on top. It is better to choose small patterns so as not to overload the design.
- A gradient manicure looks festive . Leave the bases of your nails transparent and sprinkle the tips with small red glitter in a chaotic manner.
Gradient manicure looks festive
- Don't forget to play with textures. Glossy, velvet and matte finishes look good on wide nails. Only it is better to make velvet in a single color, for example, bright blue.
Glossy, velvet and matte finishes look good on wide nails
- Moon manicure is suitable for nails of different shapes, lengths and widths. Carefully highlight the holes with white, and paint the main part of the plate in fashionable turquoise.
Moon manicure is suitable for nails of different shapes, lengths and widths
- One of the options for a positive summer manicure is a French manicure with multi-colored smiles on each nail in combination with a black leopard print. Perform the design only on one side of the nail, adding a drop of varnish in the middle of the black one in the same color as the tip.
When choosing a nail design, consider the appropriateness of the manicure.
When choosing a nail design, consider the appropriateness of the manicure. For the New Year, add a pointed snowflake or a deer with long antlers to your decoration. For Easter, instead of eggs (a round ornament will expand the plate), give preference to bunnies or spring flowers. Any themed manicure always looks relevant and unforgettable.
Any themed manicure always looks relevant and unforgettable.
Manicures for wide nails can be quite varied
Fashionable prints, different design techniques, drawings, stickers, rhinestones are allowed
As we can see, manicures for wide nails can be quite varied. Fashionable prints, different design techniques, drawings, stickers, rhinestones are allowed. Don’t be afraid to experiment, taking into account our tips, and you will get a delightful holiday manicure and decorate your everyday life with neat nails.
Don't be afraid to experiment
Brighten up your everyday life with neat nails
Advice! Remember that the manicure should match the style of the event and match your outfit.
The manicure should match the style of the event and match your outfit.
Errors
The most common beginner mistakes:
- Abuse of processing, filters. They are designed for easy adjustments, not redoing the entire frame.
- Oily skin. The cuticle needs to be moisturized with oil. But in the photograph the greasy shine does not look presentable.
- The camera distance is too far or too close. The first option can confuse viewers: is this a shot of a manicure or a table with a hand accidentally included in the frame? We recommend holding the camera 50 cm from the subject, or a little closer.
- Mixing natural daylight and lamps is simply a crime. Choose one.
- The glare is too big. Let them be light and unobtrusive, not covering the entire nail plate.
- Inappropriate background. Maybe your background is too colorful or glossy. Do the accessories look awkward? Take them away, and with time and experience the ability to work with additional attributes will come.
- The lens is dirty. You need to wipe your camera lens or the back camera of your phone. Because of this, the quality of the pictures may suffer.
Write your opinion or question in the comments!
Features of photographing the work of a pedicurist
Comment