Strengthen nails
Our nail plate consists of keratinocytes, which make up its frame. They are like roofing on a roof. When the gel manicure is removed, the top layer of the protective “roof” is also removed. Therefore, nails become weak and brittle.
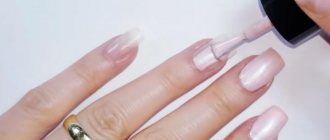
Your task is to strengthen their frame. This requires special medicinal varnishes, BB nail creams, serums with calcium and vitamins. Therapy may take two weeks. During this time, you cannot do a gel manicure or use regular nail polishes.
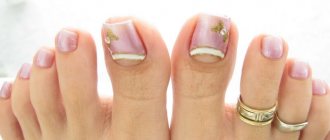
Toenail prosthetics for fungus
Nail prosthetics for fungus is a modern way to restore the aesthetic appearance of your feet. When fungus occurs, the nail plate is often severely damaged, and growing a new nail is a rather lengthy process. If you are not ready to wait for a new nail to grow, pay attention to prosthetics. It is absolutely safe and does not lead to relapses. Before prosthetics, the nail is treated with a special compound - it will not allow the fungus to multiply under the artificial nail.
Important - prosthetic toenails are performed only after complex treatment!
Take care of the cuticle
When gel polish is dried under a UV lamp or removed with a special liquid, wrapping the nails in foil, this greatly dries out the cuticle. But underneath there is a soft nail (the living part of the plate), which requires nutrition.
For moisturizing, hand creams and serums with allantoin and collagen are suitable, as well as cuticle oils based on apricot or olive with vitamins (primarily vitamin E). Oils not only moisturize it well, but also nourish the soft nail, stimulating the growth of strong and healthy nails. After applying oils, massage the cuticle area.
Once a week at night it is recommended to wear hand masks (they are sold in cosmetic stores). They deeply nourish and moisturize the cuticle and skin of the hands. The main thing is not to cut the cuticle, so as not to damage it.
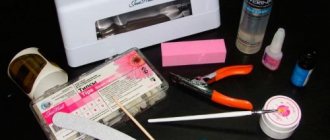
Required tools and materials
Before you add nail extensions, you need to prepare several different tools and products. Standard extension kits may include the following items:
- Gel coating or polygel - transparent or colored. It can be one, two or three phase. Depending on the type, it includes a base, modeling coating and finish. Similar materials are used for gel manicure.
- Acrylic coating - the composition of its powder must be without foreign additives.
- Forms for applying gel to them - suitable for short nails.
- Tips are artificial plates of various sizes.
- Nail polish remover - you need to have your own liquid for each chosen coating (acrylic or gel).
- UV or LED lamp.
- Files of different hardness - softer tools are used for artificial turf.
- Liquid for disinfection.
- Cuticle pusher. The classic option is a tool made of steel.
- Hard synthetic brushes for plate shaping.
- Buffs for polishing and smoothing. Polyethylene foam also copes well with this task.
- A brush that removes nail dust. Must be made of artificial material.
- Primer for degreasing - prevents the detachment of foreign coating.
- Cleanser - eliminates the sticky layer after applying the gel.
- Glue for pedicure when using tips.
The result of the extension directly depends on the quality of the materials. When using low-grade components, there is a high risk of getting uneven coating and a noticeable transition boundary. You should also not forget about the careful preparation of all instruments, especially their disinfection.
Materials and tools for extended pedicure
Go through salon treatments
If the situation with your nails is completely deplorable (they break almost from a blow of wind), you should contact a specialist. There are a number of salon procedures that strengthen nails well, and at the same time improve the condition of the skin of the hands.
For example, a preparation based on honey and beeswax is applied to the nails; the substance forms a protective film on the surface of the nail plate (simulating a layer of keratinocytes). The procedure must be repeated several times over two weeks to achieve the effect.
Chocolate wrap is even nicer and healthier for nails: melted chocolate is applied to the nails and skin of the hands for 20-30 minutes. Cocoa butter nourishes the skin and restores damaged nail plates, while you enjoy the aroma.
Symptoms of nail burns from gel polish:
- Onycholysis (detachment of the nail from the bed). This is the most common and sometimes the only symptom of a burn. It develops within a few days (and sometimes weeks) after visiting a beauty salon. Often it is not noticed for a long time under gel polish, and sometimes it is ignored during repeated treatment, aggravating the course.
- Subungual hyperkeratosis develops along with onycholysis - the detachment cavity is filled with keratin, which leads to thickening of the nail.
- A change in the color of the nail is another companion to onycholysis; the nail turns white, and when an infection occurs, it turns green (pseudomonas aeruginosa or mold) or turns yellow (fungus)
- A symptom of “subungual splinters” is the appearance of thin longitudinal stripes of dark black color under the nail. It occurs as a result of damage to the smallest vessels of the nail bed.
- Pain, burning, rashes on the skin of the fingers.
Apply paraffin
This procedure can be done both in the salon and at home. Paraffin is heated in a bath to 40 degrees. Then the hands are placed there, then they are wrapped in plastic and wrapped with a towel on top. You need to wait 15-20 minutes and then remove the paraffin mask. The procedure helps strengthen nails, smoothes the skin of the hands, and slows down the aging process.
Expert opinion
— The belief that nails deteriorate under gel coatings came to us from the 2000s. And then it was justified: when doing extensions, the masters cut off three to five lipid layers and dried the nails using special means (acid primers and bonds).
The nail industry does not stand still. Over the past 18 years, the approach of craftsmen to their work has changed, and the materials have become better. When working with gel and gel polish nowadays, preparation of the nail plate is minimal, all lipid layers remain intact. The adhesion of the gel (gel polish) and the nail plate is brought to a high level. The use of special means is required only in particularly difficult cases, for example, with hyperhidrosis (increased sweating).
Unfortunately, gel coatings are still not suitable for everyone; 15-20% of people are forced to look for an alternative. As a rule, this occurs due to the individual characteristics of the body: hyperhidrosis, hormonal imbalance, pregnancy, menopause, allergies.
Polina Nazaretyan , nail expert and co-founder of Nails Russia studios
Traditional methods
To whiten yellow fingernails, you can use folk methods and available means at hand:
- Hydrogen peroxide (3%). Make a paste from 2 tsp. baking soda and a small amount of peroxide. Apply the resulting product to the nail plates, leave for 3-5 minutes and rinse.
- Lemon. Moisten a cotton or gauze swab with freshly squeezed lemon juice and wipe the nail plates with it. The second option for using the product is baths prepared from 0.5 liters of warm water and lemon juice squeezed from half a lemon. Another way is to cut a lemon in half, stick your fingers into it and hold for 5-10 minutes. After the procedure, the citrus can not be thrown away, but used for the next whitening session.
- Table or sea salt. Stir 1 tbsp in a glass of warm water. l. salt, dip your fingers into the solution and hold for 15-25 minutes. To enhance the whitening effect, it is useful to add 1 tbsp. l. apple cider vinegar or lemon juice, a few drops of essential oil (sandalwood or tea tree, bergamot, olive, grapefruit).
- Toothpaste. Any white paste (without dyes, colored stripes or spirals) can be used as a gentle abrasive. It needs to be squeezed onto the nail plates and distributed in a thin layer over the entire surface, rubbed with a brush for 3-5 minutes, then wash your hands with warm water. Instead of toothpaste, you can use a mixture of tooth powder, baking soda and a few drops of water.
- Oil. If your nails turn yellow, castor oil will come to the rescue. It needs to be rubbed into the plates at least 2 times a day for 1-2 weeks. A positive result will appear faster if you use a mixture of jojoba oil, ylang-ylang and lemon juice.
- Cranberry. Mash fresh or thawed cranberries with a fork until smooth. Apply the mixture to the surface of the nails and leave for 5-10 minutes. Repeat the whitening procedure until the yellowness disappears completely. Alternatively, you can use freshly prepared cranberry juice, red currants or fresh pineapple pulp.
- Pharmaceutical camomile. 2 tbsp. l. Pour boiling water (250 ml) over dried flowers and leave for 30 minutes. Add warm water and increase the volume of liquid to 500 ml, dip your fingers in the bath and wait 10-15 minutes. Repeat the procedure every 2 days.
- Polishing. Yellow nails, if they are not too thin, can be lightened mechanically by removing the top layer of the plate with a fine-abrasive manicure file and polishing with a buff. However, such manipulation is allowed to be done no more than once a month.
Recipes can be modified by adding certain ingredients. For baths or lotions to help, the product must contain a weak acid (lemon, vinegar), a disinfectant (chamomile), a strengthener (salt) and a softening component (baking soda, essential, cosmetic or vegetable oil).
After washing off any bleaching agent, your hands should be lubricated with a moisturizing or nourishing cream, evenly distributing it over the skin and nail plates.
How to restore nails after shellac at home
Now let's look at how to restore nails after shellac at home. In addition to the fact that you can carry out paraffin therapy at home and apply biogel, it is recommended to place the greatest emphasis on moisturizing, nourishing the nail plates and supplying vitamins (in particular, C and E).
To cure nails after shellac, you must take baths:
- with sea salt;
- iodine, with chamomile and olive oil.
After removing gel polish, nails often acquire a yellowish tint. You can whiten them by rubbing a drop of lemon juice into them once a day. This is also necessary to compensate for the lack of vitamin C, and in order to replenish the nails that have grown back after shellac with vitamin E, you can buy special capsules and rub their contents into the plate and surrounding skin overnight.
Treatment of nails after gel polish will be most effective if, in addition to the external use of all the listed means, you strengthen the body “from the inside.” Review your diet; it should be as rich as possible in vitamins and beneficial microelements (fresh vegetables, sea fish, cottage cheese, fruits - they should be on your table every day). If the problem is serious, the phalanges hurt, the nail plates have become very thin and layered, it would not be a bad idea to drink a special vitamin and mineral complex purchased at the pharmacy.
During the recovery period while you are treating your nails after shellac, and in the future, be sure to protect your hands while doing household chores. Contact with household chemicals is very harmful, do not forget to wear rubber gloves. When leaving home, use hand and nail cream with silicone and glycerin.