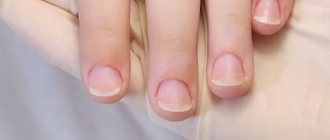
Ugly nails: tricks for visually lengthening nails
How to lengthen nails at home? If you want to correct ugly nails yourself, then adopt a few tricks:
- Always get rid of cuticles - cut out or move the grown-in area as far as possible to the base of the nail. Additional sections of the plate will help lengthen short nails.
- Use a nail file to form an oval shape and get elongated nails. Give preference to glass files.
- When applying dark shades of varnish, leave the side lines unpainted. The boundaries of the nail will correspond to the contour of the varnish.
- When applying a design or decorative decoration, concentrate attention on the middle of the nail, diverting attention from the width of the plate.
- Avoid the square shape of the nail , use the grown part to correct the shape. A few millimeters of growth will help visually lengthen your nails.
- Between matte and shiny varnishes, give preference to the second option, as this will distract attention from the natural shape of your nails.
Tricks
How to change the shape of your nails at home
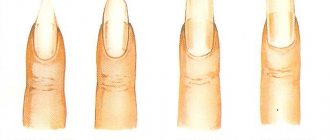
Before considering the essence of the question of how to correct the shape of nails, let's look at their main existing natural forms.
Photo from the site: skotobaza.org
It is customary to distinguish 5 main nail shapes:
- Oval. It assumes the presence of a deep nail bed, regular rounded outlines of the cuticle and parallel side ridges, located from each other at a width of approximately 1.5 times less than its height. This is the most beautiful form that does not require adjustments. However, it also needs support and proper care.
Photo from the site: zamok-mchs.ru
- Round. This shape is characterized by widely spaced side ridges, somewhat diverging towards the tip of the finger. The nail bed has approximately the same width and depth. The cuticle and the outline of the nail tip are rounded.
Photo from the site: picsly.ru
- Square. With this shape, the width and depth of the nail bed are the same size, or the width exceeds the length. The side bolsters diverge slightly towards the fingertips. The cuticle area has a straight or beveled line with angular outlines.
Photo from the site: krasotkapro.ru
- The rectangular shape is characterized by a deep nail bed and a narrow nail plate. The side rollers run parallel to each other. The cuticle can have both soft rounded and straight angular outlines. With proper care, this form looks quite attractive and, with rare exceptions, does not need correction.
Photo from the site: irecommend.ru
- Trapezoidal shape. One of the most difficult in terms of correction and in terms of creating a beautiful manicure. This form has a very narrow base of the nail bed and a wide fan-shaped divergence of the side ridges to form a wide tip of the nail. The cuticle can have either a rounded outline or a beveled shape.
Photo from the site: vashinogotki.rf
All these shapes, with the exception of oval and rectangular, do not always look attractive. And when creating a manicure, each master tries to give the remaining shape options an “oval” or “rectangle” outline. Constant and competent adjustment will eventually “discipline” the nails and over time they will acquire shapes close to ideal. You can do a similar procedure. We'll tell you how to change the shape of your nails at home.
So, a well-done and regular manicure will help, albeit not dramatically, but still correct the shape of your nails. So let's say, how to correct the trapezoidal shape of nails? To do this, you must first of all give up the habit of biting your nails or cutting your plates too short. They are the ones who lead to the formation of this form. Trim your nails, leaving a small section of the nail tip free. You should also narrow the free area of the nail as much as possible towards the side ridges. And try to free your nails from under them. To do this, simply file the side edges of the nails a little narrower from their natural width. Using an orange stick, the cuticle should be regularly pushed from the lower side edges to the base.
Photo from website: dutyfreesalon.com
So, gradually, the nail folds, which are not under pressure from the free edge, will narrow somewhat. And the nail itself will acquire an arched shape in the section. Constant manipulation of the cuticle will expand the border at the base of the nail bed and the nails will gradually approach the outline of the “oval”.
As for square and round shapes, it is important to “conquer” the length of the nail bed from the cuticle. To do this, it should be regularly pushed to the limit to the base and the overgrown tissue should be removed in a timely manner.
Important
Any manipulations with the cuticle should be performed on softened tissues (with the exception of hardware removal of the cuticle). All procedures should be completed by moisturizing it. Make it a rule to nourish it daily with special oil or even regular hand cream. This way it will grow back more slowly and will look healthy and well-groomed.
In parallel with the “conquest” of new territories in the cuticle area, work should be carried out to narrow the nail plate. To do this, just as in the case of trapezoidal nails, you should file down the side edges of the nails slightly narrower than their natural width, freeing the side edges of the nail from the side ridges as much as possible.
Even after performing such manipulations once, your nails will look attractive. Over time, with regular manicure procedures, your nails will get used to the given shape, and even if they don’t turn into the perfect “almond,” they will definitely be close to it. And a well-chosen design will make you forget that you once had wide, ugly plates.
Ugly nails: how to correct imperfections?
Apart from their shape, ugly nails have many other disadvantages. Visual effects help hide any flaws:
- A contrasting combination of light and dark shades allows you to draw attention to the desired area, beneficially adjusting the shape. A dark shade visually reduces, a light shade expands. Dark varnishes allow you to visually lengthen short nails.
- Irregularities in the nail plate are masked using ornate patterns, geometric shapes and random strokes.
Patterns
- Visual volume for a flat nail plate is added with shiny and pearlescent varnishes. Nails with rounded designs also look more voluminous.
Brilliant
- When bending the tips of your nails, it is better to stick to a short length. A strong plate grows back more smoothly, so you need to use strengthening products. The use of high-quality nail files also has a positive effect on proper nail growth.
- Brittle nails are a consequence of a lack of vitamins. If you have a constant problem with your nails, you need to take a course of useful supplements. For external effects, oil is applied to a clean plate to strengthen nails and cuticles.
Use oils
- For problematic nail plates, use a more gentle coating. For example, gel polish causes fewer side effects than acrylic coating.
Nail deformity
Various nail deformations are not strictly pathognomonic signs of a particular disease, however, by the appearance of the nail plates one can judge with a high degree of reliability the presence of a particular pathology.
"Hippocratic nails"
or "watch glass" nails have a convex spherical shape and are usually associated with a "drumstick" finger deformity. Such nails most often reflect hypertrophic pulmonary osteoarthropathy (bronchiectasis, emphysema or pulmonary tuberculosis, purulent pleurisy, lung abscess, lung cancer). Also, such nail deformation is characteristic of congenital heart defects of the “blue type”, prolonged septic endocarditis, heart failure, aortic aneurysm, and biliary cirrhosis. Sometimes “Hippocratic” nails are a hereditary or congenital feature that is not associated with any pathological conditions.
Onychogryphosis
or bird's claw nail deformity is characterized by curvature and thickening of the nail plates. The nails take on a horn or spiral shape; become very dense, change color to yellow, dirty gray or black. Such deformation of nails develops in old age, as a result of wearing tight shoes, burns or frostbite of the fingers, onychomycosis, generalized candidiasis, etc.
Koilonychia
– spoon-shaped deformity affects only the nail plates of the fingers. The surface of the nails becomes concave, but their thickness and structure do not change. Spoon-shaped deformation of nails can be caused by mechanical trauma, exposure to acids and alkalis, and heredity; less often – diseases (Addison’s disease, iron deficiency anemia, typhoid fever, etc.).
Platonychia
(flat nails) is often a congenital anomaly, but deformation may develop when exposed to occupational factors, psoriasis, liver cirrhosis, etc. In this case, all nail plates are usually affected.
Transverse grooves on the nails
(Bo's lines) can appear after influenza, jaundice, Raynaud's disease, syringomyelia, anorexia. The depth of the grooves depends on the severity of the damage to the nail matrix and can reach 1 mm. The color of the indentations does not differ from the color of the entire nail plate. With many grooves and ridges, the nail takes on a wavy shape. Longitudinal grooves on the nails (ribbed, corrugated nails) usually indicate an improper or unbalanced diet, vitamin deficiency, and malabsorption in the intestines.
Thimble-shaped or pinpoint nail deformity
characterized by the presence of many pinpoint pits on the surface of the nail plate. Small depressions have a diameter from 0.3 to 1-1.5 mm and a depth of up to 1 mm; their number can vary from 2-3 pieces to several dozen. This form of onychodystrophy is typical for eczema, psoriasis, rheumatism, and pulmonary tuberculosis. With various types of nail deformities, leukonychia (white spots on the nails), brittleness, splitting of the nails, and ingrown nail plates are common.
Ugly nails: what prevents you from visually lengthening them?
When designing your nails, it is very important to take into account the natural shape of the plate. Random application of patterns and shades can not only decorate the appearance of the hands, but also visually emphasize imperfections.
Let's look at a few taboos when designing wide, ugly nails:
- A large number of prints. The more designs on your nails, the more attention they attract. It is enough to highlight one nail and apply a classic coating to the rest.
- Clear horizontal lines. To make the nail appear longer, there should be no straight horizontal lines on it. A stripe drawn in the middle of the nail visually shortens the length of the plate by 2 times. Therefore, we avoid clear horizontal contours.
Visually shorten
- Poisonous screaming tone. Acid shades deprive the appearance of nails of femininity and sophistication. Applying bright colors to unattractive nail shapes creates a messy effect.
Almond shaped nails
The almond shape is distinguished from the oval shape by the pointed, slightly elongated tip of the nail. Some people believe that in order for the proportions to be ideal, the length of the free edge should be equal to the length of the nail bed. Maintaining this shape is not so difficult, but strengthening the nails comes to the fore - given the length, it is worth taking extra care to ensure that they are strong and do not break.
Who is suitable for almond-shaped nails:
This option is an excellent choice for those who have naturally wide palms (regardless of finger length) and/or full hands. Almond-shaped nails will visually “slimmer” your fingers and make them appear longer and more graceful.
Beauty Recipes: Soothing Lotion with Cucumber and Coconut Milk
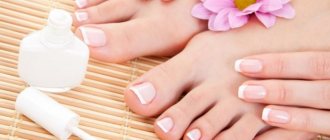
Ugly toenails
In order for your legs to look beautiful and healthy, you need to take proper care of your skin and get a pedicure. You can transform ugly toenails with the help of effective cosmetics and interesting pedicure designs.
To form a beautiful and healthy nail plate, we follow the following rules of care:
- Using nourishing oils, we moisturize the nail plate, cuticle and skin on the feet.
- To remove the applied coating we use products without acetone. This will help avoid cracking and delamination of the nail plate.
- The internal processes of the body are also responsible for the external condition of the nails, so do not forget about high-quality nutrition and a course of vitamins.
- Unsightly toenails often have a yellow tint and split. In this case, consultation with a doctor and drug treatment is necessary.
Needs to be tidied up
The secret of a perfect manicure: how to choose the shape of your nails?
Most women spend a lot of time on their manicure.
This is correct, because a beautiful and pleasant feminine image is built from little things. If everything is perfect, but the nails remain unkempt, then the whole impression of the lady will be ruined. This is why it is important to always keep your hands in good condition. For a successful manicure, it is important to choose the right nail design. This is the key to making your fingers look graceful and beautiful. The wrong shape can ruin even the best design. Therefore, devote enough time to this issue.
How do you know which nail shape suits you? Experts have long-developed techniques that allow them to make a choice not at random, but quite consciously and, moreover, successfully. These are exactly what we will talk about in our article. From it you will learn how to choose the right nail shape. This information will help you throughout your life.
Photo from the site: The world of the girl
Ugly shape of toenails - how to fix: recommendations
The correct sequence of pedicure allows you to prevent deformation of the nail plate and correct an unsightly shape. If you have ugly toenails, be sure to read the information below.
Effective recommendations for beautifully shaped toenails:
- once a week . This will help avoid ingrown nails and splitting, especially during the season of wearing closed shoes.
- Every 3-4 days, adjust the shape of the nail with a nail file. It is better to move the tool in one direction. Square and rectangular nail shapes should not have sharp corners; stick to smooth shapes. Nails are filed before water procedures.
- To keep your cuticles looking neat, oil them daily. Cutting the cuticles on your toes is highly undesirable.
- Polishing the nail smoothes the surface and eliminates lifeless cells. Rough areas of skin around the nail are removed using peeling.
- To remove dirt from under your nails and skin folds, use a soapy toothbrush or other handy tool every day. Water procedures are followed by hydration.
Nail care
Ballerina nail shape
This shape is similar to an almond, but has a smooth, straight edge and resembles the outline of a pointe shoe, which is why it got its name. It looks good on long nails and requires diligent care - not only to maintain shape, but also from a strengthening point of view. Suitable only for the lucky owners of a strong nail plate: if the nail is thin and weakened, the “ballerina” can literally turn into a cone. In recent years, the popularity of this nail shape has noticeably decreased, but if you like it, why not!
Who will suit the “ballerina” nail shape:
In the case of the “ballerina”, the restrictions are associated not so much with the shape of the hand and the length of the fingers, but with the natural shape of the nail plate - it is best if it is narrow enough.
How to grow your hair: 12 tips that really work
Pedicure for ugly nails: ideas
Ugly toenails can be transformed with the help of the right color scheme and the simplest designs. Let's look at several techniques for a beautiful pedicure.
- Horizontal lines and patterns allow you to visually expand your nails
- For short and wide nails, the design is applied along the central vertical line or along the sides of the plate.
- The classic French manicure visually elongates the nail plate. This type of pedicure is suitable for any nail shape.
- The pattern of stones also allows you to adjust the shape of the nail. To visually add length, the stones are distributed at the tip of the nail.
- The correct shape of the plate allows you to apply bright and rich shades, with the preliminary application of a colorless base.
- helps protect your nails from the negative effects of polish . The transparent layer will make the nail neater and minimize the contact of the plate with chemicals.
Horizontally
French Patterns
Result
With rocks
Restrained
shovel nail shape | sovety-idei.ru
- Modeling clay via the Internet - high-quality...
For decorative and artistic works, high-quality modeling clay provides opportunities to simplify the process of creating various... - Making wood from beads with your own hands...
To get started we need. Wire for weaving, presumably thinner. Only Czech beads are not so beautiful... - How to make a greeting card yourself...
Any holiday can be made unforgettable. It can become this way thanks to various little things created with taste and soul. ... - A sweet do-it-yourself gift for Women's Day on March 8...
The international women's holiday on March 8 is celebrated all over the world. And so it became that it was necessary to make small pleasant surprises... - DIY postcard for February 23...
Every year on February 23, girls, girls and women try to congratulate their men in an original way: dads, brothers, friends and husbands on... - Cards for Valentine's Day using quilling technique...
On Valentine's Day, everyone gives each other Valentines - small cards in the shape of hearts. Such valentines are sold in every store... - How to make a Christmas tree from dry branches with your own hands...
On the eve of the New Year holidays, everyone thinks in advance about buying a live Christmas tree, an artificial one, or making one with their own hands. Elka is the main... - How to make a New Year's wreath with your own hands...
New Year's holidays give us a sea of positive emotions and joy. Every year my children and I make interesting and beautiful crafts for... - How to sew a skirt from tulle...
Previously, tulle was sold in stores in a maximum of two colors. Today, on the shelves of modern fabric boutiques you can find an abundance of... - How to make colored cardboard with your own hands...
For children's applications and decoration of objects, colored cardboard or designer paper is often needed, especially with a pattern. But in the store... - DIY children's toys: educational mat...
Children grow and develop quickly. It is very important that in childhood they are surrounded by toys that develop mental and physical... - How to knit a scarf with knitting needles...
For several seasons in fashionable looks you can see stylish scarves with collars on girls and boys. In winter, a scarf...
sovety-idei.ru
How to paint ugly nails with varnish: tips
Applying varnish to the nail plate should transform the appearance of the nail, and not highlight imperfections. Painting nails has a certain sequence.
Let's look at how to paint ugly toenails step by step:
- Using a pedicure tool, push back the cuticle, it should not come into contact with the varnish.
- Apply a protective clear or pink coat to your nail.
- Apply the color coating in 2 stages , maintaining intervals for drying each layer.
- The last layer is applied with a transparent sealer . It will maintain the integrity of the applied varnish and add shine.
- Traces of polish outside the nail plate are wiped off with an ear stick moistened with nail polish remover.
- speed up the drying of the varnish by using a bath of cool water.
Application according to all rules
The color of nail polish should not be flashy; give preference to an elegant and feminine pedicure. Glitter polishes stay on your nails much longer than matte ones. When making your own designs, use stencils and stickers.
Soft square nail shape
Same as a regular square, but the corners are softly smoothed. Due to this, the result looks more delicate, but just as impressive. Both the regular square and the “soft” one are suitable for those who have rather fragile nails, but the “soft” one is considered a little more reliable in terms of fragility.
Who will suit the “soft square” shape:
It may seem that such a small thing as slightly more sloping corners will not make a difference, but nevertheless, this type of square can be tried even by those who naturally have rather short fingers. True, in this case it is worth growing your nails longer - “soft squares” on short nails will not have the desired effect.
Beauty recipes: how to make a scrub with orange and rose
Manicure for ugly nails: ideas
Any professional master knows how to lengthen nails with a manicure, what color lengthens nails and how to apply the coating correctly. If you want to choose your own manicure design for ugly nails, then use these useful recommendations.
- To lengthen too wide nails, distribute the color coating along the middle of the nail. We leave unpainted gaps of a few mm on the right and left. This manicure visually lengthens the nails and adds sophistication.
- The lateral borders of a wide nail plate can be reduced by drawing dark lines on the sides of the nail, using a light translucent tone as the basis. The shape of the nails cut on the sides lengthens the fingers visually.
- Pastel and light shades give nails a well-groomed look , without focusing on the shape of the plate. A dull monochromatic coating can be diversified with an emphasis on the ring finger.
- For those who like simple and laconic designs, you can lengthen the shape of your nail using a few geometric lines. A design that lengthens nails should be unobtrusive.
- Choose a dark nail polish color that visually lengthens your nails. For perfect coverage on a wide plate, use black, burgundy, dark blue and green tones.
- Using gel polishes with shimmer, a manicure is performed that lengthens short nails. The “cat eye” technique has similar properties.
- Red nail polish will decorate the hands of any woman. The key point before applying red shades is to properly correct the nail plate.
- A manicure based on a classic French manicure will fit perfectly on any nails. An additional design or sticker on one of the nails will add uniqueness without compromising femininity.
- During the sunny summer, any shape of nails will be decorated with rich shades of manicure. Add a touch of blue sky or ripe berries to the mood. When using several bright colors, it is not advisable to apply a pattern or additional decorations.
- gradient style will be a decoration for any shape of nails - a blurred transition from a light tone to a dark one.
The wide plate is perceived by the master as an advantage rather than a disadvantage; such nails are easier to work with tools. Small nails do not always allow you to realize a creative idea. A beautiful manicure will sparkle with new colors on well-groomed and well-moisturized hands.
Gently
Traditionally
Shine and contrast
Game of drawings
Diversity
Juicy
French saves the day Light color
Preparing for correction
Before you make a nail correction, you need to know some important points. A couple of days before the procedure, it is advisable to remove overgrown cuticles and treat the periungual ridges to remove rough skin. This is done so that in case of minor damage or irritation, the skin has time to recover. It is not recommended to use creams before adjustment, as this will affect the strength of the coating. For the same reason, you need to limit contact with water.
Under no circumstances should artificial coverings be applied if a living nail is damaged, or if there is an infection or fungus.
In this case, you need to remove all coverings from the injured finger and treat the wound with hydrogen peroxide. You will have to refuse any manicure manipulations until the nails or cuticles are completely restored.
For extensions to be successful, as well as nail correction, the gel must be of good quality. For amateur application at home, you can simplify the procedure by using a single-phase system. That is, in this case, you do not need to take three different jars with base, finish and modeling polymer, but only one, which takes on the functions of the others. But the Three-Phase approach is more sustainable, which means it will last longer.
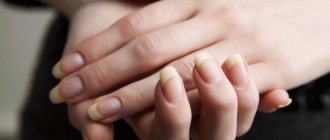
Ugly fingernails: photos before and after manicure
- A visit to a professional nail technician can turn ugly fingernails into a work of art. Let's look at some illustrative examples of the condition of nails before and after a manicure. Manicure at home often leads to brittle and split nails.
- Improper use of manicure tools slows down the growth of the nail plate.
- Professional nail care includes a wide variety of services.
- correction is carried out using trimmed and hardware manicures, nail extensions, gel polish coating, and acrylic plastic surgery.
- Therapeutic manicure includes spa treatments and helps you achieve a flawless appearance.
- Nail extensions allow you to get any desired result in a short time.
- Professionals can modify any natural form into the desired one and secure the result for a long period.
Difference Result
Restrained
Result
Gently
Features of shape correction based on the type of nail plate
Currently, depending on the materials used, there are two most popular and sought-after types of extensions – acrylic and gel. Each of them has a number of advantages and disadvantages, and, therefore, disputes between fans of one and the other technology do not subside. Most often, the choice is made based on the characteristics of the nail plate. For some, gel holds better, for others - acrylic. Read more about the features, advantages and disadvantages of each type of extension.
Acrylic coating
Gel coating
Gel coating, unlike acrylic, cannot harden on its own. For these purposes, it is necessary to use a special lamp. In addition, acrylic coating is much more resistant to external damage. At the same time, the gel does not have such a strong chemical smell as acrylic. These two areas have one thing in common: any build-up sooner or later requires correction.
The natural nail, on which the artificial material rests, grows at an approximate rate of 0.8-1 mm per week. Thus, by the 3rd week its base will differ from the general nail plate. In addition to the purely aesthetic side, untimely correction can cause significant harm in the form of cracks, loss of strength and brittleness of the nails. Therefore, how responsibly you approach this issue directly depends on their health, as well as the quality of your manicure as a whole.
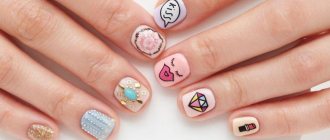
How to beautifully design small, ugly nails: tips
Following the key rules of manicure allows you to transfer fashion trends even to small, ugly nails. For modern fashionistas, we offer several popular manicure options.
- Ombre. To create a fashionable gradient, you will need two colors of varnish with a difference of 2-3 tones and a soft sponge. The upper half of the nail is covered with dark varnish, the lower half with a lighter tone. Using a similar technique, apply varnish to a sponge. Touching the sponge to the nail allows you to smoothly blur the boundaries.
Ombre
- Metallic. Metallic polishes last a long time on short nails. Use golden, silver, steel shades. Add stripes of silver or gold to your ring finger. In the salon you can create a mirror or chrome manicure.
Mirror
- Geometry. Using stickers and stencils, you can decorate small, ugly nails with geometric lines. Stripes in the form of a vertical arrow visually stretch the nail plate.
Geometry Gently
In shades of gray
In white
- Drawing from dots. Neat contrasting dots applied vertically will make the nail longer. It is better to place dots of different sizes in a clear sequence - thick at the base, thin closer to the tip of the nail.
Points
- Graffiti. Abstract designs will add volume to small nails. Using a manicure brush, create random streaks and wavy lines.
Graffiti
- Combination. Apply multi-colored varnishes in several layers. For example, inside one shape, draw a smaller shape of a different color. Contrasting layers will distract attention from the natural shape of the nail.
How I made something decent out of round trapezoidal nails
Firstly, I want to say that I am terribly amazed by the number and content of comments in my previous post: https://nail-ru.livejournal.com/2191721.html.
To be honest, I didn’t expect such positive feedback at all, and when I went to bed at half past two in the morning, I couldn’t sleep for a long time, being in such an overexcited state, as if I had been asked to get married. ;)) (By the way, I was especially surprised by the activity of the community at night!) Thank you, you wrote so many nice things! And secondly, they asked me so many times how I achieved such a result that I decided to make it a separate post.
Although I didn’t do anything that you don’t know. No, really, regular care and a little deception. Purely visual.
1) Cuticle care is the basics. By moisturizing and moving it away, you can noticeably correct the initially unsuccessful shape. In the state in which I had it before, it simply covered a significant part of the nail and narrowed its top. This, of course, is known to absolutely everyone, but this point cannot be ignored.
This is actually the only thing that can change the shape a little. But this, unfortunately, does not make the shovel turn into a magically elongated carriage, so you need to mask this sad fact.
2) Length. In order to have room for maneuver, it must exist. In my photographs, it looks like I have short nails, right? In fact, there are more than two millimeters, which is a lot for me. I personally am most impressed by nails that look beautiful even when cut almost to the root, but alas, this is not my case. I need length if I want to get something aesthetically acceptable.
3) Sawing the sides of the free edge. Here https://nail-ru.livejournal.com/652519.html#cutid1 it is popularly described how to do this. Very simple and effective.
4) Paint. Do not paint the entire width of the nail, leaving thin stripes on the sides, where the expansion of the trapezoid begins. Also trivial - but it works.
5) Opacity of the varnish. How much I like transparent nudes, who would know, but this option is not for me. The free edge should not be visible, otherwise the true shape of the nail can be seen from a kilometer away. This luxury is for those whose free edge shape is a straight line, straight ideally, semicircular with a slight bend in extreme cases.
6) Varnish color. Being carried away by varnishes, I almost immediately saw that only dark varnishes suited me, but for a long time I could not understand why. And the point here is not the skin tone, I don’t understand this at all, to be honest, but the fact that light colors seem to blur the perception of the nail, the shape is not readable, it becomes more vague and smeared, and this is not at all what we need . Dark, contrasting colors focus attention on what is painted on the nail, but what is desired is drawn there - elongated in length and with parallel edges, but what is actually there is almost not noticeable.
Initially, it was difficult for me to decide on such colors, my hand was drawn to vague pink shades - it looks like my nails are painted, but it doesn’t catch my eye, I’m not used to drawing attention to them. In addition, I understood that in order to use catchy shades - and all dark colors are like that, everything around - the cuticle, the side ridges, must look decent, then the first and second glance will fall only on the painted part of the nail. And here we return to point 1 - care, care and care. Everything is interconnected.
That's all.
I hope this was useful to someone.
nail-ru.livejournal.com
Ugly wide nails: reviews and recommendations
- Tatyana, 26 years old. At home I perform trim manicures without painting. I decided to try changing the shape of the nail and visually lengthening the plate. Having tried many different techniques, I have identified several effective methods for myself. I changed my short square nails to an oval shape. Through trial and error, I figured out which color of polish lengthens my nails - I always do a manicure with a single-color polish in dark shades. I moisturize my cuticles with oil every day. To correct the shape I use only a glass nail file.
- Sofia, 32 years old. By nature, I was not given the most beautiful shape of nails. I don’t always have the opportunity to get a manicure in a salon, so I’ve set myself a few golden rules when it comes to caring for my nails on my own. Once a week I get rid of the cuticles, this allows me to increase the space of my nails. Before cutting, I work the cuticle with an orange stick, thanks to this the plate has become more even. To strengthen the nail plate, I stopped using sanding files.
- Anastasia, 28 years old. Every three weeks I visit a manicurist, where a new design is applied to me. To correct the shape of my wide nails, the master always suggests what color of varnish will visually lengthen the nails. I noticed the professional cunning of the master. When painting a French manicure, the artist draws the lower white edge slightly below the line of the grown part. Thus visually lengthens the main plate. When painting with a single-color varnish, the plate is slightly unpainted on the sides. The shape of the nails takes on a flawless appearance.
General rules for correction
It is better to entrust the first correction to a professional. Ideally, this should be the master who carried out the extension, because he knows exactly what materials he used, what technique he used and what mistakes he could have made. However, such ideal examples are not always found. Often nail service professionals are faced with a problem when they have to correct or finish someone else’s work.
The correction procedure includes thorough disinfection of the surface of the hands and nails. Then the cuticle is softened and moved to the side. After which the natural shine is removed from the nail plate, the surface is trimmed with a nail file, and damaged areas are removed. If necessary, the length can be removed. In addition to the nail file, the master can use a milling cutter - a special machine with several types of attachments that rotate around its axis. A similar device is used to correct the shape or length of the nail plate, remove cuticles or polish the nail plate.
In the case of an acrylic coating, after carefully leveling the nail plate (especially at the junction of the natural and extended nails), degreasing is carried out with a special agent. Next, a primer is applied - a kind of fastening element of the natural and artificial layer, after which you can begin applying the acrylic coating.
Correcting gel nails is even easier than acrylic nails. After disinfection and cleaning, the nail plate is degreased, the surface is smoothed with a nail file or a milling cutter, and gel is applied. In any case, the success of the correction depends on the professionalism of the specialist, as well as on timely contacting him for help.
Happy owners of straight-growing nails will observe a similar procedure during correction. Each subsequent type of nail plate will require the master to follow a number of individual rules.
Pecking type
Many craftsmen, unknowingly, try to correct the situation by applying a thick layer of material, which is absolutely wrong. In this case, the procedure should be as follows:
- disinfection of hands, pushing back cuticles;
- removing gloss and excess thickness with a router or nail file;
- if necessary, remove the length (recommended);
- preparing the nail for coating (degreaser, base, primer);
- raising the free edge of the pecking nail;
- laying the material on the free edge (it is better to use thick gel or acrylic);
- standard nail shape;
- cutting out excess material from under the nail;
- applying a finishing coat (it can be different: add shine to the nail or vice versa, matte, fix the coating or promote faster drying);
- if necessary, dry in a lamp
Springboard type
In case of correction of the springboard shape, the procedure will be as follows:
- disinfection, pushing back the cuticle, assessing the condition of the nail plate;
- if necessary, length cleaning;
- cutting out a natural nail from the inside;
- laying out the material from the inside so that the layer thickens closer to the free edge;
- removing the topcoat from the nail, leveling the thickness;
- cuticle processing with a milling cutter;
- washing down the surface, restoring the architecture of the nail;
- applying degreaser, primer, base;
- laying out the material so that the apex is in the right place;
- alignment of the shape, as well as the surface of the nail from the inside;
- applying a fixative, if desired, a matte or glossy finish.
It is advisable to correct nails of this shape at least once every two to three weeks.
As the nails grow, they will tend to their original shape, which will subsequently greatly complicate the work of the master.
Laterally growing type
And finally, a nail growing to the side is not as common, but still possible. In this case, when making corrections, the master will be guided by the main principle: remove what is unnecessary, add what is missing. As in the case of the pecking type, first the missing part is completed, then the architecture of the nail plate is aligned.
Thus, correction and restoration of the shape of the nail plate should be carried out taking into account all the anatomical features of the client.
If you do not have the habit of changing masters and go to the same place year after year, then most likely you are lucky and do not have problems with correction. If you are still in search of the ideal master, and try something new every time, then try to ensure that the correction takes into account the characteristics of your nails. Don’t hesitate to ask questions, share your impressions of previous visits to the salon, clarify and consult. Comment
Tips for choosing a nail modeling method
What to choose: nail modeling with acrylic or gel polish? It is impossible to say that one option is definitely better, since these 2 cosmetic procedures differ in the technique of execution. Previously, there was an opinion that powder adheres more tightly to the natural nail, making it more difficult to damage and mechanically affect it, but today gel polish has begun to be made more stable and wear-resistant. As a result, both methods became almost identical in terms of wearing time.
To choose the option that suits you, you can consider how the formulations are used:
- Acrylic.
It is presented on the market in the form of powder or finely ground powder. Before use, it is diluted with liquid to a homogeneous consistency and only then applied to the surface of the plate. To make a manicure look neat, proportions must be strictly observed, which is why acrylic is often used in salon nail modeling. - Gel.
It does not need to be pre-prepared, but can be applied immediately, so it can be used even at home. Due to its thick consistency, it does not form streaks and is easily distributed. Due to ease of use, nail modeling with gel polish is very popular. However, there are a number of other characteristics by which the compositions can be compared.
The convenience of its use, as well as the final result and the duration of wear, depend on the correctly selected base for extending the ends of the plates.
Check the quality of the composition carefully. It affects the uniformity of application and distribution of the material on the nails.
How to correct extended nails
If you do not want to contact a specialist, and you are confident in your abilities, then you can restore your manicure yourself at home. You will definitely need to order or buy in the online store all the necessary materials and tools. Nail correction at home is justified from a financial point of view if you do it regularly. The main advantages of this solution are that you can make corrections whenever you want and help your friends.
Those who are interested in how to correct nails should first watch the lesson or read the step-by-step instructions with photos so as not to spoil the manicure. In addition to modeling material, you will need to purchase a UV lamp. To simplify the process, you can buy a manicure machine, the only drawback is that you need to learn how to use it and understand the sets of attachments. You don’t have to buy the most powerful router; you definitely don’t need a professional one. Its cost is relatively low, and you will use it for a long time.
- Pityriasis rosea in a child - treatment, signs and symptoms, photo
- How to change tariff on Beeline
- What does ringworm look like in cats?
Correction of extended nails with gel
This is one of the material options that is used for extensions and modeling. Correction of gel nails involves the use of specific materials that you will have to purchase yourself. For the procedure you need to have:
- degreaser;
- gel;
- modeling gel;
- liquid for removing the sticky layer;
- acid-free primer;
- antiseptic;
- cuticle oil.
This is the most minimal set for correcting extended nails with gel. If you used a single-phase gel for the first time, you can use it for correction. In the case of a three-phase procedure, any system is suitable. Next, you need to have a minimum set of tools that will help you do everything easily and quickly:
- lint-free wipes;
- buff for polishing nails;
- Ultraviolet lamp
- pusher or orange sticks;
- brushes for modeling nails with gel;
- gel files, suitable for 150/180 and 100/100 grit.
- nail clippers for cutting cuticles or blades;
- artificial nail clippers.
Below is a step-by-step description of how to correct gel-based nails. It is very similar to the procedure when working with acrylic. The instructions consist of the following steps:
- Degrease, disinfect hands, tools, remove varnish and paint from the plate (it is better to use products without acetone).
- Use an orange stick to lift the cuticle.
- Using a nail file, correct the shape, first file off those parts of the gel that have begun to lag behind. Then, in the place where the old coating begins at the cuticle, remove all the gel, you should get an imperceptible transition to the natural nail.
- Treat the surface with primer so that the infection does not get under the nail, remove excess with a towel.
- The smooth part of the regrown plate is cut off using a buff. Next, the hole is immediately filled with gel and dried with a UV lamp.
- When the material dries, you need to remove the sticky layer and form the correct shape. Use a file to immediately correct any unevenness, if any. The base layer of gel is applied evenly over all parts of the plate. A little more material is needed for the stress zone (just above the middle of the nail), but do not overdo it. Then dry the material again in a UV lamp.
- Then you need to correct the shape, smooth out defects and unevenness using a nail file. Be careful not to accidentally wear off the base layer to the old coating.
- Remove dust regularly with a brush.
- Before applying the finish, you need to make the desired design (drawing, French).
- Next, apply the finishing coat in one layer and dry under a lamp. To make it smoother, then apply a buff.
- You need to treat the side rollers and cuticles with nourishing oil (rub in like a cream).
Correction of acrylic nails
This type of artificial material is very popular among girls. Correction of nails with acrylic is carried out according to a similar algorithm, as with the option described above. To ensure everything works out correctly, you can use the instructions described below:
- Treat your hands and work surface with a disinfectant.
- Remove the varnish layer with a non-acetone product.
- Treat cuticles with a softening agent. After 2 minutes, use a wooden stick/spatula to remove the pterygium from the natural plate.
- Remove any remaining product using a lint-free cloth. File down the free edge with a nail file and set the desired shape. It is necessary to cut down 2/3 of the thickness of the material.
- Remove shine from the natural nail for better adhesion of the plate to the acrylic.
- Treat the peeling areas with a fine-grain nail file.
- Next, you need to treat the part where there is no acrylic using a degreaser.
- Treat the nail plate with a primer, which connects the keratin of the natural part with the artificial material.
- Run the simulation. Make sure that the acrylic is applied evenly over the entire area and does not penetrate the skin or into the lateral sinuses. Extension brushes should only be made of natural bristles; do not press too hard when applying.
- Then place your hands under a UV lamp for 2.5 minutes.
- Apply special oil to the cuticle.
Nail correction with shellac
This is a new type of coating that is easier to apply and lasts as long as gel/acrylic ones. Nail correction with shellac is carried out in two ways: with or without complete removal. To carry out the procedure, a standard set of instruments is used. Correction of gel polish is carried out according to the following instructions:
- It is recommended to treat nails that are too dry using a special activator. it consists of essential oils and water, apply it to the sides and keep for 5 minutes.
- Use a pusher to pick up the shellac polish. Carefully remove the coating; this is easier to do using the same activator.
- Using a nail file, give the regrown edge the required shape.
- Next, get a manicure or use a special gel to soften the cuticle and push it back.
- Clean the plate with a nail polisher until a shine appears. This step cannot be skipped; then it will be easier to remove the layer if necessary.
- Degrease the surface.
- Coat the substance that replaces the base and finish, dry it under a lamp.
- Select a shade of shellac, apply one layer to the surface, and dry.
- Then another layer, and again you need to dry it.
- Apply finishing coat last and let dry.
- Apply cuticle repair serum.
Nail correction using tips
This procedure is similar in its algorithm to working with gel extensions. Restoring sealing, updating the coating, replenishing modeling materials, giving an aesthetic appearance - all this is the correction of nails using tips. Below is an algorithm for acrylic technology:
- Saw off the overgrown tips with a reversible nozzle and process to a thin substrate.
- File the surface of the nail with a 180 grit file, smooth out the transition from the tip to its own plate.
- Use a spatula to push back the cuticle.
- Use a diamond attachment to perform a hardware manicure.
- Degrease, disinfect the nail, wipe with a napkin (dry).
- Apply a small amount of acid-free primer at the base of the tip.
- Lengthen the nail bed with camouflage acrylic and shape using a brush.
- Model the cuticle growth area and apex with matte, one-time powder.
- Next, you should compress the stress area.
- Use a clothespin to secure the clamp.
- Model the free edge of the nail with white acrylic. You can put it on two tips at once.
- Form the free edges with the base of a thick brush.
- Use the drum attachment (reversible) to file the tip of the nail.
- Treat the inner, longitudinal arch in the same way.
- File the cuticle and apex area with the “corn” attachment.
- Use a 100 grit file to file down the nail plates.
- Sand the inner arch of the nail using the reverse corn attachment.
- Use a carbide tip to treat the hyponychium area (where the inside of the nail comes into contact with the skin).
- Treat the outer and side parts with a 100 grit file and remove dust.
- Coat the inside of the loose tips with finishing gel without sticky salt.
- Cover the outside with gel too.
- Keep your hands under the UV lamp for 2 minutes.