What are pedicure attachments made of?
Attachments for hardware pedicure are made from various metals.
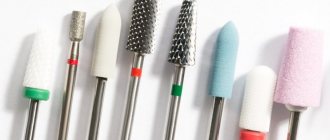
Types of cutters:
- Metal. There are notches on the surface of the cutter. During the rotation process, the nozzle carefully cuts off the skin, gel polish or other coating on the nail plate. The surface remains smooth. The depth of penetration of the cutter directly depends on the severity of the notches.
- Ceramic. Unlike metal ones, they require careful handling. When impacted, cracks and chips form on the surface of the cutter. The nozzles are made of ceramics and there are notches on the surface.
- Diamond. This type of cutter has a metal base and diamond coating. There are several main types based on the degree of abrasiveness and hardness.
- Corundum. They are resistant to temperature changes. Quite durable, rough, with an abrasive surface. The cutters can be heated while polishing the nail plates.
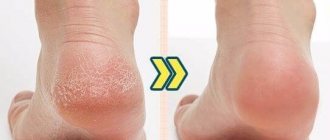
- Sand, carbide or silicon. During a pedicure, attachments of this type are used to treat keratinized areas of the skin. They are used to remove calluses and corns. The base of cutters of this type is cardboard, the caps are disposable. After treatment, the spraying is usually erased.
- Grinding. Made from fabric, silicone or rubber. Nozzles are used to treat sensitive areas. If necessary, polishing cream or oil is applied to the cutters to improve sliding.
Milling cutters also vary in color and degree of abrasiveness.
Care cosmetics: what are they and what are they for?
A high-quality pedicure provides more than just a temporary aesthetic effect. Care should be comprehensive, and the result should be long-lasting. Special cosmetics come to the rescue.
Scrubs are used for gentle exfoliation. The smallest granules delicately remove rough particles and at the same time nourish, providing a prolonged effect.
Molecular oils are used during a SMART pedicure. They are literally “imprinted” into the skin, making it perfectly smooth.
Remember that
Clients should be warned to be careful on wet bathroom tiles immediately after the procedure.
Cuticle oils help get rid of excess dryness. Professional moisturizing and nourishing creams soften and prevent the appearance of corns and calluses. If you use them regularly, you can minimize the use of files and graters, which is important for soft skin on your feet.
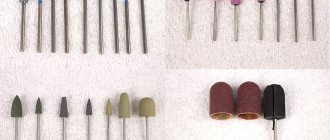
Types of cutters according to rigidity, colored notches
Attachments for hardware pedicure can be purchased at any specialized store. Milling cutters vary in degree of rigidity.
The following types are distinguished:
- delicate;
- gentle;
- medium abrasiveness;
- aggressive.
The degree of aggressiveness or softness is marked with a certain color:
- White. The softest polishes are used during the final polishing of natural nails and the treatment of sensitive skin.
- Citric. The attachments are delicate and are used when working with natural nails and hypersensitive skin.
- Coral. Delicate grinders are used to polish plates and cleanse leather. There are grinders with diamond particles on sale. Two stripes indicate increased delicacy.
- Blue. Medium hardness cutters. They are used on the skin in rare cases. Using a cutter you can remove acrylic, gel polish and other soft coatings.
- Green. This color is used to mark hard cutters used to remove gel polish, acrylic and acrylic. The attachments are also used when working with rough skin.
Attachments for hardware pedicure.
Cutters with black stripes are usually used when polishing artificial nails. They do not treat the cuticle or side ridges.
Sterilization
To sterilize an instrument, you will need a special device - a dry heater or an autoclave.
Sukhozhar is suitable for craftsmen working at home. Having placed the tools in it, we leave them there for 60-90 minutes, at a temperature of 180 degrees.
An autoclave is more expensive, so it is more often used in beauty salons. The processing temperature in the device is lower, and the time spent on sterilization is less (30 minutes is enough). The advantage of using an autoclave is that the possibility of instrument corrosion is almost completely eliminated.
Functionality
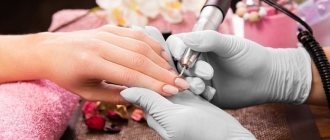
Attachments for hardware pedicure differ in functionality. Grinders of different diameters and sizes are used at the stages of removing the coating and when working with the skin. There are several types of cutters (depending on the material from which they are made).
Coating cutters
To work on the nail coating, cutters made of metal are used. On their surface there are teeth of different depths and directions (counterclockwise, clockwise). Grinders with reversible teeth are successfully used by right- and left-handed people. A cone-shaped nozzle is most suitable for removing shellac and acrylic from nails.
Materials from which the grinders are made:
- Carbide. Their surface wears off quickly. The attachments are enough for 30-40 procedures.
- Steel. The cutters are wear-resistant and durable, they are enough for 70-90 procedures.
- Ceramic. The most durable. Cutters of this type are replaced once every 2-3 years.
To remove the coating from the nail plate, you can also use metal cutters coated with titanium or gold.
Cutters for working with skin and nail plates
To work with the skin and nail plates, diamond cutters of different abrasiveness are used. With their help, they clean out the sinuses, remove the cuticle and polish the nail surface.
There are 2 main categories of nozzles:
- monolithic sintered;
- galvanic.
The first category of cutters is characterized by high strength. They usually last for several years. Diamond particles are applied to the base (sometimes in several layers) and baked in an oven. The cost of these attachments is 6000-9000 rubles. Galvanic cutters are also durable. An abrasive is sprayed onto the adhesive base; the surface of such attachments is usually granular.
Galvanic cutters are marked in different colors:
- Black. Not used for working with skin.
- Green. Mills are used to process rough skin and calluses.
- Blue. The cutter cuts the cuticle and processes the side ridges.
- Red. Used in pedicure to clean the lateral sinuses and polish the nail plate.
- Yellow. Used to work with sensitive skin. With its help, the pterygium is removed and the cover is polished.
White diamond cutters with fine cuts are rarely used in practice. They are used to polish the nail plate.
How to sterilize and treat after use?
A novice master must remember that after each pedicure session, all instruments, including cutters, must undergo mandatory sterilization. This must be done, as particles of skin, nails and fat remain on the attachments.
The complete tool processing process includes:
- dry cleaning from biological residues;
- disinfection;
- preparation for sterilization;
- sterilization.
Important! Only after going through all the stages should the nozzles be put into an airtight container.
Types of disinfection
Before disinfection, the cutters are thoroughly cleaned using a brush under running water to remove particles of nails and skin. There are 2 types of processing:
- Chemical. The nozzles are immersed in special solutions that have antiviral, antibacterial and antifungal effects. You can use drugs such as Gigasept, Alaminol, Estilodez, Optimax.
- Physical. To process this method, the cutters are immersed in boiling water for 15 minutes, after which they are thoroughly dried on a sterile cloth.
Attention! After disinfection, pre-sterilization preparation follows, consisting of washing the nozzles under running water using detergent.
Sterilization
The final stage of processing instruments after a pedicure is sterilization. Various devices are used for it:
- Glasperlen devices. Compact devices designed specifically for sterilizing cutters. Depending on the selected mode, treatment lasts from 30 seconds to 3 minutes.
- Autoclave. In this device, processing is carried out using hot steam. The device is refilled only with distilled water. The higher the selected temperature, the less time sterilization takes. Minimum – 15 minutes, maximum – 40 minutes.
- Heat cabinet. Treatment with hot dry air. The maximum holding time for nozzles is 2 hours, the minimum is 30 minutes.
Reference. To sterilize cutters at home, you can use a conventional oven. Instruments are placed in it after preliminary dry cleaning and disinfection. The holding time is 20 minutes at a temperature of 200°.
A novice manicurist should know that pedicure cutters, depending on the material and purpose, have a certain service life. To prolong it, it is important to insert them into the device and use them correctly. In this case, the pedicure will turn out better and better each time, and the attachments will last quite a long time.
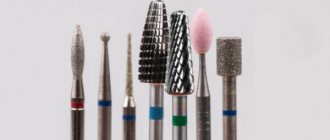
Types of cutters by shape and purpose
Attachments for hardware pedicure differ in purpose and shape. Medium-diameter cutters are usually functional - they are used at different stages of the pedicure. The attachments are used for interior and exterior nail decoration.
Flame shape
This type of grinder is used to clean and polish the base of the nail. It can also be used to treat sinuses. Experts do not recommend using it in practice for beginners: due to its rounded shape, the risk of cuts is quite high. The cutter should be held at an angle of 45°.
Needle shape
The fissure nozzle is made of carbide metal. With its help, the cuticle is lifted and opened, and the pterygium is removed. The cutter is suitable for removing a natural nail (from the inside). Most often, a nozzle with a blue (or cyan) stripe is used. Care must be taken when working so as not to injure the client with the tip of the cutter.
Corn shape
During a hardware pedicure, a ceramic cutter with green or blue (single or double) stripes is used. It helps remove artificial materials and gel polish. The cutter helps to form the correct length of the nail.
It must be kept parallel to the plate.
Cone shape
Cone-shaped corundum or diamond cutters with a blue notch allow you to open and slightly lift the cuticle. The nozzle should be held at an angle of 90°.
Ball or sphere shape
Ball-shaped cutters of different diameters help cut cuticles, remove burrs and clean side rollers. Hardware pedicure uses attachments with red and blue notches. A small ball-shaped cutter is used to remove the pterygium.
Lentil or bullet shape
During a hardware pedicure, a diamond-coated nozzle is used. With its help, the pterygium is cleaned and the cuticle is opened. The cutter is held at an angle of 90°. In operation, the nozzle replaces the “cone” and “flame”.
Drum or cylinder shape
The nozzle is made of hard alloys; it is used to correct the length of nails and remove artificial coating. The cutter is quite dangerous, so beginners should use it with the utmost caution.
The nozzle has sharp edges, so it is not recommended to work areas near the cuticle with a “cylinder” or “drum”.
Rounded cylinder or roller shape
Using a round-cylindrical metal cutter, you can process the side ridges and cut the cuticle. The risk of injury to the nail plate is minimal. During a hardware pedicure, nozzles with blue and red notches are used.
Advantages of hardware manicure
- Thanks to highly functional equipment, the master will quickly and efficiently treat even hard-to-reach areas of the client’s nails. If you think that a high-quality manicure can be done with an ordinary nail file, this is a big misconception.
- Operation of the device is completely safe. To cut yourself with cutters you still need to be smart, because the nozzles do not have sharp edges. The device does not cut, but cleans off dead skin particles.
- When performing this manicure, you can do without hand baths. After all, manicure is performed on dry hands, so the master does not need to soften the cuticle. In this case, baths can be used at will, and only after the procedure, to restore the skin of the hands.
- No need to worry about straightening your nails. Using cutters, the master will quickly give the same shape to his client’s nails, without leaving sharp or uneven edges.
Safety cutters
When performing a hardware pedicure, you must follow safety rules.
Main application criteria:
- aggressiveness of the nozzle (by type of spraying);
- cutter angle;
- pressure intensity;
- tilt towards the nail plate.
If you handle the cutter incorrectly, you can injure your skin. Silicone grinders coated with carbide coating are considered the safest. With their help, the pterygium is removed and the side ridges are cleaned. Silicone carbide cutters have several shades of markings (brown, gray, green). The softest baits are green. They polish the plate and polish the skin. Gray cutters cleanse the skin of dead cells and remove hangnails.
Brown attachments remove pterygium, polish the cover and cut of the nail. Their surface is elastic and soft, there are small carbide abrasive particles. Stones are used to cleanse the pterygium and polish the skin. When working with attachments, it is necessary to control the intensity of pressure so as not to damage the plate and skin.
Instructions for use
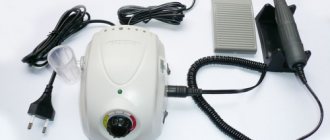
In order to use the device correctly, follow the simple instructions.
- Take the manicure machine out of the box.
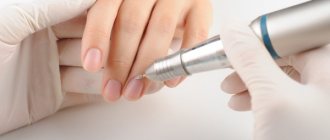
- The attachment you need must be inserted into the machine until it stops; it must be tightly secured with a clamp inside the handle socket.
- There are three types of clamping the cutter in the socket: automatic, rotary, screw. With automatic clamping, you simply insert the attachment into the handle socket. With a rotary clamp, after inserting the cutter into the socket, you must rotate the ring at the base of the socket. The device with a screw clamp is the easiest to use and is therefore suitable for home use. In order to secure the cutter in the socket, you need to turn the base of the socket until it stops, as if screwing the element into the handle.
- A professional milling machine has a function for selecting revolutions; if you are just starting your journey, do not set the speed above 6-10 thousand revolutions, because due to lack of experience you can damage the plate and skin at such a speed.
- Keep the cutters in one place, preferably in a box with divisions adapted for this purpose. This way you will never lose them and will always know where this or that attachment is located.
- Do not press the cutter against the nail - it is only intended for cutting off keratinized layers or outdated gel polish.
What forms of cutters are used for specific purposes?
Before starting the procedure for removing the keratinized layers of the skin and polishing the nail plate, it is necessary to apply a special softening agent (oil or cream) to the skin.
The zones are treated alternately, using different nozzles.
To remove cuticle
The following attachments are used to treat cuticles:
- Ball-shaped bur. The diamond cutter is safe to use. Use it to gently clean the nail plate.
- Only Clean. Used to cleanse the pterygium. The cutter is made of steel, the surface is polygonal. Apply the nozzle to a dry nail plate.
- Corundum nozzle. The cutter, depending on the abrasiveness, is used for grinding the periungual space.
- Brush. The nozzle is used at the final stage of polishing. You can first apply a cuticle softener to the nail plate.
It is not necessary to use the cutters in this sequence. Techniques for performing hardware pedicures may vary among masters.
For ingrown nails
To remove ingrown nails during a hardware pedicure, you can use the following attachments:
- Needle cutter. A carbide cutter with small cross cuts that allow you to cut through an ingrown toenail.
- Diamond cone-shaped nozzle. The cutter has a rounded end. The ingrown toenail is carefully polished with a medium abrasive nozzle.
- Pear-shaped cutter with sapphire coating. It is used at the final stage. The nozzle delicately cleanses the skin and removes remnants of ingrown nails.
When polishing nail ridges, experts recommend using fine and medium abrasive cutters.
For calluses and corns
To remove calluses and corns use:
- Diamond cutters MonAlit Tornado. The nozzle is coated with diamond chips. During operation, the skin does not heat up. The cutter delicately polishes the skin, removing calluses.
- Cone-shaped perforated cutter. Using a nozzle, the skin is polished, removing dead cells.
- Ball-shaped metal burs of different diameters. Used to remove core calluses. The nozzles have notches located longitudinally or transversely.
A sapphire pear-shaped nozzle is used to polish the skin at the final stage, making it smooth.
How to use the device correctly when working with cuticles?
The cuticle requires a very careful approach both during manicure and pedicure, since careless handling can significantly damage the skin around the nail. The algorithm for performing this procedure will be as follows:
- Gently lift and push the cuticle towards the base of the nail.
- Using the nozzle, remove dead skin particles.
- Carefully remove the pterygium. The nozzle should be held parallel to the nail plate. Eliminate any, even slight, pressure.
- Sand the sinuses and side bolsters.
- Remove rough skin and dry calluses (if any) from the subungual area and fingertips.
In addition, there are a number of rules that must be followed when removing cuticles. These include:
- the nozzle must be directed in the opposite direction from its movement;
- for each zone, use only a cutter specially designed for it;
- do not put pressure on the nail and skin;
- to avoid burns, do not linger in one place for more than 4 seconds;
- maintain optimal power of 15,000–20,000 rpm.
Help It is recommended to use different sets of attachments for manicure and pedicure. This will help prevent the spread of infections that often affect the skin and nails of the feet.
Next you can watch a video about hardware pedicure of fingers:
Recommendations, selection criteria, requirements
A qualified specialist and a beginner should have the following attachments on hand:
- grinders for final polishing of plates;
- needle-shaped cutters, which are used to clean microcracks in the skin;
- carbide and silicon disposable tips with a rubber base;
- ceramic cutters for removing varnish, shellac and other coatings;
- tools for removing extended nail plates;
- cone-shaped grinders for cleaning the pterygium;
- spherical nozzles of different hardness and diameter for cleansing the side zones and softening the cuticle;
- drop-shaped diamond grinders for cleaning the base of the nail.
The attachments need to be changed regularly, especially if the cutter starts to “hit” the nail.
Common reasons:
- Tool malfunction. If it hits a hard surface, the attachment may crack or become bent. Such cutters must be disposed of and cannot be worked with.
- End of service life. Experts do not recommend using cutters with worn coating. Periodically it is necessary to inspect the instruments and replace worn attachments with new ones.
- Incompatibility of the device and the cutter. Some attachments are not suitable for professional pedicure devices. In this case, the cutter will bounce off the nail plate and injure the skin. It is necessary to check the compatibility of the nozzle and the device in advance by comparing the parameters of the products.
Milling cutters can be purchased in specialized stores. If the device kit does not come with attachments, then you will need to create a list of tools necessary for the work yourself. Before doing this, it is important to carefully study reviews from real consumers on specialized sites.
How to do a hardware pedicure?
The speed and quality of manipulation can only be improved with experience. You can watch video tutorials on how to perform a hardware pedicure step by step, or ask an experienced nail technician to show you the procedure. There is no need to rush in the first few sessions; it is better to “bet” on the quality of the treatment. Hardware pedicure step by step for beginners:
- Wash your feet, treat them with an antiseptic and wipe dry.
- Adjust the length of your nails. Shape them into a truncated cone. You will need to use a brush periodically.
- Remove cuticle with a ball. It can first be softened with a remover and lifted with a stick or pusher.
- Clean the “pockets”, ridges, remove the pterygium with a needle and flame.
- Polish the plates with a silicone or felt pad.
- Lubricate the skin of the feet with keratolytic and leave for 5-10 minutes.
- Wipe off any remaining product with a towel and dry.
- Use a coarse sand cap to work through the roughest areas.
- To avoid discomfort, you need to move from the heel to the toes, without lingering in one zone; it is better to return to it again if necessary.
- Use a fine abrasive cap to polish the leather until it is pinkish-yellow, soft and smooth.
- Treat the fingers and the space between them with a truncated cone, first blue, then red.
- Brush off the “sawdust” with a brush, remove any remaining keratolytic with a spray bottle of warm water, and wipe your feet dry.
- Apply cuticle oil to your nails.
- Lubricate the skin with cream.
- Give a foot massage.
Top 5 best manufacturers, milling cutter prices
When purchasing attachments for hardware pedicure, you need to pay attention to the brand and quality of the material.
Popular manufacturers:
| Name | Description | Range | Price |
| HDFreza | The cutters are suitable for experienced craftsmen and beginners. The nozzles are made of high-strength materials. Used for polishing nail plates, removing cuticles and treating side ridges. | Diamond and steel burs, carbide, diamond, steel cutters, soft attachments, grinders of various shapes and abrasiveness. | 135-1200 rub. |
| TNL Professional | Attachments for hardware pedicure are presented in an assortment. The manufacturer guarantees the quality of the cutters. They are made of durable materials. The attachments are used when treating sensitive skin. | Diamond cutters (ball-shaped, cone-shaped, ribbed, with transverse and longitudinal teeth), ceramic, carbide nozzles, soft silicone grinders. | 35-1100 rub. |
| Irisk Professional | Universal cutters suitable for all models of professional machines. The set includes 6 diamond-coated attachments. Cutters of different diameters, medium grain size. | Nozzle “needle”, “bullet”, “cone”, “cylinder” (2 cutters of different diameters), soft grinder. | 200-350 rub. |
| RuNail | Cutters and attachments from domestic manufacturers. The products are suitable for professional use. Compatible with almost all devices. The nozzles are made of quality materials. | Carbide cutters, diamond cutters (different diameters and shapes), abrasive drums, abrasive caps. | 50-800 rub. |
| JessNail | The nozzles are made of durable materials. The coating is of high quality, which allows you to increase the service life. | Nozzles are presented in an assortment (cutters of varying degrees of hardness and grain size): diamond, corundum, ceramic, abrasive caps. | 80-1200 rub. |
The cost of nozzles may vary depending on the method of implementation. In specialized stores the price will be slightly higher. Attachments for hardware pedicure are used at home. The cutters must be disinfected after each procedure and dried thoroughly to extend their service life. Nozzles are stored in plastic tubes.
How to install cutters before a manicure procedure
Depending on the manufacturer and brand of router, there are three ways to clamp the attachment:
- automatic automatically fixes the inserted shank. Such a mechanism must always have either a cutter or a plug, otherwise it will be blocked. You won’t be able to deal with the blockage on your own - you’ll have to call a technician or go to a service center;
- products with semi-automatic mode have a special handle that opens the collet clamp. Having inserted the nozzle into place, close the clamp by turning the handle;
- manual installation. It involves turning on the button on the body and unscrewing the clamping washer. Once the shank is inserted, the washer is tightened with the press of a button.
The type of clamp and step-by-step installation diagram are in the instructions for the router. Before working, you must familiarize yourself with it to avoid damage.