- August 6, 2018
- Nail care
- Kira Ifeevskaya
Any manicure, even the highest quality, must be replaced, and if the nails were treated with gel polish, then even more so. As such material grows, it becomes heavy for the nail plate. Therefore, in order to maintain the health and beauty of your nails, you must remove it. You can remove it in two ways: by soaking it in a liquid specially designed for this purpose or by cutting it off using special equipment. A machine for removing gel polish from nails or a cutter is an attachment to the device. It is needed to remove the old varnish coating. How to remove gel polish with a cutter? And what subtleties need to be taken into account for this? This will be written about below.
What is a cutter and what is its purpose?
Today, hardware manicure is very common; it quickly occupied its niche, completely eliminating its competitor, when the nails were simply soaked in water. Unlike its predecessor, this method allows you to quickly and easily prepare your nails for gel polish coating. Due to the fact that the cutter rotates at the same frequency all the time, this allows the surface of the nail to be made uniform and the cuticle to be easily removed. In addition, the cutter attachments rotate very quickly, so you get a manicure without cuts, bleeding or wounds.
The same machine is used to remove the old gel polish coating, only a different cutter is installed. Preparing nails for a new manicure is carried out using this device. Which attachment should I use to remove gel polish on the device? More on this later. To make this procedure easy, you need a cutter with notches or small indentations. This way you can cut off the coating carefully.
Main characteristics of the manicure device
Key selection criteria are technical characteristics. These are power, tip rotation speed and cutter attachment system.
Power
For professional work: manicure, nail extensions and correction, pedicure, this figure should be at least 50-60 W.
There are devices with much lower power - about 10-30 W. However, all they can do is process the cuticle, grind the side rollers or plate. It is impossible to remove extended nails with such a machine. The power will not be sufficient to remove artificial material.
Rotational speed
This setting shows how fast the handpiece can rotate. For professional devices, the maximum speed is 30-40 thousand revolutions, for machines for home use - within 20 thousand revolutions per minute.
Please note that rotation speed has nothing to do with power. An insufficiently powerful device, whose tip can produce 30 thousand or more revolutions, will not allow you to remove gel or acrylic. The cutter will “slow down” in the material when pressed hard.
Cutter attachment method
There are three clamp options. The manual type is typical for the simplest and cheapest devices. To change the cutter you will have to unscrew the washer that secures it, install a new attachment and screw it back.
A semi-automatic system or collet clamp speeds up the process. To replace the cutter, just turn the handle half a turn and remove the attachment. The automatic system ensures the fastest replacement. To secure the cutter you just need to insert it into the clamp. It will lock automatically.
If you are choosing a device for a salon, buy a model with high power, good speed, and semi-automatic or automatic clamping. It will allow you to work quickly and perform manicures, extensions and pedicures.
For beginners in the nail service who plan to receive clients at home and do not yet work with artificial materials, low-power machines are suitable. However, for comfortable work it is better to choose a speed of at least 30 thousand revolutions.
Options or additional capabilities of milling cutters
When purchasing equipment, pay attention to its functionality, design and size. This is especially important for professional use, where every little detail matters and increases comfort.
Important features of manicure machines:
- Noise level
Most professional models are brushed, i.e. the mechanism inside has special rotating brushes. They are distinguished by low noise levels. The second type of clippers is brushless or electronic. They are more expensive, but practically silent. - Presence of a pedal
You can control the device: turn it on, off, and adjust the speed manually using the handle on the body or the pedal. Foot-powered milling cutters provide additional convenience and allow you not to be distracted by switching. - Handle shape and weight
These are purely individual parameters. Before you buy a device, it is advisable to evaluate its handle - how comfortable it lies in your hand, whether the coating slides or not, whether the weight is comfortable. - Housing and its dimensions
Milling cutters can have a metal or plastic housing. Modern plastic is not inferior in strength to metal, but weighs less. If you need salon equipment, this is not a significant issue. However, if you are buying a model for home and visiting clients, the best choice would be a compact and lightweight machine. - Reverse
The presence of reverse allows you to use rotation in both directions. This is convenient for left-handed professionals and allows you to avoid turning the client’s hand over.
For convenience, manicure machines are equipped with a cooling system, compartments for cutters, a pen holder, and a carrying bag. Forced cooling is important for salon work, as it allows you to work long and continuously without overheating. Tip cases and a bag are more important for on-site technicians.
Adviсe
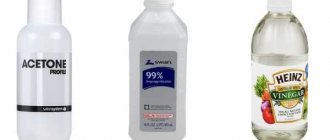
What is the best cutter to remove gel polish? Hardware manicure is safer and non-traumatic compared to filing with a file or removing the gel with acetone. The last two methods are already outdated, and because of them, the nails will become brittle and begin to peel. It is very easy to damage the nail and the skin around it with a file, abrasions form, and it is undesirable to cover such a nail plate with gel.
If you soak the nail, you can dry out the cuticle and nail plate, which will lead to it breaking and causing unpleasant pinching during the procedure. After the nail is soaked, the coating must be removed with a metal spatula, which can injure the surface of the nail, which affects its quality. The procedure for removing gel polish with a manicure machine saves time and does not harm your nails.
The attachment is similar to a corn cob; it fits onto the tool and is firmly fixed. The difference between a cutter may lie not only in the design, but also in the material from which it is made.
Which methods are suitable for whom and when?
The choice of method depends primarily on the skills of the master . Professional craftsmen prefer the hardware method of removing gel polish. But at home, removing shellac with liquid remains relevant.
It is best for beginning craftsmen to start with the chemical method , that is, liquid, as it is the easiest to use. By the way, those who do their own manicure are also recommended to give preference to removing gel polish with liquid.
Professionals are able to buy a high-quality milling cutter, since they have a regular client base and a stable income. Using a hardware method speeds up the work process and allows you to accept more clients per day.
Speaking from the clients' side, it all depends on the wishes . Of course, the master can give his advice, but the choice is up to the visitor. The nail artist must dissuade the client from choosing hardware shellac removal if the latter has very thin and brittle nails. There is a risk that the nail plate will be severely damaged under the influence of the router attachment. It is also important to find out whether a person has allergic reactions to chemical liquids.
Beauty and fashionComment
Carbide cutter
Each cutter, depending on the alloy from which it is made, has its own operating principle. For example, a carbide with notches made of straight, oblique lines or crosses cuts off the overgrown material in a circular motion, first clockwise, then counterclockwise. The threads and hole sizes of metal cutters are different. To remove the coating, you need quite strong indentations so as not to break the tool.
You can correct the shape of the nail and its thickness using a carbide cutter if the nails will be extended or strengthened. With it you can delete the old layer. The rotation of the tool occurs at a speed of 30-40 thousand revolutions per minute, which is completely harmless to natural nails. With this method of removing old manicure, you don’t have to worry about the natural nail plate, since only the top (top layer of manicure) and gel (colored part) are cut off, and the base remains, so the surface of the nail remains untouched.
How to choose a device for manicure and pedicure?
Filing and leveling the nail plate, removing and polishing cuticles, filing down artificial coverings, treating rough skin - this is an incomplete list of what this small but very useful machine is capable of. Increasingly high demands are placed on nail technology, which is why equipment for manicure and pedicure must be impeccable. Choosing a convenient and durable device that best suits the tasks of the master is not easy. In order not to make a mistake, it is important to immediately decide on the range of services (manicure, pedicure, gel polish, extensions) and the frequency of use of the device (for yourself, for a small circle of clients, for a beauty salon).
All devices for manicure and pedicure can be divided into two large groups: amateur and professional . Machines for home manicure have low power (up to 35-40 W) and a limited set of functions. This is often enough to treat natural nails and cuticles for yourself and your girlfriends. Most often, the power supply of home machines is built into the handle, and control is carried out using a wheel. In salon conditions, powerful (from 60 W) stationary devices , which consist of a control unit and a working handle with a micromotor. They do not vibrate or make noise, do not overheat during prolonged use, and are suitable for all procedures, including pedicures.
There are also semi-professional routers (40-60 W) - they have improved characteristics compared to “home” ones and do a good job of cutting down artificial surfaces. Such machines can be used in a small manicure salon, but are still not designed for serious “stream” work and pedicures.
The most important parameters for choosing a nail milling machine are:
- Number of revolutions per minute . The quality of nail treatment depends on the rotation speed of the cutters. For home appliances, this figure ranges from 4 to 25 thousand revolutions, for salon appliances - from 25 thousand and above.
- Device power . Everything is simple here: the more powerful, the better. A good salon manicure cutter has a power of 60-100 W. This ensures stable operation without vibration and overheating. However, beginners should not take a very powerful milling cutter - the price of such devices is rather high, and without experience it is easy to injure the skin and nail plate.
- Reverse rotation . The ability of the cutter to change the direction of rotation allows you to perform processing as carefully and efficiently as possible. This is a convenient feature that you shouldn’t give up even when choosing a simple machine “for yourself.”
- Power source: battery, batteries or network. Stationary devices are good because they have stable power and wide functionality. Portable ones are convenient for travel and on-site services, however, as the charge decreases, the number of revolutions of the cutter noticeably decreases, which immediately affects the quality of processing.
- Additional options that make the master’s work easier: foot pedal, built-in vacuum cleaner, backlight, power switch. They are mainly equipped with professional devices. Before purchasing, make sure that the premium for these features is worth it.
It is important to know that the working handles of different manicure devices differ in length, thickness and weight, and tip material (plastic, metal). Many have a matte or rubberized anti-slip surface, which increases the safety of the machine during operation. When choosing a device, be sure to turn it on and try out the handle: it should fit comfortably in your hand, work without excessive vibration, noise and rapid heating.
Ceramic cutter
Nowadays modern manicurists use a ceramic cutter. After using it, the coating turns into dust, not into shavings, it is removed more softly, and there are no unpleasant vibrations that occur when the nail and the cutter come into contact.
Softer texture and high strength are the main advantages of ceramic cutter. One such tool is equivalent to 4 of the same, but made of hard alloy. The coating can be removed easily and quickly due to the fact that the ceramic nozzle does not heat up. How to properly remove gel polish with a cutter? The technology of cutting with a ceramic cutter consists of soft movements that are performed without pressure.
Forms
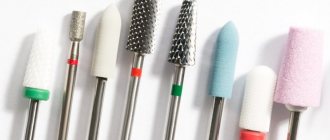
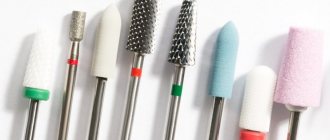
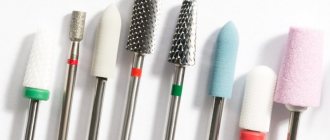
The shape of the cutters also varies: the corn shape is usually found in ceramic bits, while cylindrical or cone-shaped ones are found among metal ones. There are other forms, but manicurists give greater preference to the above. In accordance with the degree of rigidity, it is necessary to determine the scope of work. The type of cutter you will need depends on which nails the master will work with. The degree of hardness is indicated at the base of the tool: the hardest are green or black.
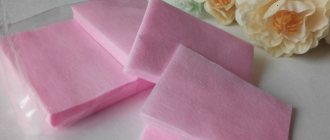
After the gel polish has been filed off, the remainder of the manicure is removed with a soft buff. That is, removing old manicure with a machine and treating nails with a buff is much safer compared to other outdated methods.
Why should it be done with a machine?
How to use a gel polish remover? Many masters remove the old layer using methods that are not only outdated, but also harmful to the nails. Since the machine for removing gel polish from nails makes them afraid of “cutting through” the plate. The impossibility of this is determined by a number of reasons. A person competent in manicure knows that old gel polish is cut off down to the base (you can recognize it by its glossy shine). And the final stage is polishing with a buff. Therefore, if you do everything correctly, you won’t be able to “saw through” the nail.
Milling cutter
To remove gel, nail technicians use carbide nozzles of medium abrasiveness. Marking: blue stripe on the shank. Such cutters remove material without heating or creating dust: the varnish is cut off by shavings. The same attachments can be used to reduce the thickness of the acrylic coating - the cut layers are thin and smooth, without leaving a groove.
You can complete the process with a smaller nozzle - with a red stripe on the shank. It can also be used at the base of the nail, where there is a high risk of damaging the cuticle skin.
Even smoother cutting with a ceramic cutter. It turns the coating into dust, removes layers smoothly, and does not heat up. Even if such a nozzle comes into contact with the nail, it will not damage it.
The shape of the cutter can be any, focus on your preferences. It is most convenient to use a cylinder or cone - they work well with a reverse movement, so you can use them to remove gel polish from your nails yourself.
You can choose a cut - the simpler and thinner it is, the faster the material will be removed. But a single cut is best used by experienced craftsmen: it is easy to “grab off” excess and injure the skin. For beginners, a cross-shaped cut is suitable. It removes nail polish very carefully and does not injure soft tissues.
If it’s difficult to decide, it’s better to buy ready-made sets. They contain everything you need to work with artificial nail coating. For example, in this set for manicure and correction there are 11 positions: medium and coarse cones, olives, cylinders; polisher and grinder; caps and rubber base; felt, stand.
Removing gel polish and discomfort
Gel nail polish remover may cause a stinging sensation when the old polish is removed. This factor is also tied to the experience of the master, as well as to the condition of the client’s nail plate. It can be very subtle, and then situations like this arise. In such cases, the master must learn how to properly remove regrown material using a cutter, and also warn the client about possible sensations that may cause discomfort. In all other cases, when the gel is cut off, the client feels a slight “tickling”, which does not bring any inconvenience to the woman.
Rules for removing gel polish
- Set the number of revolutions of the router: for carbide cutters - 20 thousand / min, for ceramic - 10-15 thousand / min.
- While the device is operating, do not press on the nail plate; the cutter may go deeper and remove more gel polish from the nails than necessary. Movements should be light and smooth.
- Do not stop the running cutter in one place; it will drill out a depression in the plate, which will then have to be ground. Smoothly move the attachment over the surface of the nail.
- Movements should be directed from bottom to top - from the cuticle to the end of the nail. In this case, the direction of rotation of the cutter should correspond to your movements.
- Areas near the skin need to be treated with extreme caution; it is better to use a smaller cutter for this.
- Focus on the base, which is under the varnish coating. File down to this layer so that the cutter does not touch the very surface of the nail.
- After removing the gel polish from the nails, go over the plate with a 220-280 grit buff to remove any remaining base. You can also use a cone-shaped corundum grinder; the machine speed should be no more than 10 thousand/min.
- If you do not plan to reapply gel polish, treat your nails with nourishing oil.
An example of using a ceramic cone to remove gel polish is in the video.
First stage of withdrawal
How to remove gel polish correctly with a cutter? As mentioned above, first the nozzle is inserted into the device and its fixation in it is checked. The master himself determines which attachment to choose (ceramic or metal). Usually the cutter is inserted until it makes a characteristic click. Next comes the removal process itself. First, check that the coating is dry and the attachment does not slip off the nail plate. You can begin the process itself. Depending on which cutter is used, movements are selected. The main thing is that they are smooth and stroking. The work should be carried out at the same pace, and you should not put too much pressure on the device. And the cutter is carried out from top to bottom, movements are made along the contour of the nail.
Removing gel polish using hardware
To remove shellac using the hardware method, a special tool is used - a milling cutter . Using a router, which comes with different attachments, you can not only remove gel polish, but also do a hardware manicure: shape the nail, remove cuticles, and correct extended nails.
To remove shellac from the nail plate you will need:
- A high-quality router with the necessary attachments.
- Additional tools (face mask, fan or damp towel).
- Nail buff.
- Nail brush.
- Means for degreasing the nail plate.
Additional tools are extremely necessary, since when cutting the coating there will be a lot of dust , which can cause allergies in the master and stain the work area. A budget option would be to lay a damp towel on the table and then wipe the surface with it. If the master is considered a professional, then it is worth purchasing a special fan with an exhaust hood.
The procedure itself takes about 10-15 minutes . The main condition is that the nails are dry . This will reduce the risk of damaging the nail plate or finger. You need to start removing the coating from the middle of the nail and stretch the router attachment to the end of the plate. The edge of the nail is treated with the middle of the nozzle, and the surface itself with the tip. When the color is cut off, the base should remain on the nail. We can easily cut it off with a buff. Then you need to use a brush to remove dust particles from your hands and degrease the nail plate with a special product.
Next stage of withdrawal
Cuts should be made long, short cuts and strong pressure on the nail are not recommended, so as not to cause discomfort to the client, and also to ensure that the manicure is removed evenly. The cutter should be inclined, and cutting usually occurs in its middle part. The pressure on the nozzle should come either from the side or from above; you cannot put pressure on it from above. That is, it is installed to the lower edge of the nail plate and the master must make one movement with the middle part of the tool to the outer edge of the nail.
Next comes the buff treatment. When the nail plate looks smooth, all irregularities are smoothed out. The final stage of removing old manicure is polishing the nail. When that is finished, you can do a new manicure.
This procedure is not particularly difficult. You just need to constantly practice to hone your skills. A machine for removing gel nail polish does not harm the nail coating; this statement was invented by masters who do not want and do not know how to use this innovation. In addition, the remaining transparent base on the nail plate after filing has a positive effect on the nail itself - it becomes stronger. This is also necessary for the keratinized layers of the skin, which are the nail, they just lack the respiratory function, like other cells. Therefore, a gel polish manicure and its removal do not harm the nails in any way.
Which device to choose for nail correction and hardware manicure?
The correction procedure will be more effective, faster and safer when using a professional device. However, not all manicure devices are suitable for this procedure. Let's look at the main parameters of the correction machine that you should pay attention to:
Power. For devices without a built-in vacuum cleaner, the optimal power is in the range of 30–60 W.
No vibration at a sufficient number of revolutions. To perform the correction procedure and generally to work with artificial material, you need a device with a speed of 30,000 rpm.
The handle should be comfortable, not too heavy. If it is too heavy, feels uncomfortable in your hand and vibrates, I advise you to choose another one. Unfortunately, you can only check this by being physically in the store, based on reviews from other customers.
Presence of reverse. Reverse stroke or reverse is needed for processing the nail plate and cuticle, in some cases it can also be useful for correction. If you plan to perform a hardware manicure, reverse will be necessary.
Correspondence of the mechanical power of the handle to the output parameters of the control unit . By the way, it is much more practical and reliable if the rotation speed regulator is not located on the handle, but located on the control unit.
Another criterion that is no longer decisive, but also important when choosing a device, is:
Electrical hose-wire that connects the handle and the transformer. There are two possible shape options: twisted and straight. More convenient, of course, is twisted. When working, it takes up little space and does not curl. The weak points of any wire are its connection points to the device and to the handle, that is, the place of constant bending. At the point where the wire is attached, the handle should have good protection in the form of an accordion thickening or a metal spring.
I bought my first two nail correction machines at the lowest price I could find, as I remember now, it was called Eve and Touch. The machine was not professional, and although I made corrections to it somehow for two years, then I realized that the power was not enough for full-fledged work. It broke down every 3-4 months and I had to invest almost half the cost of the device itself in repairs. When I finally bought my first professional device Sаtrong 210, then I realized what easy operation of the device and a reliable manufacturer are.
A nail correction device, like a brush, is one of the master’s main tools. If it is not powerful enough, then you will waste a lot of time and effort on manual work. The device should serve as a faithful assistant for the master, facilitating the process of filing, preparing and removing nails. Trust my experience, do not buy machines for home use that are sold in stores like M-Video. They do not have enough power to fully work with the material, but they can still saw through or damage the nail plate at high speeds.
What models of devices are suitable for nail correction?
I list the models of devices that I have tested and are suitable for correcting acrylic and gel nails:
- Strong 90, Strong 210, Strong 209, Strong 209A, Strong 207A.
- Marathon N2.
What are the signs of a device that is NOT suitable for nail correction?
- You work with a cutter on the material, and it “slows down”, stops during work, as if drowning in the material.
- Your machine has a non-standard clamp; classic cutters do not fit it.
- The handle of the device is too noisy during operation.
How did you choose your device and are you happy with it now? Share your experience.
Advantages of removing the coating with a machine
We have already figured out how to remove gel polish correctly using a cutter. Now let's look at the pros and cons of this common procedure. If we compare cutting with a machine and a classic file with an abrasive coating, then in the first case the procedure is safe and without injury. Moreover, the speed of the procedure is much higher. Another advantage of this type of coating removal is that the layers of varnish are removed using dry methods, and chemicals containing acetone are not used. This allows you to avoid changes in the structure of the nail plate when the nail becomes soft and dry. The skin around the nail and cuticle also become dry, leading to a burning sensation.
The duration of cutting with the device is a maximum of 10 minutes - this is if the master is experienced. It will take a little longer for a beginner, but he should understand the basics of this technology.
As mentioned above, the nail plate is safe and sound, since the machine does not touch it.
Manicure machine
A neat manicure means not only cleanliness and self-love. Today this is the standard for the appearance of modern women and men. Perfectly manicured fingernails characterize a successful person who values innovation and is accustomed to using it.
What is a manicure machine?
A manicure machine greatly simplifies the task of caring for your hands. This device is so simple that anyone can master it. The advantages of professional manicure at home are obvious:
- saving time on going to the salon;
- financial benefit;
- the ability for all family members to take care of their hands independently.
The manicure machine is an electric machine with replaceable attachments - cutters coated with spray of different calibers. It can be used to treat toenails.
Professional manicure and pedicure machine for working at home
All professional devices for manicure and pedicure are designed according to the same principle and differ only in:
- design;
- motor power and rotation speed;
- number of cutters;
- the presence of additional capabilities (for example, drying for varnish).
The cutters of the device differ in shape, size and type of spraying. Sapphire is valued among professionals, but for home manicure a simple abrasive and a small number of attachments that perform basic operations are enough:
- removal of cuticles and rough skin around the nail;
- straightening and filing the nail plate;
- polishing the nail before applying varnish.
The instructions will help you choose the right nozzle.
Electric nail file: instructions for use
The technique for professional hand care at home is simple.
- Before using the electric manicure set, you must ensure that it is in good working order. Wash your hands, clean your nails from any remaining old polish.
- Select a medium-hard nozzle to remove rough skin and treat the side ridges of the nail, remove calluses, abrasions, etc.
- Use a round nozzle to remove the top layer of cuticle.
- Give the nail plates the desired length and shape.
- Gently polish your nails with a special nozzle.
- Treat your hands and manicure apparatus with a disinfectant solution.
It is important to know some nuances:
- The manicure machine should only be used on dry hands;
- nozzles must be securely attached to the device so as not to jump out at high speed;
- each manipulation should be performed with a specially designed cutter;
- the device must be held at an angle of 45 degrees, movements should be made from the center to the periphery;
- the rotation speed must be increased gradually;
- Every 5-6 minutes the device should be turned off so as not to overheat the motor.
These rules will protect you from injury and allow you to quickly master the operation of the device. After several sessions, complete treatment of fingernails will take no more than 10 minutes.
Disadvantages of removing the coating with a machine
The only disadvantage of hardware removal is the small shavings or dust that is produced after cutting. This can cause discomfort as you have to breathe in it. It is recommended to wear a mask when working.
Another drawback is the high cost of purchasing this device, which will also require sets with cutters. There should be several sets. Also, all parts of the machine must be kept clean. Nozzles also need to be changed on time, if necessary.
